The Northern California and Southern Nevada Regional SAQA(Studio Art Quilt Associates) group put out a call for entry for a new show, Prism Play. The organizers send the partipants a color card similar to a paint chip card. It had a limited color range on it.The artists must only use the colors on the card. No black or whiteallowed. The size of the finished quilt must be 45″ x 15″ 114 cm x 38cm. Those are the only restrictions. Imagination and creativity released. Follow how the Colors of the Prism Piece developed.
Paint chip cards of orange, pink and magenta color lines
Colors of the Prism Piece
Participants requested a particular color wave or they could choose to to get a surprise. Three color waves were actually sent so that the artist could make a final choice of colors to use. Artists could make up to three pieces. I choose the purple card on the right for the colors of the prism piece.
Designing Details for Colors of the Prism Piece
Tucks on purple fabric
I start by designing fabric details that I want to include. Here is a purple piece of fabric with tucks to add movement and texture.
Yarn and piping add texture.
This light purple fabric has three lines of yarn couched(zigzagged) on it.
I like to create 3D details with the short pieces of redirected yarn.
A dark piece of fabric has various lighter colors of yarn couched on it.
The short pieces of redirected yarn came like this.
These small pieces for the colors of the prism piece are examples of the redirected yarns and materials I used from Fabmo. https://www.fabmo.org/
two layers of purple
More examples of fabrics used. I create strips of details then I cut them into smaller pieces.
Creating the Colors of the Prism Piece
Abstract art quilts begin on my flannel design wall. I marked the approximate edges with pins to help me keep track of the 15″ width (38cm) restriction. I always begin with larger fabric pieces than I want the final piece to be. One never knows how much fabric will taken up in the creative process of sewing the pieces together.
Trying out several pieces on my design wall
I place the colors of the prism pieces on the design wall always balancing colors, hues, eye grabbing details and spots for eyes to rest.
I continue to move pieces around on the design wall.Not quite finished but getting there.The top is finished and squared up.
In Conclusion
In completing this Colors of the Prism piece, I created texture and movement with the artist made details. This piece includes the use of redirected materials in the style of my abstract art quilts. However, I found the restricted size of the final piece, 45″ x 15″ 114cm x 38cm to be a challenge. It added an extra bit of pressure I had to be constantly aware of.
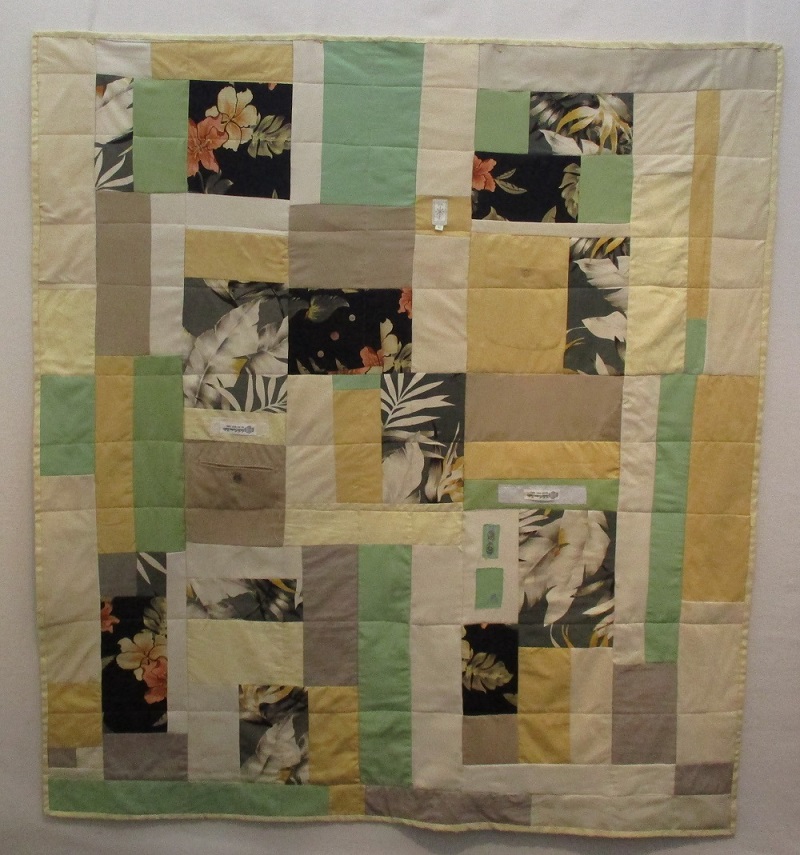
Black and Red Memory Quilt, 56″ x 51″ 142cm x 129cm
At one time, I mentioned to someone that I had a commission to make a memory quilt. That person asked me,”Wasn’t it weird to make a quilt out of a dead person’s clothing? Didn’t that creep you out? Cutting up a dead person’s clothes?” I had never thought of that. Why would that be creepy? However, I continued to think about the comment. The question focussed on the dead part while I focussed on the fabric part.
back of Black and White Memory Quilt, 51″ x 56″ 129 cm x 142cm
Focussing on the Fabric Part
Sewing involves cutting up fabric and piecing it together to make clothes or other items. Something that I had done since I was a teenager. When learning to sew clothes, mistakes are common. The seam ripper is a sewist’s or quilter’s best friend. Just like stopping is part of driving. Ripping out mistakes is part of sewing.
Repairing Clothes
In addition,sewing often involves repairing clothing. Obviously, repairing clothing means that the item has already been used. It is not such a huge step to cut up worn clothing to create something new. The creation is the important part not the living status of the person. Sewists see things differently. All kinds of divergent views add to the conversation.
Yellow and Green Memory Quilt, 56″ x 51″ 142 cm x 129cm lap quilt
Incredible fabric details
Notice details of pockets and inset of blue with seersucker from the inside of the jacket
Often the memory quilts that I have made are from men’s clothing. Don’t even consider the fast clothing market. Some of the men’s jackets are works of art. One jacket(see photo above) made in East Asia came with piping and beautiful sewing details on the inside of the jacket. Monograms are common. The fabric for the shirts is of the highest quality. Think high thread count!! These materials also stand up well to the rigors of washing. They are incredible fabric that one would not find in a regular fabric store. Don’t miss such an opportunity to repurpose such great materials.
Why Memory Quilts?
So why make memory quilts? Repurposing fabric or items is foremost for me. Could the clothing be donated? Yes. Will the donated clothing all be put to good use? I don’t know for sure. Sometimes it isn’t. If the clothing doesn’t sell, it is shredded for insulation or something else.
back of Green and Yellow Memory Quilt,56″ x 51″ 142cm x 129 cm lap quilt
The Joy of Memories
What could be more special that cuddly up in a quilt that contains small pieces of fond memories that one has for a loved one? “Oh, I remember that shirt. My dad wore that almost everyday!” “Junior loved those shorts! He wouldn’t ever take them off.” What could be better than a useful, memorable yet beautiful piece?
Making a Memory Quilt
The memory quilts highlighted here are from a recent commission. I completed two reversible lap quilts from a man’s clothing that the widow gave me.
Several shirts to choose frommore shirtsSilk ties
This client brought me a large plastic bin filled with shirts and pants along with a few silk ties. She wanted two quilts to be made. She also requested that certain fabrics be included in both quilts. I took notes on that so that I would remember. As a repeat customer she was familiar with my abstract style. The client looked forward to see what I would create.
Step 1 Choosing the Colors that Go together.
A Work in Progress
After making sure that the clothing is clean and smells fresh, the first step is to decide which colors go together. As stunning as red can be, red does not play well with other colors. I chose to pair the red with the black and white. The husband’s taste made choosing the colors of the second quilt fairly easy, yellow, cream and light green. The tropical shirts added just the right flair and action.
Step 2 Interesting Details
artist made details
Many pieces of clothing have interesting details that I like to incorporate or highlight. Boring buttons pop with the addition of bright threads. Labels and tags add interest too. Pockets are a wonderful surprise as well. Sometimes I use the the labels or tags as is or I may have to cut them and add them to another piece of fabric. It is important to have the 3 D details all on the top of the quilt and not on the backside. When it comes to quilting the three layers together, it will be easier to quilt avoiding hitting buttons.
button details, waistband, and silk ties
Using Fusible Web
Once cut apart, most of the clothing is ready to use. Silk ties and thin fabrics need to have fusible web ironed on to the back of the fabric. This prevents the fabric from stretching and aides in ease of sewing. This step is essential for the beauty of the piece and the ability to easily sew the fabrics together. It is not difficult or expensive except for the time involved.
a pocket and a labelButton details and label
Step 3 Designing on a Design Wall
These memory quilts are similar to my abstract art quilts.except that I use larger pieces of fabric. I place the details and unique items on the design wall first making sure that they are more or less where I want them. Then I add other fabrics rather randomly. I move the pieces around so that the colors and details are balanced. I sew pieces together and keep checking that the colors and patterns are not all in the same area.
Keeping items balanced.Balancing out colors and patterns
Step 4 Complete the quilt.
When I am happy with the way that the top looks,I sew all of the pieces together. Then the top is finished. I baste the quilt sandwich; top, batting and back together. Then quilt the three layers together. I keep my quilting simple to let the fabrics shine. That is the part that is most important to the client. Similarly,after I spend time designing simple quilting also keeps the price down.
In conclusion
After sewing clothes, quilts and art quilts for decades,I continue to be impressed with the quality and durability of fabric and cloth. The fast clothing market aside, there is no reason to not recycle clothing into some other form. Memory lap quilts are a perfect fit for this redirection. Whether art quilts or memory quilts, redirecting fabrics and materials is my main focus.
What is quilting? Quilting can be several things. A basic definition is the sewing together of two or three layers of fabric either for a practical purpose or a solely artistic purpose. What if a person cuts up fabric and sews it back together to make the top of a bed covering? Yes is the answer.
Who is a Quilter?
Are you a quilter if you only sew or piece the top together and then have another person do the quilting? Yes. When I started, I only did that part. I worried that I could not call myself a quilter when I really only pieced the top together. Another person quilted the three layers, the top, the batting and the back, together. It turns out that I was wrong. Even back then,I was a quilter.
Acceptance of Many
The quilting world and the art quilt world both accept people as quilters whether or not they actually sew the three layers together. Some have the luxury of sending their tops to a person with a long arm machine or another person to complete that part of the process. Let’s just make sure that they are given credit for their contribution.Words are funny that way, confusing at times and not even close to the reality. No wonder there is so much misunderstanding in the world.
Poppin’ Back, 23″ x 22″
How to Complete
I recently completed two abstract art pieces. Poppin’Back used bright yellows, purples,magentas contrasting with white pieces of fabric. The fabrics were cotton. When it was time to sew the three layers together, I didn’t stop to think. I forged ahead, quilting the usual way I often do, moving the quilt from side to side to create wavy lines . This creates another level of movement that I adds to the art piece.
Smilin’ 33″ x 24″
The Second Piece
The second piece,Smilin’ was completely made from dipioni silk in bright contrasting colors with curved line piecing.I loved the bright colors and shapes. What would quilting lines add to the stunning colors? I decided that they wouldn’t add much.
Yet, the 3 layers layers of fabric needed to be attached. Stitching in the Ditch which means quilting in the seams solved the issue for me. Many art quilters would expertly sew 1/4″ lines to fill spaces. Giving myself permission to do something differently,I listened to what I felt the piece needed. I am happy with the final product.
Conclusion
Consider what is quilting brings to an art piece? Does it add an important element like movement or color to the piece? Is it necessary? Each art piece is unique. It deserves its own consideration on how to quilt it. These are decisions that only the artist can make. It is one of the artistic decisions that the artists must make. My plan is to pay attention and listen to the art more in the future.
See more art quilts at the Studio Art Quilt Associates’ website. https://www.saqa.com/
Lingering Fog, an abstract art quilt, 34″ x 34″ 86 x 86 cm
How to improve your next Abstract Art quilt.
Improve your next art quilt by adding color. First of all,I enjoy abstract art. Moreover,I am drawn to bright colors and textured lines. While representative art is truly eyecatching. Nonetheless, I choose not to make art of something that someone can take a photograph of. In contrast,my abstract art quilts highlight my mantra, Color! Texture! Movement! Similarly,the high end fabric samples from decorators inspire me to use them in my abstract art pieces.
Color
For example,here are some bold pieces using mainly commerical cottons in this abstract art quilt.
Atlas in Rose, 32″ x 32″Sunset Through The Forest,34″ x 32″ 86 cm x 81cm
Meanwhile,Sunset Through the Forest has artist made details. Finally, decorative yarns to add 3D effects and texture in this abstract art quilt.
Improve your next art quilt with Texture
Furthermore,almost all of the fabrics in Desert Sands are new discontinued samples in this abstract art quilt.. To clarify,texture comes from the contrast between the silky and thicker fabrics. In addition,tucks add texture to certain fabric too.
Desert Sands,21″ x 16″Tranquility,30″ x 24″
Most importantly, the monochronamic blend of fabrics, Tranquility has a calming effect. Fnally, special stitches add interest.
Improve your next art quilt with Movement.
Copper Cliffs, an art quilt, 21″ x 19″
In addition, the commercial fabric with the brown markings shouts movement. Furthermore,curved line piecing and scribble quilting adds another layer. For example, I started with this fabric. Then,I chose fabrics with similar colors.
First,I built the fabrics around this redirected piece of fabric.Spring Break, 32″ x32″
Finally, it is difficult to see the top fabric in the final project,Spring Break. But it is there.
Another Example of Fabric with Movement
Here is another example of movement created by black and grey dogs on the fabric. At first, the curved lines attracted my attention. The artist in me didn’t even see the dogs. Then I couched threads on the material and cut it up. Finally,the tree branches show movement but none of the original dogs.
Step 2 black grey and white fabric with green and black yarn couched yarnSkyward, an art quilt made from redirected fabric with black and grey dogs on it.
In Conclusion
In conclusion, a unique variety of discontinued fabric samples inspire me to create my abstract art quilts. Finally, I aim to include color, texture and movement in each of my abstract fabric art pieces. Thank you for letting me share some of them with you.
Read more information that may be of interest to you.
Follow these step by step instructions using Sunset Through the Forest,an abstract art quilt as an example to create an abstract art quilt.
Getting Started
Choose Your Colors
First, I prefer to choose a few contrasting colors. Then I search through my materials for fabrics, decorative yarns and threads in those colors. Sometimes I also choose lighter and darker hues of the same colors.
Make Details with Decorative Threads.
Next, it is fun to make shapes with the decorative threads. For this piece I used the decorative threads to make several parallel lines on the fabric. I cut long strips and sewed the decorative threads in long lines.Then I randomly cut the long strips into 3 or other odd number of pieces. Creating texture- done!
Several different examples of decorative details
On the Design Wall
Next, I display the potential finalist fabrics on my design wall. My favorite choices are fabrics with movement and interest. Then, I also make sure that they are places for eyes to rest by including solid colors.
Trying out green and yellow bits of fabric randomly placed on the design wall
Balancing Colors
Next, balance out the colors and textured pieces so that they are not all on one side of the piece. Don’t be afraid to take a break to come back to view the work with fresh eyes. A fresh look is always helpful in looking for ways to improve a piece. How will one’s eyes move around the art work? Eliminate fabrics if necessary.
Balancing the fabrics and colors
Sewing Smaller Pieces Together
Begin to sew small pieces of fabrics together. Then remember to balance colors and fabrics so that they are equally spaced about the piece. Use this advantage of a design wall to view your whole piece.
Small pieces are sewn together
Sewing More Pieces Together
Continue sewing pieces together. Keep checking for balance of fabrics, colors, and textured pieces.
finished top, Sunset Through the Forest
Finishing
Lastly,I scribble quilt the three layers together to create an added level of movement. Scribble quilting is a technique I named. I use a walking foot to create a flowing quilting line by moving the quilt side to side while quilting. Make sure that the quilting is also balanced and equally fills the space. Then add a facing. Turn to the back and handsew the facing to the back. Name and sign your art!
Sunset Through The Forest, finished art quilt,32″h x 34″w
In Conclusion
These are the steps that I generally follow to create my abstract art quilt pieces. They represent my process at this time. It will probably change over time. Your process is probably unique to you.
Learn how to make a fabric landscape collage quilt using the fabric layering technique. In general, this art form is accessible to all skill levels of art quilts.
Make a Fabric Landscape Collage Quilt
Introduction
In this post you will learn how I make a fabric landscape collage quilt. Basically,the fabric collage is covered with tulle netting and then, free motion quilted together.
Free motion quilting is a high level quilt skill. Before I learned about fabric layering, I had almost given up on perfecting my skills at it. Yet, I found the fabric layering technique very forgiving for practicing free motion quilting. It became a great way for me to advance my skill level of this technique . Try it. Maybe it will help you too.
Topics Covered
How to create a fabric landscape collage art quilt
Follow a step by step procedure
Seascapes- Underwater Fantasies!
Trees with Color! Texture! Movement!
How to free motion quilt successfully!
Conclusion
How to create a Fabric Landscape Collage Art Quilt
The fabric layering technique uses a table rather than a design wall to design. First, I create a scene. Next I cover it with tulle netting. Then I free motion sew the three layers(back, batting,top) together.I use this technique for my Nature portfolio; landscapes,seacapes, mountains,and trees. I prefer to create a more impressionistic scene than realistic view.
Many beginners are encouraged to find a photo that they like in order to copy it for their first fabric collage. A photo to copy may be helpful at the beginning stages. As my artist career advances, I find a photo more restricting than freeing. My art is all about color, texture, and movement. To me copying a photo creates a flat rendition of the scene. That is not the effect that what I am going for.
First Steps
To begin, I choose the fabric that will create the background. Fore most, I prefer to choose a fabric with some dimension already on it, ie. light and dark spaces. For example, if I choose a dark background, then I will choose lighter colored materials for my plants, fish, rocks and other items . On the other hand, if I choose a lighter background, then I will choose darker colored scenery.
In this photo, the quilt sandwich is ready. Choose the backing fabric. Place it on a table. Cover it with batting, the soft center part of a quilt. Place the background fabric on top. Iron each layer so that they will lie flat.
step 1 Begin with a quilt sandwich; back fabric, batting and background fabric
Step 1
First, the back fabric is flat on the table. Next, a piece of batting is laid on top of that. Clearly, you can see the white batting hanging a bit over the edge. Then I laid a piece of moddled commercial fabric on top. The piece is about 14″ by 14″36 cm x36 cm. I let the fabric’s different shades of coloring do part of the work in creating interest and depth in the piece. Finally, I lightly baste the layers together with an Avery glue stick.
step 2
Step 2
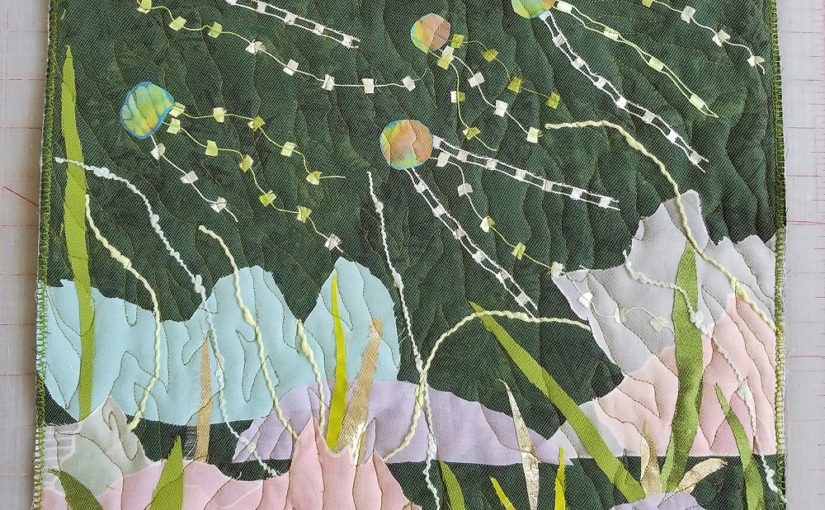
Next, I cut out light colored rocks. I placed them in the foreground. Then I cut out irregularly shaped dots of different colored batik fabric for the jellies,or jelly fish. I place the jellies as if they are swimming in the current.
step 3 Add plants with fabric and decorative threads
Step 3-
Next, I cut out plants and place them between the rocks. Next, I add decorative threads for the tenacles of the jellies. Adjust the decorative threads so that it looks like the water is moving them. After that when everything is in its place, I baste the pieces in place with a tiny dab of glue. I use a long pin to place the smallest spot of glue under the fabric. This helps me keep the dot of glue small.
step 4 Cover with tulle netting and pin down.
Step 4
Next I cover the scene with tulle netting. Then I pin the tulle in place. The tulle is really hard to see in this photo. Similarly, it usually appears almost invisible when the piece is finished. I am not fussy about the color of the tulle that I use. A black tulle will add a muted tone to your piece. A lighter color like white becomes more invisible in the final piece. Some tulle now comes with sparkles. This works especially well for water scenes. The sunlight seems to reflect off of the water!
step 5 Started free motion quilting.
Step 5
Next, I free motion quilt the three layers together. The first step is to lower the feed dogs on my machine. Primarily, this allows me to move the piece smoothly however I want. The quilting creates another level of movement. If the feed dogs( the little metal teeth) on your machine aren’t adjustable, cover them with a plastic attachment to free motion quilt. Tightly hold the edges of the quilt taut and smooth while quilting. I like to create plants moving in the water with my quilting. However, you may choose whatever you like.
The art quilt is completed.
Step 6
Finally, I finish the piece by zigzagging the edges twice. However, for larger pieces, I prefer sew a facing to the front and turn then turn the facing to the back. Then I hand stitch it down.
Finally, here is a photo of the back of the piece. The machine stitching is easily viewed.
It is easier to see the quilting from the back.
Seascapes
Seascapes are basically a variation on landscapes but underwater. My seascapes are often underwater fantasies of marine life and plants.
Above all, marine life is front and center in my home town of Santa Cruz, California. For example, this is where three young princes of Hawaii first surfed in North America on July 19, 1885 on large redwood boards. In addition, Santa Cruz is at the top of the Monterey Bay with the world class aquarium just an hour away. The area is also home several national marine research facilities. Surf City, U.S.A takes its marine life seriously.
Art ranks High too.
On the other hand, Santa Cruz is also listed as fifth in the nation as an artistic destination. That is to say that many artists live in the county. That is to say that marine life and art come together in this newer genre of art quilts. Come be inspired to try it yourself!
A Visit to the Monterey Bay Aquarium
When I first started making marine life art quilts, I visited the Monterey Bay Aquarium. In other words, I wanted to observe the fish. What do their mouths look like? What shapes are their tails? My intention was to create a accurate picture of the sea life. However, that idea went out the window very quickly. In conclusion, there is no one way that a fish’s mouth looks. The variety of shapes and forms is endless. My underwater fantasy portfolio was born. In addition, I was free to create an animal in any way I wanted because there was probably a fish that looked that way somewhere.
Deep Blue Sea 37″ x 24″ 2020 $2100.
Sea Dragons at the Aquarium
Similarly, I saw my first sea dragon at the Monterey Bay Aquarium. I couldn’t believe my eyes. Was that a plant? Was that an animal? It was impossible to tell. I was fascinated. Ever since that day, I have been incorporating sea dragons into my art.
Technically, sea dragons are cousins to the sea horse. What? It is hard to believe. Sadly for us humans, the sea dragon display is not longer at the aquarium. Happily for the sea dragons, they have been returned to their natural habitat in the waters of the Monterey Bay Marine Sanctuary. However, these fascinating animals may be on display at another aquarium.
I incorporate color, texture and movement into my art quilts while using the fabric layering technique.Plants and animals may stand out or barely be seen depending on their color. In the same way, lots of thick decorative threads add texture and life to the underwater rocks. In addition, in Sea Dragons in the Golden Kelp, I created the animals by thread painting on Sulky water soluble fabric stabilizer. This thread painting technique creates lacy and leafy animals. Free motion quilting adds movement by creating plant life that seems to move with the currents. Use one’s imagination to see animals among the plants.
Violet Seascape 33″ x26″ 2020 $2100.
Furthermore, underwater fantasies lend themselves to the use of sheer fabrics. Who knows what shadowy beings are lurking in the depths? Shiny, reflective fabrics cut into the shapes of fish and marine life add a dimension that often only becomes visible is a certain light. What a surprise! What fun!
Large Spotted Fish 15″ x 15″
Trees
Furthermore,I use this technique often to create some of my most favorite art quilts highlighting trees.
Vacant Lot 43″ x 31″
First of all, trees in art quilts are my most popular pieces. Above all, everyone can relate to the shape and various colors of trucks and leaves. Vacant Lot, is an early example of one of my tree art quilts. Furthermore, five of my art quilt trees hang permanently in local Santa Cruz County Kaiser Permanente Medical facilities.
Tree Friendly Town
I live in a tree friendly town. That is to say that Santa Cruz, California is part of the Tree City USA program. My county is full of fruit tree orchards as well as redwoods. Furthermore, the Spanish explorers saw their first redwood tree in Santa Cruz County. In addition, California’s first state park, Big Basin is also in my county. That is a lot of trees for the second smallest county in California.
Of course, many locales are tree friendly places even if they not they are enrolled in the national urban tree program. We can all relate to trees and leaves; the forms they take and the shapes they make. Creating trees lets me explore and expand my use of texture, color, and movement. Let me take this opportuntity to share my love of trees.
Use of Color
Young children and other people know what color a tree should be. We understand the general shape of a tree including the wide variety of sizes and forms. Change the color of a tree to an unnatural color. Our brains will still recognize that it as a tree. This is what makes it fun for an artist.
Teal colored tree trunk and branches ? Not so common nor are violet branches. I have received such a positive response from the movement of leaves extending beyond the edges of the art quilt that I have continued to do that.
Along the Path 34″ x 22″ soldAt the Edge of the Grove
29″ x 26″
What could be more fun than orange branches!
Tree Along Creek 32″ x 27″
This tree along the creek has pale colored branches with bluish green tint from couched yarns and decorative threads. The pop of medium green comes from a piece of dress fabric from the 1940s.
Adding Texture
Celebrating Fall has branches made from a highly textured yet, loosely woven fabric. I couched decorative threads are on top of the fabric to add more interest. This same couching technique is also visible in Tree Along Creek and At the Edge of the Grove.
Celebrating Fall 33″ x 31″ 2019
Adding Movement
In Looking up at Dusk,flying leaves and twigs are carried along by the wind. While creating this piece, I actually toss some pieces onto the quilt top. Great fun! Great serenpidity!
Looking up at Dusk,31″ x 24″ 2017Overlook 35″ x 26″ 2018
In Overlook, I choose a green and white patterned fabric for the trunk and branches. I couched (zigzagged)decorative threads and yarn to the fabric before cutting out the shape of the tree. The white spaces on the fabric create movement. The curvy line quilting in the sky also adds action. The sky fabric is from an indigo dying class. Can you see the clouds moving across the sky?
How to Free Motion Quilt Successfully!
Free motion quilting is an advanced quilting technique. Free motion quilting is when the quilter is in charge of moving the quilt instead of the machine. Here are a few easy tricks for success.
You must be able to lower the feed dogs on your sewing machine. The feed dogs are the little metal teeth that help move the fabric through the machine. If your older machine doesn’t allow for this. The feed dogs may be covered with a plastic attachment.
Use a darning foot while quilting attach photo.
While free motion quilting, the quilter moves the fabric. While stitching the throttleusually used by your foot pedal , goes quickly and your hands move the fabric slowly. Remember ,the mantra is fast feet, slow hands.
Use Aurifil 50 wt. thread is by far the best thread to use for free motion quilting. It is strong and thin. It is available in many colors at better quilting shops. While it seems expensive, there is really a lot of thread on the spool. I once pieced and quilted a king size bed quilt using only 1 spool of thread. This product will give you the best result for free motion quilting.
Practice your skill. In order for the stitches to be the same size, practice moving the fabric slowly while making the foot pedal throttle go quickly. This skill is not difficult but it does take practice.
Conclusion
Fabric landscape and seascape fabric collages are a fun and exciting new art form. People of all ages may begin their art exploration with them. They are a forgiving way to practice fee motion quilting. They let me explore my love of Color! Texture! Movement! while using of redirected materials. A win-win situation.
Not too long ago,I participated in an art and physics collaboration. As a result I created this green, yellow and black art quilt,ATLAS at CERN based on the colors from CERN. Inspired by this abstract piece I wanted to attempt something similar in a different color wave. So I choose to use the colors of black, white and rose for my next scientifically inspired art quilt.
A Scientifically Inspired Art Quilt
ATLAS at CERN, scientifically inspired art quilt
Creating Details
First, I go through my materials to find the appropriate colors of fabrics and items for the color wave I have chosen for my scientifically inspired art quilt.
Next, I think what I want to make to add texture or interest. This is when I begin to think about the whole quilting process and the order that I need to follow. I knew that I wanted to use a beaded necklace with a bit of pink. But I would have to wait until the quilt top was completed to actually sew it in place. Otherwise quilting the top would be a problem; the beads wouldn’t go through my machine. Moreover, I didn’t want to wreck the beads in the process. Hand sewing of the necklace would have to wait until the whole piece was sewn together. Yet, I would still have to keep the location of the necklace in mind as I worked.
Other Details
Continuing with other details,I found a repurposed zipper in just the right color. I created a starburst mirroring the actual scientific view after the splitting of atoms. Then, I chose rose colored embroidery threads to couch (zigzagg) with matching colored thread. I also couched several different decorative threads and a piece of stretchy webbing onto black pieces of fabric to create a pleasant contrast. A running stitch of rose colored embroidery threads through black fabric was also made. Lastly, I created a black 3D fabric flower to adorn a rose colored piece of fabric.
ATLAS in Rose selecting fabrics
A Scientifically Inspired Art Quilt On the Design Wall
I like to choose fabrics with movement. It was serenditious to find so many black and white fabrics with circles and dots that lent themselves well to ascientifically inspired art quilt. These would go well with the oval placement in the center of the beaded necklace. The black and white stripes contrasted geometrically. I created further stripes by couching black decorative threads and black ribbon on white fabric. I used black sewing thread for low or no contrast.
ATLAS in Rose, work on design wall
The Finished Top
ATLAS in Rose , finished art quilt
Here is the completed scientifically inspired art quilt. Handsewn repurposed white buttons added interest to the beaded necklace, front and center upon completion.
You may find out more about how I create my abstract art quilts at these links.
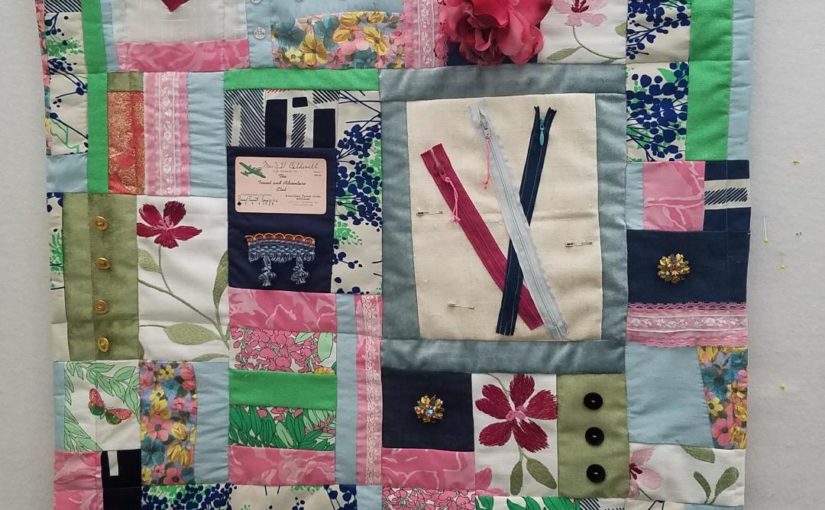
Above all,a memory quilt is a quilt made out of a person’s clothing as a way of honoring their memory. After seeing my art work, a client contacted me to make an art quilt as a way to keep the memory of her grandmother alive.For example,follow as I show the step by step the process of making a memory quilt of the client’s grandmother’s clothes and articles.
At our First Meeting
At our first meeting, the woman shared information about her grandmother’s life that she especially wanted to be included in the memory quilt. In addition,she brought artifacts to illustrate her life. The artifacts included buttons, artificial flowers, a paper card notice, lace and several dresses and clothing . Together step by step, we decided on the colors. We both agreed on the pink, green, and blue palette. I was able to use some dark blue from the orange and blue housedress.
Personal details
Furthermore,the wide range of details, artificial flowers, momentos, jewelry,clothing gave me a lot to choose from. Subsequently,I was also able to include buttons, lace from hems and the safety pins that had been hidden inside the clothing. Luckily, the client said that she would trust my artistic choices to arrange or eliminate as necessary. After that the work on the Memory Quilt-step by step began.
Step 1. Choosing fabrics and details for a memory quiltStep 2. dresses for a memory quiltStep 3. Earrings add a very personal touch.
To Begin-Memory Quilt-Step by Step
First I cut out parts of the fabric from the dresses. Based on my experience and the approximate size of the finished piece, I knew that I didn’t need to take apart all of the seams. In other words, there would be plenty of fabric. Therefore, I cut pieces of about 10” -20” square. I heat fused interfacing on to the back of the polyester to reduce stretching and to aide sewing. Then I was able to cut out a variety of interesting geometric shapes in dark navy blue from an eliminated orange dress. Finally,I noticed that the back side of the fabric was a lovely medium blue so I decided to use both sides of the fabric. The pieces were smaller about 3” each.
Using the Design Wall to create the Memory Quilt-step by step
Using the design wall, I pinned the fabric up to begin to try out fabrics for work in progress of the memory quilt.
Trying out fabrics for a memory quilt on the design wall
I created this accent from zippers I took out of the clothes. The safety pins are decorative. Be brave and use interesting objects that one might not usually think of using for a memory quilt.
Step 4 Create zipper accent
Next, I added the details to get an idea about where they should go.
Step 5 Moving around fabrics and details
Then,I began to sew pieces together.
Step6 Trying out places
I continued to sew pieces together and change their place for balance of color.
Step7 ready to sew together
Finally, all of the pieces found their special spot.Next, the top was sewn together. Then,the backing and batting are added. Lastly I quilt the three layers together. In this case,the focus is on the materials and details. Therefore, the quilting took a back seat and did not stand out.
Most artists will say that inspiration is everywhere. I certainly do agree with that statement. For example,my friend, The Lady Who Loves Birds, https://www.ladywholovesbirds.com/ sent me this photograph of the Splendid Fairy Wren of Australia. Isn’t this an incredible bird? The colors are inspirational. I immediately knew that I had to use the colors in a subsequent abstract art quilt.
First,I gathered by fabrics, medium blue, black and white.
step 1final choices for fabric step 1
Then, I put the sample fabrics on my design wall.
trying out locations, balancing shapes and colors step2
Next, I sewed some pieces together. I begin to try out locations.
Cut up and placed on design wall step3
Then, I continue to sew pieces together and find the right spot for them. I look to balance color, shape and details.
on the table pinned , ready to be quilted step4
Finally,after the top is sewn together, I choose the backing fabric. I place it on a table. Then I cover it with the batting and the finished top. I pin the three layers together. This is called a quilt sandwich. Then I quilted the sandwich together using my scribble quilting technique.
Naming the Piece
I usually don’t do political art work. Yet, as I spoke about the quilt and called it by its colors, “my black and blue piece,” something hit home. During the summer of 2019 when I was working on it, I felt like the American democracy was bruised black and blue. American Democracy, 2019 seemed like a logical title.
A Funny thing Happened on the way to my Next Quilt
After I began gathering medium blue, white and black fabrics for American Democracy, 2019, I neglected to refer back to the fairy wren photo. Only after I had finished the piece and did I take another look at it. Much to my surprise, I realized that the bird actually had a lot of purple on it. I immediately set about creating a second piece incorporating more purple. Here is the result, Splendid Fairy Wren, abstract art quilt.
When trying out fabrics, I always start with larger pieces. Then after cutting or fitting in place, they may be much smaller. The sewing takes up some of the fabric. It is always better to have too much than too little.This is the completed art quilt.
First of all,I prepared this Pechakucha laser talk in anticipation of presenting it at an art quilt meeting. The Pechakucha,a Japanese word for chitchat. To clarify it is a format that gives a speaker a limited amount of time to discuss a topic. For example, I would have 4 minutes to present a limited number of photos to on one topic. At the same time,numerous presenters of a variety of topics are able to share. That is to say that I prepared to discuss my passion for making art quilts from redirected materials. Moreover,FABMO, a local nonprofit is where I get my materials from. http://fabmo.org
My Art Quilt World
To begin,I do nature art quilts, abstracts and Mexican inspired fabric collages. Furthermore, I am very passionate about using redirected materials and threads to keep them out of the landfill. My inspiration comes from the materials I find at FABMO . I have been a volunteer there for many years. To clarify,I brought photos from three pieces that I completed recently to present at this Pechakucha laser talk. So I could share the process with you.
Spring Break, an art quilt
Paisley pattern on linen
First I choose the fabric, Here is the material I started with. I liked the variety of color and decided to use the colors as a basis of an abstract art quilt.
Step 1 Beginning to place pieces on the design wall randomly
Next, I couched decorative threads and yarns with the idea of making interesting details. Then I cut up the strips randomly to use as fabric. Following that trying out other fabrics on the design wall.You can see several examples of redirected couched ribbon and yarn on different colored fabric.
Finally,the completed piece using scribble quilting. Scribble quilting moves the quilt side to side while quilting to create flowing lines of sewing.
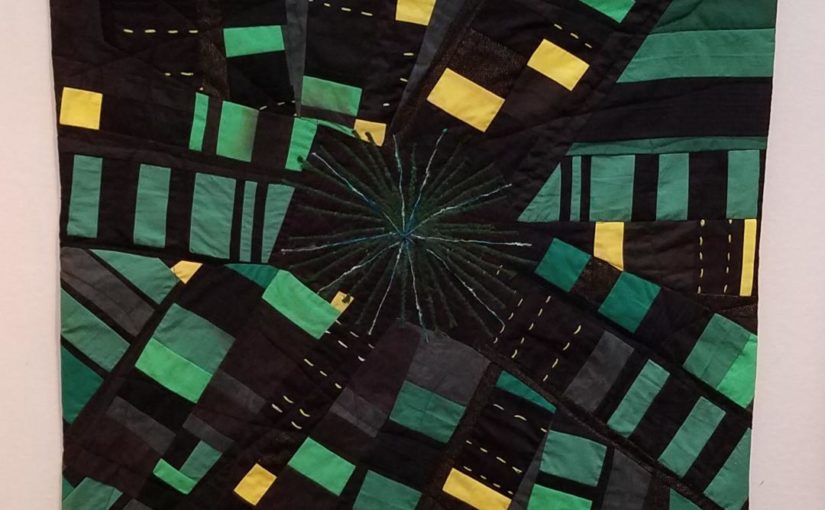
Skyward, an art quilt
GreyhoundsGreyhounds in another direction
Originally, I chose this FABMO fabric for the movement and stark lines. But when choosing the fabric,I didn’t even noticed the dogs. They were not of interest for me. First,I began to couch green and black threads.
Here, I zigzagged a variety of colors.
Then,I continued couching other colored threads. Some of these threads were light blue but read more like grey against the light grey part of the fabric.
Can you believe that the tree is made from the same material?
Finally, I was ready to use the fabric to create tree branches. Using the fabric layering technique,I laid the back fabric down on the table.Of course the back is also another piece of material from FABMO. I covered it with batting and I laid an indigo dyed piece on top for the sky background.
The finished art quilt just showed the tree tops.
The finished piece,Skyward,succeeds in its interplay of light and dark on the branches. On the other hand,one doesn’t notice the dogs at all.
Under the Shady Tree, an art quilt
The finished art quilt, Under the Shady Tree made from redirected materials.
Next is the finished piece of under the Shady Tree. Aficionados of redirected materials may recognize the fence fabric. To clarify, I used the fabric layering technique.
Unusual materials can be used in unique ways.
Furthermore,notice several leaves with bluish and gold colors. To be clear,I used a multicolored synthetic knit that kept rolling up in other projects. I couched it to help it lay flat. Then I cut it into leaves.
a different view
Last but not least,Shiny sheer fabrics add interest.
Take apart details and see what interesting fibers one can find.
Creating Texture
Moreover,texture is created by taking apart fabric details. They can be used as bunches of threads to add interest. One can also find decorative threads,ribbon and small cording . Lastly, I laid it on the foreground , covered it with tulle netting and free motioned quilted the three layers together.
To sum up,I am all about color, texture, and movement which I create using redirected materials. Thank you for letting me share some of my recent works with you.
Working backwards means thinking through each process of making your art piece before getting started. To create this collider event display, I had to figure out what would go on last. Then I thought about what each previous step backwards would be. What steps would I need to get to the finished product?That worked fairly well except for slight changes at the end.
Photo of the collider event display I worked from
Working backwards is a Different Way of Thinking
Working backwards to create art is a new and different way of thinking for me. Usually,I create my art quilts differently. As each part is completed, I reflect on what I can do to make it better or more artisitic. Generally, I don’t work from a photograph. I complete one step before even thinking about the next part. Motivation and inspiration comes from how the materials play together. Working backwards is a different way of thinking for me.
Reflecting
I reflect on how I can make it more engaging as each part is completed. Then finally, how the quilting might enhance the piece. For better or for worse,I rarely consider the quilting until the top is finished. But the whole point of this collaboration is to look at a project in a new way.
Beginning Steps to Create Art by Working Backwards
Choosing fabric and detail stitches
3.Running stitch with yellow embroidery thread4. Attempting to create the starburst effect5. Sewing more pieces together
Changes
Several fairly large changes happened at this point. I wanted to cover the cream oval with yarn to create a shadow as in the photo. But the effect wasn’t what I wanted. Luckily, the fabric was loosely woven together so I was able to pick out the threads one by one until they were gone.
Do I have to match the photo?
I also struggled with matching the photo. When I gave myself permission to not match the photo and make a work of art to my liking, I felt much better. I finished the quilt with my artist judgement in mind.
6. The finished art quilt
In Summary
With this collaboration I adjusted my decision making processes. Photographs of the collider event displays(CED) were mandatory. My collaborator showed me some collider event displays that he felt would lend themselves to work in fabric and yarn. I chose several from the suggested group.
Thinking Ahead
Using a photo as a guide, I had to have an idea of what each step would be, before beginning at all. I almost always use fabric that I have on hand. The size of that fabric then determines the size of the piece. If I quilted the three layers together first,then I could know the exact size that the CED would have to be. I had seen other art quilters quilt their work first, so it wasn’t a new idea. Just something that I had never done.
Pay Attention When Going Backwards
You have to pay attention to where you are going when walking backwards or working backwards. Working backwards just takes a bit more of a plan. It is a lot more safe than walking backwards.
Kelp Dwellers 25″ x 25″ A piece of multicolored blue sheer fabric is a perfect background for this underwater fantasy.
Use Redirected Fabric in Art Quilts
Redirecting materials inspire.
Use redirected fabric in art quilts to design something new and inspire yourself to create. I find unique fabrics not like those sold in a regular quilt store among redirected materials.
Discontinued fabric from a decorator’s studio
A sample of linen fabric from a decorator’s studio becomes the main design element with the addition of zigzagged or couched yarn. The colors; black, white,, and grey attracted me before I saw that this linen actually had greyhound dogs printed on it. My fondness for dogs aside, I didn’t want the dogs to stand out. I accomplished this by rotating the fabric and couching yarn to it. Next, I cut the fabric into twigs and branches to suggest tree tops. Then, I placed the branches on a sky blue indigo fabric background to complete the art quilt.
Friends’ Suggestions
Although dyeing fabric is a great way to redirect materials, it is a bit too messy for my situation. But many of my fabric friends have done it. The sheet that the dyed fabrics are wrapped in to carry home often is colored in an interesting way . Thanks to that warning, I was prepared when I recently took an indigo dyeing workshop. The background fabric for the sky was indeed the bedsheet that had used to carry my other dyed pieces home.
The Process-
First,I choose the fabric. I liked the way the curved lines of the dogs’s backs created movement on the fabric.
Greyhounds on linen
Next,I choose the yarn colors that I wanted to use, grey, green, and black yarn. I couched the yarns with matching threads so that the sewing threads wouldn’t stand out.
Black, grey, and white fabric with green and black yarn couched yarn
Next,I continued adding yarn curving it as I zigzagged(couched) it onto the linen.
More beige, grey, black and white yarn couched onto the fabric
Then,with more yarn, it is more difficult to identify the dogs.
The dogs disappear.
Continuing,I kept adding more yarn and zigzagging it down. For thicker lines, I wrapped 3 pieces of yarn together.
I add more lines of yarn by zigzagging them with matching thread.Different view of the fabric with threads couched
Ready to cut the Fabric into Branches
Finally, with this fabric, I cut out the tree branches,twigs and sticks. I put the backing fabric flat on the table. Then I added the batting on top. Then I added indigo dyed fabric for the background. Next, I basted them with a touch of glue. I assembled the tree on top and basted it.
Lastly,I covered the finished top with tulle and free motion quilted the layers together. I finished the edges by adding a 2″ facing folding it to the back and hand stitching it. Finally, I sew a fabric sleeve or tube onto the top back for hanging with a dowel and fishing line.
The completed piece of art is totally made from redirected materials; linen and backing material from the San Francisco Design Center, redirected yarn from my sister-in-law, redirected tulle from a wedding, and redirected background indigo fabric from a bedsheet. My heart’s desire is complete;making beautiful art from repurposed materials.
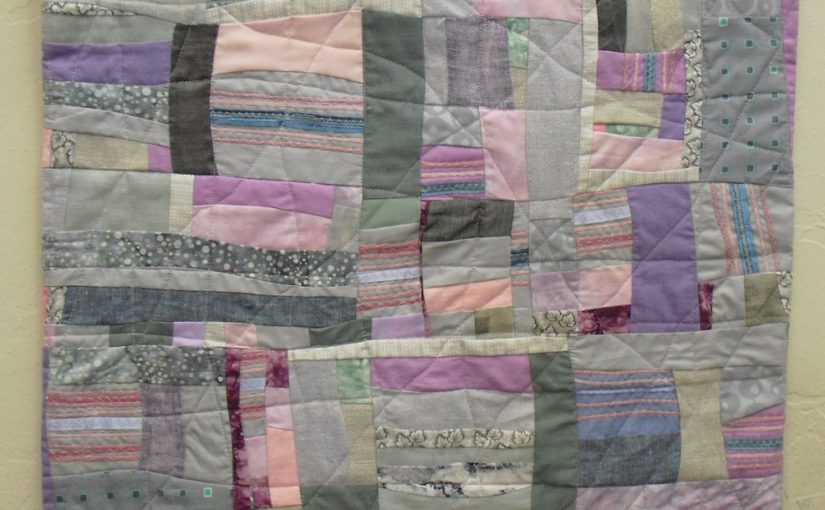
Winter Sunset, An abstract art quilt with lavander,pink, and grey colors,the finished piece
Abstract Art Quilt Work in Progress, Winter Sunset
This work in progress shows the steps I follow to create an abstract piece of art. Designing my abstract art quilts begins with choosing a group of colors. Inspiration for this quilt came from the greys and pinks of a winter sunset. I pick the decorative threads that I want to work with. I choose fabric that fits into the shades of colors that I chose. This time I want the colors to blend together and hardly be noticeable. Look for the green marbled fabric I added for that purpose. Choosing mnaterials from my stash is my favorite part of the creaive process.
1. Yarn and decorative threads for couching.2.I begin to choose fabrics.
Couching Decorative Threads and Yarns
Couching decorative threads and yarns to a long strip of fabric is fun. I use little pieces that might otherwise be thrown away. Each person’s eyes will blend the colors together differently. Then I randomly cut up the strips to use as fabric. I place the fabric on the design wall. Then I move the pieces around until I like it.
Long strips of cotton with the threads couched on them.I cut up the long strips. They are ready to be used as fabric.I place them on my design wall.
Keep Colors and Textures Balanced.
Beginning to sew the pieces together, I keep my eye out to make sure that the balance of the colors and textures is good.
I start to add the other fabrics.8. I added more fabric.
I keep adjusting the fabrics adding and subtracting fabrics as I go. Until I get it just right in my eye’s mind.I begin sewing small pieces together.
I sew more pieces of fabric together.
I continue sewing pieces pieces together. Here you can tell that the pieces are getting larger.
An abstract art quilt with lavander,pink, and grey colors
I moved some other pieces around. Sewing together continued. I finished sewing or piecing the top together.. The quilt sandwich has the top, the batting and the backing fabric pinned together to quilt.
done
I use my wacky fun scribble quilting technique to quilt the three layers together creating an added level of movement. Scribble quilting is a technique I named. I move the quilt side to side while quilting with a walking foot.
Winter Sunset, An abstract art quilt with lavander,pink, and grey colorsthe finished piece
You may be interested in reading more at Studio Art Quilt Associates (SAQA) website.
Having Fun With Color!Texture!Movement! appeared in Art Quilting Studio, Summer edition, 2018. Ann Baldwin May is having Fun With Color!Texture! Movement! in each of her art quilts.
Having Fun With Color!Texture! Movement! will show the steps needed to add color,texture andmovement to art quilts using the fabric layering technique.
Having Fun With Color!Texture!Movement! GETTING STARTED
The fabric layering technique makes it easy to have Fun With Color!Texture! Movement! to your art quilts. Begin by laying the back cotton fabric on a table. Choose a size that will easily fit on your work table. A square or rectangle about 15”-20” is a good start. Press the fabric to lay flat. Cover with batting which should also lay flat. Don’t worry if the edges don’t exactly line up, they will be trimmed later. Next, choose a fairly neutral background fabric or fabrics. Overlap the fabrics about an inch. If the fabrics shift during quilting, the batting won’t show. Cut a meandering line to look like rolling hills on the edge of the top fabric. Lightly baste with a glue stick.
Choose your Colors Having Fun With Color!Texture!Movement!
detail of Along the Path
Choose your colors adding a range of hues from light to dark as well as colors that contrast. Play with the colors to see what you like. Be ready to eliminate those that really don’t work. Go for an impressionistic view rather than a picture perfect trunk, leaf, or branch. Each viewer’s eye will blend the colors uniquely.
Start Large to Small
When beginning to create the scene, start with the largest part and work to the smallest. Cut out the tree trunk and add branches as you go. Flip the fabric and use the backside to add dimension. When you have the tree the way you like it, lightly baste. Just baste in a few places not all over. Later on, if you may want to slide a branch underneath and you won’t be able to if it is totally glued down.
Add Details Having Fun With Color!Texture!Movement!
Add rocks to the foreground. Choose fabric that will work for you to add texture. Avoid fabrics that have rocks printed on them. I chose marbled fabric I bought at Pacific International Quilt Festival and a redirected fabric to add texture. You will notice that they are cut simply. Lightly baste the rocks to the background. For the medium sized branches, I couched (zigzagged) decorative threads and ribbons on to a multicolored piece of redirected linen. Then I cut the branches out. I lay them on the piece balancing out the colors. Crossing branches adds interest and movement. Keep going until the scene is pleasing to you. Baste lightly.
Along the Path,detail
Leaves Add Interest
Working on the leaves is so much fun. Gather contrasting and blending colors. Make the leaves about 3”-4” varying the shape and size. Small scrap pieces are all that are needed. Pay attention to balancing the placement of the colors . Reflective, shiny sheer fabrics add a pop to the leaves. Save them for the top for the greatest effect. If you choose to have the leaves stick out from the edge, make those leaves ½” bigger for ease of zigzagging. During the final trimming you can adjust the leaf lines by cutting before zigzagging. Lightly baste leaves in place. Your art quilt will also be successful if you decide to make the edges straight .
The Beginning of the End
When your artist’s eye says that the scene is complete, cover with tulle. Make sure that the tulle is 2 “ longer on all sides. It can pull a bit during quilting. Pin the tulle down making sure that it is flat but not stretched. Use a lot of straight pins; remove as you quilt. As with other quilting techniques, begin in the middle of the piece and quilt outward. Edges may be rolled to accommodate the machine’s space.
Helpful Hints
Beginners will have success stitching along the edges of the branches, following the lines of the fabric. More experienced quilters can add movement by quilting lines resembling slanting plants. Choose a thread color that blends with the background. I highly recommend Aurifil thread for successful free motion quilting. Trim the edges and zigzag two times. Press lightly with a pressing cloth or piece of fabric. Add a sleeve to the back to hang. Stand back and admire!
Everyone Starts Somewhere.
Several years ago I began my path from traditional quilts to art quilts. I took a class in the fabric layering technique from the award winning, Meri Vahl (meriartquilts.com). Meri had learned the technique from Northern California artist, Laura Fogg(laura-fogg.squarespace.com).The technique allows for much personal creativity; none of our work looks similar. I was inspired to create a tree with leaves overflowing the edges as I have sold five pieces to the new Kaiser Permanente Facility in Scotts Valley and WEatsonville, California. A change in color scheme keeps all of my trees unique.
Important Materials
quality scissors; large and small, sewing machine, darning /free motion foot, walking foot for zigzagging, rotary cutter, cutting board, plastic see through quilting ruler, cotton fabric for backing, tulle, synthetic fabrics, redirected materials, commercially marbled fabric, sheers, batiks, Aurifil thread, Avery glue stick, pressing cloth ( to protect tulle and synthetics from melting when being pressed),a pointed wooden stick , straight quilting pins(They are longer than sewing pins.)
Tips
Leave a 1-2” empty back ground space on the sides of your piece. Then when trimmed your art doesn’t lose any interesting parts.
A light colored tulle will be best for your first project. I personally am not fussy about the color of tulle I use.
This technique is a forgiving way to practice free motion quilting. Before I learned this technique, I was ready to give up with free motion quilting in frustration. Lower or cover your feed dogs. Put your stitch length at 0. Use the darning/free motion foot with Aurifil thread. Push foot pedal control fast while slowly moving/quilting the layers of fabric.( Fast foot ,slow hand) Aurifil thread is available at most quilting stores. It appears more expensive but it really isn’t. I pieced and quilted a queen sized quilt of many seams with one spool.
Throwing the leaves onto the scene adds movement. Free yourself from cutting out perfectly formed leaves.
Use a large straight pin like a hat pin to get the tiniest dab of glue on the tip and gently slide under the fabric to be basted. I use a wooden stick similar to an emery stick to help me gently nudge the pieces of fabric to where I want them to be.
Advice for Beginners
I come from the world of bed quilts. The basic sewing skills used in traditional quilting are fundamental for most art quilting. However the “Quilting Rules” can be left behind. Buying patterns, pressing seams and matching seams are a few of those rules I have freed myself from. Give yourself permission to try something new, be it a color combination or creating your own designs. Listen to yourself. Take baby steps. You decide if you like your work or not. If not, change it. There is no wrong way to do it. Many art workshops or seminars begin with activities to get people in touch with one’s creative side.
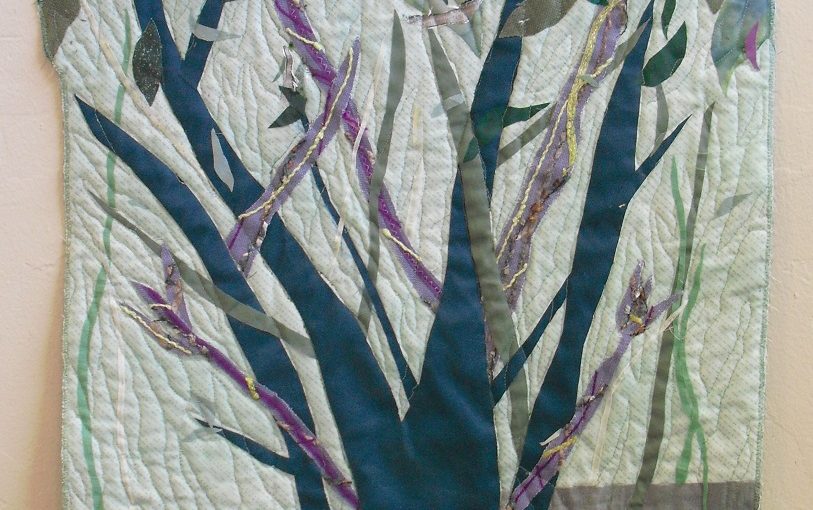
Along the Path
About the Author
Ann Baldwin May lives in Santa Cruz, California. In 2012, she retired after teaching elementary school for 36 years. She began quilting in the 1970s. Ms. May participates in the juried Santa Cruz County Open Studios Art Tour from her studio in the Santa Cruz Art Center. She recently sold five tree art quilts to Kaiser Permanente for their facilities in Santa Cruz County, California. May is a member of SAQA( Studio Art Quilter Associates). Contact her at baldwinmay49@yahoo.com or www.annbaldwinmayartquilts.com. Or visit her Etsy shop at https://www.etsy.com/shop/annbmayartquilts/
Step By Step Instructions to Make an Abstract Art Quilt
This work in progress shows the step by step instructions to make this abstract art quilt, Sunlit Boulders. Featured in Art Quilting Studio Magazine, Fall issue, 2018.
Sunlit Boulders 31″ h x 28″w
Inspiration and Adjustments
Sunlit Boulders is an art quilt with curved line piecing, Scribble Quilting and couched decorative yarns and threads. My first intention was to highlight the Native American batik shown on the left on the first photo. As I chose different fabrics, I decided that I would minimize their use. I removed more of that fabric. I was happier with the way it looked. It’s okay to change ideas in midproject if it doesn’t look or feel right to you. Follow these step by step instructions to make your own abstract art quilt. It will be uniquely yours.
Photo 1. gathering fabrics
Photo 1
I am auditioning fabrics that complement and contrast with the batik fabric. Using strips of fabric, I couch(zigzag) a variety of decorative threads and yarns to the strips. I cut the strips apart into varying lengths without much forethought.
Photo 2. Trying out fabrics.
Photo 2
I am still auditioning fabric. I included some pieced strips left over from a previous project. Notice that I eliminated the reddish fabric.
Photo 3. Begin to sew smaller pieces together.
Photo 3
I start to cut up the strips of couched yarns to add to the quilt. I am trying out where I like the pieces, moving them around. Dark strips frame the piece. I begin to sew some pieces together. Figures from the batik stand out enough.
photo 4 Sew pieces together. Move to a different spot to create balance of fabric and color.
Photo 4
Tucks are add texture. Notice that I moved some pieces around. I do more sewing of pieces together.
photo 5. I find problems are solved by cutting up fabric into a smaller piece.
Photo 5
I am not afraid to cut up fabric. I can always use the fabric at a later date for a different project. More tucks are added to fabrics. I eliminated some batiks symbols.
Photo 6. All sewn together.
Photo 6
All pieced together and ready for batting and backing.
Photo 7. A quilt sandwich when the top, the batting and the backing is ready to be quilted.
Photo 7
Scribble Quilting is complete. Edges need to be trimmed and cut straight.
Photo 8 Finished.
Photo 8
The finished art quilt represents my mantra of color, texture, and movement.