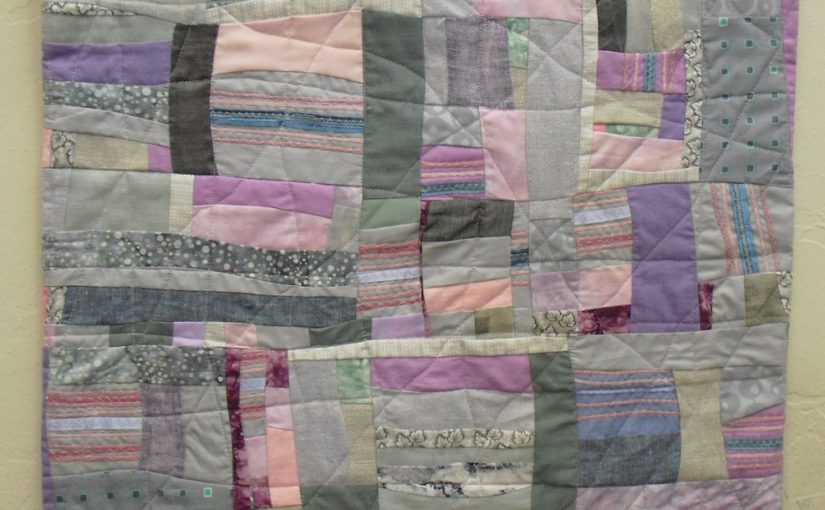
Winter Sunset, An abstract art quilt with lavander,pink, and grey colors,the finished piece
Abstract Art Quilt Work in Progress, Winter Sunset
This work in progress shows the steps I follow to create an abstract piece of art. Designing my abstract art quilts begins with choosing a group of colors. Inspiration for this quilt came from the greys and pinks of a winter sunset. I pick the decorative threads that I want to work with. I choose fabric that fits into the shades of colors that I chose. This time I want the colors to blend together and hardly be noticeable. Look for the green marbled fabric I added for that purpose. Choosing mnaterials from my stash is my favorite part of the creaive process.
1. Yarn and decorative threads for couching.2.I begin to choose fabrics.
Couching Decorative Threads and Yarns
Couching decorative threads and yarns to a long strip of fabric is fun. I use little pieces that might otherwise be thrown away. Each person’s eyes will blend the colors together differently. Then I randomly cut up the strips to use as fabric. I place the fabric on the design wall. Then I move the pieces around until I like it.
Long strips of cotton with the threads couched on them.I cut up the long strips. They are ready to be used as fabric.I place them on my design wall.
Keep Colors and Textures Balanced.
Beginning to sew the pieces together, I keep my eye out to make sure that the balance of the colors and textures is good.
I start to add the other fabrics.8. I added more fabric.
I keep adjusting the fabrics adding and subtracting fabrics as I go. Until I get it just right in my eye’s mind.I begin sewing small pieces together.
I sew more pieces of fabric together.
I continue sewing pieces pieces together. Here you can tell that the pieces are getting larger.
An abstract art quilt with lavander,pink, and grey colors
I moved some other pieces around. Sewing together continued. I finished sewing or piecing the top together.. The quilt sandwich has the top, the batting and the backing fabric pinned together to quilt.
done
I use my wacky fun scribble quilting technique to quilt the three layers together creating an added level of movement. Scribble quilting is a technique I named. I move the quilt side to side while quilting with a walking foot.
Winter Sunset, An abstract art quilt with lavander,pink, and grey colorsthe finished piece
You may be interested in reading more at Studio Art Quilt Associates (SAQA) website.
Scribble Quilting is a wacky fun way to quilt. Are you stuck in stitch-in-the-ditch? Are you a bit bored with straight line quilting? Maybe it’s time for you to try Scribble Quilting. It is not hard at all. All you need to get started is a walking foot, a quilt sandwich ready to quilt and different colors of thread.I developed this technique because I was bored with other ways to quilt.Looking for a wacky fun variation to your quilting? Try Wacky Fun Scribble Quilting.
Waiting for the Roadrunner, 22″ x 24″ 56cm x 61cm
Artful and Interesting
First of all,Scribble Quilting is a colorful, artful and an interesting way to quilt. For example,the quilting thread lines cross each other; creating positive and negative space. The sewing lines are the positive space. However,the negative spaces are the shapes created by the lines. Similarly, Lines undulate, curve and wave. Do the lines you’ve made draw your eye in and keep your interest?
By Accident
Like many great ideas, Scribble Quilting was discovered by accident. Once while making a baby quilt,I decided to quilt curvy lines with my walking foot instead of straight ones. Furthermore, I used one of the built-in stitches on my sewing machine which made regular, gentle curves. Soon, I wanted to make the curves wider. Switching back to my usual straight stitch, I began gently moving the quilt from side to side by hand to make wider curves than my built-in stitch had allowed. It was fun, and the lines looked more interesting. I kept quilting, experimenting with contrasting thread colors. Subsequently,I currently finish many of my art quilts this way.
Scribble Quilting
In addition,I named this technique Scribble Quilting. After art lessons were cut at in my elementary school classroom, I noticed that some students showed their frustration with what they considered unsuccessful art projects. After that, they would scribble all over them with four or five different crayons. It caught my attention. However,it looked like a party with confetti falling all over. As I quilted my pieces, drawing lines with multiple colors and crossing over them repeatedly, it reminded me of scribbling.
Fun with Thread Color
Take this opportunity to have fun with thread color. Be aware that the thread color can appear different depending on what colors it is on or near. Free yourself from perfectly matching the thread to the top fabric. I found that even slight variations in the color of the quilting threads added subtle interest to a quilt top.
More color is more interesting. For example, I bought a spool of wacky fun chartreuse (yellow green) thread at a flea market several years ago. I never wear this color and had not tried it in quilting. But this thread has become one of my favorites because of the way it plays with other colors. It brightens green or black fabric.Yet, it often reads as yellow. I encourage you to play with the thread to see how it changes, depending on the color of the fabric. Updated- Sometimes I use just one color of thread instead of more than one.
More Color is Better Except
More color is more interesting, with one exception. Thinking that variegated thread would be fun and wacky, I tried to use it. However, I personally was not satisfied with the results. I had no control over when the colors changed. It wasn’t fun when the bobbin thread didn’t match the top thread. Maybe this is just a personal choice on my part. Each quilter can make their own decisions.
Are you ready to start Scribble Quilting?
Begin each project by quilting straight lines about 5 inches (12cm) apart using a walking foot. Stitch-in-the-ditch works well to hold the quilt sandwich together. Remove the pins to avoid sewing over them. After you’ve finished straight-line quilting to secure the quilt sandwich, change to another thread color.
Next,quilt several lines in one color. Spread the stitiching lines out across the quilt top. As you sew from one edge of the quilt to the other,gently moving the quilt sandwich from side to side. Change thread color and continue quilting. Make wider curves so that the quilting lines cross. Keep quilting until the quilting is evenly space. Are happy with the way the lines cross each other? if not, then do some more.
Instructions
1) Prepare a quilt sandwich by pinning together the backing, batting and top (step 1).
step 1 of scribble quilting process
2) Decide where to start quilting. In the beginning, it’s easiest to start on one side and go to the opposite side.
3) Begin by using a walking foot to make straight lines of stitching about 5 inches 12 cm apart. Stitch in the ditch if you want. (step 2).
step 2 of scribble quilting process
4) Now begin sewing curved lines of quilting, still using a walking foot. Begin curved quilting on the edge of the quilt, near the middle of one side. Pull the quilt taut with both hands as you quilt. Gently move the sandwich from side to side as the machine stitches. Use your needle down position in case you have to stop. Stop quilting to readjust the quilt sandwich. Avoid jerky movements. The quilting thread should form a smooth, flowing line (step 3).
step 3 of scribble quilting process
Problemsolving
If your line of stitches moves abruptly to one side, stop immediately. Remove stitches until you have enough to thread a needle, then bury the threads in the batting. Continue quilting, starting at the end of the line of stitching. If you don’t want to stop or don’t notice the mistake until later, stitch another line of quilting which crosses the first line at the point where the mistake occurred (step 4). This will make the mistake less noticeable.
step 4 of scribble quilting process
5) As you quilt, check the back of the sandwich to see if some areas need more quilting. The quilting lines should be balanced from one area of the quilt to another (step 5). Keep quilting until you like the way it looks. If you’re not happy, add wavy lines in contrasting colors, crossing more lines of quilting.
step 5 of scribble quilting process
6) Bind the quilt using your favorite technique.
Welcome to the joy of Scribble Quilting! I hope that you enjoy using this wacky fun technique as much as I do.