Learn Something about Memory Quilts

Yellow and Green Memory Quilt, 56" x 51" lap quilt

Something about Memory Quilts

Black and Red Memory Quilt, 56″ x 51″ 142cm x 129cm

At one time, I mentioned to someone that I had a commission to make a memory quilt. That person asked me,”Wasn’t it weird to make a quilt out of a dead person’s clothing? Didn’t that creep you out? Cutting up a dead person’s clothes?” I had never thought of that. Why would that be creepy? However, I continued to think about the comment. The question focussed on the dead part while I focussed on the fabric part.

back of Black and White Memory Quilt, 51″ x 56″ 129 cm x 142cm

Focussing on the Fabric Part

Sewing involves cutting up fabric and piecing it together to make clothes or other items. Something that I had done since I was a teenager. When learning to sew clothes, mistakes are common. The seam ripper is a sewist’s or quilter’s best friend. Just like stopping is part of driving. Ripping out mistakes is part of sewing.

Repairing Clothes

In addition,sewing often involves repairing clothing. Obviously, repairing clothing means that the item has already been used. It is not such a huge step to cut up worn clothing to create something new. The creation is the important part not the living status of the person. Sewists see things differently. All kinds of divergent views add to the conversation.

Yellow and Green Memory Quilt, 56″ x 51″
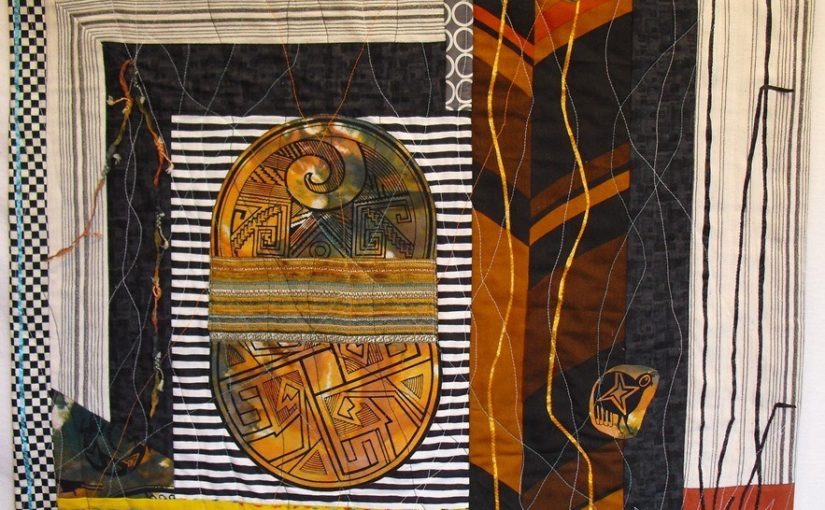
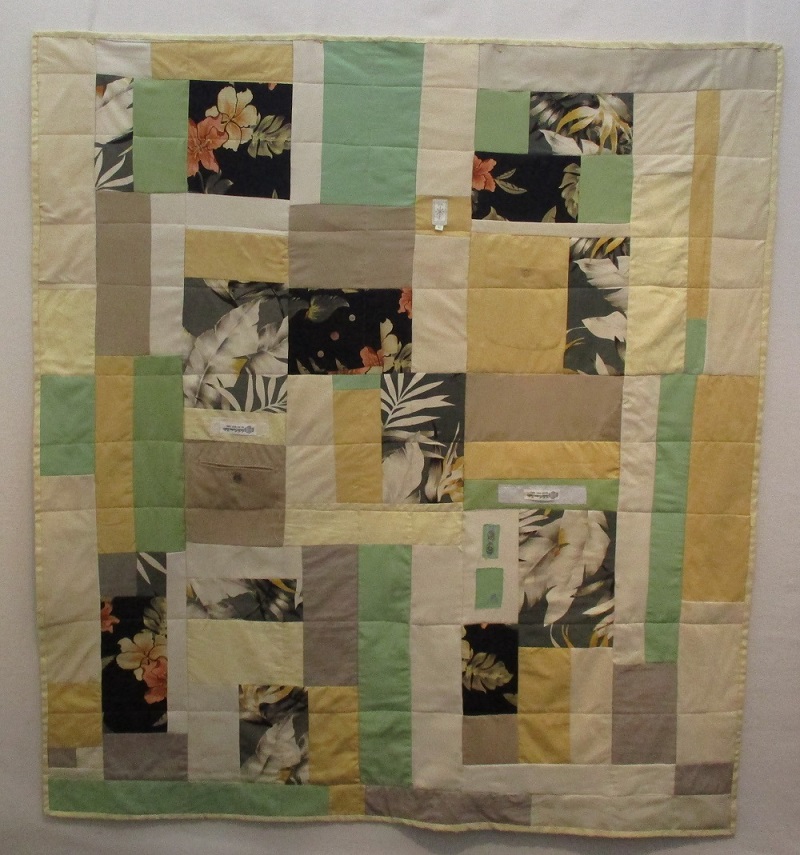
142 cm x 129cm lap quilt

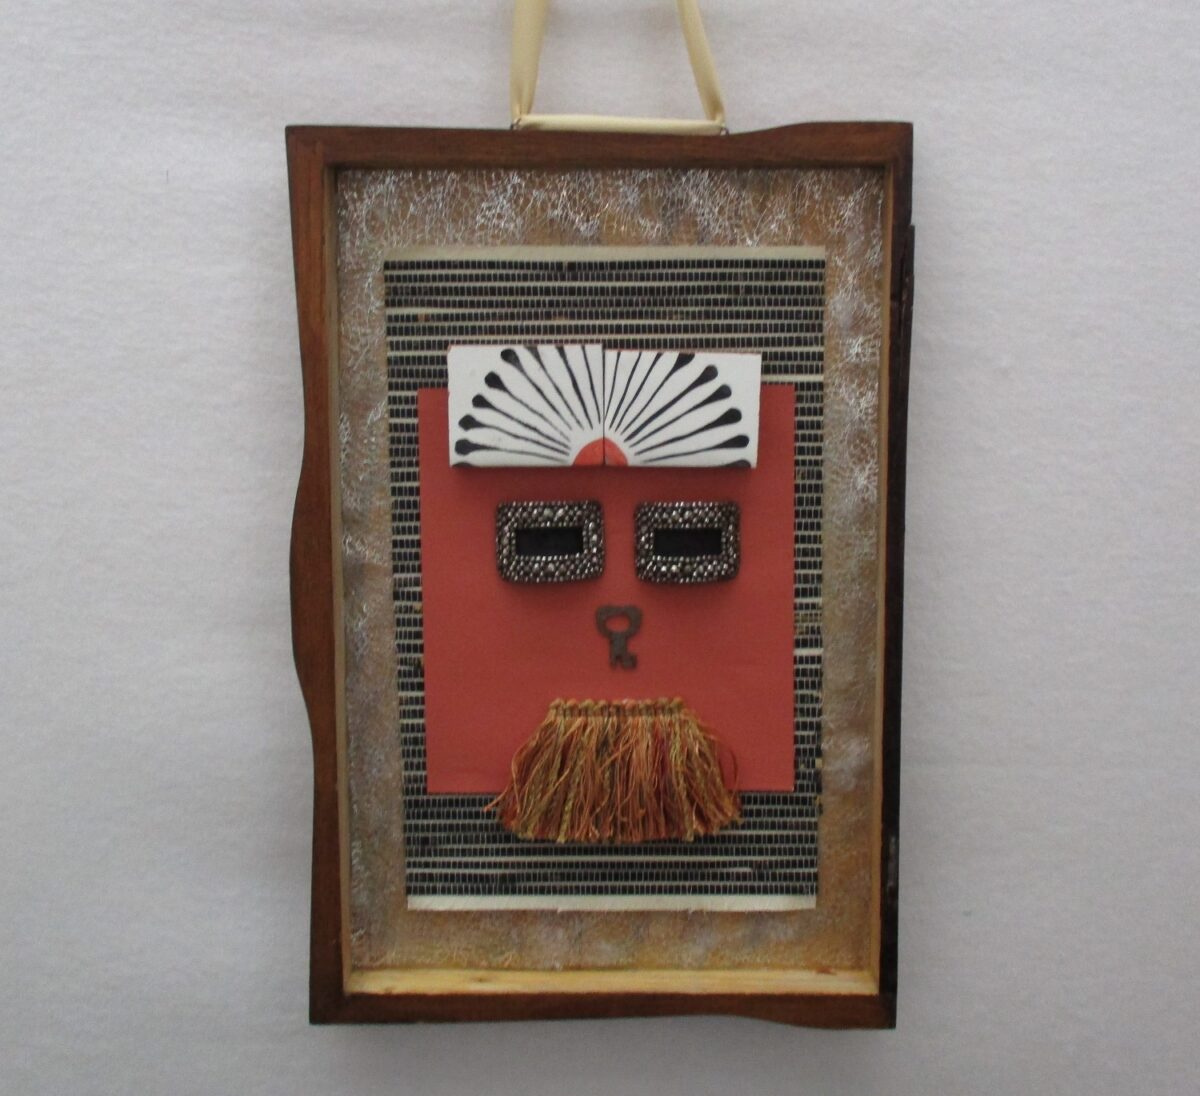
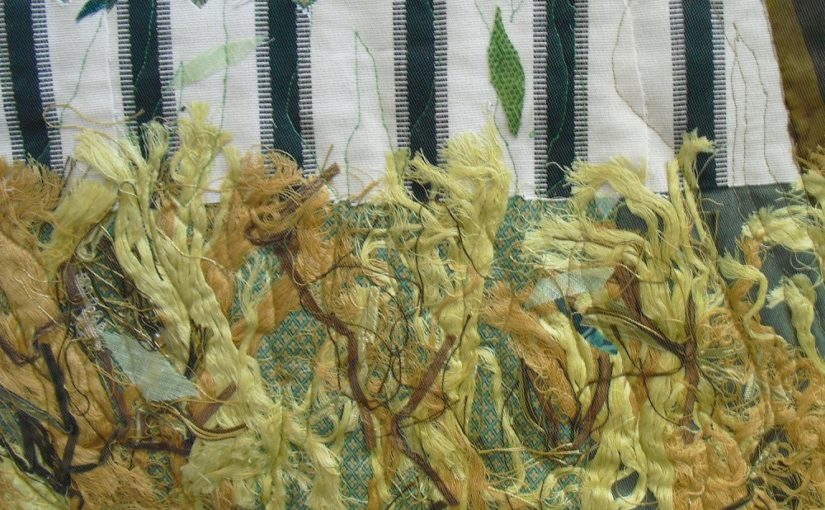
Incredible fabric details

Notice details of pockets and inset of blue with seersucker from the inside of the jacket

Often the memory quilts that I have made are from men’s clothing. Don’t even consider the fast clothing market. Some of the men’s jackets are works of art. One jacket(see photo above) made in East Asia came with piping and beautiful sewing details on the inside of the jacket. Monograms are common. The fabric for the shirts is of the highest quality. Think high thread count!! These materials also stand up well to the rigors of washing. They are incredible fabric that one would not find in a regular fabric store. Don’t miss such an opportunity to repurpose such great materials.

Why Memory Quilts?

So why make memory quilts? Repurposing fabric or items is foremost for me. Could the clothing be donated? Yes. Will the donated clothing all be put to good use? I don’t know for sure. Sometimes it isn’t. If the clothing doesn’t sell, it is shredded for insulation or something else.

back of Green and Yellow Memory Quilt,56″ x 51″ 142cm x 129 cm
lap quilt

The Joy of Memories

What could be more special that cuddly up in a quilt that contains small pieces of fond memories that one has for a loved one? “Oh, I remember that shirt. My dad wore that almost everyday!” “Junior loved those shorts! He wouldn’t ever take them off.” What could be better than a useful, memorable yet beautiful piece?

Making a Memory Quilt

The memory quilts highlighted here are from a recent commission. I completed two reversible lap quilts from a man’s clothing that the widow gave me.

Several shirts to choose from
more shirts
Silk ties

This client brought me a large plastic bin filled with shirts and pants along with a few silk ties. She wanted two quilts to be made. She also requested that certain fabrics be included in both quilts. I took notes on that so that I would remember. As a repeat customer she was familiar with my abstract style. The client looked forward to see what I would create.

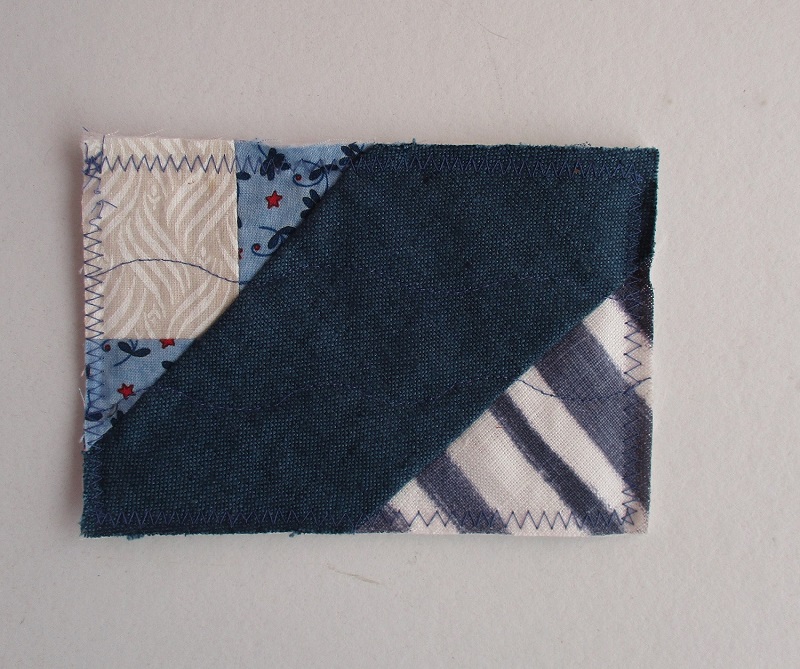
Step 1 Choosing the Colors that Go together.

A Work in Progress

After making sure that the clothing is clean and smells fresh, the first step is to decide which colors go together. As stunning as red can be, red does not play well with other colors. I chose to pair the red with the black and white. The husband’s taste made choosing the colors of the second quilt fairly easy, yellow, cream and light green. The tropical shirts added just the right flair and action.

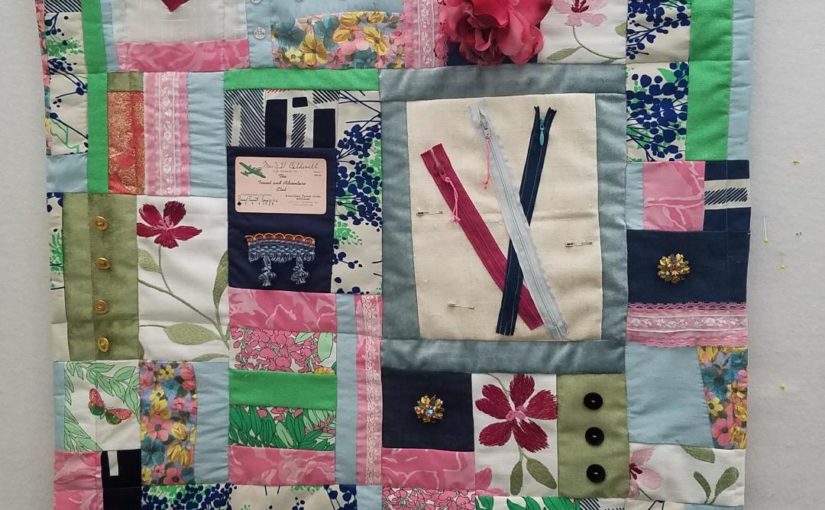
Step 2 Interesting Details
artist made details

Many pieces of clothing have interesting details that I like to incorporate or highlight. Boring buttons pop with the addition of bright threads. Labels and tags add interest too. Pockets are a wonderful surprise as well. Sometimes I use the the labels or tags as is or I may have to cut them and add them to another piece of fabric. It is important to have the 3 D details all on the top of the quilt and not on the backside. When it comes to quilting the three layers together, it will be easier to quilt avoiding hitting buttons.

button details, waistband, and silk ties
Using Fusible Web

Once cut apart, most of the clothing is ready to use. Silk ties and thin fabrics need to have fusible web ironed on to the back of the fabric. This prevents the fabric from stretching and aides in ease of sewing. This step is essential for the beauty of the piece and the ability to easily sew the fabrics together. It is not difficult or expensive except for the time involved.

a pocket and a label
Button details and label
Step 3 Designing on a Design Wall

These memory quilts are similar to my abstract art quilts.except that I use larger pieces of fabric. I place the details and unique items on the design wall first making sure that they are more or less where I want them. Then I add other fabrics rather randomly. I move the pieces around so that the colors and details are balanced. I sew pieces together and keep checking that the colors and patterns are not all in the same area.

Keeping items balanced.
Balancing out colors and patterns
Step 4 Complete the quilt.

When I am happy with the way that the top looks,I sew all of the pieces together. Then the top is finished. I baste the quilt sandwich; top, batting and back together. Then quilt the three layers together. I keep my quilting simple to let the fabrics shine. That is the part that is most important to the client. Similarly,after I spend time designing simple quilting also keeps the price down.

In conclusion

After sewing clothes, quilts and art quilts for decades,I continue to be impressed with the quality and durability of fabric and cloth. The fast clothing market aside, there is no reason to not recycle clothing into some other form. Memory lap quilts are a perfect fit for this redirection. Whether art quilts or memory quilts, redirecting fabrics and materials is my main focus.

Read more.https://annbaldwinmayartquilts.com/2020/11/memory-quilts-i-have-made/

https://annbaldwinmayartquilts.com/2017/08/memorial-quilts/

https://annbaldwinmayartquilts.com/2020/02/memory-quilt-a-work-in-progress/

https://annbaldwinmayartquilts.com/2022/01/frequently-asked-questions/

https://www.etsy.com/shop/annbmayartquilts/

What is Art in a Box or Assemblage?

Orange Key

Art in a Box or Assemblage

Cityscape   9" x 7", art in a box, wall paper and cement tiles
Cityscape 9″ x 7″

3D Collage

Assemblage is like a 3D collage usually with found objects. It is a 20th century art form that became more well known in the 1950s and 1960s. Art in a box is a type of assemblage.

Small Wooden Boxes

I recently found about fifteen 9″ x 7″ 23cm x 18cm wooden boxes. They were brand new, in light shades of grey and beige. A perfect setting for some assemblage. The box works as a frame. My mininalist style worked because there wasn’t room for much more. A chance to finally structure add some continuity to my displays. https://annbaldwinmayartquilts.com/product/cityscape-found-object-art/

A Class in Assemblage

In 2018 I took a class in assemblage from local artist, Janet Silverglate. https://www.janetsilverglate.com/

Big Brown Button  8" x 10" concentric circles of brown and green on a fiber background
Big Brown Button 8″ x 10″ My piece from the class

First,she taught the class how to use a drill with wood or metal. Meanwhile,the students created a layered piece from a wide range of available materials.

Interestingly enough, Janet also came from the sewing world. Furthermore,she built on those skills while changing her materials from fabric to metal. She encouraged me to adapt my known skills as well to the different materials. Janet was incredibly generous with the materials that she had collected. However, I still had a lot to learn about the art form.

Altar at the Top   9" x 7", art in a box, gray cement tiles and brown glass tiles
Altar at the Top 9″ x 7″

https://www.etsy.com/listing/1005720871/contemporary-mixed-media-collagebeige

Choosing a Background

One of these adapted sewing design skill includes starting with an interesting background. I chose redirected wall paper that would add movement, color or texture to a piece. My usual way of working is to first select interesting materials I like. I have no idea of what project I may use them for. For example, I let the materials play with one another. They tell me if they want to be together or not. Sometimes the size and scale is not correct. Other times the colors are slightly off. At times even great materials need to be saved for a different project .

Orange Key,9" x 7" Repurposed gift box has an antique key hanging against orange background. 1/2" tiles add interest.
Orange Key,9″ x 7″ This box came to me as a gift box.

Choosing Materials

I prefer to see the materials in front of me before making a choice. There are just too many variations involved for me to choose. Color? Are the colors of the correct shade or hue? Too grey or too beige? Scale? Is the size correct for the box? Is the action on the wallpaper too big or too small for the box? A perfectly lovely item may need to be saved for a different art piece. Scale is an important element when working small. The quarter inch tiles I redirected from a interior designer fit the tiny bill. Each miniature tile has a slightly different shade of color to it. I couldn’t place them correctly without seeing them first.


Three Keys   9" x 7" Found objects like keys add interest. minimalist art in a box
Three Keys 9″ x 7″ Found objects like keys add interest.

https://www.etsy.com/listing/1005714869/contemporary-mixed-media

Color

The color range of the tiles was limited. Yet a few tiles provided tiny pops of color. Luckily, the tints complimented the muted shades of the container boxes. In addition, finding a unique artful use for a redirected item is definitely a win-win for the earth.

Texture

Texture adds depth to a piece. Fiberous materials also add interest. The 3 dimensional aspect draws the viewer closer. However, that could just be my special view on fiber. Interesting, vintage items also provide texture. “Junk” laying around one’s house can be put to good use. Surprise yourself!

In Conclusion

In conclusion, artists stretch their artistic muscles by learning new skills. Combining shapes, forms, and colors are basic skills that can be developed. After that, those skills are available for and can be applied to many art genres. For example, I recently witnessed a flower arranger combine various colors,textures and sizes to create an incredible bouquet. Everyone starts somewhere. Just start!

Read more.

https://annbaldwinmayartquilts.com/2021/02/recent-attempts-at-assemblage/

https://annbaldwinmayartquilts.com/2021/01/first-steps-towards-assemblage/

https://annbaldwinmayartquilts.com/2021/07/art-materials-hard-or-soft/

https://annbaldwinmayartquilts.com/2021/08/sewing-room-minimalist-assemblage/

https://www.etsy.com/shop/annbmayartquilts/

https://annbaldwinmayartquilts.com/videos-of-art-quilts/assemblage-video-work-in-progress/

How to Turn your Antique Sewing Objects into Art

  Sewing Room Assemblage Art

Sewing Room Minimalist Assemblage
large plastic sewing kit, 15″ diameter

 Sewing Room Assemblage may just be another name for a mess of sewing room items.I inherited those sewing items that I now wanted to use in my assemblage pieces. Think of assemblage  as a three dimensional collage.  My mother and mother-in-law were part of the generation that grew up in the Great Depression. They married before World War II. Their families started after the war in the 1950s.

A Generation Expected to Sew

Like  many of their generation, sewing skills were expected. Neither my mother or mother -in-law were expert sewists. It has been   over twenty years since I acquired all of their sewing supplies. This included special pieces of furniture to store the sewing items as well as numerous threads,needles pins, measuring tapes, thimbles and gadgets. Some of the items are recognizable to the 21st century sewists and some aren’t.

Sewing Room Minimalist Assemblage, wooden spools in a thread tray some empty and some still with thread
Thread Tray

A New Use for the Thread Tray

A piece of furniture especially made to store sewing items had seen better days. Yet, I kept the wooden tray for thread storage. That piece became the frame for my whimsical piece with thread and small animals that I had been saving. I lined the larger left side with a piece of fiber and added a necklace. The details of buttons lay on a coral  felted piece a friend gave me. The most unusual item is the wooden needle case in the middle of the third row. The wooden spools add charm but I couldn’t resist adding some color with some that still had thread.

Sewing Room Minimalist Assemblage
Spool Wreath

Spool Wreath

I do a lot of sewing. Needless to say I had many empty wooden spools.  I generally don’t throw anything away. For several months,I kept my eye out for a way to use these spools. I finally saw a wreath on a door. It inspired me to consider making a wreath with my spools. After much thought, I decided to string  the spools on a dowel. I added red wooden beads in between. I had to experiment with the width of the dowel. The 1/4″ .5cm wide dowel was wide enough to fit the hole of the spool and strong enough to stay straight.

Other Parts of the Wreath

Other parts of the wreath used found objects like the clipon metal hanger and the fiber paper plate holder for the base. The burlap bow was reused from a gift I had received. I prefer a  minimalist assemblage style for my sewing room pieces.

Mistakes can be Good.

The shorter length rays were a mistake.  I used a 1/8″dowel that proved too  weak to hold the spools straight. The dowel broke. Instead of throwing the weak dowel out, I choose to shorten the length of the arm. I think it worked. Mistakes can add  interest although unplanned. https://annbaldwinmayartquilts.com/2018/11/mistakes-that-i-have-not-regretted/

Sew Fun, 8" x 8" mixed media with small sewing items on a wooden grid
Sew Fun, 8″ x 8″

Sew Fun

This sewing room minimalist assemblage piece,Sew Fun includes some of the more unique sewing items. I started with a wooden grid for design interest.The heart shaped item’s original use was to store pins and large needles. The three dimensional shape has a 1/4″ space between the two hearts for that purpose. The long wooden spool on the bottom originally was covered with thread. An orange packet of needles and an orange pair of scissors adds a needed bit of color.

A Metal Bobbin

I learned to sew on my mom’s Singer sewing machine with metal bobbins. The bobbin is an essential piece holds the bottom thread.  That machine is long gone. Yet, I found  a metal bobbin with orange thread  on it. An orange color scheme was devloping. Some may recognize the small metal threader in the middle. I believe that these are still available for sale. They presumably help people thread small needles although I never mastered that skill. An orange batik ribbon for hanging completes the piece.

Sewing Room Minimalist Assemblage
Red,White and Black Treasures, 8″ x 8″

Red,White and Black Treasures

The red,white and black treasures of thread were originally part of a small sewing kit my daughter bought in Germany. I lined the box with a thin piece of cork. Another long empty spool from the American Thread Company was  added. I included the paper instructions for Muriel’s Yarn Threader price 75 cents. Who doesn’t have a lot of buttons? I created  details with two levels of buttons in alternating colors. Black ceramic tiles finished the corners.

Brown European Threads 8″ x 8″

Brown European Threads

For the Brown European Threads Minimalist Assemblage, I used the bottom part of a lidded box. See the little bit of the hinge on the left. I couldn’t remove it so I just left it. I lined the box with a piece of redirected wall paper. There were several more European threads in the brown muted color range. A packet of Boye Needle Company from Chicago takes center stage. This is the type of packet that I saw many times in my youth. This time I placed the double decker buttons on  small cream colored tiles.

Art in a box green, yellow blue spools of threads with multilayered buttons on blue tiles
Blue European Threads 8″ x 6″

Blue European Threads

Another  variation of the sewing room minimalist assemblage is Blue European Threads. I used wallpaper for lining. I made double decker buttons with blue, green and yellow that match the European spools of thread.  Some matching shiny round objects to offset the spools. Blue and green buttons are placed on blue tiles to accent the corners.

Conclusion

Sewing Room Minimalist Assemblage can take many forms. So take a new look at the items that you have around your home. You don’t have any?  Search for unique items at garage sales or second hand stores.  You can give a new artful life to the common sewing items from the 20th century.

https://annbaldwinmayartquilts.com/2021/03/beginning-steps-to-creating/

https://annbaldwinmayartquilts.com/2021/02/recent-attempts-at-assemblage/

https://annbaldwinmayartquilts.com/2021/09/art-in-a-box-assemblage/

https://www.etsy.com/shop/annbmayartquilts/

How to Begin Creating Art

Face with a Key Nose
Beginning Steps to Creating, Mixed Media assemblage, art in a box with open sides, antique key orange and peach
Orange Key,9″ x 7″

Beginning Steps to Creating Art

Beginning steps to creating art suggests some new ways of thinking about making our world beautiful. Creating comes naturally to humans. We are innately artists. We try to make our world beautiful.  Some of us draw; while some of us paint. Others create beautiful food and table settings for our loved ones to enjoy. Others create beauty in their gardens.

Unfortunately, many of us do not feel that we are artistic. I certainly didn’t for many years. Yet, each of us can create beauty in our unique way. Here are some suggestions for beginning steps to creating a more beautiful everything or whatever you choose.

Beginning Steps to Creating Beauty

Part of my career as an elementary school teacher was spent at an arts infused school. We brought in special artists  to teach across the arts curriculum from drawing, painting to theatre and dance. I had been at this school before this program started.

When the program began, the whole school adjusted  its focus. I witnessed sn incredible shift  in students’ attitudes.  We told the children that we are going to try and make all of our work beautiful. We would not criticize the work of others. Trying to do one’s best was the important part. The attitude of the whole school changed for the better. It was so powerful to witness that change.

Think Differently.

Looking outside the box. Many times it is our own perspective that keeps us from seeing things in a new way. Often we acquire materials or fabric with a particular idea in mind. Then it is difficult to get rid of that idea or to envision a new use for the item.

Beginning Steps to Creating,Do these look like coffee beans on the fabric?
Do these look like coffee beans?

When I got this green fabric, it reminded me of coffee beans. That is the image that stuck in my head. I wasn’t sure how to use the fabric. It sat on the shelf for a long time. Then I began to think differently about it. How could I use it a different way? I decided to use the ovals as  bit of motion in the truck of a tree. What little bits of color could I highlight to pull those colors to the forefront and diminish the greenish colors ? A peachy orange  shade would do the trick. As my county recovered from  the largest forest fire ever, my art quilts reflect that new growth.

Rebirth of a Forest,art quilt,29" x 22" fabric tree made from fabric that looked like coffee beans,greens and oranges
Rebirth of a Forest,art quilt,29″ x 22″

Turn the Fabric Around

Another way to look at a piece of material or fabric in a new way, is to turn it around. If it has definitite figures on it ,what will they look like from another direction? New and unrecognizable is what I would be going for. When an abstract artist finishes a work, they often turn the art upside down and sideways to see if it might look better from a different angle. The original fabric for the trees and branches in Skyward was a black,white and gray fabric that had greyhound dogs on it. The movement of the fabric caught my eye before I noticed that there were actual dogs on it.

grey and black dogs on fabric, Beginning Steps to Creating
Greyhounds
black and white branches on an indigo died background,Beginning Steps to Creating
Skyward, an art quilt

Imagining Shapes

While working on my nature quilts, I cut out shapes for trees, branches, fish, rocks, or waves. I look at the fabric to see if the shapes on the fabric tell me what it would like to be in my piece. Does a swervy line imply  a wave? Maybe a mountrain will appear from the shapes on the fabric? If no shape strikes me on the fabric, then I create my own  mountain or a river. The idea is not to find a piece of fabric that has a river on it. But to create a river from lines that the original fabric artist had not thought about..

Visualization

As I am  creating, I try to  visualize what the piece is lacking. What color or shape needs to be in a particular spot? This often guides me to a hue or textile choice. This is a newly acquired skill for me. I surprised myself  when I realized visualization was happening. You can make it happen for you too.

Activities to Practice Beginning Steps to Creating

Here are a couple of powerful skills that can be practiced with no materials at all. Look at pieces of art in the real or virtual world. There certainly are many examples available on social media. Ask yourself, do you like this work? What do you like about it ? How would  you make it better? If it were your piece to change, how would you modify it?

Keys to my Heart, 9" x 7", mixed media, art in a box, antique keys and white details
Keys to my Heart, 9″ x 7″

Another practice activity is to think of how many different non traditional ways an item could be used. I recently acquired a box of antique keys. I am venturing forward into assemblage, putting repurposed items together in unusual ways. What could the keys be used for?  The possibilities are endless; a nose? hair? or other body parts or just purely decoration? While I searched the internet for inspiration, I came up empty. Left to my own devices,I have sprinkled this post with the ideas that I came up with.

Face with a Key Nose, mixed media
Face with a Key Nose

In Conclusion

Start with baby steps.  Create small bits beauty in your life. Practice helps. I took an assemblage class over two years ago. It took me this long for the ideas to perculate through my brain. Be kind to yourself during the learning process.  Trying in the first step. There are no mistakes just  whether you as the artist likes it or not. If not, modify it. Dip into your humanity and make the world more beautiful.

https://www.etsy.com/shop/annbmayartquilts/

https://annbaldwinmayartquilts.com/2021/07/art-materials-hard-or-soft/

https://annbaldwinmayartquilts.com/2021/09/develop-your-art-passion/

https://annbaldwinmayartquilts.com/2021/01/first-steps-towards-assemblage/

https://annbaldwinmayartquilts.com/2021/02/recent-attempts-at-assemblage/

https://annbaldwinmayartquilts.com/2021/05/paper-as-art-material/

More  ideas- Here is one of my favorite artists.
https://www.janetsilverglate.com/

Check out these One of a Kind Artful Fabric Business Cards

fabric business cards, about 3″ x 4″

Artful Fabric Business Cards

My Artful Fabric Business Cards reflect my art quilt business. Business cards generally give basic information about a business; location, phone number and email .  Yet, I take my business cards a step further. They are small art quilts. For people who do not know what an art quilt is,the business card gives them an actual example to choose and take with them.

Reducing Waste

Reducing waste is a major motivation for me. My cards are made of fabric that most people would throw away. I use a fabric pen to write on a plain piece of fabric. The batting inside has no other use either. I also found that as my business grew my info changed. Because I hadn’t printed out my cards, I was able to adjust easily without wasting paper.

Artful Fabric Business Cards
I started with this info on one side.
Artful Fabric Business Cards
Later I needed to add more information as my business changed.

Each card is unique. Most people enjoy choosing their favorite colors or patterns. My cards are a committment statement about my work.

Making the Cards

People often say ,”Doesn’t it take a lot of time to make the cards?” I use the assembly line approach to production. First, I write the info about 20 times on white or plain fabric. Then, maybe at a different time, I sew small pieces of left over fabric together. At another time, I baste the three layers together with a glue stick. Followed by sewing two curvy lines, horizontally across the pieces. Zigzagging the edges comes last. I generally find that there are times when I don’t feel top notch or I need a break from creating. Those times are when I turn to making my fabric cards. So it is not as if I am taking productive time away from actual work.

Artful Fabric Business Cards

My First Fabric Cards

I made my first cards when I was still working full time. I tried different things and learned from people’s responses. When I shared my card with a coworker, she actually shrieked. That was a surprising response. But I took it as a yes, I was on the right path! My first attempts were to make each card extremely special, like a real art quilt. I soon learned that that was not really necessary. People were thrilled with a simpler more random piece. So I simplified my process.

Starting Out

I admit that these cards to require more effort than a paper printed card. It was my decision to give them away. Yet, another early experience made me make adjustments. At a gallery show I was in, a woman proudly came up to me and shared that she had taken four of my cards and used them as coasters. I was such a newbie I didn’t know how to respond.

Now I would say, the first one is free. The others are $10. Because of that experience,I found a finer tip fabric pen that would let me write smaller. I reduced the size of my cards also  so that they were closer to 3 or 4 inches rather than 5 inches.

Another benefit was that I could easily  change the information on my cards. When I moved my studio downtown,I made new cards with the address on it. Later I decided to add my phone number. These changes would have been costly and wasteful if I had used paper business cards.

https://www.etsy.com/shop/annbmayartquilts/

In conclusion, fabric business cards do take longer to make. However, I make them with fabric and batting that many would throw way. They allow me to reuse and reduce while making a memorable art quilt.

https://annbaldwinmayartquilts.com/2020/11/decorative-mouse-pads/

https://annbaldwinmayartquilts.com/2023/03/why-i-love-my-unique-business-cards/

https://annbaldwinmayartquilts.com/2022/05/do-you-believe-serendipity-brings-joy/

https://annbaldwinmayartquilts.com/2022/05/reuse-dont-toss/

Looking for Unusual Fabrics? Find Inspiration from Discontinued Fabrics

Visions of New Mexico,3rd place award

Inspiration from Discontinued Designer Fabrics

Above all, I like using discontinued designer fabrics  in my art quilts. These materials add texture and movement to my work.  Most importantly as a fiber artist, I look for  unique materials. Using discontinued fabrics from designers fits the bill.

Just as important is keeping these beautiful materials out of the landfill. Certainly,giving them a new life is important. First,I gather my materials first with no idea in mind as to how  I will use them. Then I see which materials play well together.

Finding Discontinued Materials

About ten years ago I started volunteering at Fabmo,(Fabric and more). About the same time,I became more serious about making my fabric art.  FABMO is a nonprofit center for redirecting fabrics. For example,dedicated volunteers make weekly trips to the San Francisco Design Center, a decorator hub. These materials are new and ready to be recycled. Furthermore,the public can buy these materials for a donation.http://fabmo.org

Inspiration from Discontinued Fabrics

The nonprofit recently moved to a warehouse in a Sunnyvale, California. After that,it was ready to offer selection days for the public. For example, items to choose from include discontinued  items, fabric samples and details. The fabric is like none available in local quilt shops and fabric stores. It inspires me to see how the fabrics play with one another. At the same time,the volunteers are dedicated to reduce, reuse, and recycle fabrics. They search for new ideas to use the materials. Then they share these ideas on their newsletter. Check with your local decorators for similar opportunities.

Unique fabrics make Unique Art.

 Inspiration from Discontinued Fabrics Using Redirected Fabrics and Materials abstract,orange,green
Autumn Comes to the Farm,an art quilt made from redirected fabrics, 20″ x 20″
 Inspiration from Discontinued Fabrics Using Redirected Fabrics and Materials abstract,gold, deep red,an art quilt
Desert Sands,21″ x 16″

Inspiration from Unusual Fabrics

The next step is to choose from the  wide variety of materials that are available. Needlesstosay, the amount of possibilities is a bit overwhelming. Furthermore,the use of silk, linen and synthetics allows me to add texture  to my art pieces.  These fabrics can be a bit more difficult to work with than cotton. Unlike bed quilts, art quilts as wall art do not have to be washed. In other words, easy care materials like cotton are not mandatory.

Gees Bend inspired abstract,brown, beige, golden,an art quilt made from redirected materials
Rusty Cans in the Wash,16″ x 15″
art quilt black,white, rust
Visions of New Mexico,3rd place award, 31″ x 26″

A Win Win Situation

Finally,I am very inspired by how these redirected materials play together. I really hope that you will search out sources for redirected materials in your area. It will add a spark to your art. It will create a decline in entries to the local landfill. What could be more of a win-win situation?https://annbaldwinmayartquilts.com/2019/08/adding-color-to-your-art-quilts/

https://annbaldwinmayartquilts.com/2018/11/use-redirected-fabric-in-art-quilts/

https://www.etsy.com/shop/annbmayartquilts

You can learn more about FABMO here.

https://annbaldwinmayartquilts.com/2017/12/the-amazing-story-of-fabmo-how-two-dedicated-people-can-make-a-big-difference/

Want an Heirloom?Make a Memory Quilt.

Memory Quilt finished art quilt

Memory Quilt-Step by Step

Above all,a memory quilt is a quilt made out of a person’s clothing as a way of honoring their memory. After seeing my art work, a client contacted me to make an art quilt as a way to keep the memory of  her grandmother alive.For example,follow as I show the step by step the process of making a memory quilt of the client’s grandmother’s clothes and articles.

At our First Meeting

At our first meeting, the woman shared information about her grandmother’s life that she especially wanted to be included in the memory quilt. In addition,she brought artifacts to illustrate her life. The artifacts included buttons, artificial flowers, a paper card notice, lace and several dresses and clothing . Together step by step, we decided on the colors.  We both agreed on the pink, green, and blue palette. I was able to use some dark blue from the orange and blue housedress.

Personal details

Furthermore,the wide range of details, artificial flowers, momentos, jewelry,clothing gave me a lot to choose from. Subsequently,I was also able to include buttons, lace from hems and the safety pins that had been hidden inside the clothing. Luckily, the client said that she would trust my artistic choices to arrange or eliminate as necessary. After that the work on the Memory Quilt-step by step began.

https://annbaldwinmayartquilts.com/2020/11/memory-quilts-i-have-made/

choosing fabrics for a memory quilt a work in progress Memory Quilt-A work in progress
Step 1. Choosing fabrics and details for a memory quilt
dresses for a memory quilt a work in progress,Memory Quilt-A work in progress
Step 2. dresses for a memory quilt
earrings for a memory quilt a work in progress,Memory Quilt-A work in progress
Step 3. Earrings add a very personal touch.

To Begin-Memory Quilt-Step by Step

First I cut  out parts of the fabric from the dresses. Based on my experience and the approximate size of the finished piece, I knew that  I didn’t need to take apart all of the seams. In other words, there would be plenty of fabric. Therefore, I cut pieces of about 10” -20” square. I heat fused interfacing on to the back of the polyester to reduce stretching and to aide sewing. Then I was able to cut out a variety of interesting geometric shapes in dark navy blue from an eliminated orange dress. Finally,I noticed that the back side of the fabric was a lovely medium blue so I decided to use both sides of the fabric. The pieces were smaller about 3” each.

Using the  Design Wall to create the Memory Quilt-step by step

Using the design wall, I pinned the fabric up to begin to try out fabrics for work in progress of the memory quilt.

Memory Quilt,Memory Quilt-A work in progress
Trying out fabrics for a memory quilt on the design wall

I created this accent from zippers I took out of the clothes. The safety pins are decorative. Be brave and use interesting objects that one might not usually think of using  for a memory quilt.

zipper detail
Step 4 Create zipper accent

Next, I added the details to get an idea about where they should go.

Moving around fabrics and details a work in progress
Step 5 Moving around fabrics and details

Then,I began to sew pieces together.

Memory Art Quilt, I sew many pieces together
Step6 Trying out places

I continued to sew pieces together and change their place for balance of color.

The various pieces are ready to sew together.
Step7 ready to sew together

Finally, all of the pieces found their special spot.Next, the top was sewn together. Then,the backing and batting are added. Lastly I quilt  the three layers together. In this case,the focus is on the materials and details. Therefore, the quilting took a back seat and did not stand out.

Memory Quiltfinished art quilt
Step 8 Memory Quilt finished art quilt


Read more in these articles on Memory Quilts.

https://annbaldwinmayartquilts.com/2021/10/something-about-memory-quilts/

https://annbaldwinmayartquilts.com/2020/11/memory-quilts-i-have-made/

https://annbaldwinmayartquilts.com/commissions-and-memory-quilts/

https://annbaldwinmayartquilts.com/2017/08/memory-quilts/

https://www.toocooltshirtquilts.com/blog/memory-quilt-ideas

https://www.etsy.com/shop/annbmayartquilts

How to Create Texture in Art Quilts

Under the Shady Tree detail 2

      Creating Texture in Art

Techniques for creating texture on a flat piece objects are subtle.  In other posts, I addressed other aspects of my mantra, Color!Texture!Movement! Moreover, adding color or movement creates a bolder statement. Above all,color impacts the viewer first and then movement next. But texture may even go unnoticed. However, now I will share my ideas for creating texture in my art quilts.

Tucks Create Texture

For instance, tucks are  small seams sewn on the edge of a fold. Yet, a series of 3-5 tucks create texture. For example, in Upwelling they represent the layers of earth movement. Furthermore,this technique is also helpful  to reduce the size of a piece of fabric by just a small amount.

green and teal art quilt with a pop of magenta
Upwelling, 30″ x 34″ Tucks run the width of several pieces to create texture.

Naturally Thick Fabrics

On the other hand,corduroy or other thick fabrics add texture by their nature. Look for fabrics that naturally have an interesting texture like dupioni silk. Unfortunately, these fabrics are often challenging to work with. Most importantly,develop your skills so that you will be able to work with them more easily.

Couching Decorative Threads

In addition,couching (zigzaging)different threads on fabric adds texture. First,I couch threads on long strips. Then I cut the pieces apart to use as fabric. In addition,this is a good way to utilize small pieces of yarn or decorative threads. At the same time,use the same color of thread to emphasize the line aspect of art. in this way,the focus will be on the color of the yarn not the color of stitching thread.

abstract art quilt in golds and light browns,Desert Sands, 16" x 21"  2015
Desert Sands, 16″ x 21″ 2015

Three Dimensional Objects

Furthermore,add texture with 3D objects. In addition,artistic people may create their own 3D object using fibers. Here I included two fabric figures that I had previously made. Similarly,on the male figure, I added a serape  for the Mexican theme. Likewise,embroidery thread hair,jewelry and lace completed the female’s figure.Finally,I added found plastic objects.

a Mexican inspired 3D art quilt
El Senor y La Senora Win Loteria

True Confessions Time

Ultimately,sometimes I am motivated by just using up materials. What items can I add to my art to finish it up? As a result, this random technique led me to a positive ending. I had about  8 designer samples  of short threads in different colors wrapped together. Spontaneously I decided to add them to the foot  of a tree. Don’t they look like grass? Boy! did this work!

a tree with a fence,fabric art,
Under the Shady Tree, 37" x 25" 2019
Under the Shady Tree, 37″ x 25″ 2019
decorative threads are used to look like plants growing at the base of the tree
Under the Shady Tree detail 2

Start with Fiber

Fun With Fiber 6, Fiber container holds southwestern fabrics, burlap background
Fun With Fiber 6

Start with fiber. Here I used a redirected folded fiber piece. I added a found Mexican(Aztec inspired) clay head and redirected fabrics. Then I attached it to a highly textured piece of burlap.

In conclusion, the techniques to add texture include tucks, thicker fabrics, couching decorative threads, and adding three dimensional objects. There must be other ways to add texture.
Do you know of any? Please respond with your suggestions. I am open to new ideas.

These articles  may also be of interest to you.

https://annbaldwinmayartquilts.com/2020/04/an-abstract-art-quilt-sunset-through-the-forest/
https://annbaldwinmayartquilts.com/2017/06/couching-threads-and-creating-fabri/

https://annbaldwinmayartquilts.com/2019/01/couching-zigzag-…-to-art-quilts-2/

https://www.etsy.com/shop/annbmayartquilts/

How to Use Redirected Fabric in Art Quilts

Kelp Dwellers 25″ x 25″ A piece of multicolored blue sheer fabric is a perfect background for this underwater fantasy.

Use Redirected  Fabric in Art Quilts

Redirecting materials inspire.


Use redirected fabric in art quilts to design something new  and inspire yourself to create. I find unique fabrics not like those sold in a regular quilt store among redirected materials.

Discontinued fabric from a decorator’s studio

A sample of linen fabric from a decorator’s studio  becomes the main design element with the addition of zigzagged or couched yarn. The colors; black, white,, and grey attracted me before I saw that this linen actually had greyhound dogs printed on it. My fondness for dogs aside, I didn’t want the dogs to stand out. I  accomplished this by rotating the fabric and couching yarn to it. Next, I cut the fabric into twigs and branches to suggest tree tops. Then, I placed the branches on a sky blue indigo fabric background to complete the art quilt.

Friends’ Suggestions

Although dyeing fabric is a great way to redirect materials, it is a bit too messy for my situation. But many of my fabric friends have done it.  The sheet that the dyed fabrics are wrapped  in to carry home often is colored in an interesting way . Thanks to that warning, I was prepared when I recently took an indigo dyeing workshop. The background fabric for the sky was indeed the bedsheet  that had used to carry my other dyed pieces home.

The Process-


First,I choose the fabric. I liked the way the curved lines of the dogs’s backs created movement on the fabric.

grey and black dogs, Use Redirected Fabric in Art Quilts
Greyhounds on linen

Next,I choose the yarn colors that I wanted to use, grey, green, and black yarn. I couched the yarns with matching threads so that the sewing threads wouldn’t stand out.

black grey and white fabric with green and black yarn ,Use Redirected Fabric in Art Quilts
Black, grey, and white fabric with green and black yarn couched yarn

Next,I continued adding  yarn curving it as I zigzagged(couched) it onto the linen.

More beige, grey, black and white yarn couched onto the fabric

Then,with more yarn, it is more difficult to identify the dogs.

Use Redirected Fabric in Art Quilts
The dogs disappear.

Continuing,I kept adding more yarn and zigzagging it down. For thicker lines, I wrapped 3 pieces of yarn together.

Use Redirected Fabric in Art Quilts
I add more lines of yarn by zigzagging them with matching thread.
Different view of the fabric with threads couched

Ready to cut the Fabric into Branches

Finally, with this fabric, I cut out the tree branches,twigs and sticks. I put the backing fabric flat on the table. Then I added the batting on top.  Then I added indigo dyed fabric for the background. Next, I basted them with a touch of glue. I assembled the tree on top and basted  it.

Use Redirected Fabric in Art Quilts
black and white branches on an indigo died background

Lastly,I covered the finished top with tulle and free motion quilted the layers together. I finished the edges by adding a 2″ facing folding it to the back and hand stitching it. Finally, I sew a fabric sleeve or tube   onto the top back for hanging with a dowel and fishing line.

You may be interested in this previous blog post as well.
https://annbaldwinmayartquilts.com/zig-zagging-yarn-to-create-fabric/

https://annbaldwinmayartquilts.com/2020/01/creating-movement-in-abstract-art-quilts/

https://annbaldwinmayartquilts.com/2020/03/using-discontinued-fabrics/

The completed piece of  art  is totally  made from redirected materials; linen and backing material from the San Francisco Design Center, redirected yarn from my sister-in-law, redirected tulle from a wedding, and redirected background indigo fabric from a bedsheet. My heart’s desire is complete;making beautiful art from repurposed materials.

https://www.etsy.com/shop/annbmayartquilts/

How One Fabric Inspired Me

Spring Break, 32" x32", $695.

Inspiration from One Fabric

This work in progress shows the steps I take to create this abstract contemporary art quilt. I draw inspiration from one fabric.

Color! Movement! Texture!

Color! Movement! Texture! are my main goals for my abstract art quilts. Color is where I begin. What colors do I want to work with? I found a piece of linen at Fabmo, a nonprofit that redirects materials from the San Francisco Design Center. I really liked the variety of colors and movement in this one piece. This fabric became my inspiration to find other fabrics and textures with the same colors for my abstract piece.

Inspiration from One Fabric

Oddly enough, several years ago four quilter friends and I  were having trouble choosing colors for a donation quilt we wanted to create together. One friend suggested that we find a fabric and choose the colors from that fabric. At the time I couldn’t quite wrap my head around what she was saying. However, when I saw this multicolored linen, I immediately understood what she had been trying to have us do. Sometimes it takes times for inspiration to happen.

https://annbaldwinmayartquilts.com/2018/11/mistakes-that-i-have-not-regretted/

Inspiration from One Fabric
1. Inspiration from one piece of commercially producted fabric

Photo 1 Choosing the Fabric

First I choose the fabric I want to work with.  This one piece has so many different colors in it. Those are the colors that I want to work with. This is  when the fun begins. I go through my fabrics to find additional fabrics. I look for shades that are lighter and darker.At this step, I don’t reject much.

Photo 2

I chose these fabric from the stash that I had. Also I found decorative threads and yarns to add to some of  fabrics for interest.

Inspiration from one fabric
2.  Here are the fabrics I chose from my stash.

photo 3 Inspiration from One Fabric

I place small pieces of fabric on my design wall. I move them around before sewing them together. Then I start to sew smaller  pieces together. I make sure that colors, textures and similar pieces are equally balanced around the piece. Does your eye have a place to rest? Are there too many colors in one area? Time to adjust before the whole piece is sewn together.

3. Spring Break

Photo 4 and photo 5

Here is a detail of the smaller pieces already sewn together.

4. A detail of the pieces sewn together
Inspiration from One Fabric
5. Another detail of the pieces sewn together

photo 6

6. Another detail of the pieces sewn together

photo 7

Inspiration from One Fabric
7. Here is the finished quilt, Spring Break.

Inspiration from one fabric helped me create this abstract art quilt. Hopefully, this step by step explanation will inspire you as well.

For more information on couching threads refer to my previous post.

https://annbaldwinmayartquilts.com/2017/06/couching-threads…d-creating-fabri/

https://annbaldwinmayartquilts.com/2020/07/using-fabrics-saved-for-a-long-time/

https://annbaldwinmayartquilts.com/2017/10/step-by-step-instructions/

https://www.etsy.com/shop/annbmayartquilts/

<1001centerstreetsantacruzca>