Birds fill our world with color, sound and movement. One of my favorite places to be is outside, the natural habital for birds.True confessions time-Drawing is not one of my best skills. However,I can copy an outline of a bird. So that is how I often incorporate birds into my art quilts. At this point in my life, I am working with my strengths.
Big Brown Owl,14 ” x 15″ 36cm x 38cm
Shelter in Place Art
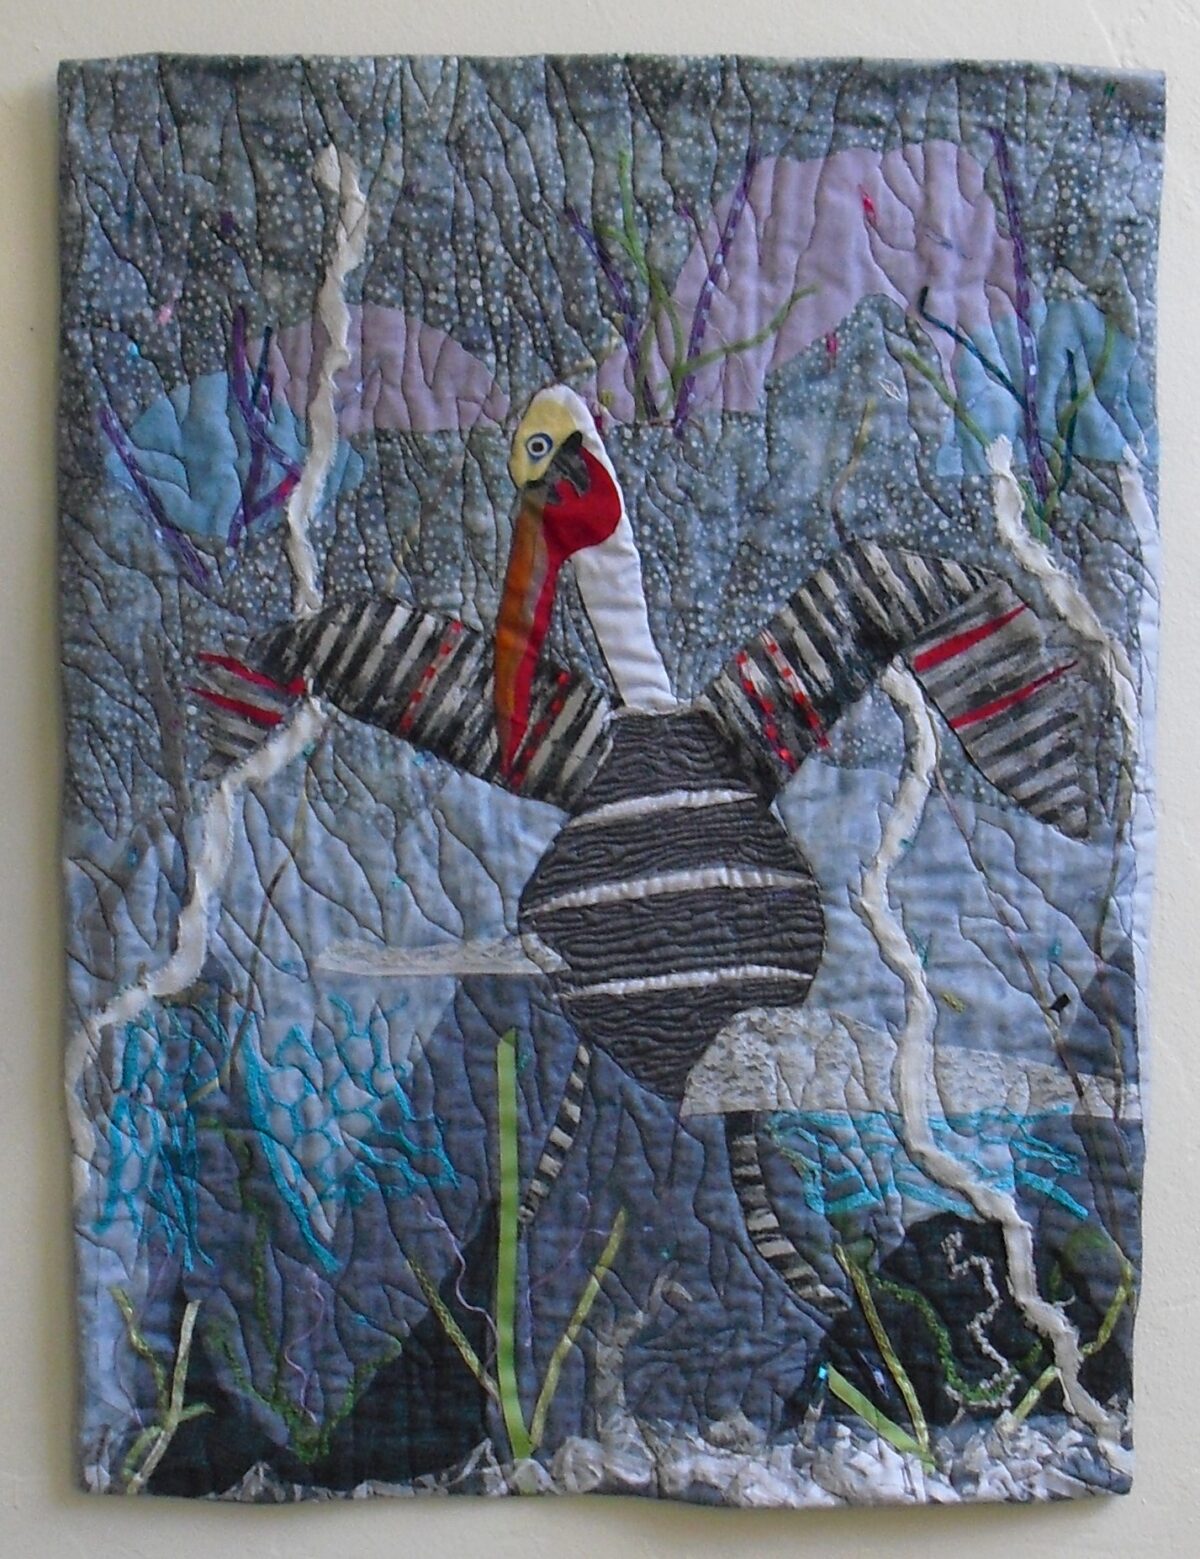
Westlake Coot, Big Brown Owl and Westside Egret were created during the first Shelter in Place. I only had limited materials with me,a large bag with small squares. Created the background first, before I considered what would do on the top. Fabric is my first motivation. How will the fabrics play together? Many times the subject matter, comes later. What subject would work with this background? Birds against a sky was my first thought. Size and scale required a smaller scene. Why do a whole body of an egret when a neck supplies the viewer with enough information?
Westlake Coot, 14″ x 15″, 36cm x 38cm $120.Westside Egret, 15″ x 16″ 38cm x 40cmNight Migration,20″ x 24″ 51cm x 61cm
Never miss an opportunity to add texture.
A bird’s habitat is full of texture, trees, grasses and underbrush. Threads and found materials lend themselves well to creating an impressionistic view of an avian’s favorite place to be.
Snowy Egret,34″ x 24″ 86 cm x 61cm
Break Your Own Rules
Pelican in the Mist and Nesting Pelican break my rule for just doing bird outlines. Looking at the light and dark stripes of redirected piece of fabric reminded me of feathers. I cut the fabric and used the same fabric to make the wings,legs and the body of a pelican. An artist never knows where inspiration will come from. Take a chance.Sometimes things just work.
Pelican in the Mist,25″ x 23″ 64cm x 66cm
Water Fowl and Coastal Birds
Inspiration often comes from one’s locale. I live on the Central Coast of California. The second largest wetlands in the state, Elkhorn Slough is not far away. Westlake Park with a spring fed pond is adjacent to the local elementary school.
Staying close to home is what we all did this year. Be inspired by where you are.
In this article you will learn about the steps to create an abstract art quilt.
Introduction
Making abstract art quilts touch my soul. The use and cost of redirected upscale fabrics motivate me. I know that am doing something good for the planet. Choosing colors and textures to piece together my art quilts makes my heart sing. Scribble Quilting adds movement to the piece.
The genre of art quilting is a newer art form. I share my process with you by explaining how I create an abstract piece of art. There are many other ways that artists make art quilts. Fusing fabrics, painting on fabrics, dyeing fabrics to use are just a few techniques. The website of international art quilters organization, SAQA(Studio Art Quilt Associates) is full of resources for those who are interested in learning more. Saqa.com Many times I look at quilts and ask myself how did they do that? I consider myself an advanced quilter. However, variations abound. The sky is the limit.
Topics Covered:
Use of a Design Wall
Where to Find Inspiration
Choosing Materials
Creating Details
Thinking ahead towards Quilting
Beginning Piecing
Sewing the Top Together
Quilting the Top
Use of a Design Wall
A design wall is essential for this type of art project. One wall in my studio is covered with a large white piece of flannel fabric. The pieces of fabric adhere to the flannel. I begin by randomly placing pieces of fabric on my design wall. Then I move them around to see where I want them to be. Sometimes I haven’t settled on where I want them to be until I start sewing the pieces together. Once sewing begins, pinning the pieces to the flannel may be necessary to help them adhere to the flannel as the weight of the piece increases. There are other possible types of design wall that my better suit your needs. Maybe you need a portable setup or other type of special need. I prefer to keep things on the simple side. A large flannel piece of fabric works for me.
Where to find Inspiration
Inspiration for colors or designs can come from anywhere. Many artists keep a notebook to write down or sketch interesting things that they see in their daily life or travels. Inspiration often come from nature. Colors of the desert, a bird or the color of the sky at sunset or after a storm can inspire me. Actually, inspiration can come from anywhere and anything, a building a floor, a pet. It is the spark that catches the artist’s attention. The finished art project does not necessarily match something at all. Guessing an artist’s inspiration is not easy especially for an abstract piece. The point is to be inspired to create.
Splendid Fairy Wren
A friend who loves birds posted a photo of an Australian fairy wren. The blues and purples were incredible. I ended up making two abstract art quilts using those colors.
Splendid Fairy Wren, abstract art quilt,30″h x 35″wAmerican Democracy,2019, a black and blue abstract art quilt,28″h x 27″w
Inspiration can come in the strangest of places. Once scraps of fabric I had randomly tossed in a pile caught my attention. The lime green, white and grey worked well together. I decided that I had to use them for a future project. Here is the subsequent quilt I made using this modern color palette inspired by a random pile of fabrics.
Because art quilts don’t need to be washed, a variety of textures and materials can be used. I started sewing clothes in junior high and high school. I would choose colors that would go well with my skin and hair tones. When I started making bed quilts, the focus was on the design on the fabric that would go with a room décor. One hundred percent cotton is necessary for ease of washing of bed quilts. Art quilts expanded my world. A variety of fabrics and textures opened up. I freed myself from the bonds of what matched a room or looked good on me. Following patterns went out the window. True Liberation !!
Consider the Style
Sometimes I begin with a piece of fabric or material that I would like to use. Often it is one that I have had for a while that I think I should use up. I consider the style of the fabric, is it a thick, rustic material or a shiny,synthetic fabric? What would it bring to the piece? Does it fit the mood that I am creating? Fabrics with colors that might not complement the piece have been eliminated because their style doesn’t match the intented style outcome. These are subtle decisions that the artist makes.
The Gathering of Materials
Generally I gather my materials without any idea of what I will use them for. If I am honest with myself, I think this comes from my being a bit overwhelmed from seeing so much fabric in a fabric store. I have to have an well defined idea of what I want or need before I go into a store. Otherwise, it is difficult for me to make a choice. Matching colors or styles is difficult without actual items in front of me. It feels easier for me to decide if I like something or not in the moment. At a later date, I can see how the material goes with other items that I have. Maybe this is part of being a visual learner.
FABMO and Other Places
I obtain my fabrics mostly from a nonprofit, FABMO.org that obtains fabric and materials from the San Francisco Design Center. I find high end new decorator samples and more. Furthermore, I get fabric from my local guild’s Bargain Garden, flea market. I learned a long time ago that shades of colors go in and out of fashion. Forest green is a family favorite. But if it is out of style it is impossible to buy. A quilter’s stash or collection of fabrics reduces the need to purchase a particular fabric in the middle of a project.
Creating Details
In the past few years, I have begun to add more three dimensional details to my work. Quite a few years ago, at the Pacific International Quilt Festival, I saw a quilt that had a big pile of yarn sewn on the top. In my opinion, it was a mess. I didn’t like the effect. However, it did inspire me to add yarn or decorative threads to my art quilts. My choice is decorative threads that would lie flat. I began to couch(zigzag) decorative threads to create contrasting details for my art quilts. Surprisingly, the decorative threads has since become one of my favorite techniques.
Using my chosen colors, I think about the items that I want to make to add texture or interest. Sometimes a particular found object, like a piece of jewelry guides my decision to incorporate it into the piece. Which techniques do I have in my toolbox? I can couch yarn to create straight lines, parallel lines, curvy lines. I can make tucks to add texture. What materials do I have that would work? What does the detail bring to the piece? Sometimes it is necessary to save a detail for another project for some reason. The style or effect just isn’t what I want for this art quilt that I am working on.
Thinking ahead towards Quilting
My usual method of creating an art quilt is to start without much consideration of the next steps like how I will quilt the piece. However,sometimes it is necessary to consider the whole process and the order that I need to follow to complete the art. When would it be best to add the detail? Can I quilt over it? Or will I need to wait until after quilting is completed to add hand sew it on? With ATLAS in Rose, I wanted to highlight the oval pink and white beaded necklace in the middle of the quilt. Yet, I would have to sew it on after the quilting was completed. Quilting over beads wrecks the beads and could possibly damage needles and my machine.
work on design wall,ATLAS in RoseATLAS in Rose, 32″ x 32″ finished art quilt
Serendipity Happens
The patterns of stripes and circles happened rather serendipitously. Some quilters would say, I wanted to make a stripes and circle quilt. That is not the way I usually work. Yet, as I looked at my black and white fabrics, I saw the oversized circles contrasted well with the stripes and checked fabric. The stripes and circles created the movement I wanted. I mirrored them by couching decorative threads to create my own form of stripes. Hand sewn repurposed white buttons added more circles to the beaded necklace, front and center upon completion.
Back to the Design Wall
The work that happens on the design wall is in many ways is the most important part of the project. My main purpose is to make sure that the colors and fabric pieces are well balanced on the wall. It is not too late to eliminate items that would work better in another piece. Often I begin by placing the most eye catching pieces on the design wall first. They need to be placed in various spots across the piece and not all in one area. Balance is a crucial part. Then I continue with other important standouts. Only then will I continue adding with other pieces of fabric. I make sure there are places to rest one’s eyes. Plain fabric balances out wild details.
Sewing the Top Together
I begin sewing once the main pieces are in place. I make sure that pieces of fabric are larger than I expect the finished piece to be. One can always cut away fabric but it is harder to add fabric. That said, one thing I love about creating abstract art quilts is that there is less matching of seams and more flexibility if you need to add a different fabric than in traditional quilting.
Start Small
In general, I start by sewing smaller pieces together. I will sew together several pieces from one area. Then I will do the same in another part of the quilt. I have learned the hard way that I should not completely sew all of the pieces in one area together. More flexibility for fabric additions is allowed by rotating the spots I sew together. Then I wait until the very end to sew all of the pieces together. In that way if I need to add more fabric to a spot, it is easy. I prefer to not rip out seams if at all necessary. This is another advantage to creating art quilts. If something doesn’t work or I want to change it, I just cut it off instead of spending time ripping out seams.
Foggy Skyline,inspired by the colors of the sky after a rain storm.16″ x 16″
New Eyes
Critically seeing eyes are necessary. I mean critical in the sense of seeing what works well and what doesn’t work well. Only the artist can make that decision. Our eyes can miss what is directly in front of us. Sometimes taking a break or even returning the following day is what we need to see clearly. In other words, so that you will look at a piece with fresh eyes. This is so important. After some time has passed, I often see immediately what needs to be changed to improve the art quilt.
The design wall also allows the artist to step back at look at a piece from a distance. Close up views and distant views differ. Ideally, a piece will work for both distances although probably in different ways.
Other Considerations
When I begin to sew the pieces together, I want as much flexibility to change their places as possible. Therefore, I begin by sewing small pieces together in one area, the upper right hand side. Then I do the same in another spot, say the lower right hand side. This allows me to move pieces or add pieces if I need to. Of course, when sewing pieces together the project becomes smaller. If a finished piece needs to be a particular size, mark the design wall with pins or yarn to help you be aware of the desired size.
Focal point design details should probably not be placed directly on the edge. I learned the hard way that when they may be trimmed off at the end when squaring up the finished quilt. Another thing I try to avoid is having heavier fabrics directly on the edge. I like to finish my quilts with a facing sewn to the front and turned to the back to be hand sewn down. Thicker fabrics made the turning more difficult. Even sheet fabric with a high thread count is hard on the fingers when hand sewing.
green yellow bits on design wall, a work in progressfinished top Sunset Through Forest 34″ x 34″ after quilting
When the top is finished. It is time to make the quilt sandwich. The quilt sandwich is made up of the three layers, the top, the batting and the back fabric. They need to be laid flat and taut and pinned or basted together.
Finishing with Quilting
In general,I don’t think about which technique I will use to quilt a piece until the top is finished. Sometimes I regret this lack of planning. For me, the quilting must add movement. I have to decide how much more visual action this quilt needs. Is there a lot of movement already in the piece? Will quilting add more interest? Maybe a less visible stitch in the ditch technique is what the piece needs. Only the artist can make these personal decisions.
I have settled on three styles of quilting that work for me. Stitch in the Ditch is quilting inside seam lines. Scribble quilting that I named is quilting by moving the quilt line from one side of the piece to the other side. Doing this repeatedly creates wavy lines that may cross over one another. I use the free motion quilting technique to quilt my fabric landscape or seascape collages. Those with access to a computerized long art have lots of other options to choose from.
In Conclusion
The genre of art quilting is a newer art form. I share my process with you as a way of explaining how I create an abstract piece of art. This article advances the understanding of the decisions that need to be made while creating an abstract art quilt. Hopefully, inspiration for the art quilter follows or the collector will gain some perspective on how this artist works.
Suggestions for Newer Art Quilters
If you are looking to advance your art quilt techniques, these are my suggestions.
Take a class in some technique that excites you.
Join a guild or group to learn from.
Visit quilt shows and museums to view art with a critical eye.
Practice, practice, practice your skills.
In Responce
Gentle Readers, since this post, How to Create an Abstract Art Quilt was published it is by far the most read of all of my posts. Just wondering if you found this info helpful or not so much.
Read More.
You may find out more about how I create texture and movement in my abstract art quilts at these links.
Recently someone mentioned to me at my studio that she had some fabric that she had had for a long time. She suggested that she should get rid of it solely for the reason that she hadn’t used it. While we all have our own rules of engagement, that is not one of mine. If I like a fabric I will keep it until I can find a good project for it. In this posting I share examples of using fabrics saved for a long time.
Using Saved Fabrics
As soon that visitor commented on her long saved fabrics, I lead her to see this recently completed piece. I explained that I had had the fabric with wavy yellow, green and turquoise lines for a long time. I could not remember where or when I had gotten it.
Over the years I would try to see if it fit in other quilts. But each time I put it back on the shelf. Often this whimsical fabric didn’t fit the style or mood of the piece or maybe the color wasn’t just right. Here, however, everything works;the colors, the movement, the whimsical style.
Sunset Through the Forest random piecesSunset Through the Forest, an art quil
ATLAS in Rose
I recently completed the abstract art quilt, ATLAS in Rose. The rose, reddish rose and gold fabric is a high quality fabric that I had had for a long time. Yet I hadn’t used it. The red and rose colors would not play well with other colors. In spite of that, I kept it. Luckily, I did. Because it went perfectly with this black and white scientifically inspired art quilt. It added color and just the right amount of movement to the art quilt.
rose and gold fabricATLAS in Rose , finished art quilt
Fabric with Small Boxes
The following red, yellow and green fabric with small boxes is another piece that I liked. I didn’t know how I would use it. But I had to have it. The colors and movement spoke to me. I ended up for saving it for many years. In Cactus Dreams, the colors fit. The geometric boxes mirror the checks in the Guatemalan and in the checkerboard fabrics.
fabric with green,yellow,red and boxesCactus Dreams,detail,abstract art quiltCactus Dreams,abstract art quilt
In Conclusion
I finished these three art quilts in the past year. Without realizing it, I probably mentioned to the visitor that I had used some saved fabric. Thankfully, I had kept the fabric. Because they worked perfectly!
Wetlands Wanderer,an egret in the wetlands Above all,notice the decorative threads at the bottom of the quilt. 28″ x 27″
Add Decorative Threads for Texture
Above all,decorative threads add texture to art quilts. Furthermore,texture is part of my mantra, Color! Texture! and Movement! Therefore, I take creating, finding and using texture very seriously. Above all for me, it is fun. I get excited about repurposing decorative ribbons and threads in my art quilts. I would like to take this opportunity to share some ideas.
My artistic path evolved about the same time I found Fabmo fabric and more https://www.fabmo.org/. Fabmo is a nonprofit that rescues fabric samples and materials from designers to keeping them out of the landfill. In addition,they make them available to the public. The charming decorative three dimensional details call to me. However, I discovered these threads quite by accident. For example,I accidently took some details apart. Most importantly, I discovered lovely threads and ribbons to add texture to my art quilts.
decorative detailsRibbons from disassembled details
Take Things Apart to find Decorative Threads for Texture
These small details add texture, fiber and interest to art quilts. However,some of the threads are quite long when disassembled. Lots of room for creativity. Make a small detail by twisting and folding longer threads. Decorative threads entered my art pieces. In addition, I use these decorative details to add 3D texture to both my abstract and nature inspired art quilts.
Cinnamon Threads, detail from an abstract art quilt detail of 23″ x 20″ art quilt
How Would You Use These Decorative Threads?
Red detailBeige detail and disassembled red detail
Some Examples of What I Did
In addition,here are a couple of photos of works in progress highlighting deconstructed fibers.
An egret, a work in progressfibers in a work in progress,
Helpful Hints
Not in the San Francisco Bay area with access to FABMO in Sunnyvale? Find interior decorators in your area. They will be thrilled to pass on their “outdated” details. Moreover,beautiful yarns can be found at garage sales. Leftover pieces of interesting yarns may also be found at yard sales or Goodwill. Decorative threads are available for purchase. Of course, interesting decorative threads are often sold at quilt shows. Does your local quilt guild have a flea market? Lots of good finds there.
In Conclusion
In conclusion, I hope that you will be inspired to try and incorporate more decorative threads into your art quilts. Therefore, please share your successes and advice. Above all, try something new.
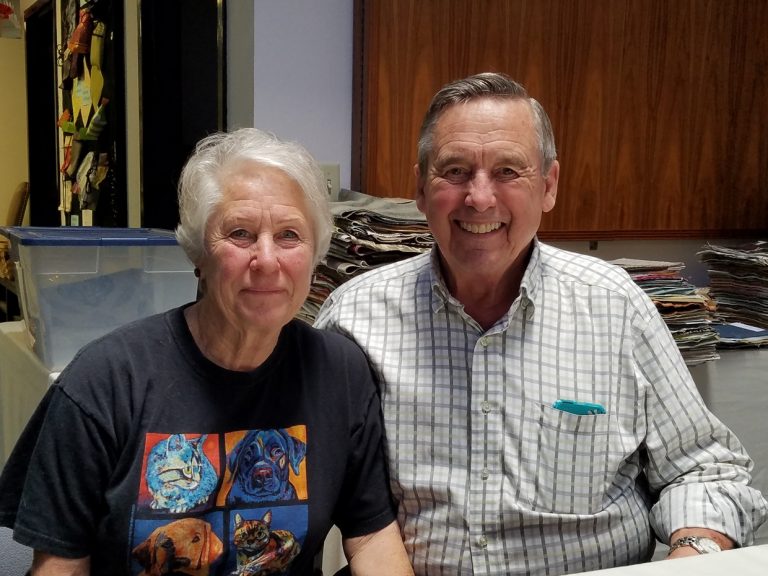
by Holly Welstein, FabMo’s Board Chairwoman (edited for space)
Holly Welstein, Hannah and Jonathan Cranch welcome visitors.
A Volunteer’s Path to Chairman- How did I start down a volunteer’s path to chairman?
Recently I attended the annual Volunteer Appreciation BBQ. It went along with FabMo’s 11th official birthday! It was a great chance to socialize with a wonderful group of people on a special occasion. Yet my earliest contact with FabMo happened over 15 years ago. It was way before the nonprofit was official.
Some Musings of an Accidental Board Chair
My first experience was responding to a Freecycle post for promising free designer material. I ended up sitting on Hannah & Jonathan’s living room floor. They encouraged me to dump out textile treasures from large black plastic bags.The bags were piled up on their sofa. I could take what I liked. Everything went back in the bags, when I was done.But oh, be careful and look out for staples.
Needless to say, I was hooked on a volunteer’s path to chairman.
Hannah and Jonathan Cranch, founders of FABMO
Slowly, the FabMo enterprise grew. My involvement slowly grew along with it. I helped with simple things like setting up tables, sorting fabric and chatting with newcomers. That led to helping plan our first Maker Faire participation. Later I headed a Boutique committee for six years. That helped this volunteer’s path to chairmanThen I received an invitation to join the Board. So for the past three years I serviced as the Board Chair. Whew!!! I really wanted to do was sew purses with some beautiful fabric!
What I know at this point is that the work we do at FabMo and only happens because individuals step up to do it. So I send a big thank you to every volunteer. What I also know is that much of the behind the scenes work is mysterious to many of you.
How the Board Works
The FabMo Board of Directors invites you to consider whether volunteer service on the Board or a Committee is for you. Could your future include a volunteer’s path to chairman?
From chairing the Board meetings to representing FabMo being on the Board has many interesting aspects.
FabMo is an all volunteer organization. There are no paid staff or Executive Director. That means the FabMo Board is a working board that acts as an Executive Director when needed. Te board provides organizational leadership and vision and makes policy. We are responsible for financial oversight and staying true to its mission. We want the group to be financially healthy and stable. So that we can continue to do our important work. That is to divert valuable materials away from the landfill and into the hands of people who will use them.
We meet every 5-6 weeks.At times there is a special extra meetings . In the past year, we have purchased a van. We created a protocol for the van’s use. We adopted a policy for our social media presence.The board worked with the Treasurer to craft a budget. we began to write charters for our committees. A quarterly Committee Chairs meeting encourages communications within FabMo. Most of the work is overseen by committees but the Board has the final say. Could your future include a volunteer’s path to chairman?
In the Coming Year
This upcoming year the Board will be evaluating our current business and operating models to consider changes to support our mission. In particular, our rent continues to rise.It is crucial that we find new sources of revenue.We need to remain financially healthy going forward. Could your future include a volunteer’s path to chairman?
So who Serves on the FabMo Board of Directors?
Well in 2019, our 7 members are: Tina Baumgartner,Estelle Chalfin,Leslie Kern,Zita Macy,Michelle Redel,Ginger Silverman,Holly Welstein. Maybe in 2020, your name will be here!
I welcome the chance to chat with anyone interested in learning more. I can answer any questions you have. If you want to attend a Board meeting, please let me know. Warmly,Holly board@fabmo.org July 29, 2019
It has been great to be part of this all volunteer organization for about 10 years. I source many of the materials there that I use in my art quilts. I feel strongly about their efforts. Ann Baldwin May, art quilter
Announcing my participation in the juried Juried Open Studios 2019. Sponsered by the Arts Council of Santa Cruz County. Saturday and Sunday, October 5-6 , October 19-20. Moreover,my venue is at the Santa Cruz Art Center, 1001 Center St. located in the Historic Downtown Santa Cruz. Above all, I fill the lobby with Color! Texture! Movement! from11 to 5 pm each weekend. In addition,free motion quilting and curved line piecing demonstrations take place throughout the day.
Lingering Fog, art quilt
County Wide Event
Similarly,artists from all over the county open up their studios for three weekends in October. As a result of so many artists residing in the county, the group is divided in half. One part participates on the first weekend of the month. The second part participates on the second weekend of the month. After that,any artist can open their studios for the third weekend called the encore weekend.
Beach Umbrellas,an abstract art quilt
This will be my fourth year of participation in the Open Studios Tour featuring over 300 artists. Although my studio is small for Open Studios and First Fridays, I hang my art quilts in the lobby of Santa Cruz Art Center. I fill the artium or lobby with Color! Texture and Movement! There is room for from 10-20 large art quilts.
First of all,I prepared this Pechakucha laser talk in anticipation of presenting it at an art quilt meeting. The Pechakucha,a Japanese word for chitchat. To clarify it is a format that gives a speaker a limited amount of time to discuss a topic. For example, I would have 4 minutes to present a limited number of photos to on one topic. At the same time,numerous presenters of a variety of topics are able to share. That is to say that I prepared to discuss my passion for making art quilts from redirected materials. Moreover,FABMO, a local nonprofit is where I get my materials from. http://fabmo.org
My Art Quilt World
To begin,I do nature art quilts, abstracts and Mexican inspired fabric collages. Furthermore, I am very passionate about using redirected materials and threads to keep them out of the landfill. My inspiration comes from the materials I find at FABMO . I have been a volunteer there for many years. To clarify,I brought photos from three pieces that I completed recently to present at this Pechakucha laser talk. So I could share the process with you.
Spring Break, an art quilt
Paisley pattern on linen
First I choose the fabric, Here is the material I started with. I liked the variety of color and decided to use the colors as a basis of an abstract art quilt.
Step 1 Beginning to place pieces on the design wall randomly
Next, I couched decorative threads and yarns with the idea of making interesting details. Then I cut up the strips randomly to use as fabric. Following that trying out other fabrics on the design wall.You can see several examples of redirected couched ribbon and yarn on different colored fabric.
Finally,the completed piece using scribble quilting. Scribble quilting moves the quilt side to side while quilting to create flowing lines of sewing.
Skyward, an art quilt
GreyhoundsGreyhounds in another direction
Originally, I chose this FABMO fabric for the movement and stark lines. But when choosing the fabric,I didn’t even noticed the dogs. They were not of interest for me. First,I began to couch green and black threads.
Here, I zigzagged a variety of colors.
Then,I continued couching other colored threads. Some of these threads were light blue but read more like grey against the light grey part of the fabric.
Can you believe that the tree is made from the same material?
Finally, I was ready to use the fabric to create tree branches. Using the fabric layering technique,I laid the back fabric down on the table.Of course the back is also another piece of material from FABMO. I covered it with batting and I laid an indigo dyed piece on top for the sky background.
The finished art quilt just showed the tree tops.
The finished piece,Skyward,succeeds in its interplay of light and dark on the branches. On the other hand,one doesn’t notice the dogs at all.
Under the Shady Tree, an art quilt
The finished art quilt, Under the Shady Tree made from redirected materials.
Next is the finished piece of under the Shady Tree. Aficionados of redirected materials may recognize the fence fabric. To clarify, I used the fabric layering technique.
Unusual materials can be used in unique ways.
Furthermore,notice several leaves with bluish and gold colors. To be clear,I used a multicolored synthetic knit that kept rolling up in other projects. I couched it to help it lay flat. Then I cut it into leaves.
a different view
Last but not least,Shiny sheer fabrics add interest.
Take apart details and see what interesting fibers one can find.
Creating Texture
Moreover,texture is created by taking apart fabric details. They can be used as bunches of threads to add interest. One can also find decorative threads,ribbon and small cording . Lastly, I laid it on the foreground , covered it with tulle netting and free motioned quilted the three layers together.
To sum up,I am all about color, texture, and movement which I create using redirected materials. Thank you for letting me share some of my recent works with you.
Kelp Dwellers 25″ x 25″ A piece of multicolored blue sheer fabric is a perfect background for this underwater fantasy.
Use Redirected Fabric in Art Quilts
Redirecting materials inspire.
Use redirected fabric in art quilts to design something new and inspire yourself to create. I find unique fabrics not like those sold in a regular quilt store among redirected materials.
Discontinued fabric from a decorator’s studio
A sample of linen fabric from a decorator’s studio becomes the main design element with the addition of zigzagged or couched yarn. The colors; black, white,, and grey attracted me before I saw that this linen actually had greyhound dogs printed on it. My fondness for dogs aside, I didn’t want the dogs to stand out. I accomplished this by rotating the fabric and couching yarn to it. Next, I cut the fabric into twigs and branches to suggest tree tops. Then, I placed the branches on a sky blue indigo fabric background to complete the art quilt.
Friends’ Suggestions
Although dyeing fabric is a great way to redirect materials, it is a bit too messy for my situation. But many of my fabric friends have done it. The sheet that the dyed fabrics are wrapped in to carry home often is colored in an interesting way . Thanks to that warning, I was prepared when I recently took an indigo dyeing workshop. The background fabric for the sky was indeed the bedsheet that had used to carry my other dyed pieces home.
The Process-
First,I choose the fabric. I liked the way the curved lines of the dogs’s backs created movement on the fabric.
Greyhounds on linen
Next,I choose the yarn colors that I wanted to use, grey, green, and black yarn. I couched the yarns with matching threads so that the sewing threads wouldn’t stand out.
Black, grey, and white fabric with green and black yarn couched yarn
Next,I continued adding yarn curving it as I zigzagged(couched) it onto the linen.
More beige, grey, black and white yarn couched onto the fabric
Then,with more yarn, it is more difficult to identify the dogs.
The dogs disappear.
Continuing,I kept adding more yarn and zigzagging it down. For thicker lines, I wrapped 3 pieces of yarn together.
I add more lines of yarn by zigzagging them with matching thread.Different view of the fabric with threads couched
Ready to cut the Fabric into Branches
Finally, with this fabric, I cut out the tree branches,twigs and sticks. I put the backing fabric flat on the table. Then I added the batting on top. Then I added indigo dyed fabric for the background. Next, I basted them with a touch of glue. I assembled the tree on top and basted it.
Lastly,I covered the finished top with tulle and free motion quilted the layers together. I finished the edges by adding a 2″ facing folding it to the back and hand stitching it. Finally, I sew a fabric sleeve or tube onto the top back for hanging with a dowel and fishing line.
The completed piece of art is totally made from redirected materials; linen and backing material from the San Francisco Design Center, redirected yarn from my sister-in-law, redirected tulle from a wedding, and redirected background indigo fabric from a bedsheet. My heart’s desire is complete;making beautiful art from repurposed materials.
A main motivation of mine besides making stunning art is to reuse materials. Pieces of yarn and decorative threads that some people may discard become unique design elements. I couch (zigzag) them on a strip of fabric, cut them and use as fabric. Yet, sometimes there are decorative threads that one just has to buy. There is one like that in this piece. The ribbon alternates rusty orange and green with 3D native inspired tied knots. Bring Your Bravery! Be Brave!
Choosing Colors- Be Brave!
Choose your color scheme. I recommend three to four colors. Sort hues from light to dark in the same shades. Be brave. Experiment with different colors on your design wall. Don’t be afraid to eliminate fabrics. Start with more material than you think you might need. Include one bright fabric that makes the piece pop.
Creating Details Bring Your Bravery! Be Brave!
Couch (zigzag) decorative threads on 5”wide strips of cotton. Try something new. Bring Your Bravery! Be Brave! Emphasize the art element of line by couching with thread that matches the yarn to make the sewing thread disappear. Double or triple the ply for a thicker line. Repeat four to six times using different colors and types of decorative threads. Couch the decorative threads fairly close together about 1/8-1/4 inch apart. Leave a 1” space on each side of the fabric strip. This gives you flexibility. You can always make it smaller.
Tucks add texture.
Bring Your Bravery! Be Brave! Tucks add texture. Fold a 12” length or longer strip of fabric wrong sides together to create a fold. Stitch 1/8” or 1/4” close to the fold edge. Choose your thread to blend into the fabric or to stand out as a design element. Make 3-5 tucks on the same strip of fabric. Remember to save room for the seam allowance on the sides. Press to lay flat. Cut up the strips into 4”- 8”pieces. Balance their placement on the design wall.
Temporarily Mark your Design Wall
Plan to make your finished artwork about 24”square. Mark with pins the approximate size of your finished piece on the design wall as a guideline. Remember when you are putting fabric on the design wall, the finished product will be smaller. Start with fabric pieces that are a bit larger.
Photo 2 Small strips are being sewn together.
Place the Pieces Randomly
So, you have assembled your own “fabric” with couched decorative threads and tucks. Now it is time to mix those fabrics with others on the design wall. Bravely put the pieces up randomly and start to move the pieces around to see what goes together. What fabrics jump out at you?
Photo 3 Almost all squared up.
Balance the Fabrics
Limit those to an odd number of them. Balance the different fabrics making sure that they are spread out evenly over the top. Beginners might choose to piece their top using straight lines up and down. Placing the pieces on a diagonal adds interest. A diagonal quilt will go past the guideline pins and be trimmed into a rectangular or square.
Show courage. Sew, cut and move fabric around the design wall. Keep cutting and sewing pieces together until it pleases you. The top doesn’t need to be totally finished to start to sew. Sew straight or curved line seams. Continue to sew pieces together into about 8” strips. Pin them to the design wall either in straight lines or on a diagonal. Allow time for this process. Trust yourself.
A “Painful” Time
This can be a “painful” time for an artist, if the piece isn’t coming together as one wishes it would. I find that if I don’t like a part, it gets more interesting after I cut it up and rearrange the pieces. Leave items on the design wall and return later to look at the piece with fresh eyes. Complete sewing the top when you are happy with it. Prepare the quilt sandwich and quilt. Scribble Quilting is fun and adds movement to your piece. Whichever way you quilt your piece, you will have an artful abstract art quilt as testament to your bravery.
About the Author
Ann Baldwin May lives in Santa Cruz, California. In 2012, she retired after teaching elementary school for 36 years. She has won several awards for her work. She participates in the juried Santa Cruz County Open Studios Art Tour from her studio in the Santa Cruz Art Center. May is a member of SAQA( Studio Art Quilter Associates). Contact her at baldwinmay49@yahoo.com or www.annbaldwinmayartquilts.com. Or visit her Etsy shop at annbmayartquilts.etsy.com
Directions for Curved Line Piecing-optional
Lay two pieces of 5” cotton squares on top of each other right sides up on the cutting mat. Cut a slightly curved line through both fabrics with a rotary cutter. There will be four pieces. The top of one fabric will fit the bottom of the other fabric like two puzzles pieces making the original square. Take those two pieces that fit together and sew right sides together with a ¼” seam. Only the part of the fabric going through the foot will line up to a ¼” seam due to the curve. Slightly adjust the top fabric as you move them both through the foot. Press open. This technique is very forgiving. You will be amazed at your curved line. Practice making curves of different widths.
Advice for Beginners
Let each person’s eye see the hues in their own way. Let go of controlling the way the colors mix together. The color of thread changes depending on the color of the fabric that it is sewn on. The color of the fabric is influenced by the color it is next to.
When I started making art quilts, I had a lot of experience sewing clothes and bed quilts. I would think of how a traditional quilter would do something and then I would choose to do it differently.
Consider expanding your stash to include a wider range of shades and hues.
Tips
It is imperative to be cautious with certain aspects of our lives, but cutting up fabric is not one of those times.
Create texture by including fabrics other than 100% cotton. While a variety of fabric adds interest, provide some solid fabrics as a needed resting spot for one’s eyes.
Include a bit of fabric that will pop. Shiny synthetics work well for this.
Supplies and Materials
Rotary blade, cutting matt, design wall(white flannel thumbtacked to the wall) sewing machine, batiks, found threads(decorative threads, yarns, rickrack, colored string, synthetic raffia), a variety of small pieces of cotton fabrics(fat quarter or smaller), fabrics of different textures (optional), thread, batting, cotton backing fabric, scissors, walking foot for quilting.
Exactly two years ago I came home with a small stash of beautiful upholstery fabric samples. Little did I know how quickly and profoundly these textiles would change my life! Today I want to tell the amazing story of FabMo, the non-profit organization where I acquired those samples. It is also the inspiring story of how two people can make a difference, its two co-founders, Hannah and Jonathan Cranch. Fabmo reuses fabric and materials.
Hannah and Jonathan CranchHolly Welstein, Hannah and Jonathan Cranch speak with visitors to FABMO
How It All Started for two people to make a difference
A couple of decades ago Hannah and Jonathan Cranch were ordinary people going about their own business. Hannah taught art in Palo Alto primary schools, while Jonathan was a general contractor. They occasionally enjoyed attending seasonal open houses at the Design Center in San Francisco, seeing what was new in the design world. They both enjoyed the refreshments, browsing the beautiful displays and chatting with the salespeople
You are Throwing What Away? Fabmo reuses fabric and materials.
One day, during one such visit, they saw a man toss a big trash bag into the dumpster. The bag tore open, spilling out a bunch of gorgeous fabrics. It turned out that in preparation for the open houses, the showrooms had to make room for newly released fabrics, which meant getting rid of all the discontinued textiles. These exquisite, expensive designer fabrics, which were displayed but never used, were thus headed for the landfill.
Fabmo reuses fabric and materials for an art teacher.
Hannah, as an art teacher, knew her fellow teachers would salivate over such a treasure, so she began the quest to save these resources. She visited showrooms and spoke with key people, asking for some fabrics, and they gradually agreed to give her some. Each time, she returned home with a bag or two full of lustrous samples, which she distributed to Palo Alto teachers.
As she gradually built relationships, the amount of material she acquired began to grow. Soon, she and Jonathan started supplying five school districts, and passed some fabrics on to the Children’s Theater, as well. Fabmo reuses fabric and materials.
When Things Got More Serious
Hannah later learned that someone named Steve was visiting the showrooms every Monday to collect discontinued fabric samples, which were then picked up by a charitable organization run by a group of nuns. One day the charity did not come by to pick up, and so showroom workers asked Hannah, who was fortuitously at the Design Center at that moment, whether she wanted the fabrics. She certainly did! As it turned out, the charity never came back, and Hannah began a weekly pickup from then on. With the sudden increase in quantity, the picture changed dramatically. However, Fabmo still reuses fabric and materials.
Selection at Johnathan and Hannah’s houseSelection at their home
At essentially the same time, in summer 2007, Palo Alto schools closed for the summer. Hannah and Jonathan were unable to distribute the growing amounts of fabrics they were collecting. They published notices on Freecycle, Craigslist and other online venues, and began compiling an email list of interested people. Soon after, they set up five tables in their living room, filled them up with materials, and invited these interested fabric-lovers to come over and pick whatever they wanted. Before long this became a recurring event.
Fabmo reuses fabric and materials at selection events.
Originally, Hannah and Jonathan distributed the materials they gathered. They were the ones deciding what resources to give each school/theater. Once they allowed people to come over to their house and pick on their own, however, they could no longer think of it as “distribution.” They decided to call these “selection events” instead, since patrons got to choose their own treasures.
Running out of Room at their house
At first, their living-room events lasted two days. As the amount of fabrics kept growing, they were extended to three. Soon, the living room wasn’t big enough for everything. Hannah and Jonathan set up yet more tables in their family room.
But the rescued samples kept accumulating. In no time they filled one spare bedroom, then another, until all the bedrooms in the house were full of textiles and other materials. Hannah and Jonathan began holding regular selection events, timing them to open up a guest room as needed.
Fabmo reuses fabric and materials with a growing mailing list.
Their email list, initially limited to about thirty people, kept growing. Before long, some one hundred and seventy people came by every month. Some were hesitant to enter a private house. Others, however, came regularly. Some of the latter offered to help pay for the gas for Hannah’s collection trips to SF, so Hannah and Jonathan put up a donation box to help finance their drives. Then someone offered to help take care of welcoming guests. One day, when Hannah, who was also co-owner of a catering business, was too busy with an event, Jonathan took that woman up on her offer. From then on the Cranches relied more and more on volunteers to help them with the many tasks of gathering, sorting and distributing. They started documenting who came to their house, and, in order to limit crowding, began setting appointments.
How FabMo Was Born
In 2009, after years of making fabrics available from their private house, Jonathan learned that their home insurance would not cover such large gatherings. Although the Cranches distributed everything for free, the insurance considered what they were doing as a business. So they found a small shared space in Palo Alto where they could hold Selection Events, but which had very little room for storage.
Six months later they moved to a bigger warehouse on Old Middlefield Road. Later they added another warehouse.
Selection at Old Middlefield Way
That same year FabMo was born as a public benefit corporation, and in 2010 was granted 501(c)(3) status. FabMo was now officially a non-profit organization! The name FabMo is short for Fabrics and More, as by then the Cranches rescued many different materials. In addition to fabrics, they also saved wallpapers, trims, tiles, leather, carpets and so on.
Another location at Bella Vista
Continual expansion
Since then, FabMo’s activities have continued to expand. Nine years ago, a regular attendee suggested creating an event for people to showcase items they created with FabMo materials, so as to inspire others. That’s how the Holiday Boutique came about. In 2015 FabMo moved into their current location in Mountain View. They regularly hold monthly three-day Selection Events, as well as 8-10 Special Sales a year. Most recently, FABMO has moved one town over to Sunnyvale, California.
In 2014 FabMo started holding regular events in Santa Cruz as well, with an active volunteer and consumer base there. They also hold Selection Events in Vallejo, as well as in different Bay Area Tech Shops. FabMo has a regular presence in at least four fairs every year (MakersFaire, San Mateo County Fair, and two Earth Day Fairs).
FabMo Now
These days, FabMo rescues more than 70 tons of materials every year from Design Centers in San Francisco and San Jose, and from other miscellaneous sources. They make these amazing resources available to creative souls all over the Bay Area and beyond. More than 8,500 people are signed up to their mailing list, with about 300 coming to collect treasures during each Selection Event. Hannah and Jonathan continue to be very involved with the organization relying on an active Board, a growing family of several hundred volunteers, and textile aficionados, who, like themselves, appreciate the creative and environmental impact of this amazing endeavor. People come from Hawaii, the Pacific Northwest, Michigan and beyond to attend, determining their own schedule based on FabMo’s.
FabMo’s dedication
To this day, FabMo distributes fabrics for a suggested donation. It trusts patrons to give what they can to help keep the project running. Costs of maintaining such a business in the Bay Area are sky-high, as are utilities and fuel. Teachers still receive many of the materials for free. FabMo only sells Special Sale materials, but even then for low prices.
serendippity
Hannah and Jonathan didn’t plan any of this. They simply couldn’t stand to see fabulous textiles thrown away and wasted, and before they knew it, FabMo had appeared. What started as a small project of love run by two individuals, turned into a collaborative effort of a creative, eco-friendly community, a family of sorts. But it still remains a not-for-profit project of love.
FabMo’s dedication continues to keep tons of precious resources out of the landfill. It also progressively builds an entire community of like-minded people who care about the environment. Likewise, it encourages the creativity of numerous others. The Cranches certainly changed my life, re-sparking my own long-suppressed creativity.
Now, people from all over the United States are starting to ask how to establish similar organizations. The Cranches even received a few inquiries from overseas. Imagine how many resources could be rescued if every community had a FabMo! Imagine all the creative things people could come up with!
To learn more about FabMo or sign up to their mailing list check out their web page: http://www.fabmo.org/fabmo/Home.htlmYou can also like their Facebook page: https://www.facebook.com/FabMo.
You can learn how one quilt artist uses FABMO materials for her art.
First of all,I found this article to be interesting. I am in the process of completing four Memorial Quilts for a client and her children using their beloved father’s clothing.Ann
Memory quilt made from tee shirts
First,on the Internet memory quilts range in price from $100 to over $1,000. Why such a large price range? However,there are a number of factors that go into the cost of making a quilt. Here are a number of cost factors that go into the pricing of a memory quilt.
Materials
There are 3 basic materials that go into all quilts. There is a quality range for each type of material. The price of your quilt will relate to the quality of materials used. The higher the quality the higher the cost. In other words,inexpensive materials create an inexpensive quilt.
Fabric
To help think about fabric, compare it to the thread count of bed sheets. For example,the lower the thread count, the cheaper the fabric. Polyester fabric with a low thread count is inexpensive. 100% cotton with a high thread count is much more expensive. For a high quality fabric for durability of wear and use, cotton should be used. Similarly,the backing and binding of the quilts will need extra fabric.
Batting
Secondly,batting is used in the middle of a quilt. It comes in a variety of quality levels from thin 100% polyester to high quality cotton batting. Polyester batting tears easily, it bunches up and will poke out the back of the quilt. However,cotton battings are the best choice. Yet,they will cost two to three times more than polyester batting.
Thread
Moreover,all quilts use thread for sewing the blocks together and quilting. On the other hand,there are cheap threads that won’t withstand time and use.Quality threads are truly worth the cost. So,a less expensive quilt is made with a lower quality thread.
In addition, another cost that is calculated into the price of a quilt is labor. Minimum wage is about $8 an hour. Typically, minimum wage is reserved for entry level and unskilled workers. However,an accomplished quilt makers are not unskilled. Above all they usually, they should have over five years or more of quilt making experience .
Skill
Similarly, it takes skill to make a memory quilt. If it didn’t take any skill or experience, you would make it yourself. Highly skilled and talented quilters make the nicest memory quilts. Furthermore,this means that their hourly rate will be much higher than minimum wage. If you want to only pay minimum wage to a quilter, expect an entry-level unskilled quilter to attempt making your quilt. If you value your clothing and memories you are putting into your memory quilt, an inexpensive quilt should scare you!
Time
How long does it take to make a memory quilt? In short,this depends on a number of factors including quilt style, complexity and craftsmanship. A low-cost quilt will take less time than a more expensive quilt. However,this means that the low-cost quilt will have a simple design without any complexities. The workmanship may be questionable.
The Worth a Quilter Places on His or Her Work.
If a quilter underprices their work, they are telling you up front that they do not think that their time and skills are good enough to charge more. Think about what this tells you. If someone does not find value in his or her work, will you?
Style
In short,there are two basic styles of quilts – those that are made in columns and rows and those that are designed by an artist.Our Too Cool puzzle style is a creative work. The number of steps and the amount of time it takes to make each style is vastly different.
Traditional
A traditional style memorial quilt is made from blocks in columns and or rows and the blocks are all one size. This makes the project very easy and involves very little planning and time to layout.
The Too Cool Style
A memory quilt made with many different sizes and shaped blocks involve a lot of consideration, planning, math and other time consuming steps. This style of quilt will take 10 times or longer than a traditional quilt.
To summarize,these and other considerations are indicators of the quality of a quilt. They also greatly influence the price of the quilt. For example, someone with great skill and artistry using cheap material might make a good looking quilt. But the quilt still has been made with cheap material that will look cheap and not wear well. Conversely, a quilt made with high quality materials that is poorly made is still a poorly made quilt. You want a quilt that is made from high quality materials by a skilled and artistic quilter. This quilt will be a family heirloom worthy of the cost.
Look carefully at the cost of memory quilts. Be sure to know what you are paying for. A quilt that costs only $100 is probably going to be a disappointment.
To learn more about having a memory quilt made, please feel free to download our Memorial Quilt Guide. It has information that will help you through the process of having a memorial quilt made.
Memorial quilt From mom’ s clothinggroup of memory quilts