Seeing critically is looking to see what one likes or doesn’t like about something. How would one make it better or more attractive? Don’t we all do this while getting dressed? However, it could also pertain to a piece of art, an room arrangement or a garden as well as others.
What would you add?
An Exercise to Practice Seeing Critically
Lately, I have found my art process spilling over into other aspects of my life. Basically my process is to do something and then try and make it better. What can I do to make the art more interesting? How can I kick it up a notch? I find myself looking at others work and doing the same thing. What parts do I like and which parts would I change? I am not being critical as in criticize but as in finding the merits and the faults of something.
I see this as seeing and thinking critically about the work. The thoughts are only for myself. I wouldn’t dare say anything to the artist. That is not my intent. It is merely a practicing looking with a critical eye.
The Learning Curve of Art
I am reminded of an exercise that a photography teacher had us do. We were to go about our lives without our cameras and look for photos to take only with our eyes. The students practiced forming low risk pictures. We would notice the world around us. Frame a shot, pretend to take a photo and continue on our way. It was a way of focussing. It was also in the days of dark rooms and fairly expensive film. However, the exercise is still a valid one to focus one’s eye to the beauty around us.
Maybe this is a common art teacher technique. Never having much art training , I don’t know. My one year of drawing and painting was back in the days of Do Your Thing. If you know what your own thing is then that is great. But I had no idea of what my thing was.
I took the photography class because I had noticed that people with a good camera could get into events more easily. People thought that you were with the press.
Trying new ventures is a good idea. However to attain a particular skill level, one must practice. Somehow that never occurred with me.We are all in different places along the learning curve of art.
How would you use this pieces?
Artful Gardens
Many people take pride in their artful gardens, large or small. As I walk by a neighborhood garden, I find myself observing critically. How are the plants arranged. Are the shapes, colors, sizes of the plantings in harmony? Are they placed in a balanced way? Or are they clumped together with no interest? Between the drought, gophers and deer,we are sometimes lucky to have anything growing this late summer.Critisizing in not my intent. However, looking for artful placement of colorful plants is.
Art on Social Media -Seeing Critically
These days many people are posting their art on social media. Each person is on their personal pathway to becoming or improving as an artist. I would never make a critical comment about that person’s art. But it is an opportunity to practice seeing critically. What parts I think work and how I might change it if it were my piece?
In conclusion, becoming an artist takes practice. Part of that progress is to see critically many different art forms or even parts of life.Try it! It is free and easy. However, it is best to keep your opinions to yourself!
How do you develop your art passion? Recently on two separate occasions I was explaining my art to another person. They both lamented that they couldn’t sew. Sewing was so hard. Yet,one person was definitely of the age of a person who had to take sewing at school. The other one was was much younger. However, she also mentioned that sewing was an impossibly hard task to do.
Where does One’s passion start?
As mentioned I can’t pinpoint when my passion for sewing started. No, my mother was not a strong seamstress. No, my grandparents were not nearby to teach me nor did they sew. Yet, I do remember begging my mother to sign me up for sewing lessons the summer after sixth grade. I don’t remember begging my parents for anything else. Okay, I did write a persuasive argument for why I needed to have a car. Does that even count? My begging usually focussed on not having to do something. I have a vague memory of trying to get out of a piano recital that I hadn’t practiced for. Music is not a strong point of mine.
My First Sewing Classes
So my mother signed me up to take sewing classes at the local Singer Sewing Store downtown. The classes were a disaster.The teacher expected to help ladies finish their projects. Her expertice did not involve teaching the basics to twelve year olds. How to do lay out a pattern on fabric and cut it out was not in her plan. Public school teachers to the rescue! Luckily, 8th grade sewing did just that. I was on my way. Little did I know that it would develop into a lifelong passion.
Developing an Art Passion
This was the late 1960s. Girls and women were still expected to know how to sew. Yet, my older sister didn’t like it. She said she didn’t have the patience. Did I think that I was a patient person? No. I liked fashion as much as any teenaged girl did. My outfits certainly didn’t push the fashion envelope. I was not an avant garde dresser.
Developing a Skill Set
But without knowing it, I was developing a skill set. I was learning about selecting fabrics. With practice,I learned what pattern envelopes said, what they meant, and what they didn’t say. Moreover, I developed opinions about what they should have said. I also knew I wanted to take an elective class of sewing in high school.I ended up taking the advanced class too. Who knows?Bound buttons may come back in style.
Imagine this top fluffy for the one I made
Back to the fuzzy yellow knitted top. I do remember planning my ensembles with texture and variations in mind. I studied my ensembles for high school. What combinations of outfits did I already have? What materials or colors were they in? How could I make something that would add a difference for my wardrobe? How could I add texture and interest to the clothes I wore?
Inspired by a Tam and Scarf
Yet at this point,sewing was my hobby. Graduating a four year college was my family’s expectation for me. I had no problems with that. I did get accepted to UC,Irvine, my first choice. My back up school was Cal Poly San Luis Obispo. SLO is famous for their home economics department. I often wonder how my life would have turned out differently if I had gone there. The closest thing to home economics at UC,Irvine was chemistry lab.
Schooling and Career
So I got a degree in History, worked on my Spanish, Master in Teaching and became an elementary school teacher. I worked passionately with second language learners for 36 years. No regrets.
Over the years I kept sewing. I made clothes for myself and my family. I learned to quilt and I kept quilting. Most of the quilts were for family members and donation quilts for charities. I learned different techniques like applique and paper piecing. I stopped counting my bed quilts at 300!
Poppin’ Back, 2021
Art Quilts
Much later I switched to art quilts. I have over 400 art quilts,large and small listed on my inventory. I learned different techniques including free motion quilting.I started entering juried art shows.Pieces sold. Practice makes perfect.Sometimes it feels good to realize that I actually know something and can comfortably do it. Do I still try new things? Yes.
Art in College
I took a year of studio art, drawing and painting in college. The teaching style in the late 1960s was totally hands off. The student was free to do their own thing. The teacher said in a positive comment that I did funny little pictures. Looking back, I realize part of my problem is that I didn’t practice. I didn’t put in the hours to become good at it. I didn’t have the passion to keep at it to develop my skills. Malcolm Gladwell https://www.gladwellbooks.com/in his book, Outliers said it takes10,000 times to get really good at something. That sounds like a lot unless one loves doing it, has fun and is passionate about continuing.
In Conclusion
Passion! Dedication! is the answer.So much so that you will choose to stick to something even when you get frustrated. Yet you keep going and over time you get better and better. Maybe you will even reach an advanced skill level. At age of ten, I knew, I wanted sewing lessons. I didn’t know why. I still don’t. But sewing and the related field of quilting has stayed with me pretty much my whole life. So much so that I can only laugh when some artist says how hard it is for them. Isn’t it great that we all have different skills and talents! Find your passion and stick to it.
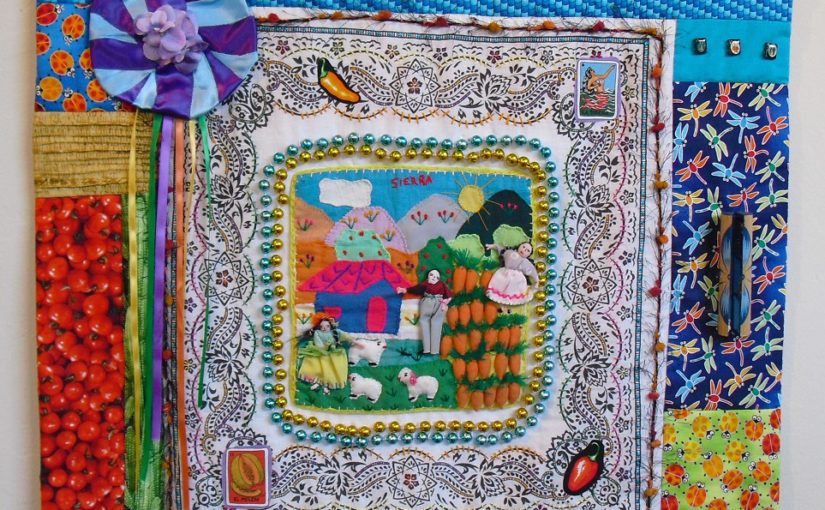
Paper as an art material is a new use for me. I usually cut fabric. A while ago, a visitor watching me cutting a tree out of fabric, he commented that it reminded him of a friend who does paper collages. While collecting materials for my new direction, mixed media assemblage, I acquired some used frames. I didn’t pay attention that some frames had glass and some didn’t. Yet, I soon realized glass doesn’t work with 3 D objects. So paper collage it was.
A New Art Direction using Paper
Paper Collage
I hadn’t really used paper as art material in my recent history.Yet, I found the process very similar to what I had done with my fabric layering techniques.Although I cut fabric instead of paper, it was the same process. The larger pieces go down first. Then I add the smaller pieces.I like using a long thin skewer or similar tool to gently move small pieces carefully.
Because this process was new to me, I made a sample. I photographed it to remember. Afterwards,I took it apart and began gluing. First, I glued the largest pieces. Then I added the smaller pieces. My go-to tool is a large pin to add glue under small spaces. It is the easiest tool I have found to glue in tiny globs.
My Motivation
Recently I have been trying some new assemblage techniques. I needed to make smaller pieces that would take less time to make and sell at a lower price point. The plan was to use items that I already had in my home and studio. Interesting pieces of discontinued wallpaper came my way and inspired me to use the paper as art material.
Using a Frame
I began with a frame or wooden box. Oddly enough for an artist,I had never used frames before. My art quilts are finished with a facing on the edges. There is no need of a frame. Probably the normal way of making art is to create something and then get it framed.
However,I worked the opposite way. I found a gently used frame or a shallow box. The art was based on what I had that would fit inside.I matched the colors of the frame. Style,size,scale and color guided me.
A Surprise
Working with new materials I wasn’t quite sure what to expect. A piece of plastic inside a frame had words on it that I wanted to remove. I figured that it was a decal. I laid it down and poured vinegar on it. After 30 minutes, the decal could easly be removed with a bit of rubbing. However, the rest of the liquid had disappeared. Where did it go? It was not on the drainboard. The liquid seeped into the plastic lining. I had to dry it several times as I turned it on its side and the liquid came out. Just a bit of an unexpected surprise!
Reusing and Reducing materials
Reusing and reducing materials is a great motivation for me. These materials were new to me. Wood, fabric,redirected tile samples and paper speak to me more that metal or plastic. I have used some small metal items. The paper I used was discontinued wallpaper samples.
Grasslands, 5″ x 4″
An Independent Study -A New Art Direction using Paper
In my college years, I completed several independent studies. The process was a familiar one to me. The self directed student chooses a topic or project. They dive into finding information or trying new techniques. The student finishes by creating a new project. As I was creating different assemblage with the found items,I realized that I had basically created an independent study for myself. No classroom credit awarded of course.
In Conclusion
It is such a joy and welcome distraction for me in these times of the pandemic to find this next direction for my art. This new direction is totally unexpected. My creative juices have been replenished.
Beginning steps to creating art suggests some new ways of thinking about making our world beautiful. Creating comes naturally to humans. We are innately artists. We try to make our world beautiful. Some of us draw; while some of us paint. Others create beautiful food and table settings for our loved ones to enjoy. Others create beauty in their gardens.
Unfortunately, many of us do not feel that we are artistic. I certainly didn’t for many years. Yet, each of us can create beauty in our unique way. Here are some suggestions for beginning steps to creating a more beautiful everything or whatever you choose.
Beginning Steps to Creating Beauty
Part of my career as an elementary school teacher was spent at an arts infused school. We brought in special artists to teach across the arts curriculum from drawing, painting to theatre and dance. I had been at this school before this program started.
When the program began, the whole school adjusted its focus. I witnessed sn incredible shift in students’ attitudes. We told the children that we are going to try and make all of our work beautiful. We would not criticize the work of others. Trying to do one’s best was the important part. The attitude of the whole school changed for the better. It was so powerful to witness that change.
Think Differently.
Looking outside the box. Many times it is our own perspective that keeps us from seeing things in a new way. Often we acquire materials or fabric with a particular idea in mind. Then it is difficult to get rid of that idea or to envision a new use for the item.
Do these look like coffee beans?
When I got this green fabric, it reminded me of coffee beans. That is the image that stuck in my head. I wasn’t sure how to use the fabric. It sat on the shelf for a long time. Then I began to think differently about it. How could I use it a different way? I decided to use the ovals as bit of motion in the truck of a tree. What little bits of color could I highlight to pull those colors to the forefront and diminish the greenish colors ? A peachy orange shade would do the trick. As my county recovered from the largest forest fire ever, my art quilts reflect that new growth.
Rebirth of a Forest,art quilt,29″ x 22″
Turn the Fabric Around
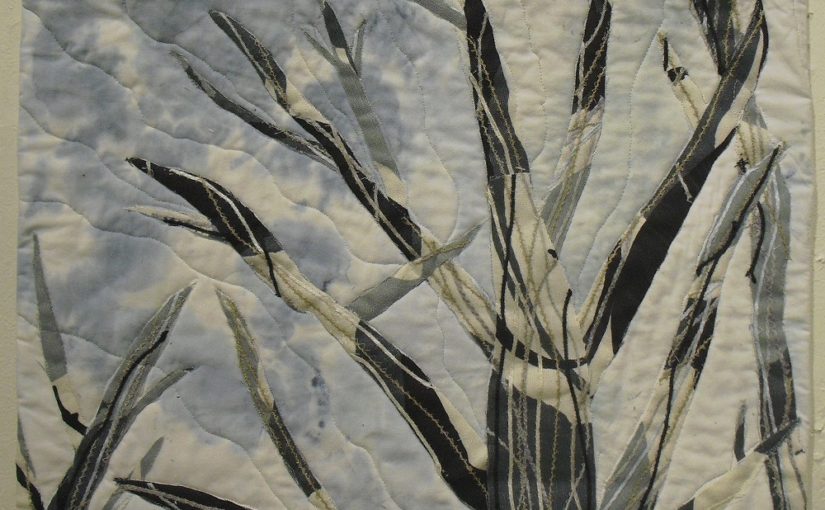
Another way to look at a piece of material or fabric in a new way, is to turn it around. If it has definitite figures on it ,what will they look like from another direction? New and unrecognizable is what I would be going for. When an abstract artist finishes a work, they often turn the art upside down and sideways to see if it might look better from a different angle. The original fabric for the trees and branches in Skyward was a black,white and gray fabric that had greyhound dogs on it. The movement of the fabric caught my eye before I noticed that there were actual dogs on it.
GreyhoundsSkyward, an art quilt
Imagining Shapes
While working on my nature quilts, I cut out shapes for trees, branches, fish, rocks, or waves. I look at the fabric to see if the shapes on the fabric tell me what it would like to be in my piece. Does a swervy line imply a wave? Maybe a mountrain will appear from the shapes on the fabric? If no shape strikes me on the fabric, then I create my own mountain or a river. The idea is not to find a piece of fabric that has a river on it. But to create a river from lines that the original fabric artist had not thought about..
Visualization
As I am creating, I try to visualize what the piece is lacking. What color or shape needs to be in a particular spot? This often guides me to a hue or textile choice. This is a newly acquired skill for me. I surprised myself when I realized visualization was happening. You can make it happen for you too.
Activities to Practice Beginning Steps to Creating
Here are a couple of powerful skills that can be practiced with no materials at all. Look at pieces of art in the real or virtual world. There certainly are many examples available on social media. Ask yourself, do you like this work? What do you like about it ? How would you make it better? If it were your piece to change, how would you modify it?
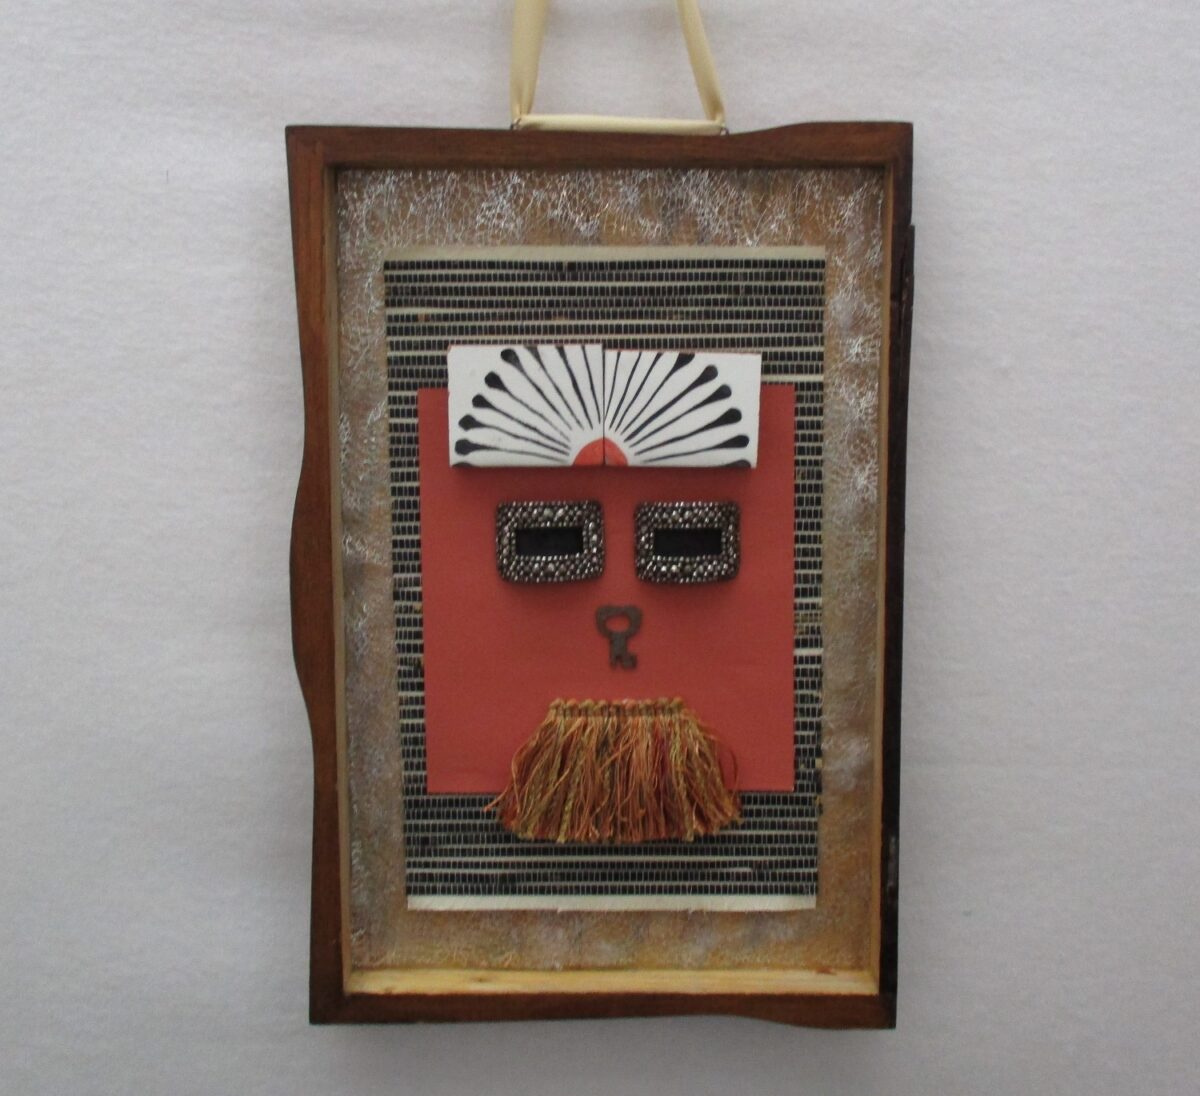
Keys to my Heart, 9″ x 7″
Another practice activity is to think of how many different non traditional ways an item could be used. I recently acquired a box of antique keys. I am venturing forward into assemblage, putting repurposed items together in unusual ways. What could the keys be used for? The possibilities are endless; a nose? hair? or other body parts or just purely decoration? While I searched the internet for inspiration, I came up empty. Left to my own devices,I have sprinkled this post with the ideas that I came up with.
Face with a Key Nose
In Conclusion
Start with baby steps. Create small bits beauty in your life. Practice helps. I took an assemblage class over two years ago. It took me this long for the ideas to perculate through my brain. Be kind to yourself during the learning process. Trying in the first step. There are no mistakes just whether you as the artist likes it or not. If not, modify it. Dip into your humanity and make the world more beautiful.
Recently someone mentioned to me at my studio that she had some fabric that she had had for a long time. She suggested that she should get rid of it solely for the reason that she hadn’t used it. While we all have our own rules of engagement, that is not one of mine. If I like a fabric I will keep it until I can find a good project for it. In this posting I share examples of using fabrics saved for a long time.
Using Saved Fabrics
As soon that visitor commented on her long saved fabrics, I lead her to see this recently completed piece. I explained that I had had the fabric with wavy yellow, green and turquoise lines for a long time. I could not remember where or when I had gotten it.
Over the years I would try to see if it fit in other quilts. But each time I put it back on the shelf. Often this whimsical fabric didn’t fit the style or mood of the piece or maybe the color wasn’t just right. Here, however, everything works;the colors, the movement, the whimsical style.
Sunset Through the Forest random piecesSunset Through the Forest, an art quil
ATLAS in Rose
I recently completed the abstract art quilt, ATLAS in Rose. The rose, reddish rose and gold fabric is a high quality fabric that I had had for a long time. Yet I hadn’t used it. The red and rose colors would not play well with other colors. In spite of that, I kept it. Luckily, I did. Because it went perfectly with this black and white scientifically inspired art quilt. It added color and just the right amount of movement to the art quilt.
rose and gold fabricATLAS in Rose , finished art quilt
Fabric with Small Boxes
The following red, yellow and green fabric with small boxes is another piece that I liked. I didn’t know how I would use it. But I had to have it. The colors and movement spoke to me. I ended up for saving it for many years. In Cactus Dreams, the colors fit. The geometric boxes mirror the checks in the Guatemalan and in the checkerboard fabrics.
fabric with green,yellow,red and boxesCactus Dreams,detail,abstract art quiltCactus Dreams,abstract art quilt
In Conclusion
I finished these three art quilts in the past year. Without realizing it, I probably mentioned to the visitor that I had used some saved fabric. Thankfully, I had kept the fabric. Because they worked perfectly!
Ann Baldwin May wrote Develop Your Art Style as a potential Zoom talk at a NorCal /Southern Nevada Regional Meeting of the International Art quilters organization,SAQA. Although this post’s original audience was art quilters, many of the points apply to all forms of artists. Especially artists who are just beginning to put themselves and their art out into the world.
Introduction
Ann Baldwin May developed her art style to become a quilt artist. Ms. May reinvented herself in retirement. Her art friends call her resilient, a prolific artist and a master at social media. She was accepted into the New York Art Center in Tribeca in 2019.
Splendid Fairy Wren, 30″ h x 25″ w, an abstract art quilt
Develop Your Art Style
How to develop your own art style? Do you want to make a career out of art ? Do you want to sell items that you make? Is your goal to be in a museum? These decisions are part of the process. An answer does not need to be made right away. Only one person can make these decisions. It is YOU. In the beginning,I would visit shows and see no art quilts that looked like mine. At first, I worried about this, but then I realized that it was a good thing. I had my own unique style. I focussed on developing it more.
Honing your Craft
Develop your skill set .This will be your bag of tricks that you will draw from.What skills are you good at? What skills do you like to use while making your art? Use these to develop your own style.
Classes are great but at some point one has to work on developing their own style.
Attend SAQA (Studio Art Quilt Associates) conferences. The workshops offer great advice for all steps of your career.
Celebrating Fall 33″h x 31″ w
Putting Yourself Out There
The 20th century model for art and many things was make or do great work. Then the world would come to you. The 21st century model is different. Each person needs to let the world know what they are doing. This can be difficult for some of us to do. However,I found this phrase helpful when I started out. Hi, I am shamelessly promoting my work. This phrase shows that it is uncomfortable yet it still needs to be done.
Let people know what you are doing. Share with your friends and the groups you are in. They will be a big support for you especially in the beginning.
Start a list of people who want to hear from you. Gather names and emails at each show you participate in. Use it to notify people of what you are doing. I do a monthly newsletter about where I am showing my art or what I am making.
What is your digital footprint? If someone sees your work and googles you, what will they see? What do you want to see when you google an artist? A website announces to the world that you are serious about your art. Online sale sites are growing. Besides sales, I have gotten commissions from my Etsy shop. I was also contacted by an editor for Art Quilting Studio to write articles for them. I was interviewed by a freelance writer for the Smithsonian Magazine due to my digital footprint.
Each Community is Unique.
Each community is unique. I happen to live in a community with a vibrant art scene. Santa Cruz, California is fifth in the nation of listing artists as their livelihood.There are opportunities to show your work at restaurants, coffee shops, quilts shows, county fairs, festivals,real estate offices,First Fridays events, Open Studios Art Tours. Your community is probably different. join together with others and form a group. Accept the opportunity to create your own events.
Educating the Public about what You Do
Take the opportunity to educate the public about art quilts. I usually say art quilting is a new form. It (SAQA) began in 1989 in Northern CA. Yvonne Porcella was actually born and raised in my county. Many people still don’t know about it.
Sea Turtles,23″ x 35″,an underwater fantasy art quilt
Further Steps
Create a laser statement, sometimes called a elevator talk. Explain what you do in a sentence or two. Most people know what quilts.But they are still unfamiliar with art quilts. I usually say art quilts use quilting technique to make wall art. My portfolios are Nature, Abstracts and Mexican inspired art quilts.
Reach beyond the art quilt world to the art world in general. Enter shows that accept fiber art.
Local press- If you are having shows or creating events the local press with search you out. Of course, you can also let them know.
Be professional. Be a person someone wants to work with. Leave your ego at the door.Be prompt, prepared at all steps.
About ten years I began my art path into the world. I gleaned these ideas presented here mainly from my own search to develop my own style. I find that they have worked for me. As one takes baby steps into the art world, people will comment on what they see or like. This feedback from the public will help you define your own style.You may have one but you may not truly recognize it. I offer these suggestions to help as you develop your own art style.
You may be interested in reading more about my style.
Ann Baldwin May presented Four Important Skills to Forge Your Own Art Path as a Zoom talk at a NorCal/Southern Nevada Regional Meeting of the International Art quilters organization,SAQA(Studio Art Quilt Associates).
American Democracy,2019 27″ w x 28″h
Introduction
There are many paths forward to become a quilt artist. Ann reinvented herself in retirement. Her art friends call her resilient, a prolific artist and a master at social media.
Forge Your Own Art Path
Part of SAQA(Studio Art Quilt Associates)’s mission statement is to encourage art quilters to move their art forward and out into the world. Forging our own way can be exhilarating and frightening at the same time. What qualities does one need to forge their own path forward? I suggest that one needs these qualities. https://annbaldwinmayartquilts.com/2019/04/making-your-own-luck/
Four Important Skills
Persistence- Just keeps trying! Resilience- Do not take things personally. Bounce by from your disappointments. Confidence -Believe in yourself. Accept Your Uniqueness. Bravery-Put yourself out there! Never miss an opportunity to show your work!
Today I would like to share a few stories that focus on these four important skills. First, I would like to say that I am a big believer in baby steps. We need to be brave but you can be brave on your own timeline. I am not an early adopter of new things. When I started out, I found using this phrase helpful as a conversation starter. Hi, I am shamelessly promoting my work .
Under the Shady Tree 27″ x 38″
Starting my Art Path
Back in 2010, I turned 60. I decided to give myself the gift of showing my art. I went to talk to the owner of a local leading gallery, the R. Blitzer Gallery. I asked how I could show my work there. Robert Blitzer, the owner is a very personable guy. He mentioned a local group show that was going to be hung soon. He gave the name of a fairly famous artist who was curating the show. I called her up and spoke with her. She asked me to send her some photos of my work. I sent her the photos. But I didn’t hear back from her.
Persistence, to Forge Your Own Art Path
At the First Friday reception, I approached the curator and introduced myself. She gasped and said, “I never got back to you. I wanted to include your work.” Awkward moment for both of us. She turned and disappeared in the crowd. I took that as a yes. The reception for First Fridays Art Walk is usually the busiest time. Then the rest of the month the show is still up, there are less visitors. This didn’t matter to me.
I returned the next day and explained the situation to Rob Blitzer. He called the curator . It was decided that he would find a space for me. He found a funky wall in the back but it was fine for me. I could put it on my resume. It was a talking point for me. My birthday present to myself was complete. Being persistent is an important skill to forge your own art path.
A Call for Entry
Several years later, I saw a call for entry for Monterey Peninsula College Art Gallery for a solo show. My application presented my Mexican inspired art quilts. I was not accepted. As a newbie, I assumed it was my fault. My work wasn’t satisfactory.
Market Day
Bravery,to Forge Your Own Art Path
About a year later,I was accepted in to a show in Santa Cruz Art League. Melissa Pickford ,the director of the Monterey Peninsula College Art Gallery was the curator. At the reception, I was trying to get enough nerve to introduce myself to her. The line to speak to her was long. Finally, after she had spoken to everyone in line, I introduced myself. Ms. Pickford recognized my name immediately! She remembered and praised the work that I had submitted.
Who Knew the Rule?
As the director, she apologized because the college has a rule that only work can be shown in the gallery if the college offers classes in that mediam. Evidently, they do have not textile department. Who knew? Be reticent and brave. What if I hadn’t been brave enough to introduce myself? I never would have learned that wonderful gem of truth, a true confidence builder. Bravery is an important skill to forge your own art path.
Resilience,to Forge Your Own Art Path
About that same time I attended my first SAQA conference. Leni Levenson Wiener gave a talk on how shows are curated. The curator has a huge job of deciding which pieces fit into her vision of the show. Choosing the art is difficult. Many pieces are not accepted for reasons that are totally out of the artist’s control.The takeaway point was that if an artist is not accepted it doesn’t mean their art is not good.
Say- Not Accepted Not, Rejected
It means that it didn’t fit in some way with the rest of the work in the show. It was emphasized that we should say that our work was not accepted for a show, rather than say it was rejected. Another gem from a SAQA conference-Maria Shell says you will not be accepted 100% of the time. Maria Shell says 30% acceptance to shows is doing well. Resilience is an important skill to forge your own art path.
Never Miss an Opportunity to Show your Work.
Funny story- I was asked to show my art quilts at a film festival taking play in a local gallery. They were having trouble with the acoustics. They wanted me to show my largest pieces of work to help with the sound. Because I had kept in touch through a monthly newsletter, the director was able to contact me quickly. I stepped up to the plate. I wish I could say I sold something but I can’t.
Confidence,to Forge Your Own Art Path
I would like to share a story that I think of often. We push ourselves to create events and shows. We publicize them and invite everyone we know. Yet sometimes the turnout is low. You may know Brian Cranston from Breaking Bad. He owns a movie theatre near Palm Springs. My husband is from that area and spends a lot of time there.
Brian was fairly famous at the time. He organized an event at the theatre. No one came. My husband was able to have a long conversation with him. These things happen to the best of us; even famous people can have a slow night. Be confident and continue on.
Persistence,to Forge Your Own Art Path
I would like to share with you my latest new friend. We met in Zumba she is in her early 80s. She recently remarried. She paints and yet has no digital foot print. But she goes to restaurants and asks if she can hang her paintings there. And she has been selling them. She is persistent in her unique path forward. Persistence is an important skill to forge your own art path.
In closing,I would like to remind you to say positive things to yourself. Hang compliments on the back wall of your mind . Refer to them often. I would like to end with a favorite quote of mine. In the words of the song,The Middle by Jimmy Eat World
“Just do your best , everything you choose and Don’t you worry what the bitter hearts might say.”
Finally,I hope that these experiences inspire you to develop the qualities of persistence,resilience, confidence and bravery . With these four qualities you can forge your own art path and get your work out into the world. Thank you.
Choosing a name for an art work is not an easy task. Yet, when the title of one’s art piece fits the work, it feels like pure genius.The title can capture the essence of the piece. What the artist wants to say or what the piece is about. I find it worth the effort. Yet, many times genius can elude us.
How To Name An Art Work
“Untitled- Number 325” The running joke of a prolific artist from a fiber group was just that. Untitled Number 325. That is how she answered when asked what the name of her latest piece was. She liked doing the work but not the naming part of it. So each piece was left unnamed.
On the other extreme,Brad Burkhart,a local clay sculptor created a lengthy group process to name a piece. He asks the group questions which lead to a consensus for the piece by consensus. He strongly supports and promotes this process. How to name an art piece can be a private or a public effort.
I Put on my Poetry Hat
Both of those processes feel unsatisfactory to me. I name my pieces by several different methods. My preferred method is to put on my poetry hat metaphorically. I try to think of an engaging title that adds to the viewer’s experience. What I was thinking about while making my art?
At times I think about what the piece looks like. People read all of my titles once they realize that they are engaging and interesting. Naming my art is an opportunity to share my creative vision and to engage with the audience. I don’t want to hand such an important element of my expression over to anyone else.
Here are some examples of my art and how and why they were so entitled.
What I Was Thinking About
Rogue Wave, an abstract art quilt, 36″ x 36″
A rogue wave or sneaker wave often hits the Central Coast of California in the winter. It is a large,strong, unexpected wave that can be very dangerous. While making this art quilt, warnings for rogue waves were being broadcast daily on the news. As my pieces included colors that reflected water and movement, I chose that title.
A Fitting Genre and Style
This art quilt is named Sherman Alexie Comes to Bookclub,
Sherman Alexie Comes to Bookclub is a modern piece inspired by the new membreño colors of black, white and rust. Mr. Alexie is a Native American author who writes about urban Indians. I thought that it was a good fit for this piece. Although it is a bit of an inside joke, if the audience doesn’t know Sherman Alexie .
Under the Savannah Shade using African fabrics, 36″ x 42″
Under the Savannah Shade is a bright abstract art quilt. The African fabrics in greens, oranges, and yellows reminded me of a hot summer’s day. Wouldn’t some shade be nice? The blue material provided that shade.
Descriptive Titles
When genius eludes us, a descriptive title will do. What do you see in the art piece? Does it remind you of something? What location is it inspired by?
Challenges
Under the Shady Tree,37″ x 25″Great Blue Heron at Dusk, 31″ x 25″Gridlock I, 33″ x 31″Gridlock II, 42″ x 36″
May I share some challenges to naming one’s art. Early in my art career, I named some pieces Gridlock I and Gridlock II. Gridlock II was juried into a “MAYHEM”show at the ARC Gallery in San Francisco. In spite of that honor, I couldn’t remember which piece was number I and which was number II. I decided to avoid numbering my art again. You may have a different opinion.
Naming a Series
Shore to Sky ZShore to Sky F
Yet, when I did a series of small abstract art quilts based on the colors of the sky meeting the land and water . I named them Shore to Sky A,B ,C through Z that presented no problems. Maybe the wider range of colors helped me differentiate the pieces better.
Conclusion
Part of being as artist is sharing one’s vision with the local community and the greater world. Naming one’s art can add to the presentation of our work. It is a personal statement. Do not miss this opportunity to connect with the public.
These are just some examples of how I named my art quilts. Were they helpful either directly or indirectly? Do you have some ideas of your own that you think worked well? Please share.
First of all,I love creating movement in my abstract art quilt pieces. A fiber artist friend asked me,“What are the essential elements you want your audience to know about your work? What do you want them to take away from seeing your art?” This friend versed in the deep discussions generated by involvement with the Artist Conference Network. I am grateful for those thought provoking questions. They helped me coalesce the ideas I had been mulling over.
Beach Umbrellas,an abstract art quilt, 37 ” x 37″ 94cm x 94cm curved line piecing creates moveSpring Break,an abstract art quilt, 32″ x 32″ 81cm x 81cm curved line piecing creates movement
Creating Movement in Abstract Art Quilts
How does one infuse movement into something that is inherently flat and static? Curved line piecing rather than just straight line sewing is one way to add movement in abstract art quilt pieces. At first, I attempted to make every seam a curved line. Then I realised that it proved too much of a good thing. The wobbly surface wasn’t the effect I wanted. Some straight lines are important for shape and balance. Another true life lesson learned: balance is important. Now I choose lines more carefully for visual impact to sew via curved line piecing. They may be wildly or more subtly shaped curves. https://annbaldwinmayartquilts.com/2019/07/creating-movement-in-art/
Activity on the Material
I choose the fabrics I use with movement in mind. I look for interesting curved lines that can create movement in my abstract art quilts. When I cut them up, they add interest and drama. They catch the eye and draw it in. One fabric of elongated greyhound dogs was rotated and sliced into the pieces. The shape of the animals disappeared yet the movement of the line remained. Other fabrics provide a pop of action to the piece. Creating the illusion of movement is an essential part in my abstract art quilts.
Beginning to zigzag yarns on grey, black, white linen background
In addition, movement is added through the quilting process. I begin by quilting straight lines in the middle of the piece making basically a large grid about 5” apart. Then the fun begins. I start quilting from corner to corner gently turning the fabric slightly side to side as I quilt. The thread line creates the movement. If the thread color contrasts with the fabric color, then the threads stand out. When the thread color matches the fabric, the thread may seem to disappear, yet the movement remains on a more subtle level. Many viewers look closer to try and understand how that can be.
Skyward, 25″ x 25″ 63cm x 63cm finished piece
Couching Decorative Threads
One technique I now consider quintessential part of my tool box is couching decorative threads. I sew multiple colored threads or yarns on to a strip of fabric. Then I cut them up into random lengths and use them as fabric. At first, the main purpose was to add texture to my pieces. Yet, the threads are often sewn in undulating parallel lines creating the slightest of distortion and movement. In Copper Cliffs both examples given can be seen, the fabric with irregular dots and the lines of decorative threads I cut apart.
Copper Cliffs, an art quilt,21 ” x 19″ 53 cm x 48 cm curvy lines of yarn create movement
I create my abstracts on a design wall. I take time to balance the colors and fabrics. Quiet spaces let one’s eyes rest. Looking at the piece with fresh eyes may take several days or longer before sewing the pieces together.
Gridlock II, an abstract art quilt, 36″ x 42″ 91 cm x 107 cm curved line piecing creates movementGridlock I ,an abstract art quilt black and white 33″ x 31″ 84cm x 79 cm
A Final Look
Abstract artists have the added benefit of being able to rotate the completed piece. They look to see if the art may be better from a different direction. It just might happen. Just because it was conceived and executed in one direction doesn’t mean that it cannot look better “upside down.”
Sandy Shore, an abstract art quilt 29″h x 25″w 74 cm x 64cm wacky, scribble quilting creates movement
A former colleague of mine made an unsolicited comment about my work, “It dances.” Her remark touched me on several levels. Years earlier she admitted that she had no interest in attending an art quilt show. So when I heard her comment, I felt that I had truly opened her eyes to a new art form.
Do you Squash your Art Quilts?
As you can tell, movement in an art quilt is important to me. Yet not all art quilters share my view. A trend in quilting art quilts seems to be creating as many stitching lines on a piece as possible. These lines tend to be straight lines with about ¼” spacing. They may turn at sharp corners. While attending a recent national art quilt shows, I noticed that almost 75% of the quilts had such quilting. I admit that such narrow line quilting may be effective for some pieces. The skill level is high for the artists that quilt that way. However, this style makes me cringe. Squashing and smashing the fabric into flat controlled pieces actually saddens me. Such tight stitching suffocates the fabric, preventing it from moving or breathing.
Best Parts about Making Abstract Quilts
I love making abstract art quilts. There are several reasons why. While placing pieces on the design wall, there is flexibility to easily add fabrics or change their locations. Furthermore, I can turn the fabric piece upside down or even side ways to choose the best spot. This also works if the fabric pieces have decorative threads on them. Do I want the lines to go vertically or horizontally? In addition, if I sew two fabrics together incorrectly, I just cut the fabric off easily and resew. No seam ripping is necessary. I welcome these hacks after experiences making traditional blocks where more accuracy is demanded.
Conclusion
In conclusion, I create movement in my abstract art pieces in several ways. I choose some pieces of fabric because they show movement as part of the design element. Couching decorative threads in not quite straight lines adds subtle movement. Pieces are sewn together with a curved line piecing technique. Finally the artist generates wavy lines all over the piece while quilting the three layers of fabric together. A basically flat piece of art is brought to life by these techniques.
Read about Other Resources
Read more about the Artist Conference Network. This artist driven organization supports artists as they move towards their artistic goals. Groups meet periodically to share and review each artist’s goals.
Memories of favorite colors can stay with you throughout a lifetime. As a seven year old, I remember telling the neighbor lady that I wanted to be an artist when I grew up. My favorite colors were pink and yellow. I chose them both because I couldn’t decide which one I liked the better.
My goal of becoming an artist faded almost immediately. That idea didn’t resurface until much, much later after a 36 year career as an elementary school teacher. Yet, my memories of my favorite colors remained with me.
Elementary School
For several years while I was in upper elementary school, a ladies choir came to sing for our school. I don’t remember the music but what stuck with me were their dresses. The ladies all wore a solid color shirtdress that was most likely from their own closet. The affect of the variety of colors was intriguing to me. I was starstruck. I kept this memory for such a long time that I made myself a single color dress to wear to work many years later.
Shirt dresses possibly from Villager.
Memories of Favorite Colors,Age 13
My mother loved clothing and dressing nicely. I could always count on her for a lovely outfit for a Christmas gift . For my thirteenth Christmas, she surprised me with several items to mix and match in forest green and light blue. There was a green blouse with light blue flowers, a fluffy Mohair blue sweater,blue pants and a light blue skirt. I was in heaven. Those colors have stayed dormant within me although I haven’t done anything with them. Maybe the time is now right?
My mohair sweater looked like this only in light blue.
Memories of Favorite Colors -Chocolate Brown and Light Blue
Fast forward ahead to my life as a young wife. My husband and I enjoyed visited model homes to get inspiration for our own space. We were both enamored with a home decorated in dark chocolate brown colors with light blue accents. Again we didn’t act on our interest. But the memory of colors of that model home stayed with us both .
Memories of Colors-Purple
We all must admit that we have been influenced positively and at times negatively by our parents. My mother did not like purple. The purple of the 1960’s was more of a sickly lilac. I share her dislike for that color. It is not a color that blends well with our olive complexion. Here are some beautiful dresses in the color lilac. I must admit it is hard to dislike these stunning examples.
lilac dressThe lilac dress is in the middle.lilac dress
Other Shades of Purple
Much later a wider variety of purples became popular. Shades of purple that constrast well with many colors are a natural choice for my art. Here are some examples.
Splendid Fairy Wren, 30″ h x 25″ wUnder the Palapa, 27″ x 21″Shore to Sky E, 10″ x 10″Love in the Abstract, an abstract art quilt in purples and pinks,24″ x 26″Winter Sunset, An abstract art quilt with lavander,pink, and grey colors,the finished piece
Conclusion
These are some of my memories of favorite colors that have stayed with me for many years. Thank you for letting me share. I assume that others also have fond memories of shades from their childhood and beyond. Do you have any color favorites of your own.? Feel free to share them here.
Myself, the Artist.I am an artist. The tools I use are fabric, threads, batting and a sewing machine. If you look in my studio, you would see a sewing machine, cutting boards, rotary cutter, scissors and tools generally found in a sewing room or fabric studio. However, the items on the walls are quite foreign to a sewing room. Underwater fantasies, abstract art and maybe a Mexican inspired collage adorn the walls of my studio.
Myself, the Artist
Art Quilt Studio in the Santa Cruz Art Center, This is where I work.
How do you do that?
Sometimes it is hard for people to understand what they are seeing. Perhaps they recognize a fish swimming though kelp. “How did you get it to look like the light is reflecting off of the water? What? It is covered with what? I don’t see it. ” Myself, the artist explains the fabric layering technique. I lay the backing down on a table.Then I lay down the batting (soft center of a quilt). Next, create the scene. Finally, I cover the whole piece with tulle netting. After free motion quilting the layers together the tulle netting disappears. The tulle netting remains on top but it can’t readily be seen. Some nettings have extra sparkles on it that reflects the light like water.This answers the question,what do I do?
Traditional Blocks
Quilt blocks (squares) sewn together to create tradional bed quilts. Those blocks are made from patterns. The patterns may be new or a hundred years old. Myself, the artist comes from that world. I love the charming bed quilts that I have made. I just don’t do that anymore.
No more Patterns
I no longer use commercial patterns. When I buy a pattern, my expectation is that it will be correct. If if is a pattern for clothing, I pay attention to the measurements on the back. I expect the pattern to fit. Since I have been sewing clothes since high school, I have used many patterns for myself and my children. Sadly, more often than not, the clothing made from following these patterns carefully did not always fit.
The last straw for me was when my daughters were 3 and 4 years old. I was working full time. Yet, I wanted to make them each a dress with a pinafore. The pinafores were the same size as the dresses. The pattern had not adjusted them to be bigger to allow them to fit over the dresses. I was so disappointed. The dresses and pinafores were wore separately and loved to death by my daughters. I never bought another pattern after that.
Who created the Fabric Layering Technique?
Laura Fogg created the fabric layering technique. Meri Vahl learned it from her. I learned it from Meri Vahl. We are all art quilters located in Northern California. I create my own landscapes and underwater fantasy scenes from fabric. While the techniques are similar, each art quilt is unique.
Swimming With Sea Dragons, an art quilt,This is what I make.
Abstract Art Quilts
Abstract art quilts are also visible in my studio. The abstract pieces I make are designed on a design wall. My design wall is a large wall covered with white flannel. The fabric pieces stick to the flannel. I can move the pieces around until they find their spot. High end redirected fabrics from interior designers add a unique quality to my art. I choose solid colors but also fabrics with texture and movement that appeals to me. This answers the question,what do I do?
Gridlock II, art quilt This answers the question,what do I make?
Mexican inspired Fabric Collages
Mexican inspired fabric collages add whimsy to my studio. They reflect my love and respect for the Mexican culture. I love playing with the bright colors. Three dimensional found objects may also be hand sewn to the finished top.
Some fond fabric memories have stuck with me for many decades. Sewing had been a passion of mine for many years. Then I focussed on quilting traditional bed quilts. I began my art quilting adventure ten years.Where did this passion for sewing begin? In search of the answer to that question, I looked back on some fond fabric memories.
Elementary School
For several years in elementary school, the local women’s chorus came to sing for the school. Singing ladies filled the auditorium stage, each wearing a dress of one solid color. I was mesmerized by all of the different colors. This choir sang only a couple of times at my school, but the image of their dresses stayed with me much more than the music. It was such a fond memory that at age thirty I sewed myself a one color dress (teal)that I wore to work for many years.
The Summer before Grade 7
This !960s crop top and shorts are similar to my first sewing project.
At age 12, I begged my mom to let me take sewing lessons during the summer. My memory is that I had to really push to convince my mom to sign me up. My mom was an incredible knitter but she rarely sewed. A friend of mine from sixth grade and I signed up at the local Singer Sewing Machine store downtown. We diligently chose patterns and fabric to make a pair of shorts and a crop top. If only the class had been designed for a total beginner, it would have been fine. However, the teacher expected women to bring in unfinished projects for her to help them finish. My friend and I had no idea of how to get started or what to do. What a disaster!
Eighth Grade
Luckily, I persevered. Eighth grade sewing taught me the basics of using a pattern and of skirt and blouse construction. I made a white collarless short sleeved shirt with a 7” zipper at the neck. The blue skirt was an A-line.Was there a waistband? Another a 7” zipper was necessary for the skirt. Putting in a zipper was definitely a learned skill. I don’t remember loving the class. But for some reason, I did want to continue to learn more about sewing.
High School
In high school in the late 1960s, I took two years of sewing. I continued to construct more difficult items for my wardrobe. Fond memories involve making jackets with bound buttons . Sophistication reigned when I wore those jackets.In those days, department stores like Macys and The Emporium where I worked sold fabric. As many teenaged girls did,I put a lot of thought into planning my wardrobe. My memory is that I worked hard to have a variety of styles and textures in my clothes. I knit a pale yellow shell to go with a skirt I had sewed. Didn’t everyone make sure their wardrobe was intriguing and fiber fresh?
Adulthood
Over the years I continued sewing clothes. I branched out into bed quilts. I was so passionate about traditional quilts. Often after a monthly lecture at our quilt guild, I wouldn’t be to sleep. I would be so excited to try out a new idea! The memory of my passion remains.
A Fashion Show
Another fond memory while transitioning to my art quilt career involved a fashion show at the Pacific International Quilt Festival. The group challenge was to create an outfit inspired by the book, Rare Bird by Iris Apfel. I made a tunic and skirt using African prints. The skirt is trimmed in black and white lace. While actual quilting was not involved, piecing the fabrics into blocks did take place. I created the fabric by sewing the blocks together. Then I cut out the pieces using a pattern. I had to pay attention to where the particular blocks would show up on the actual tunic.
Becoming an Art Quilter
I have now been making art quilts for ten years. People have told me that I have a good eye for color.My formal art education included one year of breath requirements ( drawing and painting). During my elementary school teaching career, I did work for several years at an arts infused school. When local artists taught my class, I participated along with the students. I later incorporated those lessons into my curriculum.
All in all not a lot of formal art education which makes me reflect on where the sources of my art success come from. I am not sure what I can attribute that to. Maybe the years of wardrobe planning did inform my eye for color. Throughout my whole life, I continued to play with fabrics, textiles and colors. Generally I thought all women did. However, recently I have become aware of the fact that color choices come easier to some than others. Based om my fond fabric memories, I conclude that practice and persistence counts.
Winter Sunset 23″ h x 22″ 2018Burlap and Silk 24″ x 23″ 2015Cheddar and Triscuits,30″ x 28″ 2015
I find Cheddar and Triscuits a perfect name for this art quilt.Cheddar is the name of the color used in. The cheddar and white traditional quilting blocks contrast with several types of redirected high end fabric from the San Francisco Design Center. Fiberous netting and decorative threads and synthetic raffia add texture. I couched other decorative threads and rickrack on a strip of fabric. Then I cut them into smaller pieces to add where needed.
Circuit Board 15″ x 14″ 2015
When I first saw the fabric with the dashes on it, I immediately thought of a computer circuit board. I added many redirected fabrics in this piece. Decorative threads couched on a long strip of fabric and then sliced into pieces add interest. Pulling in colors similar to the fabric with dashes was fun. It was done without much thought but with much necessity.
The Quarry 21″ x 31″ 2015
The Quarry uses found materials,beads and the color,brown that I usually avoid. Someone created fabric with a process of marbling paper in several colors, black, blue and reflective blue and pink. The stratification formed by these fabrics was a new idea to me. Bone beads added a 3D effect as if they were layered under the ground and just peeking out of a cliff.
In Conclusion
Playing with the contrast of fabrics or your chosen materials lets you create something unexpected. An outlier can suggest a new direction or technique to follow in the future. It is up to the artist to make that decision. Or maybe the success of the project that will make the decision for the artist. Make your art like your life depended on it! Because it does!
Most importantly,the City of Fremont’s Olive Hyde Art Gallery offers a glimpse into the textile world with textile creations.The show is the 50th Annual Textile Exhibition. Furthermore,it runs from August 3 – September 5, 2018. This annual exhibit began in 1968. It started in recognition of the Art Center’s original benefactor and Textile Art enthusiast, Olive Hyde. In its early years it was primarily a quilt show. However,this annual exhibition features works of both traditional and contemporary quilt artists. In short,these artists use textiles and fibers to create unique artworks and designs.
Most Popular Exhibition
Above all, this is one of Olive Hyde Art Gallery’s most popular exhibitions. Therefore, the show includes a diverse group of Northern California’s best and often most recognized textile artists.
Participating artists include: Adriane Dedic, Alice Beasley, Ann Baldwin May, Catherine Kelly, Denise Oyama Miller, Dolores Miller, Drew Matott, Emelie Rogers, Gail Sims, Ginger Summit, Giny Dixon, Ileana Soto, Jennifer Landau, Karen Balos, Kris Sazaki, Lin Schiffner, Linda Waddle, Martha Wolfe, Maureen Langenbach, Melba Vincent, Patricia Porter, P. Kay Hille-Hatten, Rashna Sutaria, Susan Helmer, and Zona Sage.
Local Wonders
Alice Beasley
Sunday On Lake Merritt by Alice Beasley
Above all,Alice Beasley has been making portraits of people and objects since 1988. In short,fabric is her chosen medium of expression. However,she incorporates the same light, shadow and realistic perspective used by artists in other media. Like the classical painter, her art is absorbed by an interest in the human figure and in our objects as they are presented in still life.
Dolores Miller
Facets 2 by Dolores Miller
Above all, Dolores Miller supposes that her love of textiles is in her blood. In short,both of her grandmothers were seamstresses. For example,she threaded needles for her paternal grandmother for her job as a fine hand finisher. Furthermore,as a young adult, she made most of her clothes. Hence,Dolores dabbled in most of the textile arts over the years.
Denise Oyama Miller
Montage 2: Strata by DeniseOyama MIller
Certainly, Denise Oyama Miller is a frequent and respected exhibitor at the Olive Hyde Art Gallery. As a result,she shows her unique, contemporary take on quilt-making using strong forms and contrasting colors. Moreover,Miller works in a variety of styles from representational scenes to intense abstractions.
Karen Balos
Chroma Two by Karen Balos
Karen Balos shows her mastery of creating visual explosions of color, patterns, and movements with textiles.
Ileana Soto
Ileana Soto looks into the history of human culture. She sees herself reflected by the complexities of life with her mixed media creations. She adds alternating layers of dye, paint, and fabrics.
Bark Codex by Ileana Soto
Martha Wolfe
Weekend by Martha Wolfe
Inspired by the natural world, Martha Wolfe gathers photographs. She uses them as a guide to create finely-detailed works. She often recreates the images of everyday life with colorful patterns.
Venture by Zona Sage
Zona Sage
Pushing the boundaries of textile sculptures,Zona Sage
assembles different found items and fabrics.
Kabuki Warrior by Adriane Dedic
Adriane Dedic
Adriane Dedic highlights the art of the figure. Inspirations from both Eastern and Western art have led her to create a wide variety of stylized figures, from traditional Japanese Geishas to figures painted by Klimt.
Opening Reception
Furthermore,the opening reception will be held on Friday, August 3,2018 from 7:00 – 9:00 p.m. at the Olive Hyde Art Center, 123 Washington Blvd. (at Mission Blvd.) In addition,parking is available at the municipal parking lot ½ block north of the Olive Hyde Art Center on Mission Blvd. The exhibition runs through Saturday, September 5th,2018. Gallery Hours: Thursday through Sunday, 12noon to 5pm.
This work in progress shows the steps I take to create this abstract contemporary art quilt. I draw inspiration from one fabric.
Color! Movement! Texture!
Color! Movement! Texture! are my main goals for my abstract art quilts. Color is where I begin. What colors do I want to work with? I found a piece of linen at Fabmo, a nonprofit that redirects materials from the San Francisco Design Center. I really liked the variety of colors and movement in this one piece. This fabric became my inspiration to find other fabrics and textures with the same colors for my abstract piece.
Inspiration from One Fabric
Oddly enough, several years ago four quilter friends and I were having trouble choosing colors for a donation quilt we wanted to create together. One friend suggested that we find a fabric and choose the colors from that fabric. At the time I couldn’t quite wrap my head around what she was saying. However, when I saw this multicolored linen, I immediately understood what she had been trying to have us do. Sometimes it takes times for inspiration to happen.
1. Inspiration from one piece of commercially producted fabric
Photo 1 Choosing the Fabric
First I choose the fabric I want to work with. This one piece has so many different colors in it. Those are the colors that I want to work with. This is when the fun begins. I go through my fabrics to find additional fabrics. I look for shades that are lighter and darker.At this step, I don’t reject much.
Photo 2
I chose these fabric from the stash that I had. Also I found decorative threads and yarns to add to some of fabrics for interest.
2. Here are the fabrics I chose from my stash.
photo 3 Inspiration from One Fabric
I place small pieces of fabric on my design wall. I move them around before sewing them together. Then I start to sew smaller pieces together. I make sure that colors, textures and similar pieces are equally balanced around the piece. Does your eye have a place to rest? Are there too many colors in one area? Time to adjust before the whole piece is sewn together.
3. Spring Break
Photo 4 and photo 5
Here is a detail of the smaller pieces already sewn together.
4. A detail of the pieces sewn together5. Another detail of the pieces sewn together
photo 6
6. Another detail of the pieces sewn together
photo 7
7. Here is the finished quilt, Spring Break.
Inspiration from one fabric helped me create this abstract art quilt. Hopefully, this step by step explanation will inspire you as well.
For more information on couching threads refer to my previous post.