Nature themes lend themselves to including unusual animals in art quilts. I often add dragonflies, fish, and jellies to my seascapes or landscapes. My preferred technique for landscape fabric collage is the fabric layering technique. I create a fiber scene on a table and quilt all of the layers together to make a piece of wall art.
A Dragonfly is an Insect.
A local gallery recently had a call for entry for insects. Of course, small creeping animals were my first thought. I would normally not choose to include bugs in my art .But I continued pondering and I remembered that dragonflies and butterflies are also insects. I choose to try my hand at dragonflies since they are a local favorite. Butterflies are beautiful but overdone in my view as small creatures in art quilts.
Teal Dragonflies 17″x 15″ 43cm x 38cm SOLD!
Sea Dragons
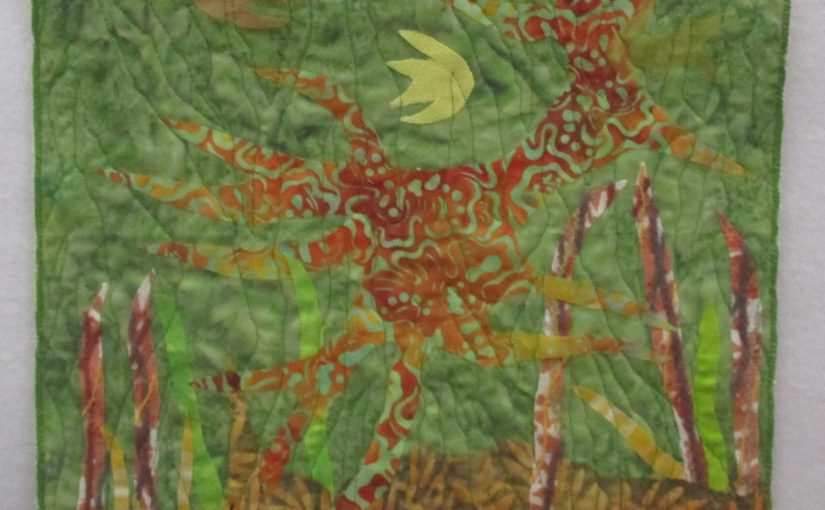
Sea dragons are a facinating cousin to a sea horse. My first thought when I saw one was, was it an animal or was it a plant? I was totally fooled. I love the impressionistic feel that it brings to my art. Each viewer can choose what they wish to envision. Sea horses and seadragons are smaller creatures than expected.Sometimes the differently colored seadragons blend in with their surroundings.
Light Green SeadragonSwimming with Seadragons 26″ x 22″ 66cm x 56cm
Some of the small animals in my work stand out and some don’t. I created these seadragons using thread painting. Sheer fabric fish create a layered look to the seascape.
Sea Dragons in the Golden Kelp,32″ h x 22″ w 81cm x 56cm
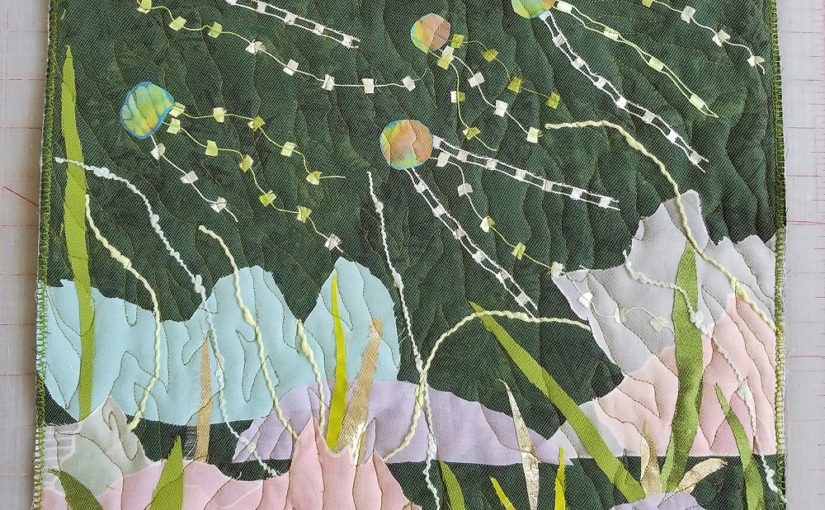
Jellies
Bloom of Jellies, 15″ x 14″ 38cm x 36cm
Jellies add a fun, whimsical feel to my art. Don’t say jellyfish because they are not fish!Decorative threads for the tentacles add a bit of whimsy and recreate a swaying movement of the water.
Jellies in the Deep, 12″ x 13″ 31 cm x 33cm
In conclusion, these small creatures, fish, seadragons, jellies and dragonflies occur often in my art quilts. They are my favorites to create. I like using sheer fabrics to add dimension. Decorative threads are fun and add interest. Impressionistic scenes allow the viewer to become involved and form their own conclusions about what is there.
Birds fill our world with color, sound and movement. One of my favorite places to be is outside, the natural habital for birds.True confessions time-Drawing is not one of my best skills. However,I can copy an outline of a bird. So that is how I often incorporate birds into my art quilts. At this point in my life, I am working with my strengths.
Big Brown Owl,14 ” x 15″ 36cm x 38cm
Shelter in Place Art
Westlake Coot, Big Brown Owl and Westside Egret were created during the first Shelter in Place. I only had limited materials with me,a large bag with small squares. Created the background first, before I considered what would do on the top. Fabric is my first motivation. How will the fabrics play together? Many times the subject matter, comes later. What subject would work with this background? Birds against a sky was my first thought. Size and scale required a smaller scene. Why do a whole body of an egret when a neck supplies the viewer with enough information?
Westlake Coot, 14″ x 15″, 36cm x 38cm $120.Westside Egret, 15″ x 16″ 38cm x 40cmNight Migration,20″ x 24″ 51cm x 61cm
Never miss an opportunity to add texture.
A bird’s habitat is full of texture, trees, grasses and underbrush. Threads and found materials lend themselves well to creating an impressionistic view of an avian’s favorite place to be.
Snowy Egret,34″ x 24″ 86 cm x 61cm
Break Your Own Rules
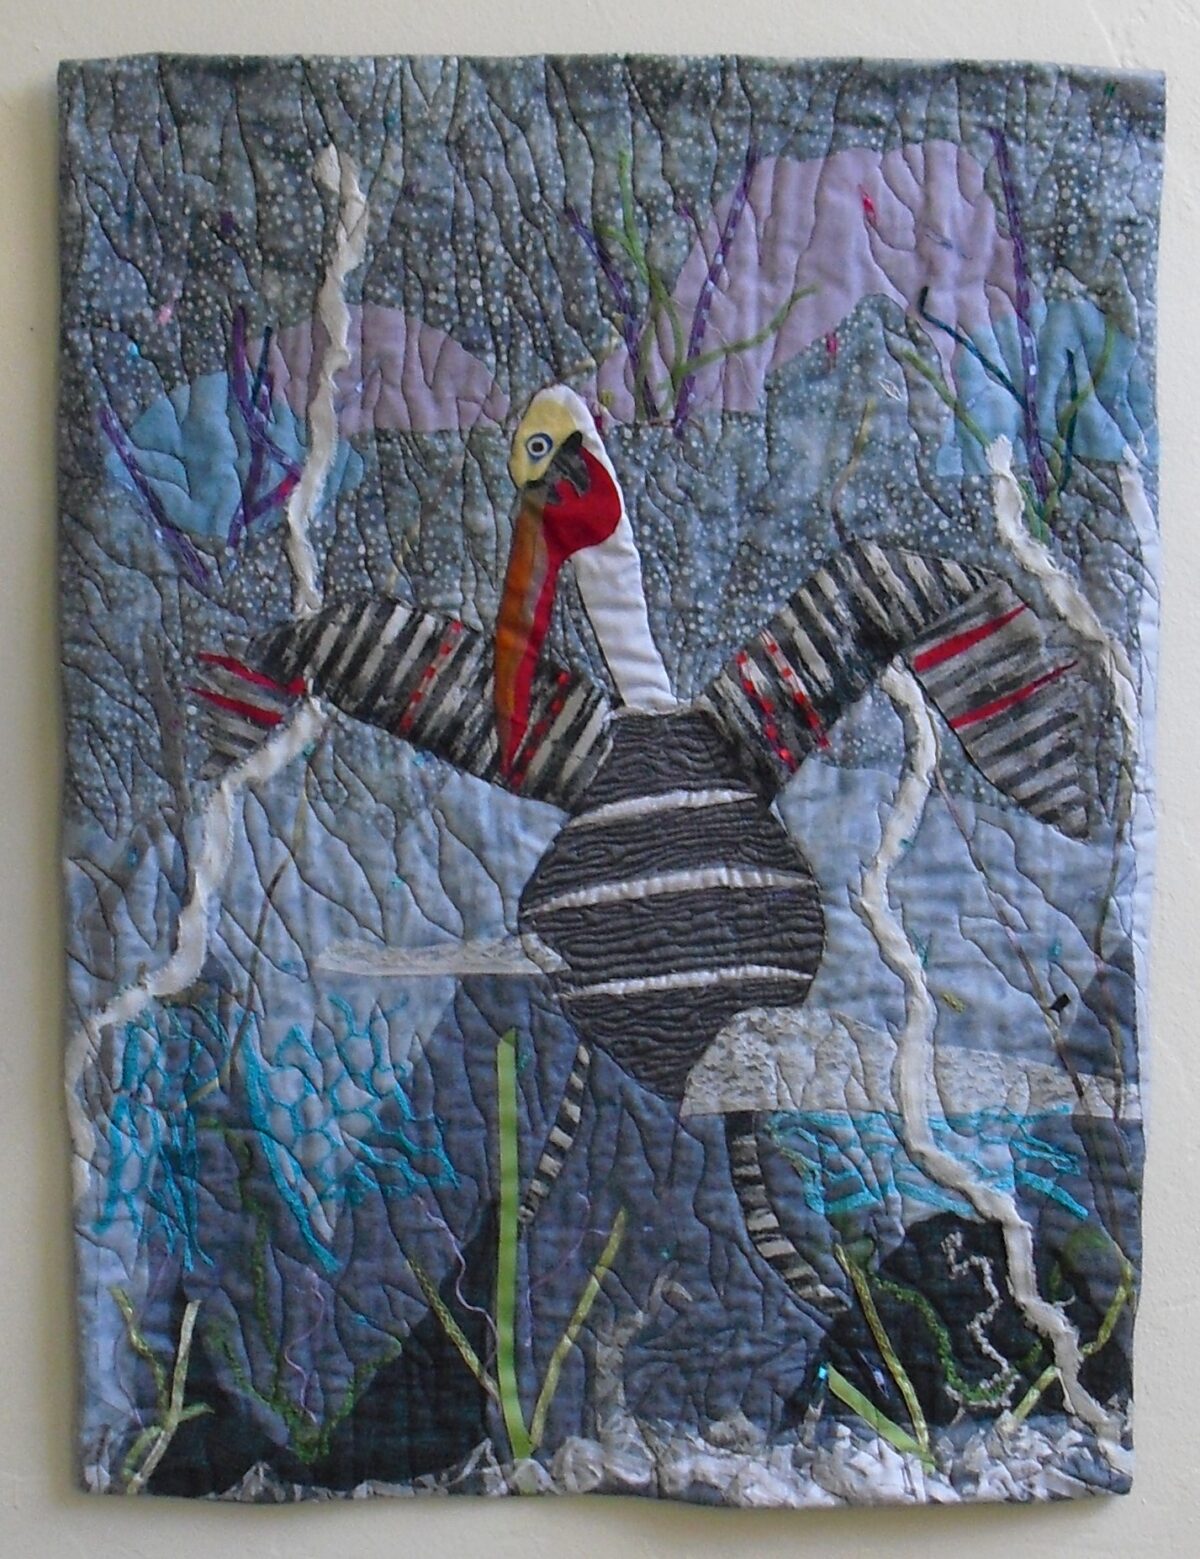
Pelican in the Mist and Nesting Pelican break my rule for just doing bird outlines. Looking at the light and dark stripes of redirected piece of fabric reminded me of feathers. I cut the fabric and used the same fabric to make the wings,legs and the body of a pelican. An artist never knows where inspiration will come from. Take a chance.Sometimes things just work.
Pelican in the Mist,25″ x 23″ 64cm x 66cm
Water Fowl and Coastal Birds
Inspiration often comes from one’s locale. I live on the Central Coast of California. The second largest wetlands in the state, Elkhorn Slough is not far away. Westlake Park with a spring fed pond is adjacent to the local elementary school.
Staying close to home is what we all did this year. Be inspired by where you are.
Learn how to make a fabric landscape collage quilt using the fabric layering technique. In general, this art form is accessible to all skill levels of art quilts.
Make a Fabric Landscape Collage Quilt
Introduction
In this post you will learn how I make a fabric landscape collage quilt. Basically,the fabric collage is covered with tulle netting and then, free motion quilted together.
Free motion quilting is a high level quilt skill. Before I learned about fabric layering, I had almost given up on perfecting my skills at it. Yet, I found the fabric layering technique very forgiving for practicing free motion quilting. It became a great way for me to advance my skill level of this technique . Try it. Maybe it will help you too.
Topics Covered
How to create a fabric landscape collage art quilt
Follow a step by step procedure
Seascapes- Underwater Fantasies!
Trees with Color! Texture! Movement!
How to free motion quilt successfully!
Conclusion
How to create a Fabric Landscape Collage Art Quilt
The fabric layering technique uses a table rather than a design wall to design. First, I create a scene. Next I cover it with tulle netting. Then I free motion sew the three layers(back, batting,top) together.I use this technique for my Nature portfolio; landscapes,seacapes, mountains,and trees. I prefer to create a more impressionistic scene than realistic view.
Many beginners are encouraged to find a photo that they like in order to copy it for their first fabric collage. A photo to copy may be helpful at the beginning stages. As my artist career advances, I find a photo more restricting than freeing. My art is all about color, texture, and movement. To me copying a photo creates a flat rendition of the scene. That is not the effect that what I am going for.
First Steps
To begin, I choose the fabric that will create the background. Fore most, I prefer to choose a fabric with some dimension already on it, ie. light and dark spaces. For example, if I choose a dark background, then I will choose lighter colored materials for my plants, fish, rocks and other items . On the other hand, if I choose a lighter background, then I will choose darker colored scenery.
In this photo, the quilt sandwich is ready. Choose the backing fabric. Place it on a table. Cover it with batting, the soft center part of a quilt. Place the background fabric on top. Iron each layer so that they will lie flat.
step 1 Begin with a quilt sandwich; back fabric, batting and background fabric
Step 1
First, the back fabric is flat on the table. Next, a piece of batting is laid on top of that. Clearly, you can see the white batting hanging a bit over the edge. Then I laid a piece of moddled commercial fabric on top. The piece is about 14″ by 14″36 cm x36 cm. I let the fabric’s different shades of coloring do part of the work in creating interest and depth in the piece. Finally, I lightly baste the layers together with an Avery glue stick.
step 2
Step 2
Next, I cut out light colored rocks. I placed them in the foreground. Then I cut out irregularly shaped dots of different colored batik fabric for the jellies,or jelly fish. I place the jellies as if they are swimming in the current.
step 3 Add plants with fabric and decorative threads
Step 3-
Next, I cut out plants and place them between the rocks. Next, I add decorative threads for the tenacles of the jellies. Adjust the decorative threads so that it looks like the water is moving them. After that when everything is in its place, I baste the pieces in place with a tiny dab of glue. I use a long pin to place the smallest spot of glue under the fabric. This helps me keep the dot of glue small.
step 4 Cover with tulle netting and pin down.
Step 4
Next I cover the scene with tulle netting. Then I pin the tulle in place. The tulle is really hard to see in this photo. Similarly, it usually appears almost invisible when the piece is finished. I am not fussy about the color of the tulle that I use. A black tulle will add a muted tone to your piece. A lighter color like white becomes more invisible in the final piece. Some tulle now comes with sparkles. This works especially well for water scenes. The sunlight seems to reflect off of the water!
step 5 Started free motion quilting.
Step 5
Next, I free motion quilt the three layers together. The first step is to lower the feed dogs on my machine. Primarily, this allows me to move the piece smoothly however I want. The quilting creates another level of movement. If the feed dogs( the little metal teeth) on your machine aren’t adjustable, cover them with a plastic attachment to free motion quilt. Tightly hold the edges of the quilt taut and smooth while quilting. I like to create plants moving in the water with my quilting. However, you may choose whatever you like.
The art quilt is completed.
Step 6
Finally, I finish the piece by zigzagging the edges twice. However, for larger pieces, I prefer sew a facing to the front and turn then turn the facing to the back. Then I hand stitch it down.
Finally, here is a photo of the back of the piece. The machine stitching is easily viewed.
It is easier to see the quilting from the back.
Seascapes
Seascapes are basically a variation on landscapes but underwater. My seascapes are often underwater fantasies of marine life and plants.
Above all, marine life is front and center in my home town of Santa Cruz, California. For example, this is where three young princes of Hawaii first surfed in North America on July 19, 1885 on large redwood boards. In addition, Santa Cruz is at the top of the Monterey Bay with the world class aquarium just an hour away. The area is also home several national marine research facilities. Surf City, U.S.A takes its marine life seriously.
Art ranks High too.
On the other hand, Santa Cruz is also listed as fifth in the nation as an artistic destination. That is to say that many artists live in the county. That is to say that marine life and art come together in this newer genre of art quilts. Come be inspired to try it yourself!
A Visit to the Monterey Bay Aquarium
When I first started making marine life art quilts, I visited the Monterey Bay Aquarium. In other words, I wanted to observe the fish. What do their mouths look like? What shapes are their tails? My intention was to create a accurate picture of the sea life. However, that idea went out the window very quickly. In conclusion, there is no one way that a fish’s mouth looks. The variety of shapes and forms is endless. My underwater fantasy portfolio was born. In addition, I was free to create an animal in any way I wanted because there was probably a fish that looked that way somewhere.
Deep Blue Sea 37″ x 24″ 2020 $2100.
Sea Dragons at the Aquarium
Similarly, I saw my first sea dragon at the Monterey Bay Aquarium. I couldn’t believe my eyes. Was that a plant? Was that an animal? It was impossible to tell. I was fascinated. Ever since that day, I have been incorporating sea dragons into my art.
Technically, sea dragons are cousins to the sea horse. What? It is hard to believe. Sadly for us humans, the sea dragon display is not longer at the aquarium. Happily for the sea dragons, they have been returned to their natural habitat in the waters of the Monterey Bay Marine Sanctuary. However, these fascinating animals may be on display at another aquarium.
I incorporate color, texture and movement into my art quilts while using the fabric layering technique.Plants and animals may stand out or barely be seen depending on their color. In the same way, lots of thick decorative threads add texture and life to the underwater rocks. In addition, in Sea Dragons in the Golden Kelp, I created the animals by thread painting on Sulky water soluble fabric stabilizer. This thread painting technique creates lacy and leafy animals. Free motion quilting adds movement by creating plant life that seems to move with the currents. Use one’s imagination to see animals among the plants.
Violet Seascape 33″ x26″ 2020 $2100.
Furthermore, underwater fantasies lend themselves to the use of sheer fabrics. Who knows what shadowy beings are lurking in the depths? Shiny, reflective fabrics cut into the shapes of fish and marine life add a dimension that often only becomes visible is a certain light. What a surprise! What fun!
Large Spotted Fish 15″ x 15″
Trees
Furthermore,I use this technique often to create some of my most favorite art quilts highlighting trees.
Vacant Lot 43″ x 31″
First of all, trees in art quilts are my most popular pieces. Above all, everyone can relate to the shape and various colors of trucks and leaves. Vacant Lot, is an early example of one of my tree art quilts. Furthermore, five of my art quilt trees hang permanently in local Santa Cruz County Kaiser Permanente Medical facilities.
Tree Friendly Town
I live in a tree friendly town. That is to say that Santa Cruz, California is part of the Tree City USA program. My county is full of fruit tree orchards as well as redwoods. Furthermore, the Spanish explorers saw their first redwood tree in Santa Cruz County. In addition, California’s first state park, Big Basin is also in my county. That is a lot of trees for the second smallest county in California.
Of course, many locales are tree friendly places even if they not they are enrolled in the national urban tree program. We can all relate to trees and leaves; the forms they take and the shapes they make. Creating trees lets me explore and expand my use of texture, color, and movement. Let me take this opportuntity to share my love of trees.
Use of Color
Young children and other people know what color a tree should be. We understand the general shape of a tree including the wide variety of sizes and forms. Change the color of a tree to an unnatural color. Our brains will still recognize that it as a tree. This is what makes it fun for an artist.
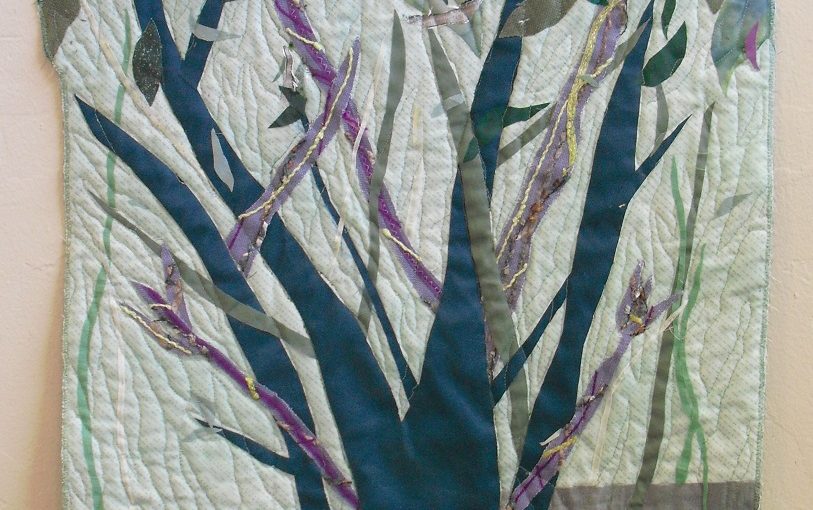
Teal colored tree trunk and branches ? Not so common nor are violet branches. I have received such a positive response from the movement of leaves extending beyond the edges of the art quilt that I have continued to do that.
Along the Path 34″ x 22″ soldAt the Edge of the Grove
29″ x 26″
What could be more fun than orange branches!
Tree Along Creek 32″ x 27″
This tree along the creek has pale colored branches with bluish green tint from couched yarns and decorative threads. The pop of medium green comes from a piece of dress fabric from the 1940s.
Adding Texture
Celebrating Fall has branches made from a highly textured yet, loosely woven fabric. I couched decorative threads are on top of the fabric to add more interest. This same couching technique is also visible in Tree Along Creek and At the Edge of the Grove.
Celebrating Fall 33″ x 31″ 2019
Adding Movement
In Looking up at Dusk,flying leaves and twigs are carried along by the wind. While creating this piece, I actually toss some pieces onto the quilt top. Great fun! Great serenpidity!
Looking up at Dusk,31″ x 24″ 2017Overlook 35″ x 26″ 2018
In Overlook, I choose a green and white patterned fabric for the trunk and branches. I couched (zigzagged)decorative threads and yarn to the fabric before cutting out the shape of the tree. The white spaces on the fabric create movement. The curvy line quilting in the sky also adds action. The sky fabric is from an indigo dying class. Can you see the clouds moving across the sky?
How to Free Motion Quilt Successfully!
Free motion quilting is an advanced quilting technique. Free motion quilting is when the quilter is in charge of moving the quilt instead of the machine. Here are a few easy tricks for success.
You must be able to lower the feed dogs on your sewing machine. The feed dogs are the little metal teeth that help move the fabric through the machine. If your older machine doesn’t allow for this. The feed dogs may be covered with a plastic attachment.
Use a darning foot while quilting attach photo.
While free motion quilting, the quilter moves the fabric. While stitching the throttleusually used by your foot pedal , goes quickly and your hands move the fabric slowly. Remember ,the mantra is fast feet, slow hands.
Use Aurifil 50 wt. thread is by far the best thread to use for free motion quilting. It is strong and thin. It is available in many colors at better quilting shops. While it seems expensive, there is really a lot of thread on the spool. I once pieced and quilted a king size bed quilt using only 1 spool of thread. This product will give you the best result for free motion quilting.
Practice your skill. In order for the stitches to be the same size, practice moving the fabric slowly while making the foot pedal throttle go quickly. This skill is not difficult but it does take practice.
Conclusion
Fabric landscape and seascape fabric collages are a fun and exciting new art form. People of all ages may begin their art exploration with them. They are a forgiving way to practice fee motion quilting. They let me explore my love of Color! Texture! Movement! while using of redirected materials. A win-win situation.
Myself, the Artist.I am an artist. The tools I use are fabric, threads, batting and a sewing machine. If you look in my studio, you would see a sewing machine, cutting boards, rotary cutter, scissors and tools generally found in a sewing room or fabric studio. However, the items on the walls are quite foreign to a sewing room. Underwater fantasies, abstract art and maybe a Mexican inspired collage adorn the walls of my studio.
Myself, the Artist
Art Quilt Studio in the Santa Cruz Art Center, This is where I work.
How do you do that?
Sometimes it is hard for people to understand what they are seeing. Perhaps they recognize a fish swimming though kelp. “How did you get it to look like the light is reflecting off of the water? What? It is covered with what? I don’t see it. ” Myself, the artist explains the fabric layering technique. I lay the backing down on a table.Then I lay down the batting (soft center of a quilt). Next, create the scene. Finally, I cover the whole piece with tulle netting. After free motion quilting the layers together the tulle netting disappears. The tulle netting remains on top but it can’t readily be seen. Some nettings have extra sparkles on it that reflects the light like water.This answers the question,what do I do?
Traditional Blocks
Quilt blocks (squares) sewn together to create tradional bed quilts. Those blocks are made from patterns. The patterns may be new or a hundred years old. Myself, the artist comes from that world. I love the charming bed quilts that I have made. I just don’t do that anymore.
No more Patterns
I no longer use commercial patterns. When I buy a pattern, my expectation is that it will be correct. If if is a pattern for clothing, I pay attention to the measurements on the back. I expect the pattern to fit. Since I have been sewing clothes since high school, I have used many patterns for myself and my children. Sadly, more often than not, the clothing made from following these patterns carefully did not always fit.
The last straw for me was when my daughters were 3 and 4 years old. I was working full time. Yet, I wanted to make them each a dress with a pinafore. The pinafores were the same size as the dresses. The pattern had not adjusted them to be bigger to allow them to fit over the dresses. I was so disappointed. The dresses and pinafores were wore separately and loved to death by my daughters. I never bought another pattern after that.
Who created the Fabric Layering Technique?
Laura Fogg created the fabric layering technique. Meri Vahl learned it from her. I learned it from Meri Vahl. We are all art quilters located in Northern California. I create my own landscapes and underwater fantasy scenes from fabric. While the techniques are similar, each art quilt is unique.
Swimming With Sea Dragons, an art quilt,This is what I make.
Abstract Art Quilts
Abstract art quilts are also visible in my studio. The abstract pieces I make are designed on a design wall. My design wall is a large wall covered with white flannel. The fabric pieces stick to the flannel. I can move the pieces around until they find their spot. High end redirected fabrics from interior designers add a unique quality to my art. I choose solid colors but also fabrics with texture and movement that appeals to me. This answers the question,what do I do?
Gridlock II, art quilt This answers the question,what do I make?
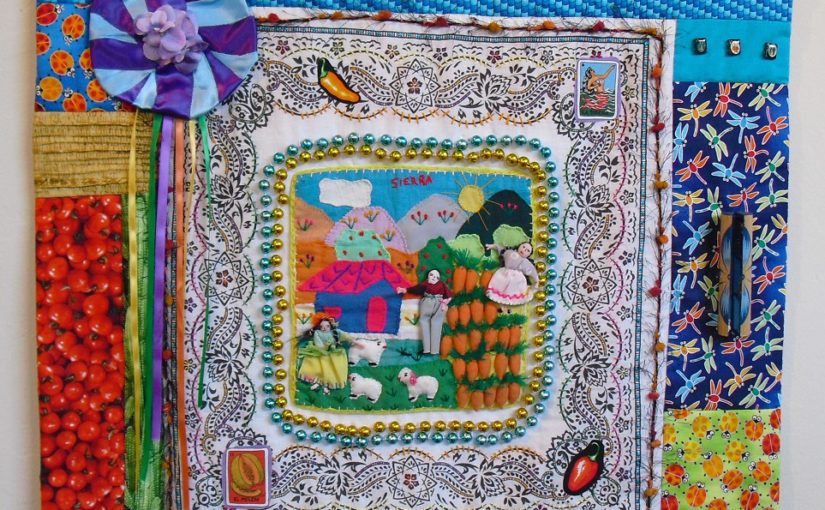
Mexican inspired Fabric Collages
Mexican inspired fabric collages add whimsy to my studio. They reflect my love and respect for the Mexican culture. I love playing with the bright colors. Three dimensional found objects may also be hand sewn to the finished top.
Try these low tech quilting hacks to make to make quilting tasks easier. This post is about my favorite tools that I often use in my studio. Redirecting materials are a major motivating factor in my art. It so happens that it affects my low tech quilting hacks as well.
Threading the Needle
My regular sewing foot has a white plastic piece that holds it together. A bit of the white forms a background that allows for the ease of threading the needle. For years, I sewed clothing. Yet, never noticed this because I had no need to change the foot. As soon as I started quilting and began to use different feet, I noticed that threading the needle became more difficult.
What Had Changed?
I couldn’t figure out what had changed. It took me a while, the small white background was not longer there. So I recreated the white by using a small piece of white paper. I now keep a particularly stiff piece of white paper close at hand. For easy threading of the needle, I slip the paper behind the needle. When I use the walking foot or darning foot for free motion quilting, I can see the needle’s hole much better.
a useful white piece of paper to aide threading a needle
Easing of Fabric through the Feed-A Low Tech Quilting Hack
Many years ago I received a stick that looks like an orange stick used for nail care. Suzanne Cam gave them away as part of a quilting workshop. This tool has now become an indespensible tool. I use it often to grab threads, to gently guide fabric smoothly through the feed when necssary.
Moving Small Pieces- A Low Tech Quilting Hack
I also use the stick to move small pieces of fabric. For the fabric layering technique,I create my art flat on a table. I place the backing fabric down first. Then I lay the batting on top.Finally, I create the scene. At times this requires a gentle movement of small pieces of fabric or yarn. I use the stick for this. Nothing else creates a smooth curve or allows me to control the placement of small items or details.
a multiuse well used stick
Tiny Globs of Glue
At times I need to glue items to my fiber pieces. Often I only need the tiniest bit of glue not a glob of glue that might show. When my studio was in my home, I would use a plate from the kitchen to put the glue on. After moving to my studio,no plates were readily available.
Making Do
I flipped over the 3 ” plastic cap from the can of starch to use. To control the smallest bit of glue, I use a large needle or hat pin. When finished I can easily wipe off the residue of white glue . The pin or needle is then ready for its original intended use.
Plastic caps to control globs of glue
A Design Wall
I use a design wall to create my abstract pieces of art. It is essential for me to have a large space available. I would recommend at least 60″ high and wide. My studio design wall is about 90″ by 90″. I covered the wall with a piece of white flannel fabric. It is held in place by push pins. Portability is not an issue for me. Other quilters will swear by their expensive design walls. Don’t be fooled! Simple can be just as effective!
My large white flannel design wall design
True Confessions Time!
I am not an early adopter nor a gadget person. Quality standard tools and materials are necessary. These hacks are very low tech. Whatever works! For those still reading this post, I expect to hear a chuckle or two or daresay I, some laughing out loud at their simplicity. What simple hacks do you use? Please share.
Sea Dragons Exhibit at Aquarium,Birch Aquarium,San Diego.
TRADEMARK AND COPYRIGHT 2019 THE ASSOCIATED PRESS. ALL RIGHTS RESERVED. By Julie Watson
All things considered Seadragons & Seahorses, Birch Aquarium’s new permanent exhibition that brings seadragon conservation to the forefront. Above all,the exhibition is home to Weedy Seadragons and several species of seahorses and pipefish.
For the first time ever, Birch Aquarium has successful bred Weedy Seadragons behind the scenes of this exhibit. In short,only a handful of aquariums around the world have bred these unusual fish. The babies are not on display, but you can learn more about their exciting birth on our Seadragon Breeding Program page.
Birch Aquarium,Scripps San Diego,CA
Why Seadragons and Seahorses?
The husbandry of seadragons is increasingly vital due to the impacts of climate change, warming oceans, and illegal collection of wild populations, whose numbers are still widely unknown.
Birch Aquarium has been successfully rearing seahorses in captivity for nearly 25 years. Similarly, that makes us a leader in the field. Furthermore,we hope this new exhibit will result in our first successful seadragon breeding.
Weedy Seadragons
Surprisingly,these seahorse cousins use their bright coloration and seaweed-like appendages to hide among the kelp-covered rocky reefs of temperate southern Australian waters.
Sea Dragons in the Golden KelpSwimming With Sea Dragons
Monterey Bay Aquarium
From the first time I saw sea dragons at the Monterey Bay Aquarium, I was fascinated. Was it a plant? Was it an animal? Seadragons and sea horses are surprisingly cousins. Unfortunately, for the interested public the Monterey Bay Aquarium exhibit is no longer. The sea dragons returned to the wild as the Aquarium often does.
I have created several art quilts inspired by the sea dragons. However, nothing is quite like seeing the real animal. That is why I was so excited to hear of this new exhibit and the excitement that it is generating.
Inspiration and the Wonder of the Collider Event Display
Inspiration and the Collider Event Display on a Tuesday 7/3/18
Ben, the physicist studies collider event displays. I, the art quilter looks for inspiration. We had our second meeting at my studio in the Santa Cruz Art Center, 1001 Center St. Downtown Santa Cruz. My studio is 243 square feet small but I have 3 walls to show my work on.
Fabric Layering Technique
I had a fabric layering piece in progress on my table. Then I explained the technique to Ben. First, I lay a piece of backing fabric on the table. I cover it with batting, the soft material inside of a quilt. Finally, I cover the piece with tulle netting and free motion quilt the three layers together. I like using this technique for making underwater fantasies and landscape quilts. I had previously made an interactive activity with precut fish and kelp for visitors to create an underwater scene. Since Ben had expressed an interest in creating some art as well, I thought that this would be a good introduction to the materials. It’s hard to create art on demand so Ben took it home to play with.
My inspiration comes from Fabmo
My inspiration comes from the materials and how they play together. Many of the materials I use come from FABMO(Fabric and more) http://fabmo.org/fabmo/Home.html. It is an all volunteer nonprofit based in Mountain View. It turns out that Ben lives nearby and jogs on the same street regularly. Each week FABMO volunteers visit the San Francisco Design Center. They collect materials; fabric samples, decorative details, wall paper sample, tiles, that would otherwise end up in the landfill. These materials available to the public for a donation. They even come to Harvey West Park in Santa Cruz about 5 times a year. I have been volunteering there for about 9 years. I am very passionate about sharing the work FABMO does as well as using their unique materials.
How do I Solve Problems?
Ben asked about limitations that I might have in my work. How do I solve problems? I find it necessary at times to stop when working on a piece.Then I return later to look at the work with “fresh eyes”. What else can be done to make it better? Are the colors and textures balanced? I had to admit that I do not stress too much about choices I make while making my art.
Let’s take a break.
Time for . . .
Fun Facts for Nonscientists
A cell is made up of molecules. A molecule is made up of atoms. An atom is made up of sub-atomic particles. Sub-atomic particles are made up of electrons and nucleons. A nucleon has protons and neutrons in it. A quark is smaller than that.
THE MYSTERY OF THE COLLIDER EVENT DISPLAY
At our first meeting, Ben, the collaborator had shown me photos of some collider event displays. Incredibly, they looked like fibers. He hoped that they might prove to be an inspiration. Some threadlike lines created a circle and crossed at the diameter. As far as art, they struck me as fairly uninspiring. However, after hearing the science behind it, they became much more interesting. Do not confuse a collider event display with a cardboard event display from a sales convention.
Path of One Particle
For example,each line represents the trajectory or path of one particle after a crash like event. The scientists break apart the particles to study them. The fallout from the crash like events can be predicted. The lines represent what it would look like after many collider events. When someone understands what they are really looking at, it becomes more interesting. Eureka! I created a truly inspired fiber piece with different threads, thicknesses, and colors. Above all, the scientific explanation solved the mystery of the uninspired photo.https://annbaldwinmayartquilts.com/2019/02/fusion-of-art-and-physics-ii/
The gloomy June coastal overcast was just lifting as I stepped off the bus on Science Hill at the University of California, Santa Cruz(UCSC). The sun was out but a coolness in the air remained. A slight hint of redwood filled the air. Having been on campus numerous times but I hadn’t recalled the loveliness of the fragrance. Enchanting, it was.The collaboration between the artist and the scientist is about to begin learning from guarding chalk to black holes.
Bridge from one side of campus to the other.
The Physics Office
I enjoyed the short walk to Benjamin Lehmann’s office in the Interdisplinary Science Building. I had never been there,but I had been to the nearby Science Library. After arriving a bit early, I took the opportunity to look around the lobby . I snuck a look at the photos of professors and PhD candidates on the wall. As it was finals week, the lobby was busy with a diverse group of students working on their laptops. The days of science being a males only field are over.
Ann Baldwin May 2018, art quilterBenjamin Lehmann, Phd physics studentBen’s office
Ben’s Office-From Guarding Chalk to Black Holes
When Ben arrived, he showed me his office, a small room with 4 desks and a chalkboard. Evidently, physicists resisted the change to white boards. They have been able to continue with chalk and blackboards for their labors. Each grad student guards their special stash of chalk. As a retired elementary school teacher who spent most of her career teaching from a chalk board, I found the practice relatable and charming.
The Search for Common Ground
We began taking baby steps to find common ground to work together. Ben pulled up some images,photos,charts and graphs on his computer that he thought might be a starting point of inspiration. They were incredible shots of space. I prefer my art be more impressionistic rather than photo image perfect. However, I plan on keeping an open mind on this aspect. I may be adjust my opinion for this project. Ben expressed an interest in being an active participant in some of the artwork.The fabric laying techniques easily accessible to newcomers. He would create a scene and I would do the sewing part. The possibility is worth looking forward to.
Learning about Dark Matter
Ben asked what I understood about dark matter. My response pertained to my very limited knowledge of black holes. Ben graciously commented that many words seems similar but have different meanings. As a theorist, he explained that he studies the beginning of the universe by studying particles and their actions right after the Big Bang. Dark matter is matter(solid, liquid, gas)that is all around us but we can’t see it. I thought of wifi. As an educational system, a core part of UCSC curriculum fosters interdisciplinary studies and collaborations as essential to the future work environment. Ben, as one of its students was successful in communicating these difficult ideas. While I understood his explanations, I warned him that I might need to have them repeated again.
Scientists need to Communicate Clearly
The issue of scientists communicating to others is crucial, more now than ever. Explaining complex scientific concepts to people, however educated they my be in their own fields, is a crucial skill. Ben shared that monthly lectures were offered by the Physics Department. At those meetings, different physicists to share their work. He admitted that he sometimes couldn’t totally understand the physicists whose work was in a field of physics different from his own. We must all work to break down the silos of communication.
Creativity -Thinking with an Open Mind
Creativity involves being open to new thinking or trying something new. One must venture forth without knowing what the end process or destination may be. In other words, Ben, theorical physicist and I, art quilter both had a creative day.
Finals Week
As the early afternoon heated up, Ben had to leave to proctor a final exam. I continued to sit on the bench we had found outside inhaling the redwoods until it got too hot. UCSC rightfully holds a place on the list of most beautiful campuses. I thoroughly enjoyed my visit. I undoubtably was the only person relaxed and smiling on that finals week afternoon.
Lost in space. Starting the collaboration,I felt a bit lost.
Collaboration of Physics and Art 1
My Collaboration of Physics and Art 1 began June 13, 2018. I am an art quilter and fiber artist. Physics PhD candidate, Benjamin Lehmann, University of California, Santa Cruz was my collaborator, (I have read far too many World War II books to not get stuck on the multiple meanings of the word, collaborate. I must get past that.) UCSC Physics professor, Stephanie Bailey,initiator of the idea,explained,
“This project aims to enable people to access and engage with physics through art and to think about the role physics plays in our lives and world at large.” I plan on blogging about our collaboration. I hope that it proves to be of interest.
The Artist’s Short Bio
Professor Bailey initiated the collaboration with a call of interest to local artists. I responded in order to connect more with the field of my daughter’s boyfriend. My own background is in the Humanities,History and Spanish. I started sewing in high school. Later I took up traditional bed quilting. About ten years ago, I initiated my foray into art quilts. In 2012, I retired from teaching elementary school.
Searching for the New
Since then I have been a full time art quilter. I never took physics in high school. Feeling ready to try something new,I really had no idea what I had signed up for. While being open to the experience, I didn’t know what to expect. What will I be able to create? Will the scientist be creating art as well? The timing for the project was compatible with my schedule. I was open to taking a new direction in my art. The plan is to complete the project with a show in January, 2019.
City Lights, a fabric art quilt
Imagining a Plan
At first,I considered which of my pieces might align best with “space shots”. Then I decided that the abstract pieces or fabric layering technique creating scenes would work best. I feared I would have problems coming up with ideas. Then at least I could fall back on what I had already done. While it feels safe to have ideas before I start, I want to keep my options open to be inspired to move in new directions.
This is the process that I could use. Imagine stars instead of jellies.
What Could I Do?
However, so many questions remained. How many pieces of art would be expected? How many other pairs of collaborators would there be? As if she heard my questions, Professor Bailey communicated a list of 15 local artists. I recognized several friends of mine on the list. Their work, painting and fused glass is very different from mine. I will focus on what lends itself to fiber. I will not be too concerned about completely a certain number of works.
Upon reflection, I am struck by the greater meaning of our collaboration. How do people of different points of view and experience come together ? How do we learn to work closely together? Ultimately, how can we learn to see the world through the eyes of someone different from ourselves?
Sea Dragons in the Golden KelpUnder the Shady Tree 27″ x 38″
Color! Texture! Movement!
Art quilts by Ann Baldwin May are all about color, texture and movement. Her inspiration comes from the natural world as well as from Mexican and Native American Influences. Motivation stems from how the materials play with one another. Her materials of choice are redirected fabrics from the San Francisco Design Center.
The artist’s portfolios includes abstracts, seascapes, landscapes and Mexican inspired fabric collages. Artist created fiber details, tucks or found objects add texture. Flowing quilting lines and curved line piecing creates movement . Techniques include curved line piecing, free motion quilting, and fabric layering.
Bio
Ann Baldwin May was born and raised in Palo Alto, California. She received her education from University of California, Irvine. She has a BA History,anElementary Teaching Credential, and a Masters in Teaching Spanish. Her first quilting class was in 1975. She retired in 2012. She worked 30 years as a bilingual teacher and Bilingual Resource Teacher in Watsonville, California.
Being an Artist
After making over 300 bed quilts, she turned her attention to art quilts. Ann is passionate about using repurposed materials often from the San Francisco Design Center. She has won several awards for her work. Five pieces were recently purchased by Kaiser Permanente for their Santa Cruz County facilities. Her work reflects her inspiration of materials, nature and her love and respect for the Mexican culture. Ann Baldwin May Art Quilts participates in the juried Santa Cruz County Open Studios Art Tour. Visit her studio and gallery in the Santa CruzArt Center, 1001 Center St. #4 Downtown S.C.
Organizations
Pájaro Valley Quilt Association (PVQA),a past president, secretary and parliamentarian. Santa Cruz Art League Pájaro Valley Arts Council Studio Art Quilt Associates(SAQA)-international art quilters organization New Fiber Group of Santa Cruz County
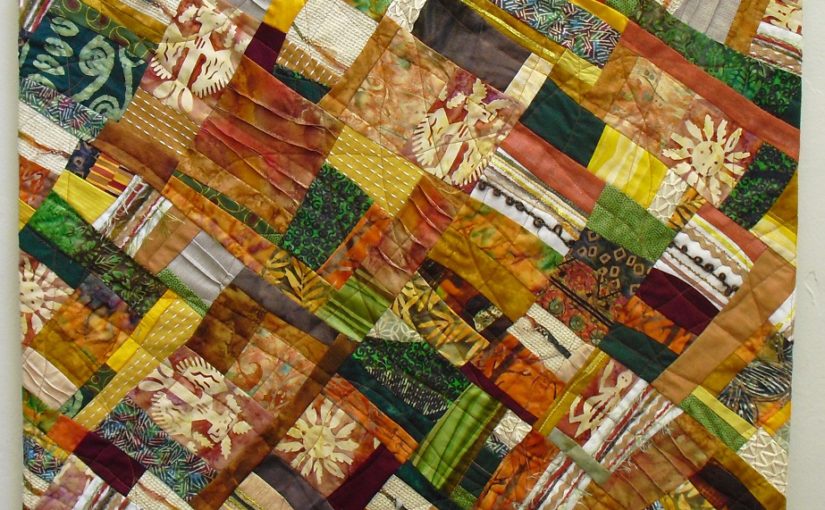
Simply,my art quilts may be abstract, whimsical or impressionistic. Furthermore,inspiration comes from the natural world as well as from Mexican and Native American influences. In addition, materials of choice are redirected fabrics and found objects. They come from the San Francisco Design Center. In addition,art quilts let me to play with color and texture. My technique, Scribble Quilting allows me to create movement on many of my pieces.
A Short Bio
I was born and raised in Palo Alto, California.In high school I studied sewing and clothing construction for two years. Later,I continued to sew much of my wardrobe. As a newlywed, I took my first quilting class at a neighborhood fabric store in Huntington Beach. My husband and I lived and traveled in Europe for a year.Then we moved to Santa Cruz, California in 1980. I continued to sew clothes and make quilts for my family.I stopped counting bed quilts at 300. After teaching 30 years in Watsonville as a bilingual teacher, I retired.
A main motivation of mine besides making stunning art is to reuse materials. Pieces of yarn and decorative threads that some people may discard become unique design elements. I couch (zigzag) them on a strip of fabric, cut them and use as fabric. Yet, sometimes there are decorative threads that one just has to buy. There is one like that in this piece. The ribbon alternates rusty orange and green with 3D native inspired tied knots. Bring Your Bravery! Be Brave!
Choosing Colors- Be Brave!
Choose your color scheme. I recommend three to four colors. Sort hues from light to dark in the same shades. Be brave. Experiment with different colors on your design wall. Don’t be afraid to eliminate fabrics. Start with more material than you think you might need. Include one bright fabric that makes the piece pop.
Creating Details Bring Your Bravery! Be Brave!
Couch (zigzag) decorative threads on 5”wide strips of cotton. Try something new. Bring Your Bravery! Be Brave! Emphasize the art element of line by couching with thread that matches the yarn to make the sewing thread disappear. Double or triple the ply for a thicker line. Repeat four to six times using different colors and types of decorative threads. Couch the decorative threads fairly close together about 1/8-1/4 inch apart. Leave a 1” space on each side of the fabric strip. This gives you flexibility. You can always make it smaller.
Tucks add texture.
Bring Your Bravery! Be Brave! Tucks add texture. Fold a 12” length or longer strip of fabric wrong sides together to create a fold. Stitch 1/8” or 1/4” close to the fold edge. Choose your thread to blend into the fabric or to stand out as a design element. Make 3-5 tucks on the same strip of fabric. Remember to save room for the seam allowance on the sides. Press to lay flat. Cut up the strips into 4”- 8”pieces. Balance their placement on the design wall.
Temporarily Mark your Design Wall
Plan to make your finished artwork about 24”square. Mark with pins the approximate size of your finished piece on the design wall as a guideline. Remember when you are putting fabric on the design wall, the finished product will be smaller. Start with fabric pieces that are a bit larger.
Photo 2 Small strips are being sewn together.
Place the Pieces Randomly
So, you have assembled your own “fabric” with couched decorative threads and tucks. Now it is time to mix those fabrics with others on the design wall. Bravely put the pieces up randomly and start to move the pieces around to see what goes together. What fabrics jump out at you?
Photo 3 Almost all squared up.
Balance the Fabrics
Limit those to an odd number of them. Balance the different fabrics making sure that they are spread out evenly over the top. Beginners might choose to piece their top using straight lines up and down. Placing the pieces on a diagonal adds interest. A diagonal quilt will go past the guideline pins and be trimmed into a rectangular or square.
Show courage. Sew, cut and move fabric around the design wall. Keep cutting and sewing pieces together until it pleases you. The top doesn’t need to be totally finished to start to sew. Sew straight or curved line seams. Continue to sew pieces together into about 8” strips. Pin them to the design wall either in straight lines or on a diagonal. Allow time for this process. Trust yourself.
A “Painful” Time
This can be a “painful” time for an artist, if the piece isn’t coming together as one wishes it would. I find that if I don’t like a part, it gets more interesting after I cut it up and rearrange the pieces. Leave items on the design wall and return later to look at the piece with fresh eyes. Complete sewing the top when you are happy with it. Prepare the quilt sandwich and quilt. Scribble Quilting is fun and adds movement to your piece. Whichever way you quilt your piece, you will have an artful abstract art quilt as testament to your bravery.
About the Author
Ann Baldwin May lives in Santa Cruz, California. In 2012, she retired after teaching elementary school for 36 years. She has won several awards for her work. She participates in the juried Santa Cruz County Open Studios Art Tour from her studio in the Santa Cruz Art Center. May is a member of SAQA( Studio Art Quilter Associates). Contact her at baldwinmay49@yahoo.com or www.annbaldwinmayartquilts.com. Or visit her Etsy shop at annbmayartquilts.etsy.com
Directions for Curved Line Piecing-optional
Lay two pieces of 5” cotton squares on top of each other right sides up on the cutting mat. Cut a slightly curved line through both fabrics with a rotary cutter. There will be four pieces. The top of one fabric will fit the bottom of the other fabric like two puzzles pieces making the original square. Take those two pieces that fit together and sew right sides together with a ¼” seam. Only the part of the fabric going through the foot will line up to a ¼” seam due to the curve. Slightly adjust the top fabric as you move them both through the foot. Press open. This technique is very forgiving. You will be amazed at your curved line. Practice making curves of different widths.
Advice for Beginners
Let each person’s eye see the hues in their own way. Let go of controlling the way the colors mix together. The color of thread changes depending on the color of the fabric that it is sewn on. The color of the fabric is influenced by the color it is next to.
When I started making art quilts, I had a lot of experience sewing clothes and bed quilts. I would think of how a traditional quilter would do something and then I would choose to do it differently.
Consider expanding your stash to include a wider range of shades and hues.
Tips
It is imperative to be cautious with certain aspects of our lives, but cutting up fabric is not one of those times.
Create texture by including fabrics other than 100% cotton. While a variety of fabric adds interest, provide some solid fabrics as a needed resting spot for one’s eyes.
Include a bit of fabric that will pop. Shiny synthetics work well for this.
Supplies and Materials
Rotary blade, cutting matt, design wall(white flannel thumbtacked to the wall) sewing machine, batiks, found threads(decorative threads, yarns, rickrack, colored string, synthetic raffia), a variety of small pieces of cotton fabrics(fat quarter or smaller), fabrics of different textures (optional), thread, batting, cotton backing fabric, scissors, walking foot for quilting.
Having Fun With Color!Texture!Movement! appeared in Art Quilting Studio, Summer edition, 2018. Ann Baldwin May is having Fun With Color!Texture! Movement! in each of her art quilts.
Having Fun With Color!Texture! Movement! will show the steps needed to add color,texture andmovement to art quilts using the fabric layering technique.
Having Fun With Color!Texture!Movement! GETTING STARTED
The fabric layering technique makes it easy to have Fun With Color!Texture! Movement! to your art quilts. Begin by laying the back cotton fabric on a table. Choose a size that will easily fit on your work table. A square or rectangle about 15”-20” is a good start. Press the fabric to lay flat. Cover with batting which should also lay flat. Don’t worry if the edges don’t exactly line up, they will be trimmed later. Next, choose a fairly neutral background fabric or fabrics. Overlap the fabrics about an inch. If the fabrics shift during quilting, the batting won’t show. Cut a meandering line to look like rolling hills on the edge of the top fabric. Lightly baste with a glue stick.
Choose your Colors Having Fun With Color!Texture!Movement!
detail of Along the Path
Choose your colors adding a range of hues from light to dark as well as colors that contrast. Play with the colors to see what you like. Be ready to eliminate those that really don’t work. Go for an impressionistic view rather than a picture perfect trunk, leaf, or branch. Each viewer’s eye will blend the colors uniquely.
Start Large to Small
When beginning to create the scene, start with the largest part and work to the smallest. Cut out the tree trunk and add branches as you go. Flip the fabric and use the backside to add dimension. When you have the tree the way you like it, lightly baste. Just baste in a few places not all over. Later on, if you may want to slide a branch underneath and you won’t be able to if it is totally glued down.
Add Details Having Fun With Color!Texture!Movement!
Add rocks to the foreground. Choose fabric that will work for you to add texture. Avoid fabrics that have rocks printed on them. I chose marbled fabric I bought at Pacific International Quilt Festival and a redirected fabric to add texture. You will notice that they are cut simply. Lightly baste the rocks to the background. For the medium sized branches, I couched (zigzagged) decorative threads and ribbons on to a multicolored piece of redirected linen. Then I cut the branches out. I lay them on the piece balancing out the colors. Crossing branches adds interest and movement. Keep going until the scene is pleasing to you. Baste lightly.
Along the Path,detail
Leaves Add Interest
Working on the leaves is so much fun. Gather contrasting and blending colors. Make the leaves about 3”-4” varying the shape and size. Small scrap pieces are all that are needed. Pay attention to balancing the placement of the colors . Reflective, shiny sheer fabrics add a pop to the leaves. Save them for the top for the greatest effect. If you choose to have the leaves stick out from the edge, make those leaves ½” bigger for ease of zigzagging. During the final trimming you can adjust the leaf lines by cutting before zigzagging. Lightly baste leaves in place. Your art quilt will also be successful if you decide to make the edges straight .
The Beginning of the End
When your artist’s eye says that the scene is complete, cover with tulle. Make sure that the tulle is 2 “ longer on all sides. It can pull a bit during quilting. Pin the tulle down making sure that it is flat but not stretched. Use a lot of straight pins; remove as you quilt. As with other quilting techniques, begin in the middle of the piece and quilt outward. Edges may be rolled to accommodate the machine’s space.
Helpful Hints
Beginners will have success stitching along the edges of the branches, following the lines of the fabric. More experienced quilters can add movement by quilting lines resembling slanting plants. Choose a thread color that blends with the background. I highly recommend Aurifil thread for successful free motion quilting. Trim the edges and zigzag two times. Press lightly with a pressing cloth or piece of fabric. Add a sleeve to the back to hang. Stand back and admire!
Everyone Starts Somewhere.
Several years ago I began my path from traditional quilts to art quilts. I took a class in the fabric layering technique from the award winning, Meri Vahl (meriartquilts.com). Meri had learned the technique from Northern California artist, Laura Fogg(laura-fogg.squarespace.com).The technique allows for much personal creativity; none of our work looks similar. I was inspired to create a tree with leaves overflowing the edges as I have sold five pieces to the new Kaiser Permanente Facility in Scotts Valley and WEatsonville, California. A change in color scheme keeps all of my trees unique.
Important Materials
quality scissors; large and small, sewing machine, darning /free motion foot, walking foot for zigzagging, rotary cutter, cutting board, plastic see through quilting ruler, cotton fabric for backing, tulle, synthetic fabrics, redirected materials, commercially marbled fabric, sheers, batiks, Aurifil thread, Avery glue stick, pressing cloth ( to protect tulle and synthetics from melting when being pressed),a pointed wooden stick , straight quilting pins(They are longer than sewing pins.)
Tips
Leave a 1-2” empty back ground space on the sides of your piece. Then when trimmed your art doesn’t lose any interesting parts.
A light colored tulle will be best for your first project. I personally am not fussy about the color of tulle I use.
This technique is a forgiving way to practice free motion quilting. Before I learned this technique, I was ready to give up with free motion quilting in frustration. Lower or cover your feed dogs. Put your stitch length at 0. Use the darning/free motion foot with Aurifil thread. Push foot pedal control fast while slowly moving/quilting the layers of fabric.( Fast foot ,slow hand) Aurifil thread is available at most quilting stores. It appears more expensive but it really isn’t. I pieced and quilted a queen sized quilt of many seams with one spool.
Throwing the leaves onto the scene adds movement. Free yourself from cutting out perfectly formed leaves.
Use a large straight pin like a hat pin to get the tiniest dab of glue on the tip and gently slide under the fabric to be basted. I use a wooden stick similar to an emery stick to help me gently nudge the pieces of fabric to where I want them to be.
Advice for Beginners
I come from the world of bed quilts. The basic sewing skills used in traditional quilting are fundamental for most art quilting. However the “Quilting Rules” can be left behind. Buying patterns, pressing seams and matching seams are a few of those rules I have freed myself from. Give yourself permission to try something new, be it a color combination or creating your own designs. Listen to yourself. Take baby steps. You decide if you like your work or not. If not, change it. There is no wrong way to do it. Many art workshops or seminars begin with activities to get people in touch with one’s creative side.
Along the Path
About the Author
Ann Baldwin May lives in Santa Cruz, California. In 2012, she retired after teaching elementary school for 36 years. She began quilting in the 1970s. Ms. May participates in the juried Santa Cruz County Open Studios Art Tour from her studio in the Santa Cruz Art Center. She recently sold five tree art quilts to Kaiser Permanente for their facilities in Santa Cruz County, California. May is a member of SAQA( Studio Art Quilter Associates). Contact her at baldwinmay49@yahoo.com or www.annbaldwinmayartquilts.com. Or visit her Etsy shop at https://www.etsy.com/shop/annbmayartquilts/
The fabric layering technique of making art quilts uses a table rather than a design wall. In short, I create a scene and then cover it with tulle netting and free motion quilt the three layers(back, batting,top) together. I use this technique for my Nature portfolio; underwater fantasies, trees, landscapes. The photos in this post are of an underwater fantasy, more impressionistic than realistic.
To Begin
To begin, I choose the top fabric. I prefer to choose a fabric with some dimension already on it, light and dark spaces. If I choose a dark background, then I will choose lighter colored materials for my plants, fish, rocks and other items . If I choose a lighter background, then I will choose darker color to create the scenery.
Step 1
The back fabric is flat on the table. A piece of batting is laid on top of that. You can see the white batting hanging a bit over the edge. Then I laid a piece of moddled commercial fabric on top. The piece is about 14″ by 14″. I let the fabric’s different shades of coloring do part of the work in creating interest and depth in the piece. I lightly baste the layers together with an Avery glue stick.
step 1 in fabric layering technique for making art quilts
Step 2
For this piece, I cut out light colored rocks and placed them in the foreground. I cut out irregularly shaped dots of different colored batik fabric for the jellies(formerly called jelly fish). I place the jellies as if they are swimming in the current. An art trick or rule is to have an odd number of items, three, five or nine objects.
step 2 in fabric layering technique another look
Step 3
Next, I cut out plants and place them between the rocks. I add decorative threads for the tenacles of the jellies being aware of the movement of the water. When everything is in its place,I baste the pieces in place with a light dab of glue. One can use different brands of glue. Test before hand that the glue does not discolor the fabric and make a mark after it has dried.
Step 4
Next, I cover the scene with tulle netting and pin the tulle in place.
step 4 in fabric layering technique another look for making art quilts
Step 5
Then,I free motion quilt the three layers together. I lower the feed dogs on my machine to allow me to move the piece however I want. The quilting creates another level of movement.
step 5 in fabric layering technique another look for making art quilts
Step 6
I finish the piece by zigzagging the edges twice. For larger pieces, I often attach a facing and turn it to the back and stitch by hand.
step 6 in fabric layering technique another look for making art quilts
Here is a photo of the back of the piece where you can see the machine stitching easier.
Free motion quilting is at the apex of skill for quilters. The technique takes a lot of practice to master. Before I took Meri Vahl’s class, I had been practicing. To be honest, I was so frustrated that I had almost decided to give up. Luckily, I didn’t. The fabric layering technique is a forgiving way to practice the skill. I highly recommend it.
Here are my suggestions for success in free motion quilting.
Use Aurifil brand thread. It can be found in fine quilting shops or online. It is totally worth the higher price. The thread is strong yet thin. I once pieced and quilted a double sized bed quilt using only one spool.
Aurifil thread 50wt
“Fast feet, slow hands.” This is the mantra for free motion quilting. This means that one pushes the pedal of their machine so that the throttle goes quickly. With the feed dogs down, the quilter slowly moves the quilt with her hands. This does take a fair amount of practice.Practice using the fabric layering technique. Begin by outlining your figures with the free motion quilting.
Have fun practicing with this technique! Let me know how it goes for you! I hope you have as much fun as I do using this technique.