Above all,human spaceflight inspires humans to create art in many forms.In addition,watch the video of a collection of fiber art quilts entitled Fly Me To The Moon. In addition,the show has been touring the country since late 2016. Moreover, many more stops are planned for the schedule. Subsequently,a group of those art quilts honored space travel was displayed at NASA’s Johnson Space Center in Houston in 2015. So this is in honor of the recognition of the 50th anniversary of the Apollo 1 fire. After that,the show’s curator, Susanne Jones comments on the artistic elements of some of the pieces. Ultimately,she notes the educational value of the exhibit to a nation inspired by space exploration.
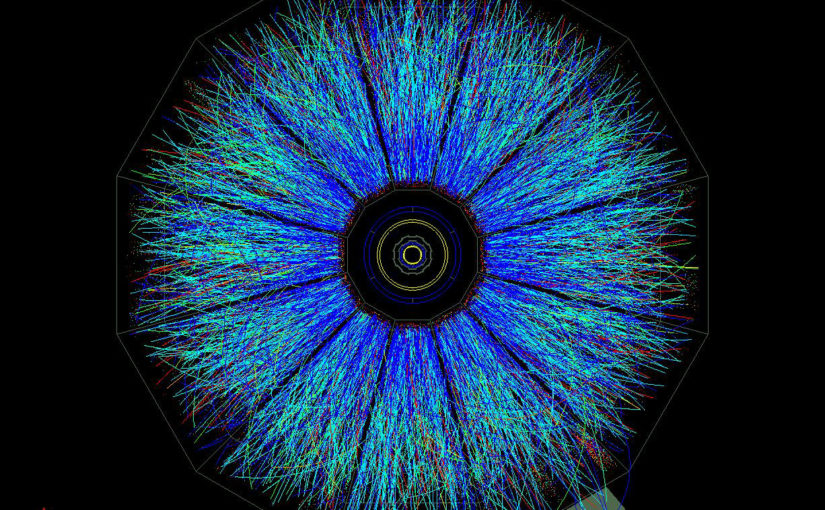
Blue Collider Event Display art quilt in Stitching, CA
The ‘Space for Art’ column recognizes the inspiration from the interaction between space and art. This inspiration presents itself in many artistic forms. For example,creative artists present the story of space exploration.
Quilting adds a New Level
The world of quilting adds surprise and a new level to recent discoveries. Another whole world of fine art that I was completely unaware of. However, thrilled I am to have now discovered it. The space-themed quilts in particular hold much interest.
Finally,these are quilts created and sewn by fiber artists. In addition to fabric and thread, they also incorporate many forms of mixed media.This adds texture and dimension. Read the complete article here.
OCTOBER 13, 2017 BY MARCIA YOUNG (edited for space)
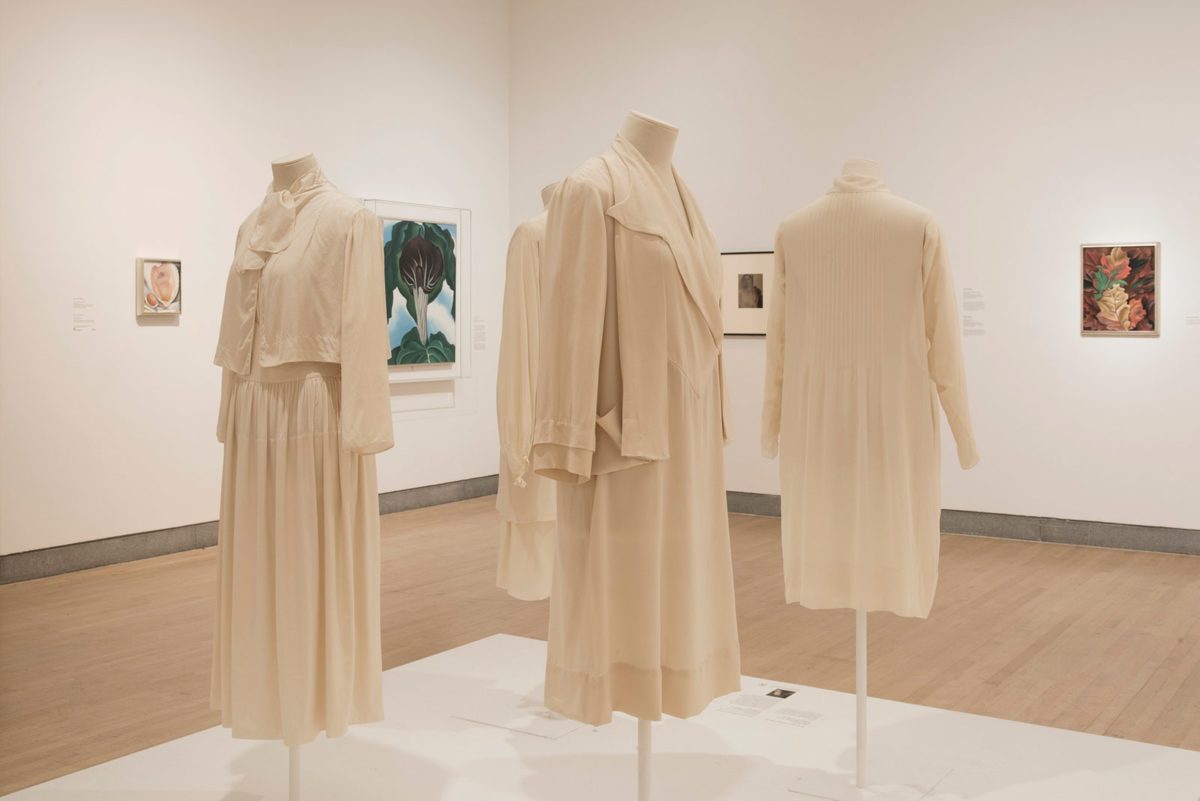
Georgia O’Keeffe and Textiles
First of all,the Peabody Essex Museum presents one of America’s artists in a new light. Georgia O’Keeffe: Art, Image, Style is the first exhibition to place artwork along side of her wardrobe. For example,these textile pieces have never before been shown. Similarly,there will also be photographs of the artist. This unique show is organized by the Brooklyn Museum and guest curator Wanda M. Corn. She is Professor Emerita in Art History at Stanford University. This exhibition is on view at Peabody Essex Museum from December 16, 2017 through April 1, 2018. Then it continues on its national tour.
For more than 70 years, Georgia O’Keeffe shaped her public persona. Above all, she defied labels and carved out a truly progressive, independent life. This was necessary for her to create her art says Austen Barron Bailly. Bailly is the organizing curator. Above all,O’Keeffe dressed as a way to unite her attire, her art, and her home. Fo example,her aesthetic legacy of organic silhouettes, few decorations and restrained color palettes continues to capture the popular imagination. Above all, it inspires leading designers and tastemakers of today.
Georgia O’Keeffe Style
Above all,Georgia O’Keeffe: Art, Image, Style includes 125 works. Furthermore,it examines how the famous artist carefully formed her public image. For example,O’Keeffe considered her clothed body as another canvas for her work,says Bailly. Similarly,the exhibition of O’Keeffe explores how she expressed her identity and artistic values. That is to say,O’Keeffe’s androgynous persona, feminist outlook, stark fashion sense and skill as a seamstress combine to create a new understanding of her role as an artist and an individual.
A Life Long Style
Throughout her life, O’Keeffe had strong opinions about how she wanted to look. It didn’t matter what the dress codes of the era were. O’Keeffe’s distinct aesthetic sensibility started young rebellion against feminine strict roles. In the 1920s and 1930s in New York, her black and white palette dominated much of her art and dress. Later years in New Mexico, her art and clothing changed in response to the Southwestern landscape. O’Keeffe sewed some of the clothes herself. Some clothes were custom made or bought off the rack. Always she consistently favored the simple lines and abstract forms that followed through her artwork and home design.
Step By Step Instructions to Make an Abstract Art Quilt
This work in progress shows the step by step instructions to make this abstract art quilt, Sunlit Boulders. Featured in Art Quilting Studio Magazine, Fall issue, 2018.
Sunlit Boulders 31″ h x 28″w
Inspiration and Adjustments
Sunlit Boulders is an art quilt with curved line piecing, Scribble Quilting and couched decorative yarns and threads. My first intention was to highlight the Native American batik shown on the left on the first photo. As I chose different fabrics, I decided that I would minimize their use. I removed more of that fabric. I was happier with the way it looked. It’s okay to change ideas in midproject if it doesn’t look or feel right to you. Follow these step by step instructions to make your own abstract art quilt. It will be uniquely yours.
Photo 1. gathering fabrics
Photo 1
I am auditioning fabrics that complement and contrast with the batik fabric. Using strips of fabric, I couch(zigzag) a variety of decorative threads and yarns to the strips. I cut the strips apart into varying lengths without much forethought.
Photo 2. Trying out fabrics.
Photo 2
I am still auditioning fabric. I included some pieced strips left over from a previous project. Notice that I eliminated the reddish fabric.
Photo 3. Begin to sew smaller pieces together.
Photo 3
I start to cut up the strips of couched yarns to add to the quilt. I am trying out where I like the pieces, moving them around. Dark strips frame the piece. I begin to sew some pieces together. Figures from the batik stand out enough.
photo 4 Sew pieces together. Move to a different spot to create balance of fabric and color.
Photo 4
Tucks are add texture. Notice that I moved some pieces around. I do more sewing of pieces together.
photo 5. I find problems are solved by cutting up fabric into a smaller piece.
Photo 5
I am not afraid to cut up fabric. I can always use the fabric at a later date for a different project. More tucks are added to fabrics. I eliminated some batiks symbols.
Photo 6. All sewn together.
Photo 6
All pieced together and ready for batting and backing.
Photo 7. A quilt sandwich when the top, the batting and the backing is ready to be quilted.
Photo 7
Scribble Quilting is complete. Edges need to be trimmed and cut straight.
Photo 8 Finished.
Photo 8
The finished art quilt represents my mantra of color, texture, and movement.
This work in progress shows the steps I take to create this abstract contemporary art quilt. I draw inspiration from one fabric.
Color! Movement! Texture!
Color! Movement! Texture! are my main goals for my abstract art quilts. Color is where I begin. What colors do I want to work with? I found a piece of linen at Fabmo, a nonprofit that redirects materials from the San Francisco Design Center. I really liked the variety of colors and movement in this one piece. This fabric became my inspiration to find other fabrics and textures with the same colors for my abstract piece.
Inspiration from One Fabric
Oddly enough, several years ago four quilter friends and I were having trouble choosing colors for a donation quilt we wanted to create together. One friend suggested that we find a fabric and choose the colors from that fabric. At the time I couldn’t quite wrap my head around what she was saying. However, when I saw this multicolored linen, I immediately understood what she had been trying to have us do. Sometimes it takes times for inspiration to happen.
1. Inspiration from one piece of commercially producted fabric
Photo 1 Choosing the Fabric
First I choose the fabric I want to work with. This one piece has so many different colors in it. Those are the colors that I want to work with. This is when the fun begins. I go through my fabrics to find additional fabrics. I look for shades that are lighter and darker.At this step, I don’t reject much.
Photo 2
I chose these fabric from the stash that I had. Also I found decorative threads and yarns to add to some of fabrics for interest.
2. Here are the fabrics I chose from my stash.
photo 3 Inspiration from One Fabric
I place small pieces of fabric on my design wall. I move them around before sewing them together. Then I start to sew smaller pieces together. I make sure that colors, textures and similar pieces are equally balanced around the piece. Does your eye have a place to rest? Are there too many colors in one area? Time to adjust before the whole piece is sewn together.
3. Spring Break
Photo 4 and photo 5
Here is a detail of the smaller pieces already sewn together.
4. A detail of the pieces sewn together5. Another detail of the pieces sewn together
photo 6
6. Another detail of the pieces sewn together
photo 7
7. Here is the finished quilt, Spring Break.
Inspiration from one fabric helped me create this abstract art quilt. Hopefully, this step by step explanation will inspire you as well.
For more information on couching threads refer to my previous post.
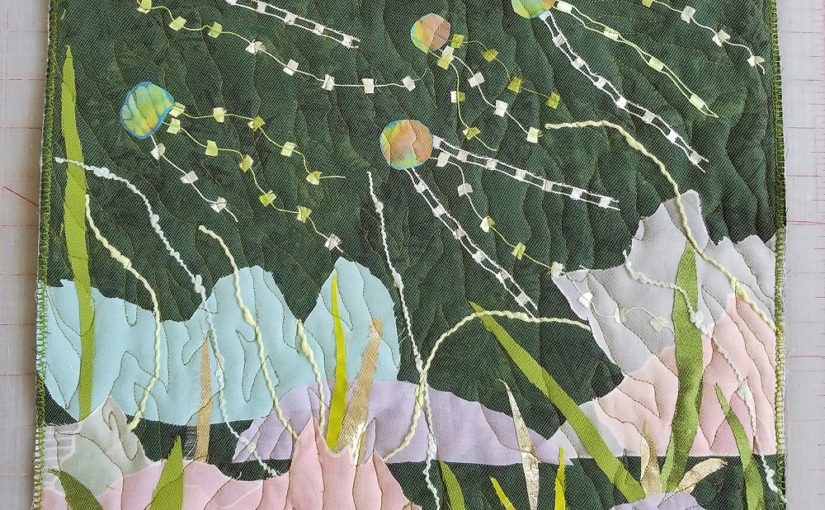
The fabric layering technique of making art quilts uses a table rather than a design wall. In short, I create a scene and then cover it with tulle netting and free motion quilt the three layers(back, batting,top) together. I use this technique for my Nature portfolio; underwater fantasies, trees, landscapes. The photos in this post are of an underwater fantasy, more impressionistic than realistic.
To Begin
To begin, I choose the top fabric. I prefer to choose a fabric with some dimension already on it, light and dark spaces. If I choose a dark background, then I will choose lighter colored materials for my plants, fish, rocks and other items . If I choose a lighter background, then I will choose darker color to create the scenery.
Step 1
The back fabric is flat on the table. A piece of batting is laid on top of that. You can see the white batting hanging a bit over the edge. Then I laid a piece of moddled commercial fabric on top. The piece is about 14″ by 14″. I let the fabric’s different shades of coloring do part of the work in creating interest and depth in the piece. I lightly baste the layers together with an Avery glue stick.
step 1 in fabric layering technique for making art quilts
Step 2
For this piece, I cut out light colored rocks and placed them in the foreground. I cut out irregularly shaped dots of different colored batik fabric for the jellies(formerly called jelly fish). I place the jellies as if they are swimming in the current. An art trick or rule is to have an odd number of items, three, five or nine objects.
step 2 in fabric layering technique another look
Step 3
Next, I cut out plants and place them between the rocks. I add decorative threads for the tenacles of the jellies being aware of the movement of the water. When everything is in its place,I baste the pieces in place with a light dab of glue. One can use different brands of glue. Test before hand that the glue does not discolor the fabric and make a mark after it has dried.
Step 4
Next, I cover the scene with tulle netting and pin the tulle in place.
step 4 in fabric layering technique another look for making art quilts
Step 5
Then,I free motion quilt the three layers together. I lower the feed dogs on my machine to allow me to move the piece however I want. The quilting creates another level of movement.
step 5 in fabric layering technique another look for making art quilts
Step 6
I finish the piece by zigzagging the edges twice. For larger pieces, I often attach a facing and turn it to the back and stitch by hand.
step 6 in fabric layering technique another look for making art quilts
Here is a photo of the back of the piece where you can see the machine stitching easier.
Free motion quilting is at the apex of skill for quilters. The technique takes a lot of practice to master. Before I took Meri Vahl’s class, I had been practicing. To be honest, I was so frustrated that I had almost decided to give up. Luckily, I didn’t. The fabric layering technique is a forgiving way to practice the skill. I highly recommend it.
Here are my suggestions for success in free motion quilting.
Use Aurifil brand thread. It can be found in fine quilting shops or online. It is totally worth the higher price. The thread is strong yet thin. I once pieced and quilted a double sized bed quilt using only one spool.
Aurifil thread 50wt
“Fast feet, slow hands.” This is the mantra for free motion quilting. This means that one pushes the pedal of their machine so that the throttle goes quickly. With the feed dogs down, the quilter slowly moves the quilt with her hands. This does take a fair amount of practice.Practice using the fabric layering technique. Begin by outlining your figures with the free motion quilting.
Have fun practicing with this technique! Let me know how it goes for you! I hope you have as much fun as I do using this technique.
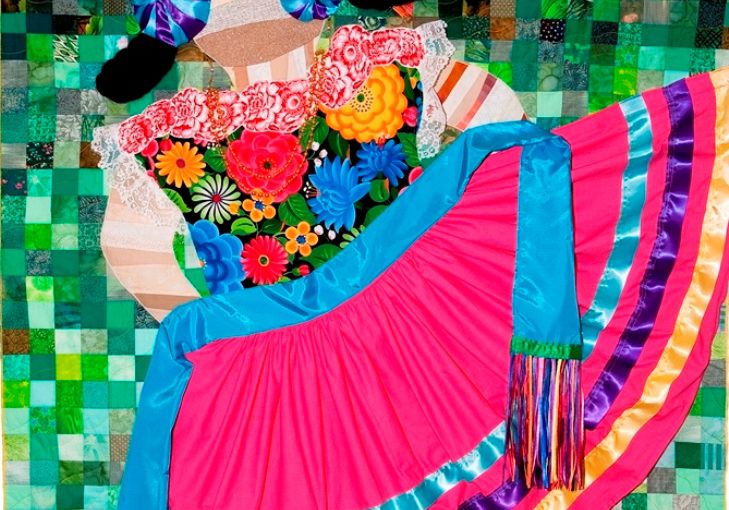
Homage to a Dancer, one of the first art quilts I made.
People ask how art quilts and bed quilts different. The answer is something that I have lived through. I started making bed quilts back in the 1970’s. In 2008, I made the transition to creating wall art. May I offer some generalizations?
Bed quilts and art quilts are made with the same tools; sewing machine, rotary cutters, cutting boards, see through ruler, a variety of feet for their machines. Many of the techniques are also the same. Both have three pieces sewn together,use applique tecniques, quilt by stitch in the ditch, and often include binding. Bed quilts generally have squares or blocks of fabric sewn together. Bed quilters prefer to use 100% cotton. It is the best fabric to work with. It lies flat and most importantly, it is washable.
Art Quilts are Wall Art.
When a quilter moves away from the necessity of washing their piece, a whole new realm of fabric possibilities open up. For me, foregoing the use of patterns also forged my way toward art quilts. I have been “scarred” by my pattern disasters. I flatly refuse to use them anymore unless it is my own pattern. But that only happens rarely. By not following anyone else’s ideas, colors, or materials, I have been able to create my own style.
Silk, linen, synthetics, yarn and decorative threads have become my go to materials. I am very focused on using redirecting fabrics and materials to keep them out of the landfill. I keep the smallest pieces of fabric to try and find a use for it instead of placing them in the trash. Of course, my first focus is on creating a beautiful piece of art that someone will want to live with.
Scribble Quilting is a wacky fun way to quilt. Are you stuck in stitch-in-the-ditch? Are you a bit bored with straight line quilting? Maybe it’s time for you to try Scribble Quilting. It is not hard at all. All you need to get started is a walking foot, a quilt sandwich ready to quilt and different colors of thread.I developed this technique because I was bored with other ways to quilt.Looking for a wacky fun variation to your quilting? Try Wacky Fun Scribble Quilting.
Waiting for the Roadrunner, 22″ x 24″ 56cm x 61cm
Artful and Interesting
First of all,Scribble Quilting is a colorful, artful and an interesting way to quilt. For example,the quilting thread lines cross each other; creating positive and negative space. The sewing lines are the positive space. However,the negative spaces are the shapes created by the lines. Similarly, Lines undulate, curve and wave. Do the lines you’ve made draw your eye in and keep your interest?
By Accident
Like many great ideas, Scribble Quilting was discovered by accident. Once while making a baby quilt,I decided to quilt curvy lines with my walking foot instead of straight ones. Furthermore, I used one of the built-in stitches on my sewing machine which made regular, gentle curves. Soon, I wanted to make the curves wider. Switching back to my usual straight stitch, I began gently moving the quilt from side to side by hand to make wider curves than my built-in stitch had allowed. It was fun, and the lines looked more interesting. I kept quilting, experimenting with contrasting thread colors. Subsequently,I currently finish many of my art quilts this way.
Scribble Quilting
In addition,I named this technique Scribble Quilting. After art lessons were cut at in my elementary school classroom, I noticed that some students showed their frustration with what they considered unsuccessful art projects. After that, they would scribble all over them with four or five different crayons. It caught my attention. However,it looked like a party with confetti falling all over. As I quilted my pieces, drawing lines with multiple colors and crossing over them repeatedly, it reminded me of scribbling.
Fun with Thread Color
Take this opportunity to have fun with thread color. Be aware that the thread color can appear different depending on what colors it is on or near. Free yourself from perfectly matching the thread to the top fabric. I found that even slight variations in the color of the quilting threads added subtle interest to a quilt top.
More color is more interesting. For example, I bought a spool of wacky fun chartreuse (yellow green) thread at a flea market several years ago. I never wear this color and had not tried it in quilting. But this thread has become one of my favorites because of the way it plays with other colors. It brightens green or black fabric.Yet, it often reads as yellow. I encourage you to play with the thread to see how it changes, depending on the color of the fabric. Updated- Sometimes I use just one color of thread instead of more than one.
More Color is Better Except
More color is more interesting, with one exception. Thinking that variegated thread would be fun and wacky, I tried to use it. However, I personally was not satisfied with the results. I had no control over when the colors changed. It wasn’t fun when the bobbin thread didn’t match the top thread. Maybe this is just a personal choice on my part. Each quilter can make their own decisions.
Are you ready to start Scribble Quilting?
Begin each project by quilting straight lines about 5 inches (12cm) apart using a walking foot. Stitch-in-the-ditch works well to hold the quilt sandwich together. Remove the pins to avoid sewing over them. After you’ve finished straight-line quilting to secure the quilt sandwich, change to another thread color.
Next,quilt several lines in one color. Spread the stitiching lines out across the quilt top. As you sew from one edge of the quilt to the other,gently moving the quilt sandwich from side to side. Change thread color and continue quilting. Make wider curves so that the quilting lines cross. Keep quilting until the quilting is evenly space. Are happy with the way the lines cross each other? if not, then do some more.
Instructions
1) Prepare a quilt sandwich by pinning together the backing, batting and top (step 1).
step 1 of scribble quilting process
2) Decide where to start quilting. In the beginning, it’s easiest to start on one side and go to the opposite side.
3) Begin by using a walking foot to make straight lines of stitching about 5 inches 12 cm apart. Stitch in the ditch if you want. (step 2).
step 2 of scribble quilting process
4) Now begin sewing curved lines of quilting, still using a walking foot. Begin curved quilting on the edge of the quilt, near the middle of one side. Pull the quilt taut with both hands as you quilt. Gently move the sandwich from side to side as the machine stitches. Use your needle down position in case you have to stop. Stop quilting to readjust the quilt sandwich. Avoid jerky movements. The quilting thread should form a smooth, flowing line (step 3).
step 3 of scribble quilting process
Problemsolving
If your line of stitches moves abruptly to one side, stop immediately. Remove stitches until you have enough to thread a needle, then bury the threads in the batting. Continue quilting, starting at the end of the line of stitching. If you don’t want to stop or don’t notice the mistake until later, stitch another line of quilting which crosses the first line at the point where the mistake occurred (step 4). This will make the mistake less noticeable.
step 4 of scribble quilting process
5) As you quilt, check the back of the sandwich to see if some areas need more quilting. The quilting lines should be balanced from one area of the quilt to another (step 5). Keep quilting until you like the way it looks. If you’re not happy, add wavy lines in contrasting colors, crossing more lines of quilting.
step 5 of scribble quilting process
6) Bind the quilt using your favorite technique.
Welcome to the joy of Scribble Quilting! I hope that you enjoy using this wacky fun technique as much as I do.