Try sparking your creativity by limiting materials. If you are like most fiber people or quilters, you may have lots of boxes or bags filled with random materials. Shake up your creativity by choosing only one box to use. Limit your materials for your next project to that one box or one bag. Make it work! Of course, you can break your own rules if you need to to use a unique fabric or item that will go perfectly in your piece.
Spark Creativity by Limiting Materials
I find having a studio full of materials limiting and stifling at times. Sometimes new productivity and creativity can come from limiting materials. Stuck in a rut? Maybe trying this will help. Long ago a librarian told me that sometimes having less books on a shelf increases book check outs. Spark creativity by limiting materials. Sometimes less is more.
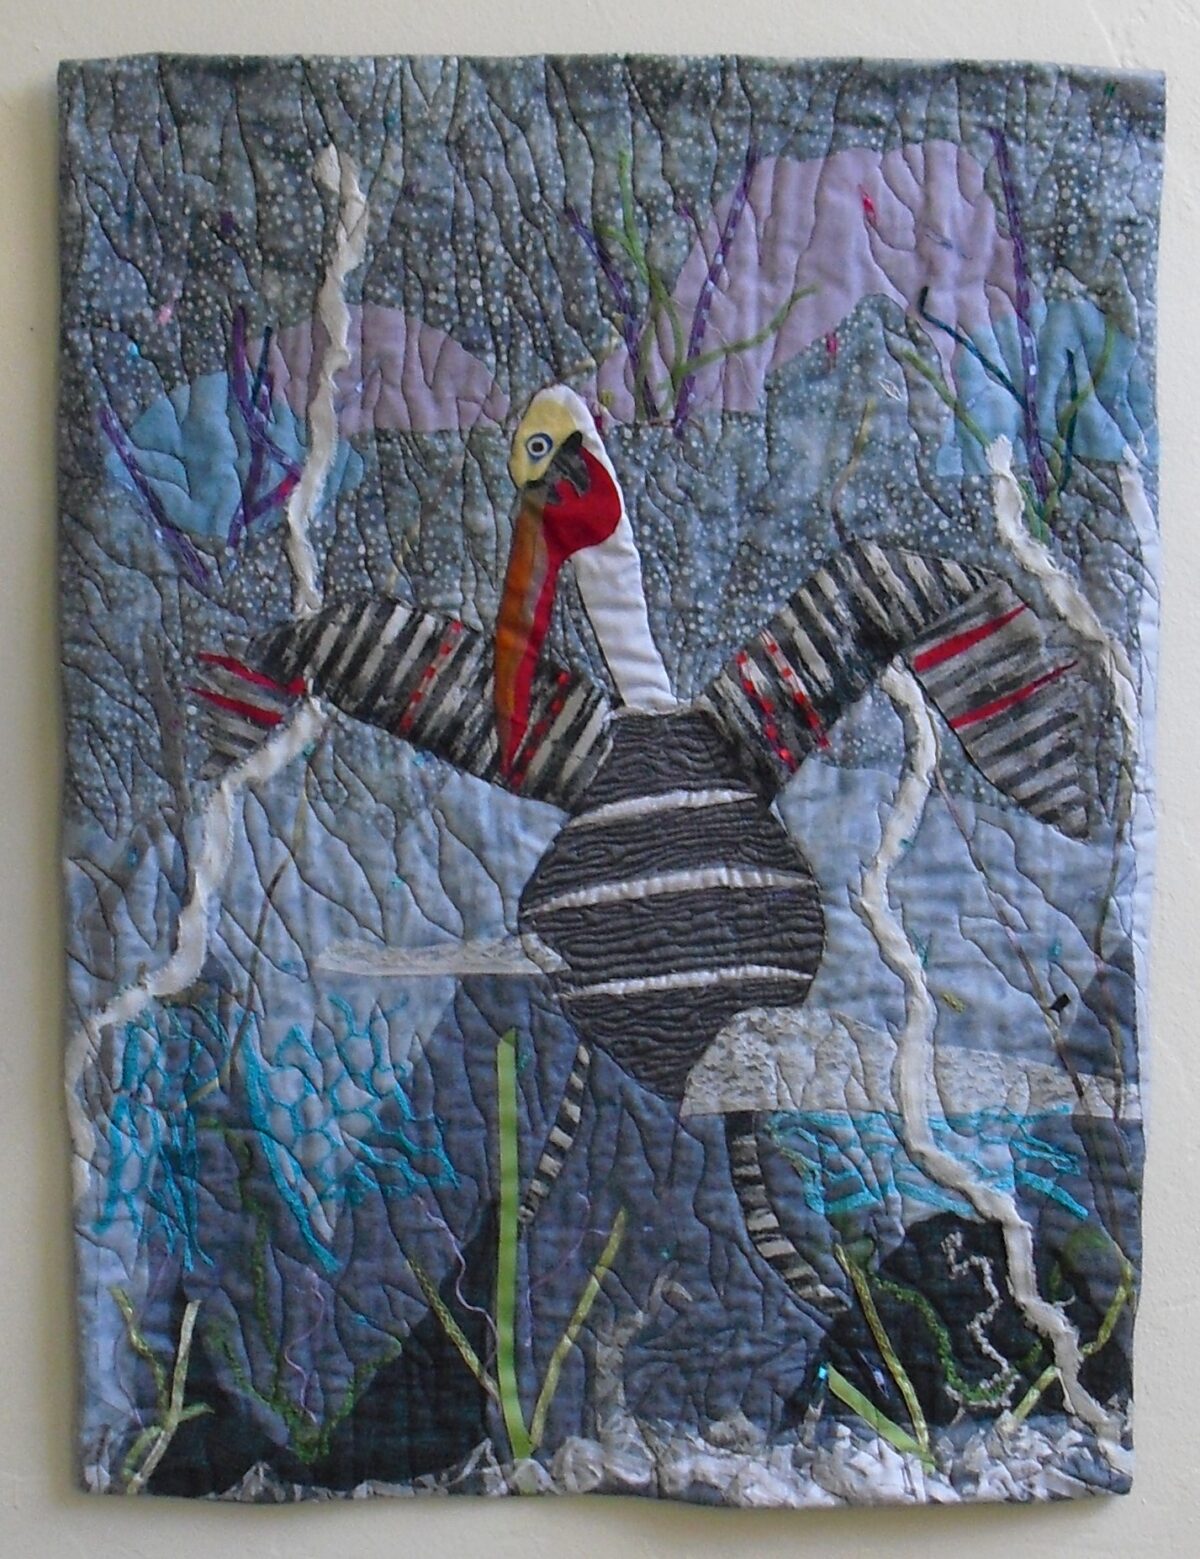
Fabrics with couched (zigzagged threads) prepared previously but unusedI originally planned to use these materials for a small underwater fantasy.
My first plan was to make an underwater fantasy with a Mexican inspired twist. I listened to the materials as they led me in a slightly different direction in my first two pieces. Finally by the third piece I hit my original goal of a seascape with Guatemalan fabric fish. It’s your art. There is no right or wrong, just different.
Geeko Fun, art quilt, 9″x 9″ 23 x 23 cmGreen Gecko, art quilt, 8″ x 9″ 20 x 23cmGuatemalan Fish, blue underwater seascape art quilt 9″ x 9″ 23 x 23 cm
Stuck in a rut? Try this technique to help you see things differently.
Do you have rules for yourself when making your art? You make the rules. You can break your own art rules. For a long time I had a rule for myself that once a piece of art was finished, I would leave it alone. I chose to not change or update a piece.
When I started exploring art quilts I didn’t really know what I was doing. As I got better and more confident, I decided to leave my previous work as it was. Could it be improved? Yes. But why not just move on. Oddly enough, while I knew I could do better, some of these early pieces sold.
Well, a decade passed. Now, I have a better sense of myself as an artist. I decided to take another look at certain pieces. I gave myself permission to rework a piece. If I make the rules then I can break the rule. I liked this freedom and lack of guilt. Break your own art rules.
A Prolific Artist
My fellow artists have called me prolific. That also means that I have a lot of work on hand. During the pandemic I took a different view, reusing a former piece in response to the George Floyd murder. I reused a beige,cream and black abstract art quilt (12″ x 14″ 30 x 36 cm) as a background. I appliqued a black male figure with a sparkly golden heart on top of the abstract piece. Break your own art rules.
Honoring Black Men 2020, 12″ x 14″ 30 x 36 cm $125.
Luckily,this piece was successful. I repeated the process with a cream colored abstract with green accents. This time I added a woman dressed in a skirt and serape for a Mexican theme.
Green and beige abstract art quilt form the background for a Mexican woman with a rebozo(shawl). 10″ x 12″ 25 x 30cm
Pumpkin pie,this abstract quilt began the background for a Day of the Dead skeleton.
Pumpkin Pie,
7″ x 8″ 18 x 20 cmPumpkin Pie reimagined with a skeleton,7″ x 8″ 18 x 20 cm
Breaking a Sewing Rule
I recently broke a sewing rule. I have been sewing since high school which is a long time ago. Somewhere along the way I got it into my head that when hemming a seam I should top stitch it. The stitches would supposedly look better that way. Recently I sewed several large fabric gift bags. First, I folded 1/4 ” fabric from the top and then another 1 1/2″ fold over. To sew this seam down easily, I sewed the seam down on the inside of the bag instead of on the front. However,if there was a difference it was slight.
Gridlock I ,black and white abstract art quilt 33″ x 31″ 84 x 79 cm
I cut up Gridlock I, a large black and white abstract piece( 33″ x 31″ 84 x 79 cm)into 4 smaller pieces. They are not all the same size to maintain a detail. However, because it is an abstract the four pieces work well independently. Changing a finished piece is something that I would never have done in the past. I broke my own rule. I come from the traditional bed quilt world. To me, this quilt seemed small compared with a double size bed quilt that I was used to making. However, as wall art it is too big. Many people don’t have a large wall to accommodate such a piece. Changing one’s mind is acceptable. Give yourself permission to do it. Break your own art rules.
What rules do you make for yourself? Maybe you have rules about certain colors or materials you use? Break your own art rules. No one will know or even care. Creativity might even flow!
What happens to unfinished quilt projects often called UFOs? See these quilt projects in a new way. Maybe they have mistakes or were not coming together asthe original maker intended. Someone may have passed before being able to finish a piece. Many times they are given away. I find these new opportunities in my quilting guild’s flea market.
Some of my first steps into creating art involved taking someone else’s unfinished projects and rethinking how they could be used. Looking back after a decade, I realise that seeing these quilt projects in a new way helped move my creativity forward. Maybe it can do the same for you.
This is a photo of a snapshot I took of this traditional quilt. I found the tulips at a garage sale along with the remaining pieces of fabric. The people were ecstatic that a passionate quilter would finish their mother’s quilt. I used the extra fabric to design and create the sashing and other blocks including the bargello,the stepping stone pieces.
Sorry No Photo
I adopted someone’s squares with colorful 3D stars. I reimagined them as Mexican pinatas. Then I added an iguana to watch the pinata fun.Unfortunately I don’t have any photos of the whimsical piece. Partly because I had no confidence that they were worthwhile. Partly because I completed it before digital cameras made taking photos so easy. However, the quilt did sell at the quilt auction at our annual show.
I made this traditional blue and cream baby quilt from discarded half triangle blocks. Before one is aware, your brain stretches to think in a different way.In addition,it frees your mind to consider a new way of looking at the blocks. Train your brain to do things a bit differently. Leave patterns and instructions behind. Seeing quilt projects in a new way exercises the brain.
With some blocks, I discovered that they had been discarded for a reason. Maybe they were not enough of them to do anything with. Sometimes the blocks were not all the same size. Yet I persevered. I continued to use these unfinished quilt projects in a new way to create a new unique quilt. Little did I know that this unknown direction would lead me down a path to see things differently.
Birdhouse Blocks
I found these bird houses many years ago. Someone had put a lot of work into making them. Yet around that time, I moved away from working with traditional blocks. They remained stored away.
Finally, I decided to pair them with an art quilt tree that I had made. The scene seemed a bit empty of birds in spite of being two main habitats for them. Therefore, taking an environmental angle,I named the piece Remember Birds ?
For many years scrub jays and robins made common appearances in my yard. Yet now I am actually overjoyed to see these previously common birds. I am not sure why they are no longer common. We did have a devastating forest fire not too far off. Or was it the many aggressive crows that had moved in?
True Confessions Time
I am not a fan of commercially made patterns. In my sewing days,I had several bad experiences which I blame on the commercial patterns I used. We pay our money and expect them to deliver. I have never used an artist made pattern. Using a pattern is not an option for me. Maybe that makes it is easier for me than for some to take this path towards creativity.
Unknown Paths
Sometimes we start down paths that we don’t even know are taking us somewhere. We are just trying something new. We have no idea of the ultimate affect they will have on our artistic lives. That is what happened to me. I saw beautiful traditional blocks that were put up for adoption at my guild’s flea market. Someone had put a lot of work into these blocks. Saving me time and energy I thought maybe I could use them for one of my quilts.
In Conclusion
Consider seeing unfinished quilt projects in a new way by reusing someone’s blocks . This is something anyone can do where ever they are in their quilting path. You are the boss. You make the choices. Will they all be successful ? Maybe yes, maybe not. But that is how we learn.
Sea Grass,a new work in progress,uses green,blue and orange, colors that I use often.Nonetheless, this time I decided to do a variation on a theme. Something different but only slightly. I choose a muted tone for these same colors. Because my work is all about Color!Texture! Movement!, decorative threads came on board too.
Getting Started with the New Work in Progress
Choosing fabrics- I start with more fabric than I expect to use.
After I decide on the colors, I find decorative threads that compliment the fabrics. That said,decorative threads may match or contrast with the fabrics.
Decorative threads
Fun threads that might work with the chosen shades of color. In addition,the threads add texture and movement.
Interesting threads in shades of cream to peach to brown add contrast and color.Dark teal fabric with light teal nubby decorative thread
Next, all of the threads are couched(zig zagged) to the fabric. For example, I choose to couch with a matching sewing thread so that the stitches don’t show.
A narrow strip of light green fabric with a 3D dark leafy decorative thread.
This decorative thread is 3D. Above all, it works hard to add contrast, movement and color.
Next I place the fabric with the decorative threads on the design wall.
These next four photos look very similar. However, look closely to the changes. I moved pieces around to balance the colors and details to please the artist’s eye in this new work in progress.
photo 1
In addition,you may notice that I eliminated the brown stripes on the right in the following photo. Similarly,I also removed the dark teal piece in the middle.Removed pieces will be saved for a different project.
photo 2 Sometimes less is more.photo 3This is photo 4
In addition,notice the inclusion of the artist’s signature detail. I sew small pieces of extra fabric together. Then I add them to the piece. As little fabric goes to waste as possible. Plus it adds a little je ne sais quoi to the piece.
photo 4 This photo shows how I sewed together the fabrics in the adjacent area.
By sewing small groups of fabric together first, it allows me flexibility in case I run into a problem. It offers me more chances to add fabric to solve a problem of balancing colors.
Finishing the New Work in Progress
The top is completely sewn together.
I sew curved line piecing to finish the art quilt and add movement to the quilt top. The vertical lines reflect the movement of the details of sea grass.
I finish the edges with a facing turned to the back. Then I hand sew the facing in place. The following photos are close up detail shots of the finished work.
The finished art quilt, Sea Grass. Quilting lines add movement to the quilt top.
Detail Photos
The following photos show details of the completed piece.
Quilters create small pieces of fabric or scraps as a normal part of their sewing process. How to effectively use these scraps is a constant issue. I often use fabric 2″-3″ (5-8cm) to create my art. Guild members have gifted me small pieces of fabric, saying “Here, you use small pieces of fabric. Have these.” I didn’t refuse them. I put them to good use.
A little fabric humor- In my fiber group, I was the only art quilter. The other members made different kinds of fiber art. We would meet and share our art and our process. I learned that what seems obvious to quilters is not always so obvious to others. Discussing my process, I asked how do you think I begin? A friend answered,”You start by cutting up a lot of little pieces of fabric.” I had to chuckle. Sewers and quilters know that as we sew and trim, we easily create small pieces that become our scraps. We don’t need to create our own.
Another Use for Small Pieces of Fabric
Above all, quilters will probably always have small pieces left over. Whenever I make a bed quilt or a lap quilt, I like it to be reversible. In that way, I get two quilts for the price of one. Variety and change is good. Use your small pieces as part of the second side. Sew the leftover fabric from the front together and add them to the back fabric. This uses up the fabrics and also adds to the beauty of the quilt.
Many Art Quilt Techniques use Small Pieces.
There is a wide variety of techniques that use small pieces of fabric. Impressionistic art quilts lend themselves easily to the use of small pieces. With a little trimming a small piece of fabric becomes foliage, a rock or a hint of an animal. I have a container to store strips. Another bin is only for small pieces. Several bags are full of pieces larger than 6″. The real trick is to remember to look in those containers when choosing fabrics.
Small Pieces are my Signature Item.
Several years ago I had a commission to make a huge bed quilt 130″x130″ 325cm x 325cm using geometric shapes of solid colors. This is a king size bed with the quilt hanging down the sides to the floor. I was almost finished piecing the top together. But I came up short of a small bit of fabric. I could have bought some more. Yet I really needed only a few very small amount. I had a few small pieces left over so I sewed them together. That was enough fabric to complete the top of the quilt.
Furthermore, I was so pleased with the effect I decided I would repeat the process in the future. I would add them as a feature to my work. Small pieces (about 2” -3″ 5-8cm) sewn together are now a signature part of my abstract art quilts.
Business Cards Use Small Pieces of Fabric
I use small pieces of fabric to create my business cards. My business cards are small handmade art quilts about 3″ x 4″ 8cm x 10cm.Most people would throw out these small fabric and batting scraps. I sew several small pieces of material together. Then I write the basic information on a solid light color piece with a fabric pen. I add batting. I sew the three layers together and zig zag the edges. The extra effort to use materials that normally would be tossed out is important to me. I like that the card is a small art quilt for those who are unfamiliar with the art form. The positive response I receive for such an unique business card also makes it worthwhile. https://annbaldwinmayartquilts.com/2020/12/artful-fabric-business-cards/ /i
One of my handmade fabric business cards. Each one is unique.The other side with the important information
Will these techniques make all of your scraps go away? Probably not. But it might be a step in tbe right direction.
I do realize that some might consider some of these scrap reducing suggestions to be a bit time consuming or even wacky. However, I am serious about reducing waste and reusing materials.Yet I can be a bit over the top at times. But as I say, ” It is not illegal, yet.” In addition, the best part is one can choose to do these ideas to use small pieces of fabric or not. Sometimes I give myself permission to toss a piece of fabric.
Who isn’t entralled with the incredible colorful childrens’ prints available? I chose fabric based on the colors or animals I wanted. However, I never paid much attention to scale. As shoppers we buy these fabrics with great plans in mind. Yet when one gets home, it can be difficult to match the fabric with others due to scale issues. The animals on childrens’ prints are often not the right scale or size to go together. Pay attention to scale.
Color or Animal
The sea theme and colors are the same but the scale is not. So much to keep in mind.Small whales, the largest is 2″ or 5 cm
The above piece of fabric with whales never seems to fit with other materials. The “largest” whale is 2 inches long,much too small. It seems strange that a whale would be considered too small.
It bears repeating that we usually we choose fabrics based on the particular animal or color of the fabric. Last on the list or not there at all is the size or scale of the print. The print artist can choose to make a small animal large or a large animal small. To my brain, it is most pleasing if the animals printed on the fabric have a similar size and scale. There are always exceptions of course depending on the quilt style. For example,place a large print in the middle of the quilt to highlight it. Then add smaller prints on the sides.
I Spy Quilts
I Spy Quilts are generally patchwork quilts using many fabrics printed with different everyday objects on them. The game is named for the guessing game, I Spy. One person says I Spy an item. The other person tries to find it quickly. In a variation one person describes an item as a clue to find it. This game is especially fun for a young child developing their language skills and vocabulary. The purpose of an I Spy quilt may be to engage in child’s play. However, paying attention to the scale of the items will make the quilt more attractive between games.
A Recent Donation
Recently someone gave me large donation of children’s fabric. Big hopes and dreams for loved ones that didn’t get made. Maybe the children grew too fast or changed their interests. Maybe life prevented the sewer from completing the project. Seeing so much charming fabric made me realize the importance of scale. It also made me think of the challenges it presents.
Quilting with children’s prints is fun. Choosing a color range makes for a more pleasing overall effect. The scale of the animal or object is not the most essential part. However,consider scale for more pleasing artistic endevour. Yet,the affect of scale can not be ignored.
I often add sheer fabrics as part of my art quilt process. Sheers add a subtle dimension to landscapes and seascapes art quilts. During one show, a visitor actually squealed in delight. He had viewed a piece straight on. However, when he walked away that he saw the reflection of the shiny sheer fabric. He squealed much to his own surprise. The sheer fabric proved subtle, yet very effective. The shape may not be visible when viewing straight on but sometimes it is. It depends on the available light. Quite by accident I discovered the surprise sheer fabrics can bring.
Cinnamon Tree 45″ x 15″ 114cm x 38cm
I use small pieces of sheer when creating with my fabric layering technique. The sheer fabric may be used for almost anything. Cut the sheer fabric into any interesting shape imititating a slope of a mountain range, a branch or a cloud. The sky’s the limit depending on the artist’s plan. Some sheers have shiny pieces imbedded in them. This adds extra fun. Cinnamon Tree has sheer leaves,plants, rocks and a peach colored partial background. Maybe the sun is setting or peaking through the clouds.
Subtle Depth in the Background
The use of these sheer fabrics create a subtle depth in the background. Use small pieces to create shadows or who knows what. I like to leave something up to the viewer to decide what they think it is. Each viewer will probably see something different. In Sea Canyon Depths, there are several sheer pieces that may be difficult to see at first glance.
Sea Canyon Depths 40″ x 17″ 102 cm x 44cmBeginning steps to creating include adding sheer fabrics early in the process.This is the beginning of Mexican Iguana, an art quilt that will ultimately show a rain forest landscape.Mexican Iguana a little farther along.
Finding Materials
One has to be imaginitive to access materials. Of course one could buy them. But what fun is that? Finding new uses for what some might call trash is part of my process. In addition, using unlikely materials creates unusual pieces of art. Flea markets and garage sales are good places to search. Preferably I choose to gather materials that speak to me. Then later I decide how I will use them. I try the fabrics out with other materials once I am in my studio.
The fabric for the trees in Desert Trees in the Wash came from FABMO. I embellished the tree fabric with dark stitches to add texture. https://annbaldwinmayartquilts.com/2017/01/discovering-new-stitches/ Notice the peach colored sheer fabric in the background. I slipped in a small piece of a reflective sheer in the center.
Sheer Fabrics from FABMO
The San Francisco Bay Area has many unique things to offer. FABMO.org is one of them for artists and crafters. Every week this nonprofit’s volunteers pickup discontinued materials from the decorators at the SF Design Center. The materials are then made them available to the public to keep them out of the landfill. The sheer fabrics are often slow to be adopted. When I heard this,I started to gather them.I had no idea how I would use them. Slowly they made their way into my art quilts. Would that everyone had this access to a wide variety of sheer fabrics!
You can read more about the fabric layering technique here.
Finding a way to cheat in quilting is a way of letting the fabric do the heavy lifting.Naturally when I suggest a fabric artist to find a way to cheat, I am not suggesting anything illegal. However, I suggest that the background fabric can help you create your art piece. In addition,let the color and design of the fabric add to the work. Fabric collage art brings together smaller pieces to form a unique work of art. Read about background fabric and fabric collage examples.
A whole cloth with a quiltlike pattern known as a cheater cloth.
Cheater Cloth has been available for a long time.
Unbelievably, cheater cloth has been around for longer than you would think. Surprisingly, it appeared as early as 1850. A cheater cloth is a whole piece of cloth printed with usually with a traditional quilt pattern. In other words, it is a short cut for some who wants to quilt quickly. In this way, a person can quilt without having to sew the fabric pieces together. However, to be clear I am not suggesting that one use one of these traditional creater cloths in their art work.
A detail of a cheater cloth that looks like it has hand embroidery sewn on it.
Using Background Fabric to Find a Way to Cheat in Quilting.
Furthermore, it is only in this vein that I call myself a “cheater.” Use background fabric to do the heavy lifting in some pieces. Recently, a fellow artist commented that I had used some paint on an art quilt. Yet in reality it was a piece of fabric that looked like I had painted it. At times I will do the jaywalking of cheating. Select a background fabric that aides in forming depth in your art.
Find a Way to Cheat Yet Make it Your Own.
Here is Beach Tree,2021,an art quilt with a multicolored whole cloth as the background.
Beach Tree, 43″ x 29″ 109 cm x 74cm began with a whole piece of fabric with blended blues and greens. Above all,the multi colored background reminds me of the seashore. Because I live in Surf City, this worked for me. Next,I created a magenta tree on top. Then,I added foliage and leaves to create a tree that is uniquely mine. Indeed,this is the type of cheating that I am suggesting. Use a fabric to enhance your art work. Consequently,add to the design to make it your own. Find a way to cheat in quilting legally.
In November Skies, I cut shades of gray, violet and blue clouds to form the background sky. Rocks and plants fill the foreground. Decorative threads imitate birds flying in the distance. Finally, I cut three flying cranes from an Asian inspired piece of fabric. The birds enhance my work with a bit of elegance that I could not have created on my own. I finished the piece by covering with tulle netting. Then I free motion quilted the whole piece.
Moon Over Slough,21″ x 21″ 53 cm x 53cm uses a multicolored fabric for the background to create layers in the landscape. The moon,slough plants and rocks finish the landscape. The impressionistic lines reach out to the viewer. Are they mountains? water? or sand? The viewer becomes involved in making their own mind up about the piece.
Kelp Dwellers,2018
Kelp Dwellers, 25″ x 25″ 63 cm x 63cm started with a discontinued abstract multicolored sheer fabric sample. There is so much diversity of fauna,flora and movement under the water. Any fish that I cut out can probably be found under the water. I call these pieces Underwater Fantasies because accuracy is not the goal. Sheer and reflective fabrics help to create a sense of wonder.
My Background Fabric
detail of Overlook,35″ x 26″ 89 cm x 66cm,2018
Sometimes I cheat with my own work. The sky background is a piece of cloth I dyed in an indigo class. Actually the fabric is the piece that I used to wrap up my work during the process. In this landscape art quilt,Overlook, it worked to create a cloud filled sky as the backdrop to my tree and owl on a hillside.
Adding Little People
The designers of fabric works hard to create interesting designs. There are so many designs to choose from. This is what encourages the public to buy so much fabric. The designs may be of people, birds, or animals. Those of use who are not strong in drawing can cut out a picture from the fabric. Use it in a fabric collage or art quilt. This is a legal way to use someone else’s work.
Here are a couple of whimsical fabric collages that I made at the beginning of my art quilt career. Without the charming fabric of the little people and the bright colors, the effect wouldn’t be the same.
Teaching, the Toughest Job You’ll Ever Love 1, 2012
This art quilt,Teaching, the Toughest Job You’ll Ever Love 1, 48″ x 43″ 122 cm x 109cm is a fabric collage of brightly colored child friendly fabrics. Some small pieces of fabric are fused on. I added 3D flowers, a golden heart and 3D stars to the quilt top. The lettering is bias tape.
Teaching, the Toughest Job You’ll Ever Love 2, 2013
Furthermore, I had so much fun creating the first piece I decided to create another.This art quilt,Teaching, the Toughest Job You’ll Ever Love 2 is a bit smaller, 27″ x 26″ 69cm x 66cm. Yet, I again used fused pieces and 3D objects added the pieced fabric top.
In Conclusion
It is my hope that you will become inspired to try these techniques. They are another skill to add to your toolkit. Creating a unique piece of artwork that could only be yours is the goal.
As an abstract art quilter, I am always looking for unusual color combos. They show themselves to me in the most random of places. Read to learn how I found unusual color combos in art.
Lingering Fog, 34″ x 34″ 87cm x 87cm
A previous post discussed the steps for creating a light and dark grey piece contrasting with lime green. I discovered this unusual color combo when I noticed scraps I had tossed on the floor. Serendipitious success. How I found unusual color combos in unusual places.
How I found unusual color combos in art.
Recently I found pieces of fabric from different projects that I had thrown together in a bag. I discovered a charming unusual color combo of light purple and a yellow orange.
Spring Sunset 12″ x 12 ” 30cm x 30cm
Meanwhile, I looked up the name for a yellow orange color. It is called amber. What? I thought amber was a darker color. Surprisingly,it turns out that amber is directly between yellow and orange on the color wheel. As a result,I am now convinced that the color is amber.
Lilac
Lilac, a light or medium purple has not always been my favorite color. Growing up it was the springtime purple of choice. Maybe my mother’s dislike for the color influenced me.
However in these times of COVID I find my choice of colors changing. Previously my mantra of Color! Texture! Movement! usually included bold bright colors. These days the colors of choice are lighter and subtle creating calm and peaceful emotions.
Goldenrod Blush,31″ x 32″ 79cm x 81cm 2022
My focus on incorporating texture and movement remain. For some of the fabrics,I sewed a layer of lace on top of a sturdier fabric. Next, I couched (zigzagged)decorative threads on top. Then I cut the lace into smaller pieces.You may be interested in reading other blogs on how to add more texture to your art quilts.
A color coordinated fabric storage area looks appealing. However, it reduces the chance for coming across an unusual color combination.
Certainly, finding unusual color combinations begins with open eyes and an open mind. Unfortunately there are no easy pathways forward. Ultimately,each artist must take this road on their own.
Learn more about the international organization for art quilters, Studio Art Quilt Associates. https://www.saqa.com/
Two random win-win situations happened to me recently. During COVID, passing unwanted items on had been a challenge. While Goodwill was open, I wanted to pass fabric related items to a more appropriate place where they would be welcomed and appreciated.
Here is my basket of threads. I generally am not fussy about the type of thread I use for most kinds of sewing.
I had some spools of thread that I couldn’t use. The threads were too thin or too thick . Luckily, our quilt guild would be having their annual show soon. This show includes a Bargain Garden flea market. I had them in a plastic bag. They were ready to be donated to the upcoming flea market.
a straight pin and a longer quilting pin
Serendipity Situation #1 Brings Joy
A young man popped into my studio. He graciously explained that he and his friends were making dream catchers for their families. He asked politely if I might have some threads for them to use. I handed him the bag of 10 spools. He was thrilled. He bought me a coffee. When he returned with the coffee, in addition,I offered him some yarn. People give me items all of the time. I was thrilled to be able to pass the items to this person who definitely was a fiber enthralled person. A win win situation #1
Serendipity Situation #2 Brings Joy
The pins I like to use are quilters’ pins. They are a bit longer than normal straight pins. They measure closer to 2″ instead of 1 “. Somehow my pin cushion had several of the shorter regular pins in it. It was annoying at times to grab the shorter pins when I needed a longer one. A neighbor stopped in. She needed some pins to borrow. Most importantly, I was able to pass on those annoyingly short pins. Another random win win.
My pin cushionthe back without all of the pins
In Conclusion
Did I know that these situations would happen in the same week? No. Was I happy to have these situations occur? Yes! I believe serendipity brings joy. These random win wins events were welcomed more than ever especially after these two years of COVID. May you have more joy from serendipity in your life too.
These Mexican Dance Fabric Art quilts represent the meshing together of two major passions in my life,quilting and Mexican folk dance. Naturally I wanted to express my love of both of them. Can you just hear the Mariachi music now?
My First Mexican Art Quilt
Homage to a Dancer was my first art quilt. Furthermore,the 2 1/2″ inch blocks in the background come from the traditional quilt world. I added the braids and ribbon detail from my actual Jalisco region outfit. The ribbons on the skirt, shawl(rebozo) and garter mimic the actual costumes.
Homage to a Dancer 56″h x 45″ w 2009
Above all,the Jalisco region of Mexico dominates the world’s view of Mexico with mariachi music, Mexican Hat Dance and charros(Mexican cowboys).
Michoacan Regional Dance
However, each of the other 29 states have varied and unique traditions and dances. Michoacan is the Mexican Land of the Lakes. So, I included a net with fish to highlight that part of the culture. Furthermore,Day of the Dead traditions are especially vibrant there.
This Mexican Dance Fabric Art quilt,El Danzante de los Viejitos(The Dance of the Little Old Men) represents a traditional dance from Michoacan, Mexico. Young men with old men masks and canes wobble on to the stage. A competition of lively steps takes place. The dancers knock down other dancers with the canes. At the end, the dancers wobble off stage again.
More Fabric Art from Mexico
Market Day 51″ x 40″ 129 cm x 101 cm 2009
This Mexican Dance Fabric Art,Market Day is a 3 D representation of a typical dance outfit. I brought the plastic shopping bag back from Mexico. I made the braid to use when I performed Mexican folk dancing. Overall, the 2 1/2″ (6cm) blocks of blue fabric background connects me to the traditional quilt world. Many 3D items adorn and add texture. Yet, the piece remains culturally accurate.
Birds fill our world with color, sound and movement. One of my favorite places to be is outside, the natural habital for birds.True confessions time-Drawing is not one of my best skills. However,I can copy an outline of a bird. So that is how I often incorporate birds into my art quilts. At this point in my life, I am working with my strengths.
Big Brown Owl,14 ” x 15″ 36cm x 38cm
Shelter in Place Art
Westlake Coot, Big Brown Owl and Westside Egret were created during the first Shelter in Place. I only had limited materials with me,a large bag with small squares. Created the background first, before I considered what would do on the top. Fabric is my first motivation. How will the fabrics play together? Many times the subject matter, comes later. What subject would work with this background? Birds against a sky was my first thought. Size and scale required a smaller scene. Why do a whole body of an egret when a neck supplies the viewer with enough information?
Westlake Coot, 14″ x 15″, 36cm x 38cm $120.Westside Egret, 15″ x 16″ 38cm x 40cmNight Migration,20″ x 24″ 51cm x 61cm
Never miss an opportunity to add texture.
A bird’s habitat is full of texture, trees, grasses and underbrush. Threads and found materials lend themselves well to creating an impressionistic view of an avian’s favorite place to be.
Snowy Egret,34″ x 24″ 86 cm x 61cm
Break Your Own Rules
Pelican in the Mist and Nesting Pelican break my rule for just doing bird outlines. Looking at the light and dark stripes of redirected piece of fabric reminded me of feathers. I cut the fabric and used the same fabric to make the wings,legs and the body of a pelican. An artist never knows where inspiration will come from. Take a chance.Sometimes things just work.
Pelican in the Mist,25″ x 23″ 64cm x 66cm
Water Fowl and Coastal Birds
Inspiration often comes from one’s locale. I live on the Central Coast of California. The second largest wetlands in the state, Elkhorn Slough is not far away. Westlake Park with a spring fed pond is adjacent to the local elementary school.
Staying close to home is what we all did this year. Be inspired by where you are.
Viewing art made with mostly black and white colors is engaging. Furthermore, the contrast with just one other color attracts the viewer’s eye. While this is true of all art genres, I make art quilts. This post is about the quilts that use mostly black and white with possibly one or two other colors.
Classic Decor
Black and white decor is a classic look that is currently enjoying a rebirth in popularity. Black and white floors are common in Europe. One art fan compared my art quilts to tapestries. One time someone asked me to line the walls with my largest quilts to improve the acoustics at a film festival. The small dash of color is easily accommodated. Limiting the colors to just black and white and one more, insures flexibility that the piece will fit easily into many different places.
Adding Texture in Decor
Adding a cozy traditional quilt has been a a long time go-to idea for adding texture. Building on that,consider adding texture in the form of wall art to your decor. Wall art quilts are a new and modern way to accomplish that. It may seem subtle but a piece of fabric wall art is not as flat as a poster or a painting. An art quilt brings an added dimension to a room.
Easy Care Art
Art quilts are easy to hang. They generally weigh about a pound. MIne come with a handsewn fabric sleeve(tube) sewn on the back of the piece, a dowel and fishing line. Simply hang the invisible fishing line on a push pin or a nail. The edges of my art quilts are completely finished with a facing hand sewn to the back.
There is no reason to add a heavy frame. A frame just adds cost to shipping and unnecessary weight to the piece. Hanging a quilt rather than a heavy painting over a bed is an added advantage in earthquake country.
Fabric is a material that we are all familiar with. It is long lasting and adds warmth to a room. Keeping a piece out of the direct sunlight is necessary to prevent fading. Other than that, textiles are an easy care product.
Larger Wall Art
Gridlock I, 33″ x 31″Gridlock II,42″ x 36″ Juried into MAYHEM show at the ARC Gallery in San Francisco, 2013
Smaller Wall Art
Petite Madness,12″ x 9″ ,$125.Art quilt,Petite Limeade,10 ” x 10″ SOLDPetite Carbon Footprint,12″ x 9″,$125.
In conclusion,black and white art is classic.Adding a pop of color makes it fresh and modern.
In this article you will learn about the steps to create an abstract art quilt.
Introduction
Making abstract art quilts touch my soul. The use and cost of redirected upscale fabrics motivate me. I know that am doing something good for the planet. Choosing colors and textures to piece together my art quilts makes my heart sing. Scribble Quilting adds movement to the piece.
The genre of art quilting is a newer art form. I share my process with you by explaining how I create an abstract piece of art. There are many other ways that artists make art quilts. Fusing fabrics, painting on fabrics, dyeing fabrics to use are just a few techniques. The website of international art quilters organization, SAQA(Studio Art Quilt Associates) is full of resources for those who are interested in learning more. Saqa.com Many times I look at quilts and ask myself how did they do that? I consider myself an advanced quilter. However, variations abound. The sky is the limit.
Topics Covered:
Use of a Design Wall
Where to Find Inspiration
Choosing Materials
Creating Details
Thinking ahead towards Quilting
Beginning Piecing
Sewing the Top Together
Quilting the Top
Use of a Design Wall
A design wall is essential for this type of art project. One wall in my studio is covered with a large white piece of flannel fabric. The pieces of fabric adhere to the flannel. I begin by randomly placing pieces of fabric on my design wall. Then I move them around to see where I want them to be. Sometimes I haven’t settled on where I want them to be until I start sewing the pieces together. Once sewing begins, pinning the pieces to the flannel may be necessary to help them adhere to the flannel as the weight of the piece increases. There are other possible types of design wall that my better suit your needs. Maybe you need a portable setup or other type of special need. I prefer to keep things on the simple side. A large flannel piece of fabric works for me.
Where to find Inspiration
Inspiration for colors or designs can come from anywhere. Many artists keep a notebook to write down or sketch interesting things that they see in their daily life or travels. Inspiration often come from nature. Colors of the desert, a bird or the color of the sky at sunset or after a storm can inspire me. Actually, inspiration can come from anywhere and anything, a building a floor, a pet. It is the spark that catches the artist’s attention. The finished art project does not necessarily match something at all. Guessing an artist’s inspiration is not easy especially for an abstract piece. The point is to be inspired to create.
Splendid Fairy Wren
A friend who loves birds posted a photo of an Australian fairy wren. The blues and purples were incredible. I ended up making two abstract art quilts using those colors.
Splendid Fairy Wren, abstract art quilt,30″h x 35″wAmerican Democracy,2019, a black and blue abstract art quilt,28″h x 27″w
Inspiration can come in the strangest of places. Once scraps of fabric I had randomly tossed in a pile caught my attention. The lime green, white and grey worked well together. I decided that I had to use them for a future project. Here is the subsequent quilt I made using this modern color palette inspired by a random pile of fabrics.
Because art quilts don’t need to be washed, a variety of textures and materials can be used. I started sewing clothes in junior high and high school. I would choose colors that would go well with my skin and hair tones. When I started making bed quilts, the focus was on the design on the fabric that would go with a room décor. One hundred percent cotton is necessary for ease of washing of bed quilts. Art quilts expanded my world. A variety of fabrics and textures opened up. I freed myself from the bonds of what matched a room or looked good on me. Following patterns went out the window. True Liberation !!
Consider the Style
Sometimes I begin with a piece of fabric or material that I would like to use. Often it is one that I have had for a while that I think I should use up. I consider the style of the fabric, is it a thick, rustic material or a shiny,synthetic fabric? What would it bring to the piece? Does it fit the mood that I am creating? Fabrics with colors that might not complement the piece have been eliminated because their style doesn’t match the intented style outcome. These are subtle decisions that the artist makes.
The Gathering of Materials
Generally I gather my materials without any idea of what I will use them for. If I am honest with myself, I think this comes from my being a bit overwhelmed from seeing so much fabric in a fabric store. I have to have an well defined idea of what I want or need before I go into a store. Otherwise, it is difficult for me to make a choice. Matching colors or styles is difficult without actual items in front of me. It feels easier for me to decide if I like something or not in the moment. At a later date, I can see how the material goes with other items that I have. Maybe this is part of being a visual learner.
FABMO and Other Places
I obtain my fabrics mostly from a nonprofit, FABMO.org that obtains fabric and materials from the San Francisco Design Center. I find high end new decorator samples and more. Furthermore, I get fabric from my local guild’s Bargain Garden, flea market. I learned a long time ago that shades of colors go in and out of fashion. Forest green is a family favorite. But if it is out of style it is impossible to buy. A quilter’s stash or collection of fabrics reduces the need to purchase a particular fabric in the middle of a project.
Creating Details
In the past few years, I have begun to add more three dimensional details to my work. Quite a few years ago, at the Pacific International Quilt Festival, I saw a quilt that had a big pile of yarn sewn on the top. In my opinion, it was a mess. I didn’t like the effect. However, it did inspire me to add yarn or decorative threads to my art quilts. My choice is decorative threads that would lie flat. I began to couch(zigzag) decorative threads to create contrasting details for my art quilts. Surprisingly, the decorative threads has since become one of my favorite techniques.
Using my chosen colors, I think about the items that I want to make to add texture or interest. Sometimes a particular found object, like a piece of jewelry guides my decision to incorporate it into the piece. Which techniques do I have in my toolbox? I can couch yarn to create straight lines, parallel lines, curvy lines. I can make tucks to add texture. What materials do I have that would work? What does the detail bring to the piece? Sometimes it is necessary to save a detail for another project for some reason. The style or effect just isn’t what I want for this art quilt that I am working on.
Thinking ahead towards Quilting
My usual method of creating an art quilt is to start without much consideration of the next steps like how I will quilt the piece. However,sometimes it is necessary to consider the whole process and the order that I need to follow to complete the art. When would it be best to add the detail? Can I quilt over it? Or will I need to wait until after quilting is completed to add hand sew it on? With ATLAS in Rose, I wanted to highlight the oval pink and white beaded necklace in the middle of the quilt. Yet, I would have to sew it on after the quilting was completed. Quilting over beads wrecks the beads and could possibly damage needles and my machine.
work on design wall,ATLAS in RoseATLAS in Rose, 32″ x 32″ finished art quilt
Serendipity Happens
The patterns of stripes and circles happened rather serendipitously. Some quilters would say, I wanted to make a stripes and circle quilt. That is not the way I usually work. Yet, as I looked at my black and white fabrics, I saw the oversized circles contrasted well with the stripes and checked fabric. The stripes and circles created the movement I wanted. I mirrored them by couching decorative threads to create my own form of stripes. Hand sewn repurposed white buttons added more circles to the beaded necklace, front and center upon completion.
Back to the Design Wall
The work that happens on the design wall is in many ways is the most important part of the project. My main purpose is to make sure that the colors and fabric pieces are well balanced on the wall. It is not too late to eliminate items that would work better in another piece. Often I begin by placing the most eye catching pieces on the design wall first. They need to be placed in various spots across the piece and not all in one area. Balance is a crucial part. Then I continue with other important standouts. Only then will I continue adding with other pieces of fabric. I make sure there are places to rest one’s eyes. Plain fabric balances out wild details.
Sewing the Top Together
I begin sewing once the main pieces are in place. I make sure that pieces of fabric are larger than I expect the finished piece to be. One can always cut away fabric but it is harder to add fabric. That said, one thing I love about creating abstract art quilts is that there is less matching of seams and more flexibility if you need to add a different fabric than in traditional quilting.
Start Small
In general, I start by sewing smaller pieces together. I will sew together several pieces from one area. Then I will do the same in another part of the quilt. I have learned the hard way that I should not completely sew all of the pieces in one area together. More flexibility for fabric additions is allowed by rotating the spots I sew together. Then I wait until the very end to sew all of the pieces together. In that way if I need to add more fabric to a spot, it is easy. I prefer to not rip out seams if at all necessary. This is another advantage to creating art quilts. If something doesn’t work or I want to change it, I just cut it off instead of spending time ripping out seams.
Foggy Skyline,inspired by the colors of the sky after a rain storm.16″ x 16″
New Eyes
Critically seeing eyes are necessary. I mean critical in the sense of seeing what works well and what doesn’t work well. Only the artist can make that decision. Our eyes can miss what is directly in front of us. Sometimes taking a break or even returning the following day is what we need to see clearly. In other words, so that you will look at a piece with fresh eyes. This is so important. After some time has passed, I often see immediately what needs to be changed to improve the art quilt.
The design wall also allows the artist to step back at look at a piece from a distance. Close up views and distant views differ. Ideally, a piece will work for both distances although probably in different ways.
Other Considerations
When I begin to sew the pieces together, I want as much flexibility to change their places as possible. Therefore, I begin by sewing small pieces together in one area, the upper right hand side. Then I do the same in another spot, say the lower right hand side. This allows me to move pieces or add pieces if I need to. Of course, when sewing pieces together the project becomes smaller. If a finished piece needs to be a particular size, mark the design wall with pins or yarn to help you be aware of the desired size.
Focal point design details should probably not be placed directly on the edge. I learned the hard way that when they may be trimmed off at the end when squaring up the finished quilt. Another thing I try to avoid is having heavier fabrics directly on the edge. I like to finish my quilts with a facing sewn to the front and turned to the back to be hand sewn down. Thicker fabrics made the turning more difficult. Even sheet fabric with a high thread count is hard on the fingers when hand sewing.
green yellow bits on design wall, a work in progressfinished top Sunset Through Forest 34″ x 34″ after quilting
When the top is finished. It is time to make the quilt sandwich. The quilt sandwich is made up of the three layers, the top, the batting and the back fabric. They need to be laid flat and taut and pinned or basted together.
Finishing with Quilting
In general,I don’t think about which technique I will use to quilt a piece until the top is finished. Sometimes I regret this lack of planning. For me, the quilting must add movement. I have to decide how much more visual action this quilt needs. Is there a lot of movement already in the piece? Will quilting add more interest? Maybe a less visible stitch in the ditch technique is what the piece needs. Only the artist can make these personal decisions.
I have settled on three styles of quilting that work for me. Stitch in the Ditch is quilting inside seam lines. Scribble quilting that I named is quilting by moving the quilt line from one side of the piece to the other side. Doing this repeatedly creates wavy lines that may cross over one another. I use the free motion quilting technique to quilt my fabric landscape or seascape collages. Those with access to a computerized long art have lots of other options to choose from.
In Conclusion
The genre of art quilting is a newer art form. I share my process with you as a way of explaining how I create an abstract piece of art. This article advances the understanding of the decisions that need to be made while creating an abstract art quilt. Hopefully, inspiration for the art quilter follows or the collector will gain some perspective on how this artist works.
Suggestions for Newer Art Quilters
If you are looking to advance your art quilt techniques, these are my suggestions.
Take a class in some technique that excites you.
Join a guild or group to learn from.
Visit quilt shows and museums to view art with a critical eye.
Practice, practice, practice your skills.
In Responce
Gentle Readers, since this post, How to Create an Abstract Art Quilt was published it is by far the most read of all of my posts. Just wondering if you found this info helpful or not so much.
Read More.
You may find out more about how I create texture and movement in my abstract art quilts at these links.
More than ever Etsy shops list an incredible number of unique handmade and vintage items. If you shop Etsy you will find joy. Art quilts are listed on my site. Currently, I have also listed vintage items from my family. I have kept some of my own pieces for so long they are now vintage. http://annbmayartquilts.etsy.com/
A Funny Story
Back in the 1970’s, the Bob Newhart Show was a popular sitcom. I remember a funny setup. His receptionist dates an older man. She goes to his apartment for the first time. She says, “I love what you have done with these antiques.” Her date answers,”Thank you. They weren’t antiques when I bought them.” Similarly,I am there now.
Sadly the Shop Etsy Find Joy videos are no longer available.
Vintage Clothing
Vintage clothing is at least twenty years old. Similarly,recent listings include vintage clothing and vintage jewelry. Many of these are one owner items. They come from the closets of my grandmother, mother and mother in law or myself. Many items from the 1940 to the 1980s.
I made this jacket for myself. First I sewedthe fabrics together. Then I cut out the pattern. I wore the jacket several times. Then I realised that I am not a jacket person. I much prefer sweaters or a warm hooded coat. May someone else enjoy wearing this piece!
Assemblage – 3D Collages
During the pandemic shut downs, I created some assemblage pieces. They are 3D collages. Some are art in a box. Similarly, due to the smaller size they are minimalist. I inherited several antique keys that I added to my pieces.
Ann Baldwin May presented Four Important Skills to Forge Your Own Art Path as a Zoom talk at a NorCal/Southern Nevada Regional Meeting of the International Art quilters organization,SAQA(Studio Art Quilt Associates).
American Democracy,2019 27″ w x 28″h
Introduction
There are many paths forward to become a quilt artist. Ann reinvented herself in retirement. Her art friends call her resilient, a prolific artist and a master at social media.
Forge Your Own Art Path
Part of SAQA(Studio Art Quilt Associates)’s mission statement is to encourage art quilters to move their art forward and out into the world. Forging our own way can be exhilarating and frightening at the same time. What qualities does one need to forge their own path forward? I suggest that one needs these qualities. https://annbaldwinmayartquilts.com/2019/04/making-your-own-luck/
Four Important Skills
Persistence- Just keeps trying! Resilience- Do not take things personally. Bounce by from your disappointments. Confidence -Believe in yourself. Accept Your Uniqueness. Bravery-Put yourself out there! Never miss an opportunity to show your work!
Today I would like to share a few stories that focus on these four important skills. First, I would like to say that I am a big believer in baby steps. We need to be brave but you can be brave on your own timeline. I am not an early adopter of new things. When I started out, I found using this phrase helpful as a conversation starter. Hi, I am shamelessly promoting my work .
Under the Shady Tree 27″ x 38″
Starting my Art Path
Back in 2010, I turned 60. I decided to give myself the gift of showing my art. I went to talk to the owner of a local leading gallery, the R. Blitzer Gallery. I asked how I could show my work there. Robert Blitzer, the owner is a very personable guy. He mentioned a local group show that was going to be hung soon. He gave the name of a fairly famous artist who was curating the show. I called her up and spoke with her. She asked me to send her some photos of my work. I sent her the photos. But I didn’t hear back from her.
Persistence, to Forge Your Own Art Path
At the First Friday reception, I approached the curator and introduced myself. She gasped and said, “I never got back to you. I wanted to include your work.” Awkward moment for both of us. She turned and disappeared in the crowd. I took that as a yes. The reception for First Fridays Art Walk is usually the busiest time. Then the rest of the month the show is still up, there are less visitors. This didn’t matter to me.
I returned the next day and explained the situation to Rob Blitzer. He called the curator . It was decided that he would find a space for me. He found a funky wall in the back but it was fine for me. I could put it on my resume. It was a talking point for me. My birthday present to myself was complete. Being persistent is an important skill to forge your own art path.
A Call for Entry
Several years later, I saw a call for entry for Monterey Peninsula College Art Gallery for a solo show. My application presented my Mexican inspired art quilts. I was not accepted. As a newbie, I assumed it was my fault. My work wasn’t satisfactory.
Market Day
Bravery,to Forge Your Own Art Path
About a year later,I was accepted in to a show in Santa Cruz Art League. Melissa Pickford ,the director of the Monterey Peninsula College Art Gallery was the curator. At the reception, I was trying to get enough nerve to introduce myself to her. The line to speak to her was long. Finally, after she had spoken to everyone in line, I introduced myself. Ms. Pickford recognized my name immediately! She remembered and praised the work that I had submitted.
Who Knew the Rule?
As the director, she apologized because the college has a rule that only work can be shown in the gallery if the college offers classes in that mediam. Evidently, they do have not textile department. Who knew? Be reticent and brave. What if I hadn’t been brave enough to introduce myself? I never would have learned that wonderful gem of truth, a true confidence builder. Bravery is an important skill to forge your own art path.
Resilience,to Forge Your Own Art Path
About that same time I attended my first SAQA conference. Leni Levenson Wiener gave a talk on how shows are curated. The curator has a huge job of deciding which pieces fit into her vision of the show. Choosing the art is difficult. Many pieces are not accepted for reasons that are totally out of the artist’s control.The takeaway point was that if an artist is not accepted it doesn’t mean their art is not good.
Say- Not Accepted Not, Rejected
It means that it didn’t fit in some way with the rest of the work in the show. It was emphasized that we should say that our work was not accepted for a show, rather than say it was rejected. Another gem from a SAQA conference-Maria Shell says you will not be accepted 100% of the time. Maria Shell says 30% acceptance to shows is doing well. Resilience is an important skill to forge your own art path.
Never Miss an Opportunity to Show your Work.
Funny story- I was asked to show my art quilts at a film festival taking play in a local gallery. They were having trouble with the acoustics. They wanted me to show my largest pieces of work to help with the sound. Because I had kept in touch through a monthly newsletter, the director was able to contact me quickly. I stepped up to the plate. I wish I could say I sold something but I can’t.
Confidence,to Forge Your Own Art Path
I would like to share a story that I think of often. We push ourselves to create events and shows. We publicize them and invite everyone we know. Yet sometimes the turnout is low. You may know Brian Cranston from Breaking Bad. He owns a movie theatre near Palm Springs. My husband is from that area and spends a lot of time there.
Brian was fairly famous at the time. He organized an event at the theatre. No one came. My husband was able to have a long conversation with him. These things happen to the best of us; even famous people can have a slow night. Be confident and continue on.
Persistence,to Forge Your Own Art Path
I would like to share with you my latest new friend. We met in Zumba she is in her early 80s. She recently remarried. She paints and yet has no digital foot print. But she goes to restaurants and asks if she can hang her paintings there. And she has been selling them. She is persistent in her unique path forward. Persistence is an important skill to forge your own art path.
In closing,I would like to remind you to say positive things to yourself. Hang compliments on the back wall of your mind . Refer to them often. I would like to end with a favorite quote of mine. In the words of the song,The Middle by Jimmy Eat World
“Just do your best , everything you choose and Don’t you worry what the bitter hearts might say.”
Finally,I hope that these experiences inspire you to develop the qualities of persistence,resilience, confidence and bravery . With these four qualities you can forge your own art path and get your work out into the world. Thank you.
Not too long ago,I participated in an art and physics collaboration. As a result I created this green, yellow and black art quilt,ATLAS at CERN based on the colors from CERN. Inspired by this abstract piece I wanted to attempt something similar in a different color wave. So I choose to use the colors of black, white and rose for my next scientifically inspired art quilt.
A Scientifically Inspired Art Quilt
ATLAS at CERN, scientifically inspired art quilt
Creating Details
First, I go through my materials to find the appropriate colors of fabrics and items for the color wave I have chosen for my scientifically inspired art quilt.
Next, I think what I want to make to add texture or interest. This is when I begin to think about the whole quilting process and the order that I need to follow. I knew that I wanted to use a beaded necklace with a bit of pink. But I would have to wait until the quilt top was completed to actually sew it in place. Otherwise quilting the top would be a problem; the beads wouldn’t go through my machine. Moreover, I didn’t want to wreck the beads in the process. Hand sewing of the necklace would have to wait until the whole piece was sewn together. Yet, I would still have to keep the location of the necklace in mind as I worked.
Other Details
Continuing with other details,I found a repurposed zipper in just the right color. I created a starburst mirroring the actual scientific view after the splitting of atoms. Then, I chose rose colored embroidery threads to couch (zigzagg) with matching colored thread. I also couched several different decorative threads and a piece of stretchy webbing onto black pieces of fabric to create a pleasant contrast. A running stitch of rose colored embroidery threads through black fabric was also made. Lastly, I created a black 3D fabric flower to adorn a rose colored piece of fabric.
ATLAS in Rose selecting fabrics
A Scientifically Inspired Art Quilt On the Design Wall
I like to choose fabrics with movement. It was serenditious to find so many black and white fabrics with circles and dots that lent themselves well to ascientifically inspired art quilt. These would go well with the oval placement in the center of the beaded necklace. The black and white stripes contrasted geometrically. I created further stripes by couching black decorative threads and black ribbon on white fabric. I used black sewing thread for low or no contrast.
ATLAS in Rose, work on design wall
The Finished Top
ATLAS in Rose , finished art quilt
Here is the completed scientifically inspired art quilt. Handsewn repurposed white buttons added interest to the beaded necklace, front and center upon completion.
You may find out more about how I create my abstract art quilts at these links.
First of all,I love creating movement in my abstract art quilt pieces. A fiber artist friend asked me,“What are the essential elements you want your audience to know about your work? What do you want them to take away from seeing your art?” This friend versed in the deep discussions generated by involvement with the Artist Conference Network. I am grateful for those thought provoking questions. They helped me coalesce the ideas I had been mulling over.
Beach Umbrellas,an abstract art quilt, 37 ” x 37″ 94cm x 94cm curved line piecing creates moveSpring Break,an abstract art quilt, 32″ x 32″ 81cm x 81cm curved line piecing creates movement
Creating Movement in Abstract Art Quilts
How does one infuse movement into something that is inherently flat and static? Curved line piecing rather than just straight line sewing is one way to add movement in abstract art quilt pieces. At first, I attempted to make every seam a curved line. Then I realised that it proved too much of a good thing. The wobbly surface wasn’t the effect I wanted. Some straight lines are important for shape and balance. Another true life lesson learned: balance is important. Now I choose lines more carefully for visual impact to sew via curved line piecing. They may be wildly or more subtly shaped curves. https://annbaldwinmayartquilts.com/2019/07/creating-movement-in-art/
Activity on the Material
I choose the fabrics I use with movement in mind. I look for interesting curved lines that can create movement in my abstract art quilts. When I cut them up, they add interest and drama. They catch the eye and draw it in. One fabric of elongated greyhound dogs was rotated and sliced into the pieces. The shape of the animals disappeared yet the movement of the line remained. Other fabrics provide a pop of action to the piece. Creating the illusion of movement is an essential part in my abstract art quilts.
Beginning to zigzag yarns on grey, black, white linen background
In addition, movement is added through the quilting process. I begin by quilting straight lines in the middle of the piece making basically a large grid about 5” apart. Then the fun begins. I start quilting from corner to corner gently turning the fabric slightly side to side as I quilt. The thread line creates the movement. If the thread color contrasts with the fabric color, then the threads stand out. When the thread color matches the fabric, the thread may seem to disappear, yet the movement remains on a more subtle level. Many viewers look closer to try and understand how that can be.
Skyward, 25″ x 25″ 63cm x 63cm finished piece
Couching Decorative Threads
One technique I now consider quintessential part of my tool box is couching decorative threads. I sew multiple colored threads or yarns on to a strip of fabric. Then I cut them up into random lengths and use them as fabric. At first, the main purpose was to add texture to my pieces. Yet, the threads are often sewn in undulating parallel lines creating the slightest of distortion and movement. In Copper Cliffs both examples given can be seen, the fabric with irregular dots and the lines of decorative threads I cut apart.
Copper Cliffs, an art quilt,21 ” x 19″ 53 cm x 48 cm curvy lines of yarn create movement
I create my abstracts on a design wall. I take time to balance the colors and fabrics. Quiet spaces let one’s eyes rest. Looking at the piece with fresh eyes may take several days or longer before sewing the pieces together.
Gridlock II, an abstract art quilt, 36″ x 42″ 91 cm x 107 cm curved line piecing creates movementGridlock I ,an abstract art quilt black and white 33″ x 31″ 84cm x 79 cm
A Final Look
Abstract artists have the added benefit of being able to rotate the completed piece. They look to see if the art may be better from a different direction. It just might happen. Just because it was conceived and executed in one direction doesn’t mean that it cannot look better “upside down.”
Sandy Shore, an abstract art quilt 29″h x 25″w 74 cm x 64cm wacky, scribble quilting creates movement
A former colleague of mine made an unsolicited comment about my work, “It dances.” Her remark touched me on several levels. Years earlier she admitted that she had no interest in attending an art quilt show. So when I heard her comment, I felt that I had truly opened her eyes to a new art form.
Do you Squash your Art Quilts?
As you can tell, movement in an art quilt is important to me. Yet not all art quilters share my view. A trend in quilting art quilts seems to be creating as many stitching lines on a piece as possible. These lines tend to be straight lines with about ¼” spacing. They may turn at sharp corners. While attending a recent national art quilt shows, I noticed that almost 75% of the quilts had such quilting. I admit that such narrow line quilting may be effective for some pieces. The skill level is high for the artists that quilt that way. However, this style makes me cringe. Squashing and smashing the fabric into flat controlled pieces actually saddens me. Such tight stitching suffocates the fabric, preventing it from moving or breathing.
Best Parts about Making Abstract Quilts
I love making abstract art quilts. There are several reasons why. While placing pieces on the design wall, there is flexibility to easily add fabrics or change their locations. Furthermore, I can turn the fabric piece upside down or even side ways to choose the best spot. This also works if the fabric pieces have decorative threads on them. Do I want the lines to go vertically or horizontally? In addition, if I sew two fabrics together incorrectly, I just cut the fabric off easily and resew. No seam ripping is necessary. I welcome these hacks after experiences making traditional blocks where more accuracy is demanded.
Conclusion
In conclusion, I create movement in my abstract art pieces in several ways. I choose some pieces of fabric because they show movement as part of the design element. Couching decorative threads in not quite straight lines adds subtle movement. Pieces are sewn together with a curved line piecing technique. Finally the artist generates wavy lines all over the piece while quilting the three layers of fabric together. A basically flat piece of art is brought to life by these techniques.
Read about Other Resources
Read more about the Artist Conference Network. This artist driven organization supports artists as they move towards their artistic goals. Groups meet periodically to share and review each artist’s goals.
Memories of favorite colors can stay with you throughout a lifetime. As a seven year old, I remember telling the neighbor lady that I wanted to be an artist when I grew up. My favorite colors were pink and yellow. I chose them both because I couldn’t decide which one I liked the better.
My goal of becoming an artist faded almost immediately. That idea didn’t resurface until much, much later after a 36 year career as an elementary school teacher. Yet, my memories of my favorite colors remained with me.
Elementary School
For several years while I was in upper elementary school, a ladies choir came to sing for our school. I don’t remember the music but what stuck with me were their dresses. The ladies all wore a solid color shirtdress that was most likely from their own closet. The affect of the variety of colors was intriguing to me. I was starstruck. I kept this memory for such a long time that I made myself a single color dress to wear to work many years later.
Shirt dresses possibly from Villager.
Memories of Favorite Colors,Age 13
My mother loved clothing and dressing nicely. I could always count on her for a lovely outfit for a Christmas gift . For my thirteenth Christmas, she surprised me with several items to mix and match in forest green and light blue. There was a green blouse with light blue flowers, a fluffy Mohair blue sweater,blue pants and a light blue skirt. I was in heaven. Those colors have stayed dormant within me although I haven’t done anything with them. Maybe the time is now right?
My mohair sweater looked like this only in light blue.
Memories of Favorite Colors -Chocolate Brown and Light Blue
Fast forward ahead to my life as a young wife. My husband and I enjoyed visited model homes to get inspiration for our own space. We were both enamored with a home decorated in dark chocolate brown colors with light blue accents. Again we didn’t act on our interest. But the memory of colors of that model home stayed with us both .
Memories of Colors-Purple
We all must admit that we have been influenced positively and at times negatively by our parents. My mother did not like purple. The purple of the 1960’s was more of a sickly lilac. I share her dislike for that color. It is not a color that blends well with our olive complexion. Here are some beautiful dresses in the color lilac. I must admit it is hard to dislike these stunning examples.
lilac dressThe lilac dress is in the middle.lilac dress
Other Shades of Purple
Much later a wider variety of purples became popular. Shades of purple that constrast well with many colors are a natural choice for my art. Here are some examples.
Splendid Fairy Wren, 30″ h x 25″ wUnder the Palapa, 27″ x 21″Shore to Sky E, 10″ x 10″Love in the Abstract, an abstract art quilt in purples and pinks,24″ x 26″Winter Sunset, An abstract art quilt with lavander,pink, and grey colors,the finished piece
Conclusion
These are some of my memories of favorite colors that have stayed with me for many years. Thank you for letting me share. I assume that others also have fond memories of shades from their childhood and beyond. Do you have any color favorites of your own.? Feel free to share them here.
For the past ten years, I have worked to come into my own as an art quilter. It took that long to grow into the artist I am today. Growth happens when we least expect it. I started making art quilts about 12 years ago. I entered and was accepted into my first juried art show in 2010. The next year the same piece won an award. Subsequently, there was not turning back. I was off and running. This year,2019 I was accepted into New York Art to show in their gallery in TriBeCa in New York City.
At first,I would look at art quilts in galleries and shows. It was puzzling that none of them looked like mine. At first,I was worried. This struck me as worrisome. It took me a while to realize what that meant. After that, I realised that I had my own style. This became reassuring. No one has had my experiences, my life, but me. No one chooses the materials that I choose. That is why the quilts are different.
Underwater Fantasies
Living on the California coast, marine landscapes are popular.In the beginning when I started doing underwater seascapes, I was concerned about how make a fish’s face or mouth. Then I went to the Monterey Bay Aquarium. I saw examples of everything . For example, some fish mouths went up, some mouths went down ,some were big and some were small with everything in between. Subsequently,this freed me to create as I chose. Clearly,I don’t do scientific drawings. However,I do create whimsical seascapes I call underwater fantasies. This is who I want to be.
Sea Turtles,23″ x 35″
Wavy Quilting Lines
I have noticed that many art quilts that win awards at art quilt shows are heavily quilted with tight quilting lines, mostly straight lines ¼” apart. To me that kind of quilting just tries to control the fabric and squeeze all movement out of the quilt. Movement is one of my guiding influences . My quilting lines swerve and wave from corner to corner. It is what I do. It is my style.
Petite Neutrality, 11″ x 12″
Working from Photos-NOT
I do not like to work from photos. I do not want to create anything that can be copied with a camera. That’s just me. Yet many other art quilters do work from photos. They do create award winning pieces.
Once, I tried to make a landscape quilt using fabric with rocks and trees on it instead of just creating my own. It was not fun trying to find the exact fabric I needed. Just thinking about it gives me a headache. Now I prefer to work in the realm of impressionism. Yes, it will obviously be a landscape or a seascape. But I trust the viewers’ eyes and minds to interpret a scene as they see it.
The color of threads changes according to what fabric is near or next to them.The threads and fabric don’t need to match exactly. I love that quality. It frees the artist from certain restraints.More recently I have been making abstract art quilts by choosing three contrasting colors. Then I find the hues of those colors to increase the range of the colors. It is what I do. It is my style.
Creating Texture
To add texture, one might find some 3D decorative threads hanging freely down off of the top. One might see rows of couched decorative threads throughout the piece adding more texture. My nature pieces may include lots of threads used to create bushes or brush in the landscape.One might see straight or curving tucks to add texture and movement. It is what I do. It is my style as an art quilter.
Under the Shady Tree, 27″ x38″h
My Three Portfolios
I have three portfolios that speak to me; Nature quilts(trees, landscapes and underwater fantasies) Mexican inspired pieces ( often fabric collages) and abstract art quilts. I usually rotate between each portfolio making several pieces before moving on. In this way , each portfolio feels new as I haven’t done it for a while. Creating Color! Texture! Movement! in each piece remains consistent. It is satisfying to finally recognize who I am and what I do as an art quilter.The good news is I now know who I am as an art quilter. https://annbaldwinmayartquilts.com/2019/10/myself-the-artist/
De La Sierra, fabric collage with appillera, 32″ x 30″