An acquaintance who follows my work on Instagram recently commented on the progress of my work into hard materials. The comment stopped me in my tracks. What? It made me think. For me, moving into assemblage was something that I had been doing for a while at a very slow pace. Assemblage is a 3D collage generally of diverse found objects.Yes, fabric art quilts are soft and generaly 3D materials are hard. Yet, I hadn’t thought about it that way.
3D Found Materials
As an art quilter I had often added 3D found objects to my work. Whimsical toy soldiers, artificial flowers, pieces of jewelry are just a few examples. Seeing it from another’s view made me take a second look at what I was doing. Larger tile pieces would be too heavy to work with.As a result, I had chosen quarter inch tiles and other objects mainly due to their size and color.
Inspiration
I draw inspiration from the materials and how they play together. I gather materials without thinking about how I will use them. This process applies to the hard or soft art materials that I work with. My sources are redirected sample designer materials. If the small slate-like samples had not been available, I wouldn’t have searched for them. On the other hand, I wouldn’t have even known that they existed.
Materials Front and Center
In the past, I have spent time looking for the perfect piece of fabric for a project. It was frustrating and time consuming. Moreover, the results were often disappointing. I discovered that my imagined perfect fabric didn’t always perform as perfectly as I had expected. Working with what is in front of me proved more creative, artistic and satisfying.
On the other hand, a shopping situation with distractions galore overwhelms me. With the materials front and center, I can quickly see that the scale or color either did or didn’t work. This proves more fun anyway even allowing serendippity to happen. Materials,however, fabulous don’t always work for every project. Save them for another project.
Tower in City 9″ x 7″
Color! Texture! Movement!
My mantra is Color! Texture! Movement! That is what I want the viewer to take away from my art quilts. Changing to hard materials didn’t fundamentally change that for me. I do admit it might look differently from the outside or to a viewer on a tiny screen.
The whole concept of choosing hard or soft art materials did not cross my mind. Even though some materials are obviously heavier and harder than others. I selected the background wallpaper to build action and color into the piece. Slight variations of colors in the pieces of concrete flow. Variations of width of the materials add depth.
Scale
The size of the project and time involved encouraged me to widen my artistic scope. Scale followed quickly. One cannot make smaller items without being aware of scale. True confessions time- I wanted some projects with a lower price point. Even small quilts involve time consuming hand work. Yet,smaller doesn’t always mean less time involved in the creation. Depending on the materials at hand,working with a smaller scale can negatively affect the time spend on designing.
People see Things Differently
I appreciate getting insight into how others view my work. The hard and soft comment opened my mind. Some comments from people I take more seriously than others.A comment from an experienced quilt artist would catch my atttention. However, I generally ignore some comments. A gentleman once commented that a piece reminded him of a particular place. I listened and even googled that location.Yet, that place had not been my inspiration. While I was willing to listen, I was not too concerned. People see things differently. They bring their own experiences to how they view a piece.
Start at the End, Sometimes
Some of my fiber artist friends are extremely talented. One in particular would use unusual found objects to create incredibly engaging art pieces. Yet when she was finished she didn’t know how to hang or best display her large 3D work. So I decided that I would consider how to display the work before I got started. With these assemblage pieces I attached a hook first.Then I continued designing the piece. Working backwards is new process for me.
Cityscape, 9″ x 7″
A Unifying Look
Early in my creative process I acquired twelve identical wooden boxes of varying pale colors. That was a good start for me. Usually I never consider how a piece will look next to another piece. This gave me a chance to unify my look. Some assemblage pieces can be hung and some can sit on a shelf or table.
So I start with a frame or wooden box. Then I add a hook to hang it on. Next,I search for wall paper that complements the box color . With luck it adds texture. Because I am new to this process, I want to know where I will end before I permanently attaching the paper. This may change as I gain more experience. The viewer doesn’t know what the artist began with and how they might have added or subtracted from what was there.
What Do You See? 12″ x 7″
Metal or Wood
Assemblage artists generally choose materials from wood and metal. Personally my preference is wood. Metal just doesn’t speak to me in the same way. In the class I took I learned how to use an electric drill to make holes in metal or other objects. I still have my childhood skates that attached to my saddle shoes. I would love to use them in a piece. Several times I have tried to see what might work with the skates with no success. As much as I love them, I will save them for a later date.
In Conclusion
In conclusion, it is not about the materials being hard or soft. It is the color, texture and movement of the surface that inspires this artist to create something new and hopefully exciting. How will you push yourself to try something new? Do your materials inspire you to move to your next level?https://annbaldwinmayartquilts.com/2021/03/beginning-steps-to-creating/
These pieces of assemblage are available at my etsy shop.
Beginning steps to creating art suggests some new ways of thinking about making our world beautiful. Creating comes naturally to humans. We are innately artists. We try to make our world beautiful. Some of us draw; while some of us paint. Others create beautiful food and table settings for our loved ones to enjoy. Others create beauty in their gardens.
Unfortunately, many of us do not feel that we are artistic. I certainly didn’t for many years. Yet, each of us can create beauty in our unique way. Here are some suggestions for beginning steps to creating a more beautiful everything or whatever you choose.
Beginning Steps to Creating Beauty
Part of my career as an elementary school teacher was spent at an arts infused school. We brought in special artists to teach across the arts curriculum from drawing, painting to theatre and dance. I had been at this school before this program started.
When the program began, the whole school adjusted its focus. I witnessed sn incredible shift in students’ attitudes. We told the children that we are going to try and make all of our work beautiful. We would not criticize the work of others. Trying to do one’s best was the important part. The attitude of the whole school changed for the better. It was so powerful to witness that change.
Think Differently.
Looking outside the box. Many times it is our own perspective that keeps us from seeing things in a new way. Often we acquire materials or fabric with a particular idea in mind. Then it is difficult to get rid of that idea or to envision a new use for the item.
Do these look like coffee beans?
When I got this green fabric, it reminded me of coffee beans. That is the image that stuck in my head. I wasn’t sure how to use the fabric. It sat on the shelf for a long time. Then I began to think differently about it. How could I use it a different way? I decided to use the ovals as bit of motion in the truck of a tree. What little bits of color could I highlight to pull those colors to the forefront and diminish the greenish colors ? A peachy orange shade would do the trick. As my county recovered from the largest forest fire ever, my art quilts reflect that new growth.
Rebirth of a Forest,art quilt,29″ x 22″
Turn the Fabric Around
Another way to look at a piece of material or fabric in a new way, is to turn it around. If it has definitite figures on it ,what will they look like from another direction? New and unrecognizable is what I would be going for. When an abstract artist finishes a work, they often turn the art upside down and sideways to see if it might look better from a different angle. The original fabric for the trees and branches in Skyward was a black,white and gray fabric that had greyhound dogs on it. The movement of the fabric caught my eye before I noticed that there were actual dogs on it.
GreyhoundsSkyward, an art quilt
Imagining Shapes
While working on my nature quilts, I cut out shapes for trees, branches, fish, rocks, or waves. I look at the fabric to see if the shapes on the fabric tell me what it would like to be in my piece. Does a swervy line imply a wave? Maybe a mountrain will appear from the shapes on the fabric? If no shape strikes me on the fabric, then I create my own mountain or a river. The idea is not to find a piece of fabric that has a river on it. But to create a river from lines that the original fabric artist had not thought about..
Visualization
As I am creating, I try to visualize what the piece is lacking. What color or shape needs to be in a particular spot? This often guides me to a hue or textile choice. This is a newly acquired skill for me. I surprised myself when I realized visualization was happening. You can make it happen for you too.
Activities to Practice Beginning Steps to Creating
Here are a couple of powerful skills that can be practiced with no materials at all. Look at pieces of art in the real or virtual world. There certainly are many examples available on social media. Ask yourself, do you like this work? What do you like about it ? How would you make it better? If it were your piece to change, how would you modify it?
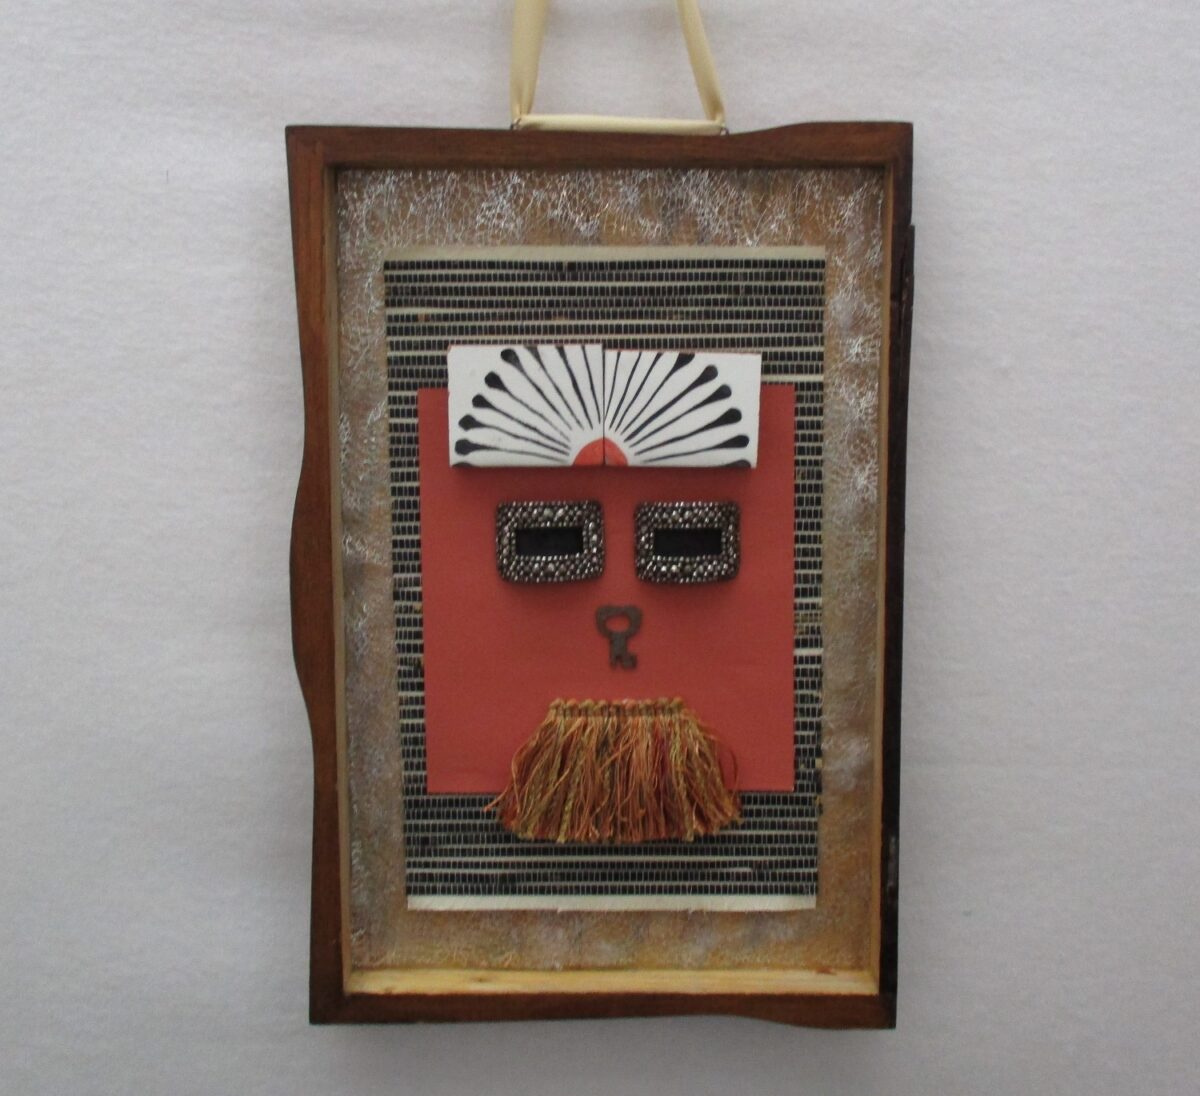
Keys to my Heart, 9″ x 7″
Another practice activity is to think of how many different non traditional ways an item could be used. I recently acquired a box of antique keys. I am venturing forward into assemblage, putting repurposed items together in unusual ways. What could the keys be used for? The possibilities are endless; a nose? hair? or other body parts or just purely decoration? While I searched the internet for inspiration, I came up empty. Left to my own devices,I have sprinkled this post with the ideas that I came up with.
Face with a Key Nose
In Conclusion
Start with baby steps. Create small bits beauty in your life. Practice helps. I took an assemblage class over two years ago. It took me this long for the ideas to perculate through my brain. Be kind to yourself during the learning process. Trying in the first step. There are no mistakes just whether you as the artist likes it or not. If not, modify it. Dip into your humanity and make the world more beautiful.
In this article you will learn about the steps to create an abstract art quilt.
Introduction
Making abstract art quilts touch my soul. The use and cost of redirected upscale fabrics motivate me. I know that am doing something good for the planet. Choosing colors and textures to piece together my art quilts makes my heart sing. Scribble Quilting adds movement to the piece.
The genre of art quilting is a newer art form. I share my process with you by explaining how I create an abstract piece of art. There are many other ways that artists make art quilts. Fusing fabrics, painting on fabrics, dyeing fabrics to use are just a few techniques. The website of international art quilters organization, SAQA(Studio Art Quilt Associates) is full of resources for those who are interested in learning more. Saqa.com Many times I look at quilts and ask myself how did they do that? I consider myself an advanced quilter. However, variations abound. The sky is the limit.
Topics Covered:
Use of a Design Wall
Where to Find Inspiration
Choosing Materials
Creating Details
Thinking ahead towards Quilting
Beginning Piecing
Sewing the Top Together
Quilting the Top
Use of a Design Wall
A design wall is essential for this type of art project. One wall in my studio is covered with a large white piece of flannel fabric. The pieces of fabric adhere to the flannel. I begin by randomly placing pieces of fabric on my design wall. Then I move them around to see where I want them to be. Sometimes I haven’t settled on where I want them to be until I start sewing the pieces together. Once sewing begins, pinning the pieces to the flannel may be necessary to help them adhere to the flannel as the weight of the piece increases. There are other possible types of design wall that my better suit your needs. Maybe you need a portable setup or other type of special need. I prefer to keep things on the simple side. A large flannel piece of fabric works for me.
Where to find Inspiration
Inspiration for colors or designs can come from anywhere. Many artists keep a notebook to write down or sketch interesting things that they see in their daily life or travels. Inspiration often come from nature. Colors of the desert, a bird or the color of the sky at sunset or after a storm can inspire me. Actually, inspiration can come from anywhere and anything, a building a floor, a pet. It is the spark that catches the artist’s attention. The finished art project does not necessarily match something at all. Guessing an artist’s inspiration is not easy especially for an abstract piece. The point is to be inspired to create.
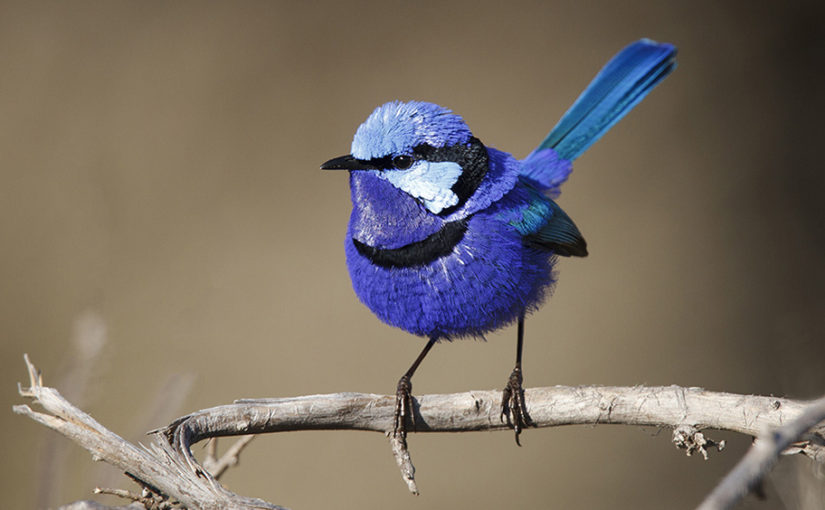
Splendid Fairy Wren
A friend who loves birds posted a photo of an Australian fairy wren. The blues and purples were incredible. I ended up making two abstract art quilts using those colors.
Splendid Fairy Wren, abstract art quilt,30″h x 35″wAmerican Democracy,2019, a black and blue abstract art quilt,28″h x 27″w
Inspiration can come in the strangest of places. Once scraps of fabric I had randomly tossed in a pile caught my attention. The lime green, white and grey worked well together. I decided that I had to use them for a future project. Here is the subsequent quilt I made using this modern color palette inspired by a random pile of fabrics.
Because art quilts don’t need to be washed, a variety of textures and materials can be used. I started sewing clothes in junior high and high school. I would choose colors that would go well with my skin and hair tones. When I started making bed quilts, the focus was on the design on the fabric that would go with a room décor. One hundred percent cotton is necessary for ease of washing of bed quilts. Art quilts expanded my world. A variety of fabrics and textures opened up. I freed myself from the bonds of what matched a room or looked good on me. Following patterns went out the window. True Liberation !!
Consider the Style
Sometimes I begin with a piece of fabric or material that I would like to use. Often it is one that I have had for a while that I think I should use up. I consider the style of the fabric, is it a thick, rustic material or a shiny,synthetic fabric? What would it bring to the piece? Does it fit the mood that I am creating? Fabrics with colors that might not complement the piece have been eliminated because their style doesn’t match the intented style outcome. These are subtle decisions that the artist makes.
The Gathering of Materials
Generally I gather my materials without any idea of what I will use them for. If I am honest with myself, I think this comes from my being a bit overwhelmed from seeing so much fabric in a fabric store. I have to have an well defined idea of what I want or need before I go into a store. Otherwise, it is difficult for me to make a choice. Matching colors or styles is difficult without actual items in front of me. It feels easier for me to decide if I like something or not in the moment. At a later date, I can see how the material goes with other items that I have. Maybe this is part of being a visual learner.
FABMO and Other Places
I obtain my fabrics mostly from a nonprofit, FABMO.org that obtains fabric and materials from the San Francisco Design Center. I find high end new decorator samples and more. Furthermore, I get fabric from my local guild’s Bargain Garden, flea market. I learned a long time ago that shades of colors go in and out of fashion. Forest green is a family favorite. But if it is out of style it is impossible to buy. A quilter’s stash or collection of fabrics reduces the need to purchase a particular fabric in the middle of a project.
Creating Details
In the past few years, I have begun to add more three dimensional details to my work. Quite a few years ago, at the Pacific International Quilt Festival, I saw a quilt that had a big pile of yarn sewn on the top. In my opinion, it was a mess. I didn’t like the effect. However, it did inspire me to add yarn or decorative threads to my art quilts. My choice is decorative threads that would lie flat. I began to couch(zigzag) decorative threads to create contrasting details for my art quilts. Surprisingly, the decorative threads has since become one of my favorite techniques.
Using my chosen colors, I think about the items that I want to make to add texture or interest. Sometimes a particular found object, like a piece of jewelry guides my decision to incorporate it into the piece. Which techniques do I have in my toolbox? I can couch yarn to create straight lines, parallel lines, curvy lines. I can make tucks to add texture. What materials do I have that would work? What does the detail bring to the piece? Sometimes it is necessary to save a detail for another project for some reason. The style or effect just isn’t what I want for this art quilt that I am working on.
Thinking ahead towards Quilting
My usual method of creating an art quilt is to start without much consideration of the next steps like how I will quilt the piece. However,sometimes it is necessary to consider the whole process and the order that I need to follow to complete the art. When would it be best to add the detail? Can I quilt over it? Or will I need to wait until after quilting is completed to add hand sew it on? With ATLAS in Rose, I wanted to highlight the oval pink and white beaded necklace in the middle of the quilt. Yet, I would have to sew it on after the quilting was completed. Quilting over beads wrecks the beads and could possibly damage needles and my machine.
work on design wall,ATLAS in RoseATLAS in Rose, 32″ x 32″ finished art quilt
Serendipity Happens
The patterns of stripes and circles happened rather serendipitously. Some quilters would say, I wanted to make a stripes and circle quilt. That is not the way I usually work. Yet, as I looked at my black and white fabrics, I saw the oversized circles contrasted well with the stripes and checked fabric. The stripes and circles created the movement I wanted. I mirrored them by couching decorative threads to create my own form of stripes. Hand sewn repurposed white buttons added more circles to the beaded necklace, front and center upon completion.
Back to the Design Wall
The work that happens on the design wall is in many ways is the most important part of the project. My main purpose is to make sure that the colors and fabric pieces are well balanced on the wall. It is not too late to eliminate items that would work better in another piece. Often I begin by placing the most eye catching pieces on the design wall first. They need to be placed in various spots across the piece and not all in one area. Balance is a crucial part. Then I continue with other important standouts. Only then will I continue adding with other pieces of fabric. I make sure there are places to rest one’s eyes. Plain fabric balances out wild details.
Sewing the Top Together
I begin sewing once the main pieces are in place. I make sure that pieces of fabric are larger than I expect the finished piece to be. One can always cut away fabric but it is harder to add fabric. That said, one thing I love about creating abstract art quilts is that there is less matching of seams and more flexibility if you need to add a different fabric than in traditional quilting.
Start Small
In general, I start by sewing smaller pieces together. I will sew together several pieces from one area. Then I will do the same in another part of the quilt. I have learned the hard way that I should not completely sew all of the pieces in one area together. More flexibility for fabric additions is allowed by rotating the spots I sew together. Then I wait until the very end to sew all of the pieces together. In that way if I need to add more fabric to a spot, it is easy. I prefer to not rip out seams if at all necessary. This is another advantage to creating art quilts. If something doesn’t work or I want to change it, I just cut it off instead of spending time ripping out seams.
Foggy Skyline,inspired by the colors of the sky after a rain storm.16″ x 16″
New Eyes
Critically seeing eyes are necessary. I mean critical in the sense of seeing what works well and what doesn’t work well. Only the artist can make that decision. Our eyes can miss what is directly in front of us. Sometimes taking a break or even returning the following day is what we need to see clearly. In other words, so that you will look at a piece with fresh eyes. This is so important. After some time has passed, I often see immediately what needs to be changed to improve the art quilt.
The design wall also allows the artist to step back at look at a piece from a distance. Close up views and distant views differ. Ideally, a piece will work for both distances although probably in different ways.
Other Considerations
When I begin to sew the pieces together, I want as much flexibility to change their places as possible. Therefore, I begin by sewing small pieces together in one area, the upper right hand side. Then I do the same in another spot, say the lower right hand side. This allows me to move pieces or add pieces if I need to. Of course, when sewing pieces together the project becomes smaller. If a finished piece needs to be a particular size, mark the design wall with pins or yarn to help you be aware of the desired size.
Focal point design details should probably not be placed directly on the edge. I learned the hard way that when they may be trimmed off at the end when squaring up the finished quilt. Another thing I try to avoid is having heavier fabrics directly on the edge. I like to finish my quilts with a facing sewn to the front and turned to the back to be hand sewn down. Thicker fabrics made the turning more difficult. Even sheet fabric with a high thread count is hard on the fingers when hand sewing.
green yellow bits on design wall, a work in progressfinished top Sunset Through Forest 34″ x 34″ after quilting
When the top is finished. It is time to make the quilt sandwich. The quilt sandwich is made up of the three layers, the top, the batting and the back fabric. They need to be laid flat and taut and pinned or basted together.
Finishing with Quilting
In general,I don’t think about which technique I will use to quilt a piece until the top is finished. Sometimes I regret this lack of planning. For me, the quilting must add movement. I have to decide how much more visual action this quilt needs. Is there a lot of movement already in the piece? Will quilting add more interest? Maybe a less visible stitch in the ditch technique is what the piece needs. Only the artist can make these personal decisions.
I have settled on three styles of quilting that work for me. Stitch in the Ditch is quilting inside seam lines. Scribble quilting that I named is quilting by moving the quilt line from one side of the piece to the other side. Doing this repeatedly creates wavy lines that may cross over one another. I use the free motion quilting technique to quilt my fabric landscape or seascape collages. Those with access to a computerized long art have lots of other options to choose from.
In Conclusion
The genre of art quilting is a newer art form. I share my process with you as a way of explaining how I create an abstract piece of art. This article advances the understanding of the decisions that need to be made while creating an abstract art quilt. Hopefully, inspiration for the art quilter follows or the collector will gain some perspective on how this artist works.
Suggestions for Newer Art Quilters
If you are looking to advance your art quilt techniques, these are my suggestions.
Take a class in some technique that excites you.
Join a guild or group to learn from.
Visit quilt shows and museums to view art with a critical eye.
Practice, practice, practice your skills.
In Responce
Gentle Readers, since this post, How to Create an Abstract Art Quilt was published it is by far the most read of all of my posts. Just wondering if you found this info helpful or not so much.
Read More.
You may find out more about how I create texture and movement in my abstract art quilts at these links.
Recently someone mentioned to me at my studio that she had some fabric that she had had for a long time. She suggested that she should get rid of it solely for the reason that she hadn’t used it. While we all have our own rules of engagement, that is not one of mine. If I like a fabric I will keep it until I can find a good project for it. In this posting I share examples of using fabrics saved for a long time.
Using Saved Fabrics
As soon that visitor commented on her long saved fabrics, I lead her to see this recently completed piece. I explained that I had had the fabric with wavy yellow, green and turquoise lines for a long time. I could not remember where or when I had gotten it.
Over the years I would try to see if it fit in other quilts. But each time I put it back on the shelf. Often this whimsical fabric didn’t fit the style or mood of the piece or maybe the color wasn’t just right. Here, however, everything works;the colors, the movement, the whimsical style.
Sunset Through the Forest random piecesSunset Through the Forest, an art quil
ATLAS in Rose
I recently completed the abstract art quilt, ATLAS in Rose. The rose, reddish rose and gold fabric is a high quality fabric that I had had for a long time. Yet I hadn’t used it. The red and rose colors would not play well with other colors. In spite of that, I kept it. Luckily, I did. Because it went perfectly with this black and white scientifically inspired art quilt. It added color and just the right amount of movement to the art quilt.
rose and gold fabricATLAS in Rose , finished art quilt
Fabric with Small Boxes
The following red, yellow and green fabric with small boxes is another piece that I liked. I didn’t know how I would use it. But I had to have it. The colors and movement spoke to me. I ended up for saving it for many years. In Cactus Dreams, the colors fit. The geometric boxes mirror the checks in the Guatemalan and in the checkerboard fabrics.
fabric with green,yellow,red and boxesCactus Dreams,detail,abstract art quiltCactus Dreams,abstract art quilt
In Conclusion
I finished these three art quilts in the past year. Without realizing it, I probably mentioned to the visitor that I had used some saved fabric. Thankfully, I had kept the fabric. Because they worked perfectly!
Follow these step by step instructions using Sunset Through the Forest,an abstract art quilt as an example to create an abstract art quilt.
Getting Started
Choose Your Colors
First, I prefer to choose a few contrasting colors. Then I search through my materials for fabrics, decorative yarns and threads in those colors. Sometimes I also choose lighter and darker hues of the same colors.
Make Details with Decorative Threads.
Next, it is fun to make shapes with the decorative threads. For this piece I used the decorative threads to make several parallel lines on the fabric. I cut long strips and sewed the decorative threads in long lines.Then I randomly cut the long strips into 3 or other odd number of pieces. Creating texture- done!
Several different examples of decorative details
On the Design Wall
Next, I display the potential finalist fabrics on my design wall. My favorite choices are fabrics with movement and interest. Then, I also make sure that they are places for eyes to rest by including solid colors.
Trying out green and yellow bits of fabric randomly placed on the design wall
Balancing Colors
Next, balance out the colors and textured pieces so that they are not all on one side of the piece. Don’t be afraid to take a break to come back to view the work with fresh eyes. A fresh look is always helpful in looking for ways to improve a piece. How will one’s eyes move around the art work? Eliminate fabrics if necessary.
Balancing the fabrics and colors
Sewing Smaller Pieces Together
Begin to sew small pieces of fabrics together. Then remember to balance colors and fabrics so that they are equally spaced about the piece. Use this advantage of a design wall to view your whole piece.
Small pieces are sewn together
Sewing More Pieces Together
Continue sewing pieces together. Keep checking for balance of fabrics, colors, and textured pieces.
finished top, Sunset Through the Forest
Finishing
Lastly,I scribble quilt the three layers together to create an added level of movement. Scribble quilting is a technique I named. I use a walking foot to create a flowing quilting line by moving the quilt side to side while quilting. Make sure that the quilting is also balanced and equally fills the space. Then add a facing. Turn to the back and handsew the facing to the back. Name and sign your art!
Sunset Through The Forest, finished art quilt,32″h x 34″w
In Conclusion
These are the steps that I generally follow to create my abstract art quilt pieces. They represent my process at this time. It will probably change over time. Your process is probably unique to you.
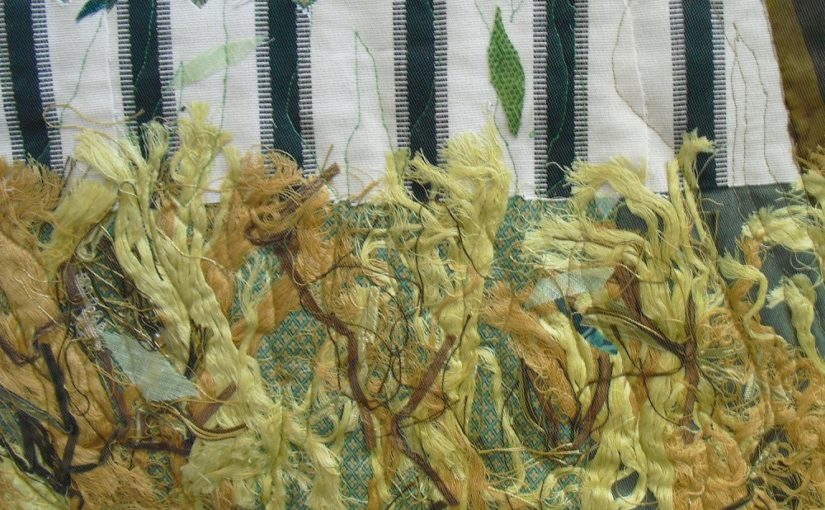
Wetlands Wanderer,an egret in the wetlands Above all,notice the decorative threads at the bottom of the quilt. 28″ x 27″
Add Decorative Threads for Texture
Above all,decorative threads add texture to art quilts. Furthermore,texture is part of my mantra, Color! Texture! and Movement! Therefore, I take creating, finding and using texture very seriously. Above all for me, it is fun. I get excited about repurposing decorative ribbons and threads in my art quilts. I would like to take this opportunity to share some ideas.
My artistic path evolved about the same time I found Fabmo fabric and more https://www.fabmo.org/. Fabmo is a nonprofit that rescues fabric samples and materials from designers to keeping them out of the landfill. In addition,they make them available to the public. The charming decorative three dimensional details call to me. However, I discovered these threads quite by accident. For example,I accidently took some details apart. Most importantly, I discovered lovely threads and ribbons to add texture to my art quilts.
decorative detailsRibbons from disassembled details
Take Things Apart to find Decorative Threads for Texture
These small details add texture, fiber and interest to art quilts. However,some of the threads are quite long when disassembled. Lots of room for creativity. Make a small detail by twisting and folding longer threads. Decorative threads entered my art pieces. In addition, I use these decorative details to add 3D texture to both my abstract and nature inspired art quilts.
Cinnamon Threads, detail from an abstract art quilt detail of 23″ x 20″ art quilt
How Would You Use These Decorative Threads?
Red detailBeige detail and disassembled red detail
Some Examples of What I Did
In addition,here are a couple of photos of works in progress highlighting deconstructed fibers.
An egret, a work in progressfibers in a work in progress,
Helpful Hints
Not in the San Francisco Bay area with access to FABMO in Sunnyvale? Find interior decorators in your area. They will be thrilled to pass on their “outdated” details. Moreover,beautiful yarns can be found at garage sales. Leftover pieces of interesting yarns may also be found at yard sales or Goodwill. Decorative threads are available for purchase. Of course, interesting decorative threads are often sold at quilt shows. Does your local quilt guild have a flea market? Lots of good finds there.
In Conclusion
In conclusion, I hope that you will be inspired to try and incorporate more decorative threads into your art quilts. Therefore, please share your successes and advice. Above all, try something new.
Are you curious about how to become more creative? Have you ever thought how creativity works? Is someone born with it? Is it a developed skill? Or is it magic? I personally feel that it is a bit of all of those things. But for the most part, creativity is based on a lot of practice, making mistakes and hard work.
Becoming More Creative
American Democracy,2019 27″ w x 28″h
They must be a Genius.
I am not very musically inclined. Upon hearing a complicated piece of music, I would wonder how did someone create that? I would have no idea how the piece was put together. I assumed that the artist created the piece all at once. Therefore, they had to be some kind of a genius to be so special and creative.
Creativity is not a Fixed Entity.
More recently after creating many original art quilts, I have a clearer idea of how creativity works. Creativity is not a fixed entity. It must be nurtured and developed. The musicians might be very talented but probably they worked a long time on a particular piece working bit by bit. Maybe even different people contributed different parts. Ever notice that some people write the music and others write the words? People have strengths in different areas.Their genius takes years of practice.
Making Choices
When beginning an art quilt, first I decide what type of quilt I will make. Will it be an abstract, a nature piece or a Mexican inspired fabric collage? Then I begin to choose the colors based on the fabrics and materials that I have. It helps me to have a vague idea of where I am going. But I keep it flexible in case,I want to change things. Sometimes I start by making a lot of really interesting parts to be focal points. It could be a fabric doll, couched decorative threads or ribbons or 3D textural piece.
Plan something. Then Work to make it Better.
For an abstract art quilt, I begin by choosing a three color palette before adding light and dark hues. It is best to have an idea of what I am going to use these special details or parts for so that the colors I choose will work with the project. But there have been instances when these details haven’t worked as first intended. So were put aside and saved for another piece.
After choosing the colors, I take my first steps of laying the pieces on my design wall. Then I ponder, what I could do to make it better. How can I make it more artful or interesting? How can I add texture or movement to the piece? This is an ongoing process. I make those adjustments and continue on.
Fresh Eyes
Taking a break. Coming back to look again with fresh eyes is helpful and necessary. It is amazing how our eyes can fail to see things. Even when trying to look for errors and they are right in front of our face.
In Conclusion
After making over 400 art quilts, I have a clearer idea of how creativity works for me. Time in the studio working to create art is a must. I am motivated by the way different materials work together. Themes or colors may be the same but rarely do my pieces look similar. Serendipity does occur and should be embraced when it happens.
Color is probably the art element that attracts and motivates most artists to begin work. For most people it is the most engaging aspect. For my take on this subject, I am going to focus on how I choose to adding color to my abstract art quilts. In general, I chooose 3-4 colors to work with. Then I find the range of hues from light to dark to add for balance and interest. I often use bright colors while I find a pale palette of beiges and whites to be very calming. I work on a large white flannel design wall.
To begin, Where do I get my ideas? How do I decide on which colors I want to work with? Most of my materials are from FABMO, a non profit that gets castoff materials from designers. Swatches of a wide range of colors with slight variations provide a lot of choices. Here are some ideas I have inspired me to get started.
A Photograph
A friend sent me this photograph of a colorful bird from Australia. Rarely do I work from photographs. I will not be using the bird however, the hues of purple,blue and black will be in an abstract art quilt in the near future.
Look Down
While working on a piece,I tossed the extra fabric in a box on the floor next to me. I did this repeated. At the end of the day, I looked down and saw these wonderful grey and lime green colors together. I gathered them up and put the in a special place to work on later. This was the piece inspired by leftovers. May I note that I usually don’t use these colors.
Lingering Fog,34″ x 34″ 86 x86 cm 2019
Using Up Materials
Sometimes I just start a project with materials or colors that I want to use up. I might have too big a piece of fabric or too much of one color. Some artists might find this idea very unorthodox or even unsettling. When I started City Lights, I had a pile of blue fabric that I wanted to diminish. Sand Between My Toes allowed me to make use of whites and beiges. Sea Turtles is not an abstract art quilts but I had a large piece of blue synthetic fabric that I used for the background. The turquoise plants are also created from fabric I wanted to use up.
City Lights, a fabric art quilt,24″ x 22″Sea Turtles 35″ x 23 ” 2014Sand Between My Toes
Use the Palette of a Commercial Piece of Fabric
A fabric friend suggested this to me several years ago. I have to admit I couldn’t wrap my mind around this idea for a long time. Go to a fabric store. Look at the colors on the commercial fabrics. Very experienced designers work to create these prints. Choose a palette that you would like to use. You don’t need to use the fabric just let the colors inspire you.
In my abstract art quilt, Spring Break I did use some of the fabric. However, the process of chosing the materials was driven by the colors of the original piece of redirected linen. I looked for complementary colors from the fabrics I already had.
Spring BreakI built the fabrics around this piece of fabric.
In conclusion, inspiration for art can be found in many unusual places. Inspiration comes from spending time in your studio. Keep your mind open and inspiration will appear.
Techniques for creating texture on a flat piece objects are subtle. In other posts, I addressed other aspects of my mantra, Color!Texture!Movement! Moreover, adding color or movement creates a bolder statement. Above all,color impacts the viewer first and then movement next. But texture may even go unnoticed. However, now I will share my ideas for creating texture in my art quilts.
Tucks Create Texture
For instance, tucks are small seams sewn on the edge of a fold. Yet, a series of 3-5 tucks create texture. For example, in Upwelling they represent the layers of earth movement. Furthermore,this technique is also helpful to reduce the size of a piece of fabric by just a small amount.
Upwelling, 30″ x 34″ Tucks run the width of several pieces to create texture.
Naturally Thick Fabrics
On the other hand,corduroy or other thick fabrics add texture by their nature. Look for fabrics that naturally have an interesting texture like dupioni silk. Unfortunately, these fabrics are often challenging to work with. Most importantly,develop your skills so that you will be able to work with them more easily.
Couching Decorative Threads
In addition,couching (zigzaging)different threads on fabric adds texture. First,I couch threads on long strips. Then I cut the pieces apart to use as fabric. In addition,this is a good way to utilize small pieces of yarn or decorative threads. At the same time,use the same color of thread to emphasize the line aspect of art. in this way,the focus will be on the color of the yarn not the color of stitching thread.
Desert Sands, 16″ x 21″ 2015
Three Dimensional Objects
Furthermore,add texture with 3D objects. In addition,artistic people may create their own 3D object using fibers. Here I included two fabric figures that I had previously made. Similarly,on the male figure, I added a serape for the Mexican theme. Likewise,embroidery thread hair,jewelry and lace completed the female’s figure.Finally,I added found plastic objects.
El Senor y La Senora Win Loteria
True Confessions Time
Ultimately,sometimes I am motivated by just using up materials. What items can I add to my art to finish it up? As a result, this random technique led me to a positive ending. I had about 8 designer samples of short threads in different colors wrapped together. Spontaneously I decided to add them to the foot of a tree. Don’t they look like grass? Boy! did this work!
Under the Shady Tree, 37″ x 25″ 2019Under the Shady Tree detail 2
Start with Fiber
Fun With Fiber 6
Start with fiber. Here I used a redirected folded fiber piece. I added a found Mexican(Aztec inspired) clay head and redirected fabrics. Then I attached it to a highly textured piece of burlap.
In conclusion, the techniques to add texture include tucks, thicker fabrics, couching decorative threads, and adding three dimensional objects. There must be other ways to add texture. Do you know of any? Please respond with your suggestions. I am open to new ideas.
First of all,I prepared this Pechakucha laser talk in anticipation of presenting it at an art quilt meeting. The Pechakucha,a Japanese word for chitchat. To clarify it is a format that gives a speaker a limited amount of time to discuss a topic. For example, I would have 4 minutes to present a limited number of photos to on one topic. At the same time,numerous presenters of a variety of topics are able to share. That is to say that I prepared to discuss my passion for making art quilts from redirected materials. Moreover,FABMO, a local nonprofit is where I get my materials from. http://fabmo.org
My Art Quilt World
To begin,I do nature art quilts, abstracts and Mexican inspired fabric collages. Furthermore, I am very passionate about using redirected materials and threads to keep them out of the landfill. My inspiration comes from the materials I find at FABMO . I have been a volunteer there for many years. To clarify,I brought photos from three pieces that I completed recently to present at this Pechakucha laser talk. So I could share the process with you.
Spring Break, an art quilt
Paisley pattern on linen
First I choose the fabric, Here is the material I started with. I liked the variety of color and decided to use the colors as a basis of an abstract art quilt.
Step 1 Beginning to place pieces on the design wall randomly
Next, I couched decorative threads and yarns with the idea of making interesting details. Then I cut up the strips randomly to use as fabric. Following that trying out other fabrics on the design wall.You can see several examples of redirected couched ribbon and yarn on different colored fabric.
Finally,the completed piece using scribble quilting. Scribble quilting moves the quilt side to side while quilting to create flowing lines of sewing.
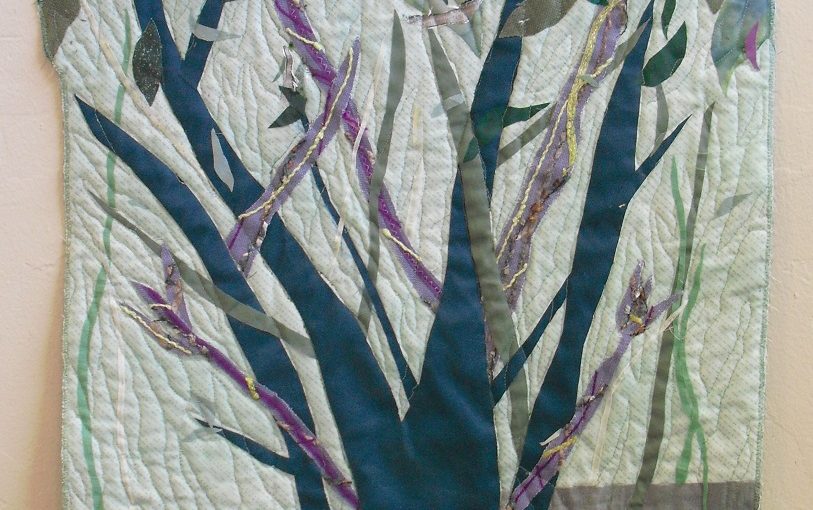
Skyward, an art quilt
GreyhoundsGreyhounds in another direction
Originally, I chose this FABMO fabric for the movement and stark lines. But when choosing the fabric,I didn’t even noticed the dogs. They were not of interest for me. First,I began to couch green and black threads.
Here, I zigzagged a variety of colors.
Then,I continued couching other colored threads. Some of these threads were light blue but read more like grey against the light grey part of the fabric.
Can you believe that the tree is made from the same material?
Finally, I was ready to use the fabric to create tree branches. Using the fabric layering technique,I laid the back fabric down on the table.Of course the back is also another piece of material from FABMO. I covered it with batting and I laid an indigo dyed piece on top for the sky background.
The finished art quilt just showed the tree tops.
The finished piece,Skyward,succeeds in its interplay of light and dark on the branches. On the other hand,one doesn’t notice the dogs at all.
Under the Shady Tree, an art quilt
The finished art quilt, Under the Shady Tree made from redirected materials.
Next is the finished piece of under the Shady Tree. Aficionados of redirected materials may recognize the fence fabric. To clarify, I used the fabric layering technique.
Unusual materials can be used in unique ways.
Furthermore,notice several leaves with bluish and gold colors. To be clear,I used a multicolored synthetic knit that kept rolling up in other projects. I couched it to help it lay flat. Then I cut it into leaves.
a different view
Last but not least,Shiny sheer fabrics add interest.
Take apart details and see what interesting fibers one can find.
Creating Texture
Moreover,texture is created by taking apart fabric details. They can be used as bunches of threads to add interest. One can also find decorative threads,ribbon and small cording . Lastly, I laid it on the foreground , covered it with tulle netting and free motioned quilted the three layers together.
To sum up,I am all about color, texture, and movement which I create using redirected materials. Thank you for letting me share some of my recent works with you.
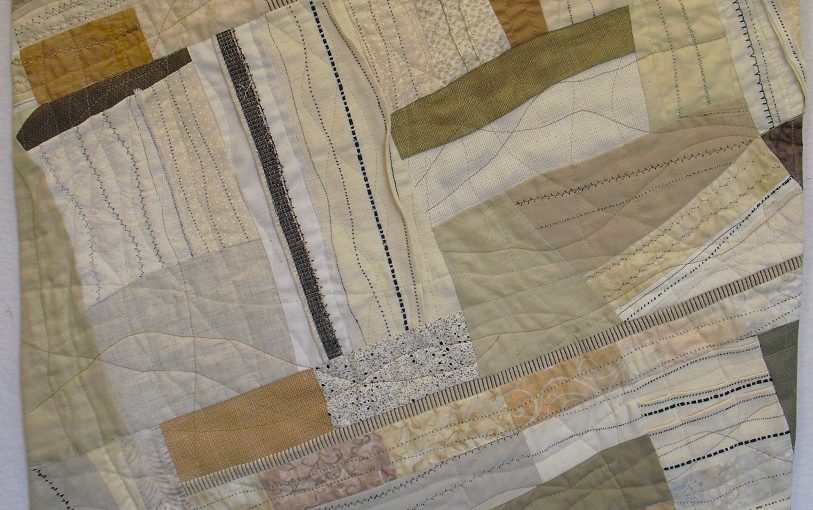
Winter Sunset 23″ h x 22″ 2018Burlap and Silk 24″ x 23″ 2015Cheddar and Triscuits,30″ x 28″ 2015
I find Cheddar and Triscuits a perfect name for this art quilt.Cheddar is the name of the color used in. The cheddar and white traditional quilting blocks contrast with several types of redirected high end fabric from the San Francisco Design Center. Fiberous netting and decorative threads and synthetic raffia add texture. I couched other decorative threads and rickrack on a strip of fabric. Then I cut them into smaller pieces to add where needed.
Circuit Board 15″ x 14″ 2015
When I first saw the fabric with the dashes on it, I immediately thought of a computer circuit board. I added many redirected fabrics in this piece. Decorative threads couched on a long strip of fabric and then sliced into pieces add interest. Pulling in colors similar to the fabric with dashes was fun. It was done without much thought but with much necessity.
The Quarry 21″ x 31″ 2015
The Quarry uses found materials,beads and the color,brown that I usually avoid. Someone created fabric with a process of marbling paper in several colors, black, blue and reflective blue and pink. The stratification formed by these fabrics was a new idea to me. Bone beads added a 3D effect as if they were layered under the ground and just peeking out of a cliff.
In Conclusion
Playing with the contrast of fabrics or your chosen materials lets you create something unexpected. An outlier can suggest a new direction or technique to follow in the future. It is up to the artist to make that decision. Or maybe the success of the project that will make the decision for the artist. Make your art like your life depended on it! Because it does!
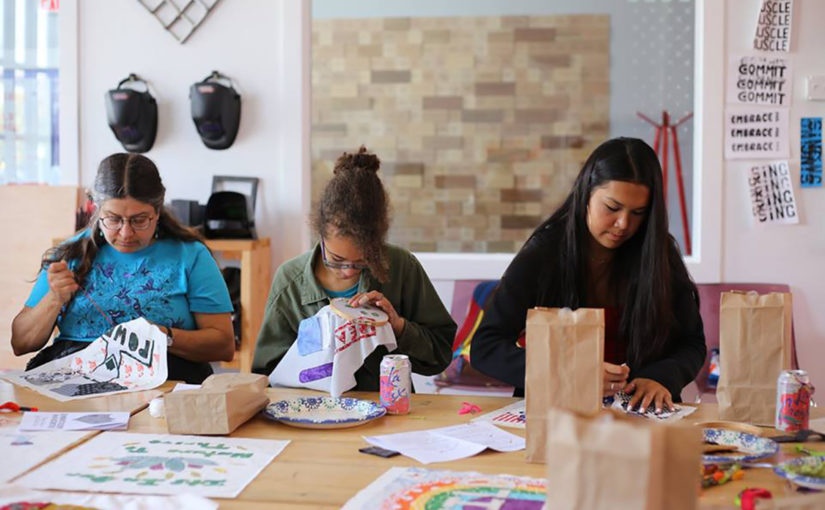
(Photo: Courtesy of the Social Justice Sewing Academy)
The afternoon quilting workshop at Hillcrest Elementary School in San Francisco, California, meets in a mobile classroom behind the main building. After the school day is over. Then sixteen kids have walked across the basketball court, dropped their backpacks, and headed for a table piled high with colorful fabric. Then they cut out silhouettes and gluing block letters.For example, a red appliqué stop sign reads Stop Deportation. Or the letters LGBTQ underscore a feminine face with a small of a black mustache. Then the caption says Let Me Be Me.
Sara Trail
Sara Trail, the 23-year-old founder of the Social Justice Sewing Academy organizes these quilting bees for activist youth. She’s raced over from her day job teaching high school courses to incarcerated adults.
Inspired by Trayvon Martin’s death
Trail says that social justice work became urgent for her when she was a high school senior in the wealthy Bay Area suburb of Walnut Creek. It was February of 2012, she recalls, and she’d just celebrated her 17th birthday. On the opposite side of the country, a boy she didn’t know had also just turned 17. Someone she might never have heard of except that shortly after his birthday, he was killed.His slaying made national news. It was Trayvon Martin.
Trail was one of the few black kids in her neighborhood. When Martin was killed, she says, she didn’t yet fear the police. She says that her parents were protective and focused on scholarly achievements. “I did swimming and reading and piano,” Trail says. However, from age four, she sewed. Quilting enabled Trail to express the intense feelings that Martin’s death aroused.After that, ” I started making my first art quilt,” she says, “which was Trayvon’s face.”
A few months later, she began her freshman year at the University of California,Berkeley. In addition,she also began tutoring at a nearby public school. Then,she decided to try using craft as a way for students to comment on the issues that touched their own lives.
Quilting and Social Justice
Quilting might seem too quiet and slow to hold teenagers’ attention. But it has always been a kind of social media. For centuries, quilting circles have been a space for women to discuss their lives and to seek support. Quilts themselves have served as a mode of communication where others failed or posed a threat.
a small grant
At the end of her senior year at Berkeley, Trail founded the Social Justice Sewing Academy with a small grant. She used the money to buy sewing machines, supplies, and public transit tickets for students. In the mornings, she taught ethnic studies and critical consciousness. In the afternoons, the issues would inspire sketches for a quilt square. I paid attention to the student’s interests.If they mentioned redlining, then we would look at maps of their area. Later they would find out how many buildings had been foreclosed. Research how many families were given predatory loans Trail says.
Seasoned Quilters Help Out
Trail built a worldwide network of seasoned quilters through Instagram. She mails the students’ fabric squares for final stitching to the experienced quilters. Most of them are older, white, and living in places where they rarely come into direct contact with youth from disadvantaged backgrounds. However, they are eager to help and share their skills.
“C is for Colorism”
Bianca Mercado participated in an Social Justice Sewing Academy workshop as a 17-year-old at her high school in Massachusetts. She created an alphabet quilt with 26 social justice statements. Her “C is for Colorism” block was mailed to Colleen Haraden-Gorski, a water-resource specialist in California. Haraden-Gorski researched color discrimination. Then she decided to stitch in a rectangle of brown fabric with a script reading brown paper bag. The added detail refers to the custom among African Americans to compare their skin tones to brown paper.
Touring Around the Country
Now, Mercado’s quilt is touring exhibitions around the country. Moreover, it often hangs among more traditional patterns, surprising viewers accustomed to tamer geometries. From the quiet patchwork of fabric, the young artist’s voice speaks loud and clear.
A main motivation of mine besides making stunning art is to reuse materials. Pieces of yarn and decorative threads that some people may discard become unique design elements. I couch (zigzag) them on a strip of fabric, cut them and use as fabric. Yet, sometimes there are decorative threads that one just has to buy. There is one like that in this piece. The ribbon alternates rusty orange and green with 3D native inspired tied knots. Bring Your Bravery! Be Brave!
Choosing Colors- Be Brave!
Choose your color scheme. I recommend three to four colors. Sort hues from light to dark in the same shades. Be brave. Experiment with different colors on your design wall. Don’t be afraid to eliminate fabrics. Start with more material than you think you might need. Include one bright fabric that makes the piece pop.
Creating Details Bring Your Bravery! Be Brave!
Couch (zigzag) decorative threads on 5”wide strips of cotton. Try something new. Bring Your Bravery! Be Brave! Emphasize the art element of line by couching with thread that matches the yarn to make the sewing thread disappear. Double or triple the ply for a thicker line. Repeat four to six times using different colors and types of decorative threads. Couch the decorative threads fairly close together about 1/8-1/4 inch apart. Leave a 1” space on each side of the fabric strip. This gives you flexibility. You can always make it smaller.
Tucks add texture.
Bring Your Bravery! Be Brave! Tucks add texture. Fold a 12” length or longer strip of fabric wrong sides together to create a fold. Stitch 1/8” or 1/4” close to the fold edge. Choose your thread to blend into the fabric or to stand out as a design element. Make 3-5 tucks on the same strip of fabric. Remember to save room for the seam allowance on the sides. Press to lay flat. Cut up the strips into 4”- 8”pieces. Balance their placement on the design wall.
Temporarily Mark your Design Wall
Plan to make your finished artwork about 24”square. Mark with pins the approximate size of your finished piece on the design wall as a guideline. Remember when you are putting fabric on the design wall, the finished product will be smaller. Start with fabric pieces that are a bit larger.
Photo 2 Small strips are being sewn together.
Place the Pieces Randomly
So, you have assembled your own “fabric” with couched decorative threads and tucks. Now it is time to mix those fabrics with others on the design wall. Bravely put the pieces up randomly and start to move the pieces around to see what goes together. What fabrics jump out at you?
Photo 3 Almost all squared up.
Balance the Fabrics
Limit those to an odd number of them. Balance the different fabrics making sure that they are spread out evenly over the top. Beginners might choose to piece their top using straight lines up and down. Placing the pieces on a diagonal adds interest. A diagonal quilt will go past the guideline pins and be trimmed into a rectangular or square.
Show courage. Sew, cut and move fabric around the design wall. Keep cutting and sewing pieces together until it pleases you. The top doesn’t need to be totally finished to start to sew. Sew straight or curved line seams. Continue to sew pieces together into about 8” strips. Pin them to the design wall either in straight lines or on a diagonal. Allow time for this process. Trust yourself.
A “Painful” Time
This can be a “painful” time for an artist, if the piece isn’t coming together as one wishes it would. I find that if I don’t like a part, it gets more interesting after I cut it up and rearrange the pieces. Leave items on the design wall and return later to look at the piece with fresh eyes. Complete sewing the top when you are happy with it. Prepare the quilt sandwich and quilt. Scribble Quilting is fun and adds movement to your piece. Whichever way you quilt your piece, you will have an artful abstract art quilt as testament to your bravery.
About the Author
Ann Baldwin May lives in Santa Cruz, California. In 2012, she retired after teaching elementary school for 36 years. She has won several awards for her work. She participates in the juried Santa Cruz County Open Studios Art Tour from her studio in the Santa Cruz Art Center. May is a member of SAQA( Studio Art Quilter Associates). Contact her at baldwinmay49@yahoo.com or www.annbaldwinmayartquilts.com. Or visit her Etsy shop at annbmayartquilts.etsy.com
Directions for Curved Line Piecing-optional
Lay two pieces of 5” cotton squares on top of each other right sides up on the cutting mat. Cut a slightly curved line through both fabrics with a rotary cutter. There will be four pieces. The top of one fabric will fit the bottom of the other fabric like two puzzles pieces making the original square. Take those two pieces that fit together and sew right sides together with a ¼” seam. Only the part of the fabric going through the foot will line up to a ¼” seam due to the curve. Slightly adjust the top fabric as you move them both through the foot. Press open. This technique is very forgiving. You will be amazed at your curved line. Practice making curves of different widths.
Advice for Beginners
Let each person’s eye see the hues in their own way. Let go of controlling the way the colors mix together. The color of thread changes depending on the color of the fabric that it is sewn on. The color of the fabric is influenced by the color it is next to.
When I started making art quilts, I had a lot of experience sewing clothes and bed quilts. I would think of how a traditional quilter would do something and then I would choose to do it differently.
Consider expanding your stash to include a wider range of shades and hues.
Tips
It is imperative to be cautious with certain aspects of our lives, but cutting up fabric is not one of those times.
Create texture by including fabrics other than 100% cotton. While a variety of fabric adds interest, provide some solid fabrics as a needed resting spot for one’s eyes.
Include a bit of fabric that will pop. Shiny synthetics work well for this.
Supplies and Materials
Rotary blade, cutting matt, design wall(white flannel thumbtacked to the wall) sewing machine, batiks, found threads(decorative threads, yarns, rickrack, colored string, synthetic raffia), a variety of small pieces of cotton fabrics(fat quarter or smaller), fabrics of different textures (optional), thread, batting, cotton backing fabric, scissors, walking foot for quilting.
Having Fun With Color!Texture!Movement! appeared in Art Quilting Studio, Summer edition, 2018. Ann Baldwin May is having Fun With Color!Texture! Movement! in each of her art quilts.
Having Fun With Color!Texture! Movement! will show the steps needed to add color,texture andmovement to art quilts using the fabric layering technique.
Having Fun With Color!Texture!Movement! GETTING STARTED
The fabric layering technique makes it easy to have Fun With Color!Texture! Movement! to your art quilts. Begin by laying the back cotton fabric on a table. Choose a size that will easily fit on your work table. A square or rectangle about 15”-20” is a good start. Press the fabric to lay flat. Cover with batting which should also lay flat. Don’t worry if the edges don’t exactly line up, they will be trimmed later. Next, choose a fairly neutral background fabric or fabrics. Overlap the fabrics about an inch. If the fabrics shift during quilting, the batting won’t show. Cut a meandering line to look like rolling hills on the edge of the top fabric. Lightly baste with a glue stick.
Choose your Colors Having Fun With Color!Texture!Movement!
detail of Along the Path
Choose your colors adding a range of hues from light to dark as well as colors that contrast. Play with the colors to see what you like. Be ready to eliminate those that really don’t work. Go for an impressionistic view rather than a picture perfect trunk, leaf, or branch. Each viewer’s eye will blend the colors uniquely.
Start Large to Small
When beginning to create the scene, start with the largest part and work to the smallest. Cut out the tree trunk and add branches as you go. Flip the fabric and use the backside to add dimension. When you have the tree the way you like it, lightly baste. Just baste in a few places not all over. Later on, if you may want to slide a branch underneath and you won’t be able to if it is totally glued down.
Add Details Having Fun With Color!Texture!Movement!
Add rocks to the foreground. Choose fabric that will work for you to add texture. Avoid fabrics that have rocks printed on them. I chose marbled fabric I bought at Pacific International Quilt Festival and a redirected fabric to add texture. You will notice that they are cut simply. Lightly baste the rocks to the background. For the medium sized branches, I couched (zigzagged) decorative threads and ribbons on to a multicolored piece of redirected linen. Then I cut the branches out. I lay them on the piece balancing out the colors. Crossing branches adds interest and movement. Keep going until the scene is pleasing to you. Baste lightly.
Along the Path,detail
Leaves Add Interest
Working on the leaves is so much fun. Gather contrasting and blending colors. Make the leaves about 3”-4” varying the shape and size. Small scrap pieces are all that are needed. Pay attention to balancing the placement of the colors . Reflective, shiny sheer fabrics add a pop to the leaves. Save them for the top for the greatest effect. If you choose to have the leaves stick out from the edge, make those leaves ½” bigger for ease of zigzagging. During the final trimming you can adjust the leaf lines by cutting before zigzagging. Lightly baste leaves in place. Your art quilt will also be successful if you decide to make the edges straight .
The Beginning of the End
When your artist’s eye says that the scene is complete, cover with tulle. Make sure that the tulle is 2 “ longer on all sides. It can pull a bit during quilting. Pin the tulle down making sure that it is flat but not stretched. Use a lot of straight pins; remove as you quilt. As with other quilting techniques, begin in the middle of the piece and quilt outward. Edges may be rolled to accommodate the machine’s space.
Helpful Hints
Beginners will have success stitching along the edges of the branches, following the lines of the fabric. More experienced quilters can add movement by quilting lines resembling slanting plants. Choose a thread color that blends with the background. I highly recommend Aurifil thread for successful free motion quilting. Trim the edges and zigzag two times. Press lightly with a pressing cloth or piece of fabric. Add a sleeve to the back to hang. Stand back and admire!
Everyone Starts Somewhere.
Several years ago I began my path from traditional quilts to art quilts. I took a class in the fabric layering technique from the award winning, Meri Vahl (meriartquilts.com). Meri had learned the technique from Northern California artist, Laura Fogg(laura-fogg.squarespace.com).The technique allows for much personal creativity; none of our work looks similar. I was inspired to create a tree with leaves overflowing the edges as I have sold five pieces to the new Kaiser Permanente Facility in Scotts Valley and WEatsonville, California. A change in color scheme keeps all of my trees unique.
Important Materials
quality scissors; large and small, sewing machine, darning /free motion foot, walking foot for zigzagging, rotary cutter, cutting board, plastic see through quilting ruler, cotton fabric for backing, tulle, synthetic fabrics, redirected materials, commercially marbled fabric, sheers, batiks, Aurifil thread, Avery glue stick, pressing cloth ( to protect tulle and synthetics from melting when being pressed),a pointed wooden stick , straight quilting pins(They are longer than sewing pins.)
Tips
Leave a 1-2” empty back ground space on the sides of your piece. Then when trimmed your art doesn’t lose any interesting parts.
A light colored tulle will be best for your first project. I personally am not fussy about the color of tulle I use.
This technique is a forgiving way to practice free motion quilting. Before I learned this technique, I was ready to give up with free motion quilting in frustration. Lower or cover your feed dogs. Put your stitch length at 0. Use the darning/free motion foot with Aurifil thread. Push foot pedal control fast while slowly moving/quilting the layers of fabric.( Fast foot ,slow hand) Aurifil thread is available at most quilting stores. It appears more expensive but it really isn’t. I pieced and quilted a queen sized quilt of many seams with one spool.
Throwing the leaves onto the scene adds movement. Free yourself from cutting out perfectly formed leaves.
Use a large straight pin like a hat pin to get the tiniest dab of glue on the tip and gently slide under the fabric to be basted. I use a wooden stick similar to an emery stick to help me gently nudge the pieces of fabric to where I want them to be.
Advice for Beginners
I come from the world of bed quilts. The basic sewing skills used in traditional quilting are fundamental for most art quilting. However the “Quilting Rules” can be left behind. Buying patterns, pressing seams and matching seams are a few of those rules I have freed myself from. Give yourself permission to try something new, be it a color combination or creating your own designs. Listen to yourself. Take baby steps. You decide if you like your work or not. If not, change it. There is no wrong way to do it. Many art workshops or seminars begin with activities to get people in touch with one’s creative side.
Along the Path
About the Author
Ann Baldwin May lives in Santa Cruz, California. In 2012, she retired after teaching elementary school for 36 years. She began quilting in the 1970s. Ms. May participates in the juried Santa Cruz County Open Studios Art Tour from her studio in the Santa Cruz Art Center. She recently sold five tree art quilts to Kaiser Permanente for their facilities in Santa Cruz County, California. May is a member of SAQA( Studio Art Quilter Associates). Contact her at baldwinmay49@yahoo.com or www.annbaldwinmayartquilts.com. Or visit her Etsy shop at https://www.etsy.com/shop/annbmayartquilts/
New stitches can be found by accident. Mistakes can sometimes lead to a wonderful realization or improvement.
Discovering New Stitches by Mistake
Tranquility, an art quilt with black stitches pulled through to the front before quilting.
The Tension was Off.
Tension is the balance between the top threads and the bottome threads on a sewing machine.A while back my 20 year old Huskavarna Lily was acting up. Out of the blue, the tension would change as I was sewing. The action pulled the bobbin thread through to the front (top) of the fabric. As annoying as this was, I liked the way the stitches looked. I was discovering new stitches quite by accident. Could I repeat the success of this stitch ?
Let me confess, that I am not a person who often uses all of the stitches that are available on my machine. I usually use the zigzag stitch and one or two decorative stitches. I decided to fool around. How could I could use this “accidental stitch ” to my advantage? I wanted to discover new stitches by mistake. Would it be a way to add interest to my art quilts?
Changing the Tension
I changed the tension to 8 or 9 high on my machine. with a black thread in the bobbin. The top thread I used matched the white or beige color of my fabric. At the time, I was doing Native American inspired quilts. Moreover,I felt the black dots on the top somehow seemed to work for me. The maximum contrast drew my attention. I also adjusted the stitch length and width to make them as large as possible for maximum visibility. The results were pleasing.
In conclusion,errors can turn into serendipitous wonders if we keep our minds open to them. In the future, I should be more adventuous to change the tension and adjust more of my machines stitches.