Quilters are famous for reusing fabric in their quilts. Yet, for quilters there are several other ways to reuse and not toss materials. Let me share a few of the ways that I have taken this a bit farther. I am very passionate some might say obsessed about not throwing fabric or other materials away.
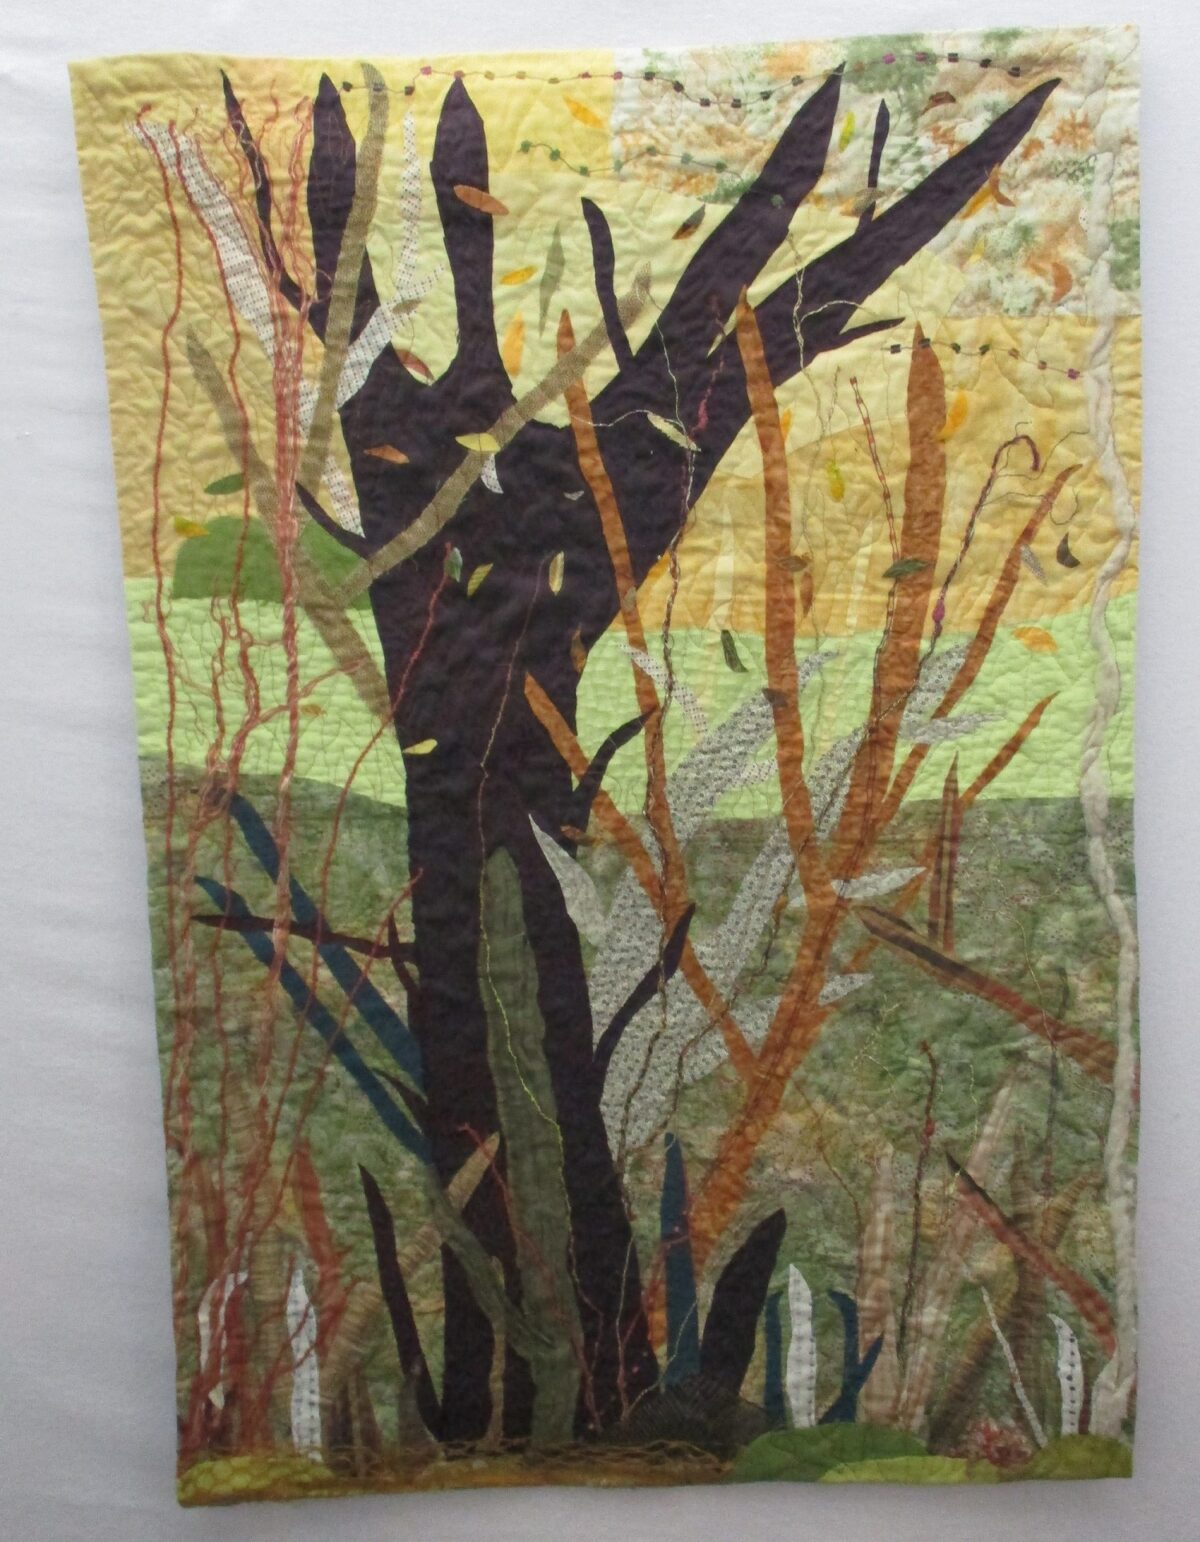
DesertTrees in the Wash, 25″ x 24″ 64 cm x 61cm 2021 Just one example of how I use small bits in my art quilts.
Business Cards
I use bits of batting and fabric to make my business cards. They are like mini art quilts. Some people benefit from a visual example of what an art quilt is. The fabric cards are about 4″ x 4″ 10 cm 10cm.
First, I write out my contact information using a fabric pen on a light colored solid piece of fabric. Next,I sew several small pieces of leftover fabric together. Finally, I make a small quilt sandwich with a small piece of batting inside. Then I stitch the three layers together. Trim and zigzag the edges.
a fabric business card- a work in progressa fabric business card -a work in progress with batting and backing
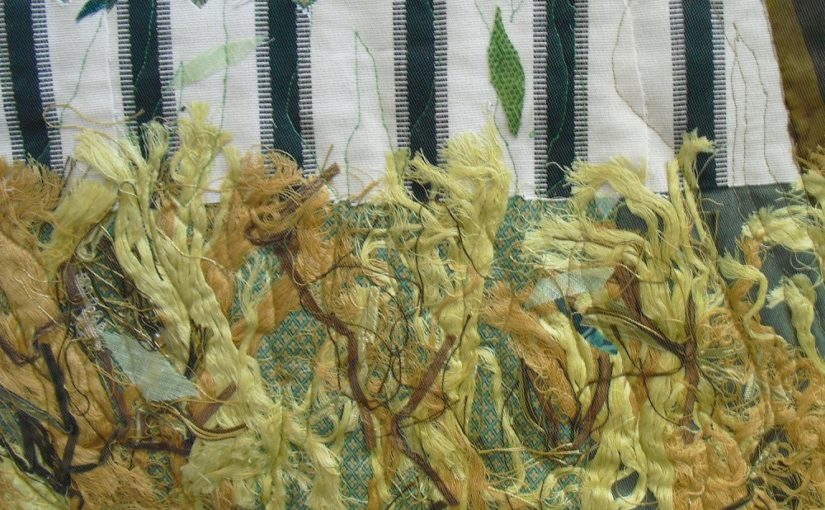
Short Pieces of Decorative Threads
Pieces of decorative threads add texture and dimension to my art quilts. They could be birds or twigs in the wind. I prefer to create a more impressionistic view in my landscape art quilts. I leave it up to the viewer to decide whether the small piece is a bird or a leaf blowing in the wind. Reuse, don’t toss.
A textile friend gave me lots sof small pieces of the decorative threads she had left over from making scarves.a closer look at some of the decorative threadsHere are some other yarns I use.Decorative threads and decor details I take apart to use their threads
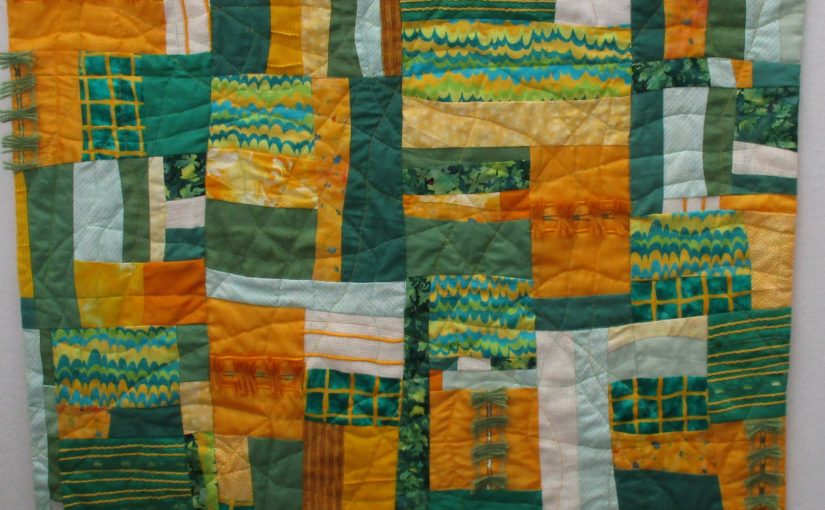
Small Pieces of Fabric
Small pieces of fabric become abstract art quilts or fabric landscape collages. I have written several blogs on this topic. Here are links to two.
Pieces of batting can be sewn together to be used like a larger piece. Make sure the weight of the batting is the same. Cut straight edges. Sew by zigzagging straight edges together. Make sure to create no gaps. Often there is a narrow long piece of batting let over when quilting a large quilt. These are my coveted pieces for this technique. Quilters,Reuse,Don’t Toss
Two pieces of equal weighted batting can be sewn together.
Reusing items in Mixed Media
During the pandemic I turned my attention to mixed media or assemblage. I searched for small yet unusual items. These items would add interest to an art piece. Everything does not need to be a broken piece. Repurposing items also counts. My daughter brought back a small sewing kit from a trip to Europe. She never used it. I found a new use for them.
Blue EuropeanThreads, 9″ x 6″ 23 cm x 15 cm
I am not sure if buttons would be considered unusual items. Yet, when I stacked them up with contrasting colors the effect was unusual.
Reuse, don’t toss. Sometimes I have to give myself permission to throw something away. But with some thought, it is easy to consider another way to use something.
First of all,trees in art quilts are my most popular pieces.Everyone loves trees. Above all,everyone can relate to the shape and various colors of trucks and leaves. Vacant Lot, is an early example of one of my tree art quilts. Furthermore,five of my art quilt trees hang in local Santa Cruz County Kaiser Permanente Medical facilities.
Tree Friendly Town
I live in a tree friendly town. That is to say that Santa Cruz, California is part of the Tree City USA program. My county is full of fruit tree orchards as well as redwoods. Furthermore,the Spanish explorers saw their first redwood tree in Santa Cruz County. In addition, California’s first state park, Big Basin is also in my county. That is a lot of trees for the second smallest county in California.
Of course,many locales are tree friendly places even if they not they are enrolled in the national urban tree program. We can all relate to trees and leaves; the forms they take and the shapes they make. Creating trees lets me explore and expand my use of texture, color, and movement. Let me take this opportuntity to share my love of trees.
Adding Color
Young children and other people know what color a tree should be. We understand the general shape of a tree including the wide variety of sizes and forms. Adjust the color of a tree to an unnatural color. Our brains will still recognize that it as a tree. This is what makes it fun for an artist.
Palo Colorado,34″ x 32″ 86cm x 81cm
Red and White Challenge
In 2013, my local quilting guild had a Red and White Challenge. Participants receive certain fabrics that must be used. Notice the red and white polka dot fabric. Additional fabrics and details were encouraged. I placed the red tree, Palo Colorado on a background of various pieced white fabrics with red hand stitching for accents.
Along the Path,34″ h x 22″ 86cm x 56cm
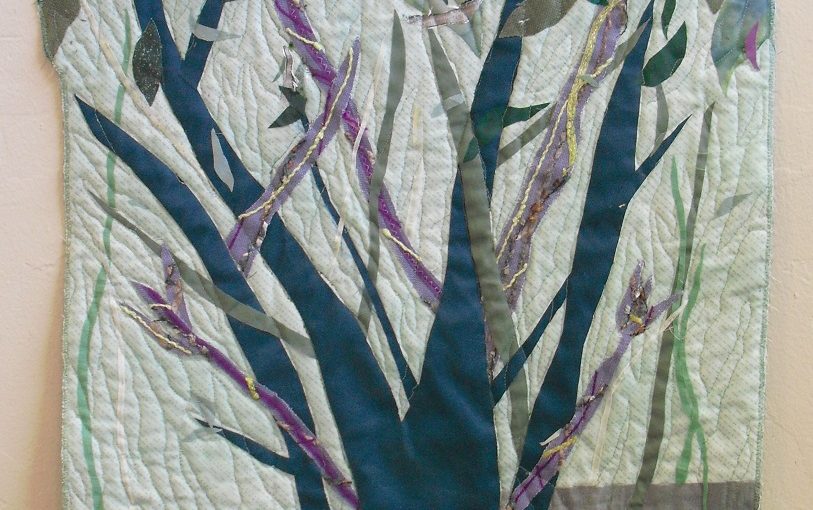
Teal colored tree trunk and branches ? Not so common,nor are violet branches. I have received such a positive response from the movement of leaves extending beyond the edges of the art quilt that I have continued to do that.
At the Edge of the Grove,29″h x 26″ 74cm x 66cm
What could be more fun than orange branches!
Tree Along Creek,32″ x 27″ 81 cm x 69cm
This tree along the creek has pale colored branches with bluish green tint from couched yarns and decorative threads. The pop of medium green comes from a piece of dress fabric from the 1940s.
Adding Texture
Celebrating Fall has branches made from a highly textured yet, loosely woven fabric. I couched decorative threads are on top of the fabric to add more interest. This same couching technique is also visible in Tree Along Creek and At the Edge of the Grove.
Celebrating Fall,33″ x 31″ 84cm x 79cm
Adding Movement
In Looking up at Dusk,flying leaves and twigs are carried along by the wind. While creating this piece, I actually toss some pieces onto the quilt top. Great fun! Great serenpidity!
Looking up at Dusk,31″ x 24″ 79cm x 61cmOverlook,35″ x 26″ 88cm x66cm
In Overlook, I choose a green and white patterned fabric for the trunk and branches. I couched decorative threads and yarn to the fabric before cutting out the shape of the tree. The white spaces on the fabric create movement. The curvy line quilting in the sky also adds action. The sky fabric is from an indigo dying class. Can you see the clouds moving across the sky?
Conclusion
My art is all about Color! Texture! and Movement! Tree art quilts are a perfect theme for me to showcase this mantra. Repurposed decorative threads and yarns are a natural fit as well to add more texture and movement.
Follow these step by step instructions using Sunset Through the Forest,an abstract art quilt as an example to create an abstract art quilt.
Getting Started
Choose Your Colors
First, I prefer to choose a few contrasting colors. Then I search through my materials for fabrics, decorative yarns and threads in those colors. Sometimes I also choose lighter and darker hues of the same colors.
Make Details with Decorative Threads.
Next, it is fun to make shapes with the decorative threads. For this piece I used the decorative threads to make several parallel lines on the fabric. I cut long strips and sewed the decorative threads in long lines.Then I randomly cut the long strips into 3 or other odd number of pieces. Creating texture- done!
Several different examples of decorative details
On the Design Wall
Next, I display the potential finalist fabrics on my design wall. My favorite choices are fabrics with movement and interest. Then, I also make sure that they are places for eyes to rest by including solid colors.
Trying out green and yellow bits of fabric randomly placed on the design wall
Balancing Colors
Next, balance out the colors and textured pieces so that they are not all on one side of the piece. Don’t be afraid to take a break to come back to view the work with fresh eyes. A fresh look is always helpful in looking for ways to improve a piece. How will one’s eyes move around the art work? Eliminate fabrics if necessary.
Balancing the fabrics and colors
Sewing Smaller Pieces Together
Begin to sew small pieces of fabrics together. Then remember to balance colors and fabrics so that they are equally spaced about the piece. Use this advantage of a design wall to view your whole piece.
Small pieces are sewn together
Sewing More Pieces Together
Continue sewing pieces together. Keep checking for balance of fabrics, colors, and textured pieces.
finished top, Sunset Through the Forest
Finishing
Lastly,I scribble quilt the three layers together to create an added level of movement. Scribble quilting is a technique I named. I use a walking foot to create a flowing quilting line by moving the quilt side to side while quilting. Make sure that the quilting is also balanced and equally fills the space. Then add a facing. Turn to the back and handsew the facing to the back. Name and sign your art!
Sunset Through The Forest, finished art quilt,32″h x 34″w
In Conclusion
These are the steps that I generally follow to create my abstract art quilt pieces. They represent my process at this time. It will probably change over time. Your process is probably unique to you.
Techniques for creating texture on a flat piece objects are subtle. In other posts, I addressed other aspects of my mantra, Color!Texture!Movement! Moreover, adding color or movement creates a bolder statement. Above all,color impacts the viewer first and then movement next. But texture may even go unnoticed. However, now I will share my ideas for creating texture in my art quilts.
Tucks Create Texture
For instance, tucks are small seams sewn on the edge of a fold. Yet, a series of 3-5 tucks create texture. For example, in Upwelling they represent the layers of earth movement. Furthermore,this technique is also helpful to reduce the size of a piece of fabric by just a small amount.
Upwelling, 30″ x 34″ Tucks run the width of several pieces to create texture.
Naturally Thick Fabrics
On the other hand,corduroy or other thick fabrics add texture by their nature. Look for fabrics that naturally have an interesting texture like dupioni silk. Unfortunately, these fabrics are often challenging to work with. Most importantly,develop your skills so that you will be able to work with them more easily.
Couching Decorative Threads
In addition,couching (zigzaging)different threads on fabric adds texture. First,I couch threads on long strips. Then I cut the pieces apart to use as fabric. In addition,this is a good way to utilize small pieces of yarn or decorative threads. At the same time,use the same color of thread to emphasize the line aspect of art. in this way,the focus will be on the color of the yarn not the color of stitching thread.
Desert Sands, 16″ x 21″ 2015
Three Dimensional Objects
Furthermore,add texture with 3D objects. In addition,artistic people may create their own 3D object using fibers. Here I included two fabric figures that I had previously made. Similarly,on the male figure, I added a serape for the Mexican theme. Likewise,embroidery thread hair,jewelry and lace completed the female’s figure.Finally,I added found plastic objects.
El Senor y La Senora Win Loteria
True Confessions Time
Ultimately,sometimes I am motivated by just using up materials. What items can I add to my art to finish it up? As a result, this random technique led me to a positive ending. I had about 8 designer samples of short threads in different colors wrapped together. Spontaneously I decided to add them to the foot of a tree. Don’t they look like grass? Boy! did this work!
Under the Shady Tree, 37″ x 25″ 2019Under the Shady Tree detail 2
Start with Fiber
Fun With Fiber 6
Start with fiber. Here I used a redirected folded fiber piece. I added a found Mexican(Aztec inspired) clay head and redirected fabrics. Then I attached it to a highly textured piece of burlap.
In conclusion, the techniques to add texture include tucks, thicker fabrics, couching decorative threads, and adding three dimensional objects. There must be other ways to add texture. Do you know of any? Please respond with your suggestions. I am open to new ideas.
Above all as an artist I am interesting in creating movement in art.That is how I answered this question.“What are the essential elements you want your audience to know about your work? What do you want them to take away from seeing your art? “ asked a fiber artist friend.
She is well versed in the deep discussions generated by involvement with the Artist Conference Network. The ideas I had been thinking about came together. The question brought my ideas into focus; color, texture, movement. At this time I would like to address creating movement in my abstract art quilt pieces.
Subtle Wavy Lines
How does one make movement on something that is inherently static and flat? At first, I attempted to make every seam a curved line. That turned out to be a poor choice that affected the over all shape of the piece. I learned some straight lines are important for shape and balance. Another true life lesson learned, the importance of balance. Choose seams carefully for the visual impact. They may be wildly or gently shaped curves.
Activity on the Material
To begin, I choose the fabrics with movement in mind. I look for interestingly curved shapesthat are part of the fabric’s design. When I cut them up, they add interest and drama. They catch the eye and draw it in.
When I first selected this fabric of elongated greyhound dogs, I didn’t even notice the dogs just the colors and the shapes. I couched threads, rotated the fabric and then sliced the fabric into usable pieces. The shape of the animals disappeared yet the movement of their bodies remained. Other fabrics provide a pop of action to the piece. Creating the illusion of movement is an essential part of my abstract art quilts.
Greyhounds with some couching of yarnSkyward, the finished art quilt
Couching Decorative Threads
Couching decorative threads is another technique that is an essential part of my tool box. I sew multiple colored threads or yarns on to a strip of fabric. Then I cut them up into random lengths and use them as fabric. At first,the main purpose was to add texture to my pieces. Yet, sewing the threads in undulating parallel lines creates the slightest of distortion and movement.
Long strips of cotton with the threads couched on them.Winter Sunset, the finished piece
Adding Tucks
Adding tucks is another technique that started out as a way to add texture to a piece. However, movement was created at the same time. Tucks are small seams that run along the folded edge of fabric. When quilting over a series of parallel tucks they are folded up or down. This creates an illusion of movement.
Upwelling , Tucks run the width of several pieces to create movement.
Using the Design Wall
I create my abstracts on a design wall. I take time to balance the colors, fabrics, and quiet spaces for eyes to rest. Looking at the piece with fresh eyes may take several days or longer before sewing all the pieces together. Abstract artists have the added benefit of being able to rotate the completed piece. They check to see if viewing the piece from another direction it may actually improves it. It just might happen. Just because it was conceived and executed in one direction doesn’t mean that it cannot look better “upside down.”
Creating Movement While Quilting
In addition, the quilting process adds movement. I begin quilting in the middle of the piece making basically a large grid about 5” apart. Then the fun begins. I start quilting from corner to corner gently turning the fabric slightly side to side as I quilt. The thread line creates the movement. If the thread color contrasts with the fabric color, then the threads stand out. When the thread color matches the fabric, the thread may seem to disappear, yet the movement remains on a more subtle level. Many viewers look closer to try and understand how that affect can be.
Mossy Rocks, an art quilt
“It Dances.”
A former colleague of mine made an unsolicited comment about my work, “It dances.” Her remark touched me on several levels. Years earlier she admitted that she had no interest in attending an art quilt show. So when I heard her comment, I felt that I had truly opened her eyes to a new art form.
The Importance of Movement in Art Quilts
As you can tell movement in an art quilt is important to me. Yet not all art quilters share my view. A trend in quilting art quilts seems to be creating as many stitching lines on a piece as possible. These lines tend to be straight lines with about ¼” spacing . They may turn at sharp corners.
Does your quilting squash your fabric?
While attending a recent national art quilt shows, I noticed that almost 75% of the quilts had such quilting. I admit that such narrow line quilting may be effective for some pieces. The skill level is high for the artists that work that way. However, this style makes me cringe. Squashing and smashing the fabric into flat controlled pieces actually saddens me.Such tight stitching suffocates the fabric preventing it from moving or breathing.
In Conclusion
I create movement in several ways in my abstract art pieces. Some pieces of fabric are chosen based on their design element of movement. Couching decorative threads and tucks into gently waving lines adds subtle movement. Pieces are sewn together in a curve line piecing technique. Finally the artist generates wavy lines all over the piece quilting the three layers of fabric together.
Other resources that you may be interested in.
You may be interested in finding out more about the Artist Conference Network. It is an artist driven organization supporting artists as their more towards their artistic goals. Groups meet periodically to share and review each artist’s goals.
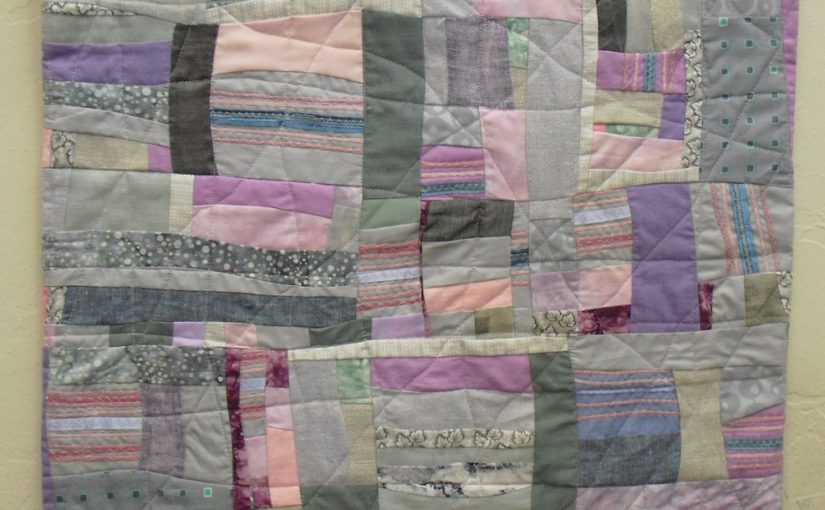
Winter Sunset, An abstract art quilt with lavander,pink, and grey colors,the finished piece
Abstract Art Quilt Work in Progress, Winter Sunset
This work in progress shows the steps I follow to create an abstract piece of art. Designing my abstract art quilts begins with choosing a group of colors. Inspiration for this quilt came from the greys and pinks of a winter sunset. I pick the decorative threads that I want to work with. I choose fabric that fits into the shades of colors that I chose. This time I want the colors to blend together and hardly be noticeable. Look for the green marbled fabric I added for that purpose. Choosing mnaterials from my stash is my favorite part of the creaive process.
1. Yarn and decorative threads for couching.2.I begin to choose fabrics.
Couching Decorative Threads and Yarns
Couching decorative threads and yarns to a long strip of fabric is fun. I use little pieces that might otherwise be thrown away. Each person’s eyes will blend the colors together differently. Then I randomly cut up the strips to use as fabric. I place the fabric on the design wall. Then I move the pieces around until I like it.
Long strips of cotton with the threads couched on them.I cut up the long strips. They are ready to be used as fabric.I place them on my design wall.
Keep Colors and Textures Balanced.
Beginning to sew the pieces together, I keep my eye out to make sure that the balance of the colors and textures is good.
I start to add the other fabrics.8. I added more fabric.
I keep adjusting the fabrics adding and subtracting fabrics as I go. Until I get it just right in my eye’s mind.I begin sewing small pieces together.
I sew more pieces of fabric together.
I continue sewing pieces pieces together. Here you can tell that the pieces are getting larger.
An abstract art quilt with lavander,pink, and grey colors
I moved some other pieces around. Sewing together continued. I finished sewing or piecing the top together.. The quilt sandwich has the top, the batting and the backing fabric pinned together to quilt.
done
I use my wacky fun scribble quilting technique to quilt the three layers together creating an added level of movement. Scribble quilting is a technique I named. I move the quilt side to side while quilting with a walking foot.
Winter Sunset, An abstract art quilt with lavander,pink, and grey colorsthe finished piece
You may be interested in reading more at Studio Art Quilt Associates (SAQA) website.
Having Fun With Color!Texture!Movement! appeared in Art Quilting Studio, Summer edition, 2018. Ann Baldwin May is having Fun With Color!Texture! Movement! in each of her art quilts.
Having Fun With Color!Texture! Movement! will show the steps needed to add color,texture andmovement to art quilts using the fabric layering technique.
Having Fun With Color!Texture!Movement! GETTING STARTED
The fabric layering technique makes it easy to have Fun With Color!Texture! Movement! to your art quilts. Begin by laying the back cotton fabric on a table. Choose a size that will easily fit on your work table. A square or rectangle about 15”-20” is a good start. Press the fabric to lay flat. Cover with batting which should also lay flat. Don’t worry if the edges don’t exactly line up, they will be trimmed later. Next, choose a fairly neutral background fabric or fabrics. Overlap the fabrics about an inch. If the fabrics shift during quilting, the batting won’t show. Cut a meandering line to look like rolling hills on the edge of the top fabric. Lightly baste with a glue stick.
Choose your Colors Having Fun With Color!Texture!Movement!
detail of Along the Path
Choose your colors adding a range of hues from light to dark as well as colors that contrast. Play with the colors to see what you like. Be ready to eliminate those that really don’t work. Go for an impressionistic view rather than a picture perfect trunk, leaf, or branch. Each viewer’s eye will blend the colors uniquely.
Start Large to Small
When beginning to create the scene, start with the largest part and work to the smallest. Cut out the tree trunk and add branches as you go. Flip the fabric and use the backside to add dimension. When you have the tree the way you like it, lightly baste. Just baste in a few places not all over. Later on, if you may want to slide a branch underneath and you won’t be able to if it is totally glued down.
Add Details Having Fun With Color!Texture!Movement!
Add rocks to the foreground. Choose fabric that will work for you to add texture. Avoid fabrics that have rocks printed on them. I chose marbled fabric I bought at Pacific International Quilt Festival and a redirected fabric to add texture. You will notice that they are cut simply. Lightly baste the rocks to the background. For the medium sized branches, I couched (zigzagged) decorative threads and ribbons on to a multicolored piece of redirected linen. Then I cut the branches out. I lay them on the piece balancing out the colors. Crossing branches adds interest and movement. Keep going until the scene is pleasing to you. Baste lightly.
Along the Path,detail
Leaves Add Interest
Working on the leaves is so much fun. Gather contrasting and blending colors. Make the leaves about 3”-4” varying the shape and size. Small scrap pieces are all that are needed. Pay attention to balancing the placement of the colors . Reflective, shiny sheer fabrics add a pop to the leaves. Save them for the top for the greatest effect. If you choose to have the leaves stick out from the edge, make those leaves ½” bigger for ease of zigzagging. During the final trimming you can adjust the leaf lines by cutting before zigzagging. Lightly baste leaves in place. Your art quilt will also be successful if you decide to make the edges straight .
The Beginning of the End
When your artist’s eye says that the scene is complete, cover with tulle. Make sure that the tulle is 2 “ longer on all sides. It can pull a bit during quilting. Pin the tulle down making sure that it is flat but not stretched. Use a lot of straight pins; remove as you quilt. As with other quilting techniques, begin in the middle of the piece and quilt outward. Edges may be rolled to accommodate the machine’s space.
Helpful Hints
Beginners will have success stitching along the edges of the branches, following the lines of the fabric. More experienced quilters can add movement by quilting lines resembling slanting plants. Choose a thread color that blends with the background. I highly recommend Aurifil thread for successful free motion quilting. Trim the edges and zigzag two times. Press lightly with a pressing cloth or piece of fabric. Add a sleeve to the back to hang. Stand back and admire!
Everyone Starts Somewhere.
Several years ago I began my path from traditional quilts to art quilts. I took a class in the fabric layering technique from the award winning, Meri Vahl (meriartquilts.com). Meri had learned the technique from Northern California artist, Laura Fogg(laura-fogg.squarespace.com).The technique allows for much personal creativity; none of our work looks similar. I was inspired to create a tree with leaves overflowing the edges as I have sold five pieces to the new Kaiser Permanente Facility in Scotts Valley and WEatsonville, California. A change in color scheme keeps all of my trees unique.
Important Materials
quality scissors; large and small, sewing machine, darning /free motion foot, walking foot for zigzagging, rotary cutter, cutting board, plastic see through quilting ruler, cotton fabric for backing, tulle, synthetic fabrics, redirected materials, commercially marbled fabric, sheers, batiks, Aurifil thread, Avery glue stick, pressing cloth ( to protect tulle and synthetics from melting when being pressed),a pointed wooden stick , straight quilting pins(They are longer than sewing pins.)
Tips
Leave a 1-2” empty back ground space on the sides of your piece. Then when trimmed your art doesn’t lose any interesting parts.
A light colored tulle will be best for your first project. I personally am not fussy about the color of tulle I use.
This technique is a forgiving way to practice free motion quilting. Before I learned this technique, I was ready to give up with free motion quilting in frustration. Lower or cover your feed dogs. Put your stitch length at 0. Use the darning/free motion foot with Aurifil thread. Push foot pedal control fast while slowly moving/quilting the layers of fabric.( Fast foot ,slow hand) Aurifil thread is available at most quilting stores. It appears more expensive but it really isn’t. I pieced and quilted a queen sized quilt of many seams with one spool.
Throwing the leaves onto the scene adds movement. Free yourself from cutting out perfectly formed leaves.
Use a large straight pin like a hat pin to get the tiniest dab of glue on the tip and gently slide under the fabric to be basted. I use a wooden stick similar to an emery stick to help me gently nudge the pieces of fabric to where I want them to be.
Advice for Beginners
I come from the world of bed quilts. The basic sewing skills used in traditional quilting are fundamental for most art quilting. However the “Quilting Rules” can be left behind. Buying patterns, pressing seams and matching seams are a few of those rules I have freed myself from. Give yourself permission to try something new, be it a color combination or creating your own designs. Listen to yourself. Take baby steps. You decide if you like your work or not. If not, change it. There is no wrong way to do it. Many art workshops or seminars begin with activities to get people in touch with one’s creative side.
Along the Path
About the Author
Ann Baldwin May lives in Santa Cruz, California. In 2012, she retired after teaching elementary school for 36 years. She began quilting in the 1970s. Ms. May participates in the juried Santa Cruz County Open Studios Art Tour from her studio in the Santa Cruz Art Center. She recently sold five tree art quilts to Kaiser Permanente for their facilities in Santa Cruz County, California. May is a member of SAQA( Studio Art Quilter Associates). Contact her at baldwinmay49@yahoo.com or www.annbaldwinmayartquilts.com. Or visit her Etsy shop at https://www.etsy.com/shop/annbmayartquilts/
This work in progress shows the steps I take to create this abstract contemporary art quilt. I draw inspiration from one fabric.
Color! Movement! Texture!
Color! Movement! Texture! are my main goals for my abstract art quilts. Color is where I begin. What colors do I want to work with? I found a piece of linen at Fabmo, a nonprofit that redirects materials from the San Francisco Design Center. I really liked the variety of colors and movement in this one piece. This fabric became my inspiration to find other fabrics and textures with the same colors for my abstract piece.
Inspiration from One Fabric
Oddly enough, several years ago four quilter friends and I were having trouble choosing colors for a donation quilt we wanted to create together. One friend suggested that we find a fabric and choose the colors from that fabric. At the time I couldn’t quite wrap my head around what she was saying. However, when I saw this multicolored linen, I immediately understood what she had been trying to have us do. Sometimes it takes times for inspiration to happen.
1. Inspiration from one piece of commercially producted fabric
Photo 1 Choosing the Fabric
First I choose the fabric I want to work with. This one piece has so many different colors in it. Those are the colors that I want to work with. This is when the fun begins. I go through my fabrics to find additional fabrics. I look for shades that are lighter and darker.At this step, I don’t reject much.
Photo 2
I chose these fabric from the stash that I had. Also I found decorative threads and yarns to add to some of fabrics for interest.
2. Here are the fabrics I chose from my stash.
photo 3 Inspiration from One Fabric
I place small pieces of fabric on my design wall. I move them around before sewing them together. Then I start to sew smaller pieces together. I make sure that colors, textures and similar pieces are equally balanced around the piece. Does your eye have a place to rest? Are there too many colors in one area? Time to adjust before the whole piece is sewn together.
3. Spring Break
Photo 4 and photo 5
Here is a detail of the smaller pieces already sewn together.
4. A detail of the pieces sewn together5. Another detail of the pieces sewn together
photo 6
6. Another detail of the pieces sewn together
photo 7
7. Here is the finished quilt, Spring Break.
Inspiration from one fabric helped me create this abstract art quilt. Hopefully, this step by step explanation will inspire you as well.
For more information on couching threads refer to my previous post.
Use yarn to create fabric to add texture to an art quilt. I zigzag or couch multiple pieces of yarn on strips of 100% cotton. Then I cut them up and use the pieces as fabric in my art pieces. Decorative threads can also be used.
Yarn I inherited from my mother.
My First Inspiration
I have several small spools of yarn I inherited from my mother. Their bright colors attracted me. I don’t know what my mother had used them for. I wanted them for something,although I didn’t know for what. They languished in my studio for a long time before a perfect use came up.
My Second Inspiration
Several years back at a large quilt show, I saw a piece that had a large amount of yarn jammed on top into big blob. To be honest, I didn’t like effect at all. But it gave me the idea to use yarn in a more orderly fashion. I stumbled upon a way to create more texture for my pieces.
Materials
First, I chose the colors that I want to use in my art quilt. I go through my box of decorative threads and yarns looking for yarn with texture and complementary shade of color. Using a long strip of cotton fabric, 20”-40” long and 5” to 6” wide, I begin. Other backings like ribbon didn’t work well as it was slippery and was not easy to sew with. I zigzag(couch) the yarn to the cotton strip. I prefer to match the sewing thread color to the yarn as that the color of the yarn stands out more; the stitching appears invisible. But that is a personal choice one can make.
Suggestions
Don’t worry about the lines being straight. A thin piece of yarn can be doubled or tripled to become thicker . Vary your use of threads for texture. Remember to leave space for the 1/4″seam allowance. Don’t sew too close to the side edges of the cotton fabric.
Next,various strips of cotton with yarn and decorative threads zigzagged on them.Then,long strips of cotton with the yarn couched on them.
More Suggestions
Sometimes I keep the threads straight and sometimes I cross one thread on top of another. I like the movement this creates on my art quilts. Overthinking this process is not necessary. I find it fun and relaxing. If things don’t turn out as I would like then I can just save the piece for another project. After 5 or 6 pieces of yarn have been couched, then I randomly cut them into pieces to use as fabric.
Sometimes I use linen with a slight design on it for added texture.Finally,I cut up the long strips. They are ready to be used as fabric.
Conclusion It will be easy to find interesting yarns and decorative threads at flea markets or garage sales. There won’t be enough yarn for a scarf or a sweater but there will be more than enough for your couching projects.