Inspiration can come from anywhere for artists. This post presents ideas that may inspire you to create your art.
About the Quilt Artist
My art quilts are all about the quilt artist creating abstract, whimsical or impressionistic pieces. Inspiration comes from the natural world as well as from Mexican and Native American influences. My materials of choice are often redirected fabrics from the San Francisco Design Center and found objects. Art quilts free me to play with color and texture. My technique, Scribble Quilting allows me to create movement on many of my pieces.
TWO INSPIRATIONAL ARTISTS
I owe some of my inspiration to two artists from Santa Cruz County, California. Meri Vahl, an award winning art quilter has been recognized nationally for her work. Teacher of the fabric layering technique, she was patient. Understanding that each student brought individual strengths, weaknesses and abilities. Ellen edith;friend, art quilter, fabric designer and artist extraordinaire made whimsical, personal quilts. Her influence lives on well beyond her life. I have great appreciation for these two local leaders of the art quilt world.
SAQA (STUDIO ART QUILT ASSOCIATES)
I am proud to be part of an evergrowing group of art quilters. SAQA started by Yvonne Porcella in Northern California in 1989. It has grown to an international organization. Art quilters have transformed the quilt into a 21st Century art form. I continue to explore new forms and ways of working with unusual materials on this journey.
ABOUT THE ARTIST,BIO
I was born and raised in Palo Alto, California. In high school I studied sewing and clothing construction for two years. I continued to sew much of my wardrobe. In 1974,I took my first quilting class at a neighborhood fabric store. Over the years, I continued to sew clothes and make quilts for my family. I stopped counting bed quilts at 300. After teaching 30 years in Watsonville as a bilingual teacher, I retired to spend more time on creating art quilts.
MY FIRST ART QUILT
Homage to a Dancer,45″ x 56″
In 2008, I made my first art quilt, Homage to a Dancer. It reflects my participation in Los Méxicas,the University of California,Santa Cruz ballet folklórico group.
A STUDIO IN THE ART CENTER
In May of 2016, I opened a studio in the Santa Cruz Art Center, 1001 Center St. Downtown Santa Cruz. I have space to work and display my work. For First Fridays and Open Studios, I fill the lobby with art. In June, 2019 New York Art Center accepted my work into their gallery. 7 Franklin Place, TRIBECA, New York City.
AWARD WINNING ARTIST
Great Blue Heron at Dusk,31″ x 25″
Great Blue Heron at Dusk entered into an art show in 2010. The following year it won a merit award at the Olive Hyde Art Gallery in Fremont,California.
In 2013, Visions of New Mexico won third place in the Neo Membreno Vessels 2013 Show at the Western New Mexico University Museum in Silver City, New Mexico.
A winter storm is hitting the central coast of California on a day I had planned to create new work. Furthermore,I prefer to choose my colors and fabrics when my studio has natural light comes through the ceiling level windows of my studio. I am ready to go but the natural light is not so bright. By all means,make art in a less than perfect situation
In the Shadow of the Mountain, art quilt , 25″ x 20″ 51 x 64 cm
Therefore, I forge ahead. Throwing caution to the wind I begin. I tell myself that I will not finalize anything until the light is brighter. Yet I feel more free to not worry or stress, always a good way to create. This piece is not headed to a museum or even for a show. Just something fun to work on or play with. Be brave. Make art in a less than perfect situation.
The winter storms continued as I gave myself permission to choose colors in a less than perfect situation. In reality things aren’t too bad. I have heat and electricity. I have materials to make art. Motivated? Yes. I am just lacking as much light as I would like. I work in the brightest spot in my studio which happens to be on my ironing board. Throw caution to the wind and choose colors. It might not be what you planned but do your best anyway.
The Cove, 8″ x 8″ 20 x 20 cm
Turn it into a Learning Opportunity.
Most importantly,I notice that some color choices are less forgiving than others. Certain lime greens have to work perfectly with other greens to be included. Certain reds need to play together well also. I could avoid these colors and just play it safe. But what fun would that be? I decide that deep reds will be okay to work with.
On the one hand,some of my favorite pieces are hills with trees. Yet, I had never felt successful doing mountains. This day layers of mountains glide into one another filling the landscape with a variety of bright and muted colors. I don’t work from photographs. To be honest, it took me many years for my inspiration of the mountains surrounding La Quinta, southeast of Palm Springs, California to fall into place. Familar sheers as well Guatemalan woven fabrics filled my comfort zone yet were used in a new way.
Before I knew it I was off, creating layers of mountains criss crossing one another. Continuing to make art in a less than perfect situation propelled me in a new direction. Incorporating sheers for reflecting lights and using my Mayan fabrics in a new way held my interest through several art quilts.
Southwest Mountains, 24′ x 24″ 61 x 61cmShiny Mountain, 24″ x 24″ 61 x 61 cm
Sometimes working in a less than optimal situation is necessary. This forces one to address new ways to solve solutions. Furthermore, it can become a learning experience. Do not wait until the “perfect” situation arises to create art. Create where ever and whenever you are. The best artists remain resilient.
http://www.saqa.com/ Studiio Art Quilt Associates- International art quilters organization
Develop a positive attitude towards change! Life is change. Life is struggle. Trying to improve things to make them better is what life is about. Face the day with a positive attitude!
The 20th Century View of Retirement
An older well respected person upon entering retirement age once said “I just don’t want any more problems.” This depression era person had the view that the golden age would be perfect. Ahead lay endless sunny days of golf or other enjoyment. Originally, due to life expectancy retirement was expected to only last about 5 to 10 years. Yet,the world has changed. While it is a blessing to be living longer, if one hasn’t developed interests to fill their time, it can be a curse.
One can only play just so many games of golf or fill in the blank of your favorite activity. Growing and being engaged is what life is all about. That is a healthy mindset. While I believe that we should try and prevent as many issues as possible, that is not always a possibility. Stuff happens. Life is change.Develop a positive attitude towards change.Facing problems with a positive creative attitude helps.
Smilin’ ,33″ x 24″ 84cm x 61cm When we thought the Pandemic was over the first time.
What New Interests Can You Develop
If one is lucky to be healthy and active, then they can persue a new interest in retirement. Notwithstanding, it is important to develop hobbies or interests to keep one occupied and interested in life. Upon retirement, many return to earlier interests. There are certainly many important organizations that offer volunteer opportunities. Learn something new. Exercise those dentrites! Of course, if you have grandchildren you are lucky. You have a built in interest if they live close enough for you be involved in their lives. The unintended consequence of this blog has definitely helped provide me with brain stimulation.
Develop a Positive Attitude Towards Change
It is never to late to try new things. Keeping a positive attitude towards new things helps. If we are honest the good old days weren’t so great for everyone. We can remember the past fondly while looking forward to the future. Life is change.We should not expect perfection but rather rise to the daily challenges we all face. Yet even the most positive thinker can have set backs. 2022 is offering us a whole new set of issues to deal with. Fill in the blank with the ones that are stressing the best of us.
Solving Life’s Little Problems
Instead of telling yourself, oh I have this problem to deal with. Ask yourself how you will overcome it and solve it like a daily puzzle.Take strength in solving all the littles issues as they come up such as computer problems, ant invasions that remain for days, or the loss of a water heater. Power in solving these small issues abounds. It helps me to remember I can handle this. After all I am not in a war zone. On the other hand, I want to acknowledge that there are some serious issues out there people are struggling with.This post is a reminder to keep on keeping on . This too will pass. What we say to ourselves is important.
What do you call these animals? I call them sowbugs.
How sow bugs taught me to be persistent in art. Sow bugs, pill bugs,rolypollys, or maybe you use another name are a common garden inhabitant. Surprisingly these bugs are crustaceans not insects.Sow bugs are more closely related to shrimp and crayfish than to insects. Nonetheless, by observation, sow bugs taught me to be persistent in art.
Several decades ago my husband and I bought an old farmhouse. We gutted the interior before adding new drywall and a new interior. Part of the process involved knocking down an old brick chimney. In reality the chimney didn’t seem to be of much use. We did save and reuse the bricks. My unskilled labor was put to use separating the bricks from the crumbling cement and stacking them for later use.This of course took numerous days of labor.
Sow bugs taught me how to be persistent in art.
As I separated the dirt and the bricks, the sowbugs appeared. At first, as I dug out the bricks, I didn’t pay much attention to them. I kept working, separating the bricks, removing the dirt and stacking bricks. I started to notice their behavior.If dirt from a shovel landed on the sow bugs,they dug themselves out and continued on their merry way like nothing had happened.They were not deterred. The bugs were persistent. I was amazed. If I had a load of dirt dumped on me, I would have to stop for at least a minute. The visual of the sow bugs continuing on stayed with me all of these years. They taught me to be persistent.
So Called Human Qualities
I have come to realise that many so called human qualities are rooted in our animal past. Compassion and love are not as unique to humans as previously thought. Science has shown animals to be generous and empathetic among other qualities. Persistence seems to be one of them.
An artist needs to be persistent. That just means that you keep going. Keep trying. Don’t get confused into thinking one needs to be annoying as in pestering. Putting oneself out in the world is not easy. One must not give up. Give yourself permission to take a break at times as needed. However,forge on no matter what dirt the world dumps on you. If the lowly sowbug can continue on, surely an artist can too.
Making a quilt without a pattern may sound easy and appropriate for a beginner. However, it is not. First of all,this post assumes that the person has basic quilting skills and materials. As always,choose 100% cotton for ease of sewing and washing. Use a quilter’s cutting board, quilter’s straight edge and rotary cutter. I prefer to use a generous 1/4″ 1 cm seam when sewing.Whatever seam size you use, be consistent throughout your piece.
Whimsical fabric and strips
Starting Your Patternless Quilt
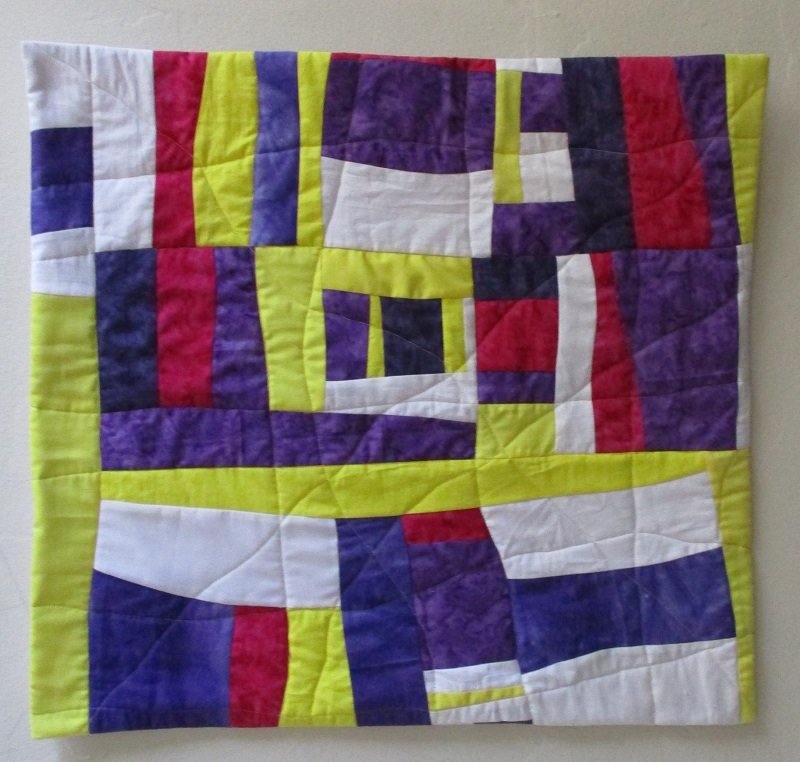
Choose your colors and fabrics,3 solid colors. Fabrics that read solid from a distance are also fine. Some batiks fit this bill. They add interest close up and seem solid from away. Choose 1-3 fabrics of interest to highlight. This could include animals, checks, dots or a number of items. Plan on a quilt of about 44″ x 35″ 112cm x 89 cm. This is the size of my work table. Adjust for your liking or workspace. Yet, this is a doable size for the first effort.
Next,press and lay out the patterned fabric you want to highlight. Cut 3,5,or 7 pieces of varying lengths and widths. Using leftover pieces works well. Trim to make sure long edges are straight. Place fabric on your work space or design wall in a balanced order.
Balanced solid and print fabrics laid out on the cutting table before sewing begins.
Planning Before Sewing
3. Next, cut the strips of solid fabric. The width can vary. I prefer 4-6″ 10-20cm wide. A wider strip gives you more flexibility if you need to trim it later.Lay them on the table or design wall. Adjust to your liking. Add other colored strips to fill in the spaces. Make sure that the colors are equally balanced across the top of your quilt. That said there aren’t too many pieces of one color on one side of the quilt or the other. Does your eye flow smoothly across the quilt top or does your eye get stuck somewhere? I prefer that the eyes flow or move gently across the quilt top. Step back from your piece to observe. Take a break to rest for your eyes. It is amazing what little errors one might see upon return. You don’t need to lie down just do something else and come back later.
4. Then,begin to sew your pieces together. Finally,add your favorite batting and quilt as you generally choose to do.
a lap quilt of solid colors , magenta, purple, white and violet
Hints to Make a Quilt without a Pattern
When trimming fabric with a design or picture, look at the fabric design before cutting. Pay attention to the fabric’s pattern or animals. Trim to highlight the part of the pattern you want. For example in the wild animal quilt,I highlighted the faces of the animal. On the other hand,I trimmed off the foliage. Take notice and trim fabric from each end rather than cutting from one side only. This extra bit of caution can make a big difference in the look of the final product.
Some printed fabrics have a direction to them. Are all of the pictures facing one way? Or are all the pictures facing all directions? No matter which side it is being viewed from, a face is looking at the viewer. It is your choice if you want all of the pieces ( ie. animal faces)facing one direction or not. We often create a quilt with the designs facing one direction.Yet when it is used a quilt is usually not viewed that way. So don’t worry too much about this.
Have a general idea of where you want certain pieces to be in your quilt. Lay them all out to view before sewing together. Leave them for a few hours or longer to be able to view the pieces with “new eyes”. Are the colors and patterns balanced? Does something catch your eye that shouldn’t? Furthermore, make these changes before the sewing starts.
When piecing the quilt top together, flexibility is necessary. More strips may need to be added. Or at times strips may need to be trimmed. I find that I have more flexibility to make these changes if I sew the top together more or less by sections. For example,sew the upper right corner together. Then move to the upper left corner. Then the lower right corner and the lower left corner. If for some reason another strip or piece of fabric is needed, it is easy to add it this way.
In Conclusion
At this point in my career, I do not use quilt patterns. However, I did use patterns for years to quilt and sew. The rare time I do use a pattern is generally a shape that I have made myself. If sewing without a pattern is new for you, I applaud your bravery. It can be a daunting new experience. At times, it can be very scary. Ultimaltely, it is my hope that you will find it as freeing as I do.
I have several lapquilts on my etsy site made in this way.
Finding a way to cheat in quilting is a way of letting the fabric do the heavy lifting.Naturally when I suggest a fabric artist to find a way to cheat, I am not suggesting anything illegal. However, I suggest that the background fabric can help you create your art piece. In addition,let the color and design of the fabric add to the work. Fabric collage art brings together smaller pieces to form a unique work of art. Read about background fabric and fabric collage examples.
A whole cloth with a quiltlike pattern known as a cheater cloth.
Cheater Cloth has been available for a long time.
Unbelievably, cheater cloth has been around for longer than you would think. Surprisingly, it appeared as early as 1850. A cheater cloth is a whole piece of cloth printed with usually with a traditional quilt pattern. In other words, it is a short cut for some who wants to quilt quickly. In this way, a person can quilt without having to sew the fabric pieces together. However, to be clear I am not suggesting that one use one of these traditional creater cloths in their art work.
A detail of a cheater cloth that looks like it has hand embroidery sewn on it.
Using Background Fabric to Find a Way to Cheat in Quilting.
Furthermore, it is only in this vein that I call myself a “cheater.” Use background fabric to do the heavy lifting in some pieces. Recently, a fellow artist commented that I had used some paint on an art quilt. Yet in reality it was a piece of fabric that looked like I had painted it. At times I will do the jaywalking of cheating. Select a background fabric that aides in forming depth in your art.
Find a Way to Cheat Yet Make it Your Own.
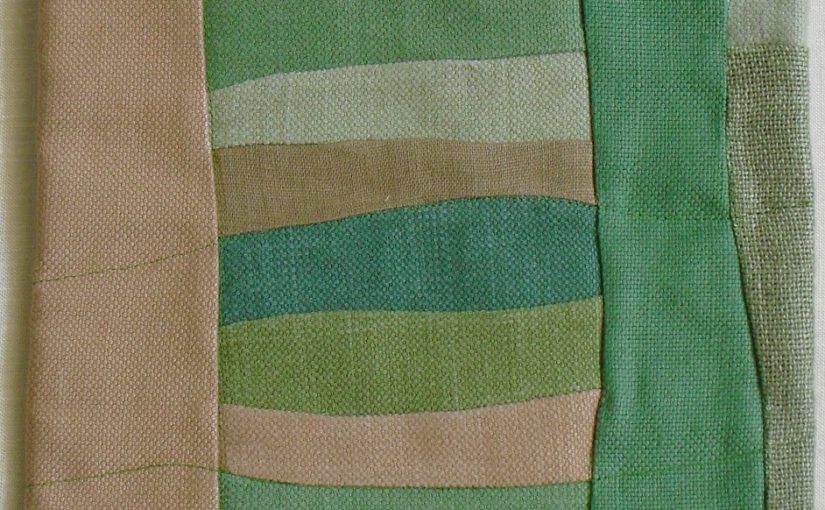
Here is Beach Tree,2021,an art quilt with a multicolored whole cloth as the background.
Beach Tree, 43″ x 29″ 109 cm x 74cm began with a whole piece of fabric with blended blues and greens. Above all,the multi colored background reminds me of the seashore. Because I live in Surf City, this worked for me. Next,I created a magenta tree on top. Then,I added foliage and leaves to create a tree that is uniquely mine. Indeed,this is the type of cheating that I am suggesting. Use a fabric to enhance your art work. Consequently,add to the design to make it your own. Find a way to cheat in quilting legally.
In November Skies, I cut shades of gray, violet and blue clouds to form the background sky. Rocks and plants fill the foreground. Decorative threads imitate birds flying in the distance. Finally, I cut three flying cranes from an Asian inspired piece of fabric. The birds enhance my work with a bit of elegance that I could not have created on my own. I finished the piece by covering with tulle netting. Then I free motion quilted the whole piece.
Moon Over Slough,21″ x 21″ 53 cm x 53cm uses a multicolored fabric for the background to create layers in the landscape. The moon,slough plants and rocks finish the landscape. The impressionistic lines reach out to the viewer. Are they mountains? water? or sand? The viewer becomes involved in making their own mind up about the piece.
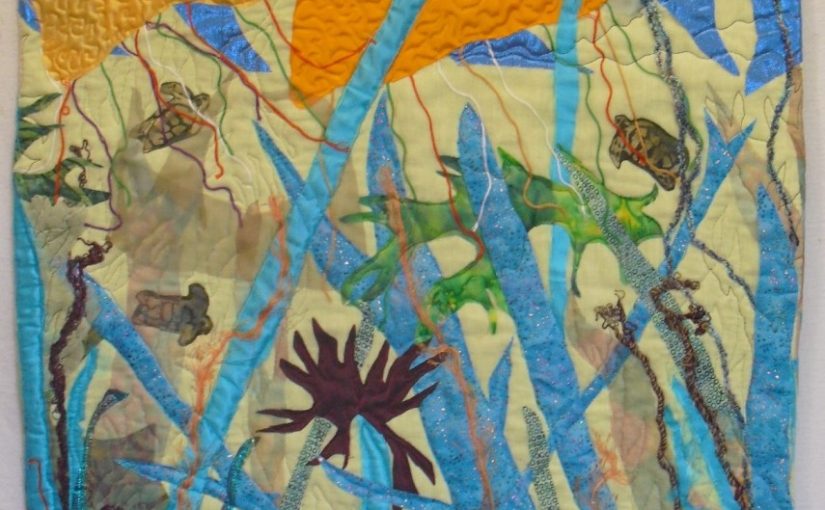
Kelp Dwellers,2018
Kelp Dwellers, 25″ x 25″ 63 cm x 63cm started with a discontinued abstract multicolored sheer fabric sample. There is so much diversity of fauna,flora and movement under the water. Any fish that I cut out can probably be found under the water. I call these pieces Underwater Fantasies because accuracy is not the goal. Sheer and reflective fabrics help to create a sense of wonder.
My Background Fabric
detail of Overlook,35″ x 26″ 89 cm x 66cm,2018
Sometimes I cheat with my own work. The sky background is a piece of cloth I dyed in an indigo class. Actually the fabric is the piece that I used to wrap up my work during the process. In this landscape art quilt,Overlook, it worked to create a cloud filled sky as the backdrop to my tree and owl on a hillside.
Adding Little People
The designers of fabric works hard to create interesting designs. There are so many designs to choose from. This is what encourages the public to buy so much fabric. The designs may be of people, birds, or animals. Those of use who are not strong in drawing can cut out a picture from the fabric. Use it in a fabric collage or art quilt. This is a legal way to use someone else’s work.
Here are a couple of whimsical fabric collages that I made at the beginning of my art quilt career. Without the charming fabric of the little people and the bright colors, the effect wouldn’t be the same.
Teaching, the Toughest Job You’ll Ever Love 1, 2012
This art quilt,Teaching, the Toughest Job You’ll Ever Love 1, 48″ x 43″ 122 cm x 109cm is a fabric collage of brightly colored child friendly fabrics. Some small pieces of fabric are fused on. I added 3D flowers, a golden heart and 3D stars to the quilt top. The lettering is bias tape.
Teaching, the Toughest Job You’ll Ever Love 2, 2013
Furthermore, I had so much fun creating the first piece I decided to create another.This art quilt,Teaching, the Toughest Job You’ll Ever Love 2 is a bit smaller, 27″ x 26″ 69cm x 66cm. Yet, I again used fused pieces and 3D objects added the pieced fabric top.
In Conclusion
It is my hope that you will become inspired to try these techniques. They are another skill to add to your toolkit. Creating a unique piece of artwork that could only be yours is the goal.
I met an educated artist a while ago. Subsequently, we talked about art. She knew all the names of the unique colors. At certain times of the convo, I didn’t even recognize the name she used. Initially,her depth of knowledge blew me away. I had not studied art. I had not memorized nor had even heard of some of the colors. In short, I assumed that she was an excellent artist. However, was I correct to make that assumption?
Her Work
Subsequently, she showed me some of her work. These included drawings,paintings and mixed media that had done over the years. Her work was good not great or spectucular. Knowing all the correct art terms didn’t help her create better art. Maybe time spent is the studio is important. Focus one’s attention. Decide what one’s goals are.
What Makes a Great Educated Artist?
So what really contributes to making a great artist? Skills, time to practice, resiliency, and above all, the mastery of materials.
Skills and Materials
The great thing about art is that everyone can and should make art. Humans need to make art. Each human can choose what skills and materials they want to use. They may choose materials that they have readily available. The skill needed to use those materials needs to be developed.
Time
One has to have time to develop those skills. Time could be set aside daily or weekly. Or on the other hand, it could be developed over years. It is difficult to juggle a job, family and art. Each person gets to choose how they will handle it.
Resiliency
Resiliency is necessary to keep going. Artists need it so that they continue on in spite of setbacks. One cannot give up. Making a living from selling art is hard. Some choose different pathways to do something in art for their career. Teaching or commercial art are just two paths. Others wait until retirement to work on their art full time.
In Conclusion
Skills and the mastery of materials, time, and resiliency contribute to the making of a great artist.
How do you develop your art passion? Recently on two separate occasions I was explaining my art to another person. They both lamented that they couldn’t sew. Sewing was so hard. Yet,one person was definitely of the age of a person who had to take sewing at school. The other one was was much younger. However, she also mentioned that sewing was an impossibly hard task to do.
Where does One’s passion start?
As mentioned I can’t pinpoint when my passion for sewing started. No, my mother was not a strong seamstress. No, my grandparents were not nearby to teach me nor did they sew. Yet, I do remember begging my mother to sign me up for sewing lessons the summer after sixth grade. I don’t remember begging my parents for anything else. Okay, I did write a persuasive argument for why I needed to have a car. Does that even count? My begging usually focussed on not having to do something. I have a vague memory of trying to get out of a piano recital that I hadn’t practiced for. Music is not a strong point of mine.
My First Sewing Classes
So my mother signed me up to take sewing classes at the local Singer Sewing Store downtown. The classes were a disaster.The teacher expected to help ladies finish their projects. Her expertice did not involve teaching the basics to twelve year olds. How to do lay out a pattern on fabric and cut it out was not in her plan. Public school teachers to the rescue! Luckily, 8th grade sewing did just that. I was on my way. Little did I know that it would develop into a lifelong passion.
Developing an Art Passion
This was the late 1960s. Girls and women were still expected to know how to sew. Yet, my older sister didn’t like it. She said she didn’t have the patience. Did I think that I was a patient person? No. I liked fashion as much as any teenaged girl did. My outfits certainly didn’t push the fashion envelope. I was not an avant garde dresser.
Developing a Skill Set
But without knowing it, I was developing a skill set. I was learning about selecting fabrics. With practice,I learned what pattern envelopes said, what they meant, and what they didn’t say. Moreover, I developed opinions about what they should have said. I also knew I wanted to take an elective class of sewing in high school.I ended up taking the advanced class too. Who knows?Bound buttons may come back in style.
Imagine this top fluffy for the one I made
Back to the fuzzy yellow knitted top. I do remember planning my ensembles with texture and variations in mind. I studied my ensembles for high school. What combinations of outfits did I already have? What materials or colors were they in? How could I make something that would add a difference for my wardrobe? How could I add texture and interest to the clothes I wore?
Inspired by a Tam and Scarf
Yet at this point,sewing was my hobby. Graduating a four year college was my family’s expectation for me. I had no problems with that. I did get accepted to UC,Irvine, my first choice. My back up school was Cal Poly San Luis Obispo. SLO is famous for their home economics department. I often wonder how my life would have turned out differently if I had gone there. The closest thing to home economics at UC,Irvine was chemistry lab.
Schooling and Career
So I got a degree in History, worked on my Spanish, Master in Teaching and became an elementary school teacher. I worked passionately with second language learners for 36 years. No regrets.
Over the years I kept sewing. I made clothes for myself and my family. I learned to quilt and I kept quilting. Most of the quilts were for family members and donation quilts for charities. I learned different techniques like applique and paper piecing. I stopped counting my bed quilts at 300!
Poppin’ Back, 2021
Art Quilts
Much later I switched to art quilts. I have over 400 art quilts,large and small listed on my inventory. I learned different techniques including free motion quilting.I started entering juried art shows.Pieces sold. Practice makes perfect.Sometimes it feels good to realize that I actually know something and can comfortably do it. Do I still try new things? Yes.
Art in College
I took a year of studio art, drawing and painting in college. The teaching style in the late 1960s was totally hands off. The student was free to do their own thing. The teacher said in a positive comment that I did funny little pictures. Looking back, I realize part of my problem is that I didn’t practice. I didn’t put in the hours to become good at it. I didn’t have the passion to keep at it to develop my skills. Malcolm Gladwell https://www.gladwellbooks.com/in his book, Outliers said it takes10,000 times to get really good at something. That sounds like a lot unless one loves doing it, has fun and is passionate about continuing.
In Conclusion
Passion! Dedication! is the answer.So much so that you will choose to stick to something even when you get frustrated. Yet you keep going and over time you get better and better. Maybe you will even reach an advanced skill level. At age of ten, I knew, I wanted sewing lessons. I didn’t know why. I still don’t. But sewing and the related field of quilting has stayed with me pretty much my whole life. So much so that I can only laugh when some artist says how hard it is for them. Isn’t it great that we all have different skills and talents! Find your passion and stick to it.
An acquaintance who follows my work on Instagram recently commented on the progress of my work into hard materials. The comment stopped me in my tracks. What? It made me think. For me, moving into assemblage was something that I had been doing for a while at a very slow pace. Assemblage is a 3D collage generally of diverse found objects.Yes, fabric art quilts are soft and generaly 3D materials are hard. Yet, I hadn’t thought about it that way.
3D Found Materials
As an art quilter I had often added 3D found objects to my work. Whimsical toy soldiers, artificial flowers, pieces of jewelry are just a few examples. Seeing it from another’s view made me take a second look at what I was doing. Larger tile pieces would be too heavy to work with.As a result, I had chosen quarter inch tiles and other objects mainly due to their size and color.
Inspiration
I draw inspiration from the materials and how they play together. I gather materials without thinking about how I will use them. This process applies to the hard or soft art materials that I work with. My sources are redirected sample designer materials. If the small slate-like samples had not been available, I wouldn’t have searched for them. On the other hand, I wouldn’t have even known that they existed.
Materials Front and Center
In the past, I have spent time looking for the perfect piece of fabric for a project. It was frustrating and time consuming. Moreover, the results were often disappointing. I discovered that my imagined perfect fabric didn’t always perform as perfectly as I had expected. Working with what is in front of me proved more creative, artistic and satisfying.
On the other hand, a shopping situation with distractions galore overwhelms me. With the materials front and center, I can quickly see that the scale or color either did or didn’t work. This proves more fun anyway even allowing serendippity to happen. Materials,however, fabulous don’t always work for every project. Save them for another project.
Tower in City 9″ x 7″
Color! Texture! Movement!
My mantra is Color! Texture! Movement! That is what I want the viewer to take away from my art quilts. Changing to hard materials didn’t fundamentally change that for me. I do admit it might look differently from the outside or to a viewer on a tiny screen.
The whole concept of choosing hard or soft art materials did not cross my mind. Even though some materials are obviously heavier and harder than others. I selected the background wallpaper to build action and color into the piece. Slight variations of colors in the pieces of concrete flow. Variations of width of the materials add depth.
Scale
The size of the project and time involved encouraged me to widen my artistic scope. Scale followed quickly. One cannot make smaller items without being aware of scale. True confessions time- I wanted some projects with a lower price point. Even small quilts involve time consuming hand work. Yet,smaller doesn’t always mean less time involved in the creation. Depending on the materials at hand,working with a smaller scale can negatively affect the time spend on designing.
People see Things Differently
I appreciate getting insight into how others view my work. The hard and soft comment opened my mind. Some comments from people I take more seriously than others.A comment from an experienced quilt artist would catch my atttention. However, I generally ignore some comments. A gentleman once commented that a piece reminded him of a particular place. I listened and even googled that location.Yet, that place had not been my inspiration. While I was willing to listen, I was not too concerned. People see things differently. They bring their own experiences to how they view a piece.
Start at the End, Sometimes
Some of my fiber artist friends are extremely talented. One in particular would use unusual found objects to create incredibly engaging art pieces. Yet when she was finished she didn’t know how to hang or best display her large 3D work. So I decided that I would consider how to display the work before I got started. With these assemblage pieces I attached a hook first.Then I continued designing the piece. Working backwards is new process for me.
Cityscape, 9″ x 7″
A Unifying Look
Early in my creative process I acquired twelve identical wooden boxes of varying pale colors. That was a good start for me. Usually I never consider how a piece will look next to another piece. This gave me a chance to unify my look. Some assemblage pieces can be hung and some can sit on a shelf or table.
So I start with a frame or wooden box. Then I add a hook to hang it on. Next,I search for wall paper that complements the box color . With luck it adds texture. Because I am new to this process, I want to know where I will end before I permanently attaching the paper. This may change as I gain more experience. The viewer doesn’t know what the artist began with and how they might have added or subtracted from what was there.
What Do You See? 12″ x 7″
Metal or Wood
Assemblage artists generally choose materials from wood and metal. Personally my preference is wood. Metal just doesn’t speak to me in the same way. In the class I took I learned how to use an electric drill to make holes in metal or other objects. I still have my childhood skates that attached to my saddle shoes. I would love to use them in a piece. Several times I have tried to see what might work with the skates with no success. As much as I love them, I will save them for a later date.
In Conclusion
In conclusion, it is not about the materials being hard or soft. It is the color, texture and movement of the surface that inspires this artist to create something new and hopefully exciting. How will you push yourself to try something new? Do your materials inspire you to move to your next level?https://annbaldwinmayartquilts.com/2021/03/beginning-steps-to-creating/
These pieces of assemblage are available at my etsy shop.
Shifting one’s can have a big affect on a situation. All other factors remaining the same except for a change of view. Shift your view!
Love in the Abstract, an art quilt, 26 ” x 24″
Abstract Art Quilts
I had been working on a pink,magenta and purple abstract piece at the time. I liked it so much that I made a smaller one to donate. As this was my first time at this local institution, I was excited. The auction has a two week window. I kept track with several visits. But no one bid on my piece. How embarressing! I was mortified! So I bid on it myself in my mother’s name with my phone number. In the end, I bought back my own piece!
Time passed and I pondered.
Time passed. I realized that I could shift my view. There was another way to look at the experience.First, the money paid went to an organization I wanted to support. It didn’t matter if the donation was money or a piece of art.
A Newer Art Form
Art Quilts are a newer art form. The more the public sees textiles as an art form the better. Hopefully a love and understanding of art quilts will develop with exposure. A better way to view this is to turn it around into an educational opportunity for the public to be exposed to something new .Every time a person views a new art quilt in an accepted venue, it is a win for everyone not just a sale or a donation.
What ideas of your own can be seen differently? How can they be shifted to create a win win situation?
Here is the link to the Santa Cruz County Art Council. They work year round to support artists and art education throughout the county.
Choosing a name for an art work is not an easy task. Yet, when the title of one’s art piece fits the work, it feels like pure genius.The title can capture the essence of the piece. What the artist wants to say or what the piece is about. I find it worth the effort. Yet, many times genius can elude us.
How To Name An Art Work
“Untitled- Number 325” The running joke of a prolific artist from a fiber group was just that. Untitled Number 325. That is how she answered when asked what the name of her latest piece was. She liked doing the work but not the naming part of it. So each piece was left unnamed.
On the other extreme,Brad Burkhart,a local clay sculptor created a lengthy group process to name a piece. He asks the group questions which lead to a consensus for the piece by consensus. He strongly supports and promotes this process. How to name an art piece can be a private or a public effort.
I Put on my Poetry Hat
Both of those processes feel unsatisfactory to me. I name my pieces by several different methods. My preferred method is to put on my poetry hat metaphorically. I try to think of an engaging title that adds to the viewer’s experience. What I was thinking about while making my art?
At times I think about what the piece looks like. People read all of my titles once they realize that they are engaging and interesting. Naming my art is an opportunity to share my creative vision and to engage with the audience. I don’t want to hand such an important element of my expression over to anyone else.
Here are some examples of my art and how and why they were so entitled.
What I Was Thinking About
Rogue Wave, an abstract art quilt, 36″ x 36″
A rogue wave or sneaker wave often hits the Central Coast of California in the winter. It is a large,strong, unexpected wave that can be very dangerous. While making this art quilt, warnings for rogue waves were being broadcast daily on the news. As my pieces included colors that reflected water and movement, I chose that title.
A Fitting Genre and Style
This art quilt is named Sherman Alexie Comes to Bookclub,
Sherman Alexie Comes to Bookclub is a modern piece inspired by the new membreño colors of black, white and rust. Mr. Alexie is a Native American author who writes about urban Indians. I thought that it was a good fit for this piece. Although it is a bit of an inside joke, if the audience doesn’t know Sherman Alexie .
Under the Savannah Shade using African fabrics, 36″ x 42″
Under the Savannah Shade is a bright abstract art quilt. The African fabrics in greens, oranges, and yellows reminded me of a hot summer’s day. Wouldn’t some shade be nice? The blue material provided that shade.
Descriptive Titles
When genius eludes us, a descriptive title will do. What do you see in the art piece? Does it remind you of something? What location is it inspired by?
Challenges
Under the Shady Tree,37″ x 25″Great Blue Heron at Dusk, 31″ x 25″Gridlock I, 33″ x 31″Gridlock II, 42″ x 36″
May I share some challenges to naming one’s art. Early in my art career, I named some pieces Gridlock I and Gridlock II. Gridlock II was juried into a “MAYHEM”show at the ARC Gallery in San Francisco. In spite of that honor, I couldn’t remember which piece was number I and which was number II. I decided to avoid numbering my art again. You may have a different opinion.
Naming a Series
Shore to Sky ZShore to Sky F
Yet, when I did a series of small abstract art quilts based on the colors of the sky meeting the land and water . I named them Shore to Sky A,B ,C through Z that presented no problems. Maybe the wider range of colors helped me differentiate the pieces better.
Conclusion
Part of being as artist is sharing one’s vision with the local community and the greater world. Naming one’s art can add to the presentation of our work. It is a personal statement. Do not miss this opportunity to connect with the public.
These are just some examples of how I named my art quilts. Were they helpful either directly or indirectly? Do you have some ideas of your own that you think worked well? Please share.
For the past ten years, I have worked to come into my own as an art quilter. It took that long to grow into the artist I am today. Growth happens when we least expect it. I started making art quilts about 12 years ago. I entered and was accepted into my first juried art show in 2010. The next year the same piece won an award. Subsequently, there was not turning back. I was off and running. This year,2019 I was accepted into New York Art to show in their gallery in TriBeCa in New York City.
At first,I would look at art quilts in galleries and shows. It was puzzling that none of them looked like mine. At first,I was worried. This struck me as worrisome. It took me a while to realize what that meant. After that, I realised that I had my own style. This became reassuring. No one has had my experiences, my life, but me. No one chooses the materials that I choose. That is why the quilts are different.
Underwater Fantasies
Living on the California coast, marine landscapes are popular.In the beginning when I started doing underwater seascapes, I was concerned about how make a fish’s face or mouth. Then I went to the Monterey Bay Aquarium. I saw examples of everything . For example, some fish mouths went up, some mouths went down ,some were big and some were small with everything in between. Subsequently,this freed me to create as I chose. Clearly,I don’t do scientific drawings. However,I do create whimsical seascapes I call underwater fantasies. This is who I want to be.
Sea Turtles,23″ x 35″
Wavy Quilting Lines
I have noticed that many art quilts that win awards at art quilt shows are heavily quilted with tight quilting lines, mostly straight lines ¼” apart. To me that kind of quilting just tries to control the fabric and squeeze all movement out of the quilt. Movement is one of my guiding influences . My quilting lines swerve and wave from corner to corner. It is what I do. It is my style.
Petite Neutrality, 11″ x 12″
Working from Photos-NOT
I do not like to work from photos. I do not want to create anything that can be copied with a camera. That’s just me. Yet many other art quilters do work from photos. They do create award winning pieces.
Once, I tried to make a landscape quilt using fabric with rocks and trees on it instead of just creating my own. It was not fun trying to find the exact fabric I needed. Just thinking about it gives me a headache. Now I prefer to work in the realm of impressionism. Yes, it will obviously be a landscape or a seascape. But I trust the viewers’ eyes and minds to interpret a scene as they see it.
The color of threads changes according to what fabric is near or next to them.The threads and fabric don’t need to match exactly. I love that quality. It frees the artist from certain restraints.More recently I have been making abstract art quilts by choosing three contrasting colors. Then I find the hues of those colors to increase the range of the colors. It is what I do. It is my style.
Creating Texture
To add texture, one might find some 3D decorative threads hanging freely down off of the top. One might see rows of couched decorative threads throughout the piece adding more texture. My nature pieces may include lots of threads used to create bushes or brush in the landscape.One might see straight or curving tucks to add texture and movement. It is what I do. It is my style as an art quilter.
Under the Shady Tree, 27″ x38″h
My Three Portfolios
I have three portfolios that speak to me; Nature quilts(trees, landscapes and underwater fantasies) Mexican inspired pieces ( often fabric collages) and abstract art quilts. I usually rotate between each portfolio making several pieces before moving on. In this way , each portfolio feels new as I haven’t done it for a while. Creating Color! Texture! Movement! in each piece remains consistent. It is satisfying to finally recognize who I am and what I do as an art quilter.The good news is I now know who I am as an art quilter. https://annbaldwinmayartquilts.com/2019/10/myself-the-artist/
De La Sierra, fabric collage with appillera, 32″ x 30″
Are you curious about how to become more creative? Have you ever thought how creativity works? Is someone born with it? Is it a developed skill? Or is it magic? I personally feel that it is a bit of all of those things. But for the most part, creativity is based on a lot of practice, making mistakes and hard work.
Becoming More Creative
American Democracy,2019 27″ w x 28″h
They must be a Genius.
I am not very musically inclined. Upon hearing a complicated piece of music, I would wonder how did someone create that? I would have no idea how the piece was put together. I assumed that the artist created the piece all at once. Therefore, they had to be some kind of a genius to be so special and creative.
Creativity is not a Fixed Entity.
More recently after creating many original art quilts, I have a clearer idea of how creativity works. Creativity is not a fixed entity. It must be nurtured and developed. The musicians might be very talented but probably they worked a long time on a particular piece working bit by bit. Maybe even different people contributed different parts. Ever notice that some people write the music and others write the words? People have strengths in different areas.Their genius takes years of practice.
Making Choices
When beginning an art quilt, first I decide what type of quilt I will make. Will it be an abstract, a nature piece or a Mexican inspired fabric collage? Then I begin to choose the colors based on the fabrics and materials that I have. It helps me to have a vague idea of where I am going. But I keep it flexible in case,I want to change things. Sometimes I start by making a lot of really interesting parts to be focal points. It could be a fabric doll, couched decorative threads or ribbons or 3D textural piece.
Plan something. Then Work to make it Better.
For an abstract art quilt, I begin by choosing a three color palette before adding light and dark hues. It is best to have an idea of what I am going to use these special details or parts for so that the colors I choose will work with the project. But there have been instances when these details haven’t worked as first intended. So were put aside and saved for another piece.
After choosing the colors, I take my first steps of laying the pieces on my design wall. Then I ponder, what I could do to make it better. How can I make it more artful or interesting? How can I add texture or movement to the piece? This is an ongoing process. I make those adjustments and continue on.
Fresh Eyes
Taking a break. Coming back to look again with fresh eyes is helpful and necessary. It is amazing how our eyes can fail to see things. Even when trying to look for errors and they are right in front of our face.
In Conclusion
After making over 400 art quilts, I have a clearer idea of how creativity works for me. Time in the studio working to create art is a must. I am motivated by the way different materials work together. Themes or colors may be the same but rarely do my pieces look similar. Serendipity does occur and should be embraced when it happens.
Color is probably the art element that attracts and motivates most artists to begin work. For most people it is the most engaging aspect. For my take on this subject, I am going to focus on how I choose to adding color to my abstract art quilts. In general, I chooose 3-4 colors to work with. Then I find the range of hues from light to dark to add for balance and interest. I often use bright colors while I find a pale palette of beiges and whites to be very calming. I work on a large white flannel design wall.
To begin, Where do I get my ideas? How do I decide on which colors I want to work with? Most of my materials are from FABMO, a non profit that gets castoff materials from designers. Swatches of a wide range of colors with slight variations provide a lot of choices. Here are some ideas I have inspired me to get started.
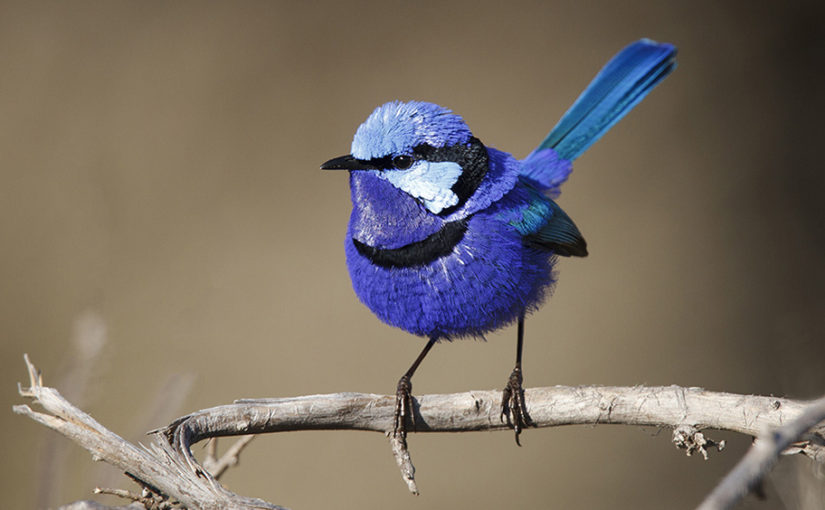
A Photograph
A friend sent me this photograph of a colorful bird from Australia. Rarely do I work from photographs. I will not be using the bird however, the hues of purple,blue and black will be in an abstract art quilt in the near future.
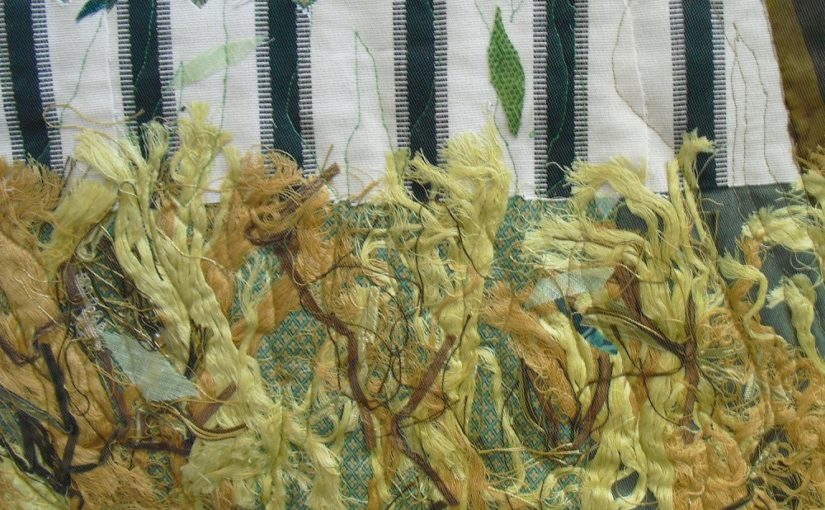
Look Down
While working on a piece,I tossed the extra fabric in a box on the floor next to me. I did this repeated. At the end of the day, I looked down and saw these wonderful grey and lime green colors together. I gathered them up and put the in a special place to work on later. This was the piece inspired by leftovers. May I note that I usually don’t use these colors.
Lingering Fog,34″ x 34″ 86 x86 cm 2019
Using Up Materials
Sometimes I just start a project with materials or colors that I want to use up. I might have too big a piece of fabric or too much of one color. Some artists might find this idea very unorthodox or even unsettling. When I started City Lights, I had a pile of blue fabric that I wanted to diminish. Sand Between My Toes allowed me to make use of whites and beiges. Sea Turtles is not an abstract art quilts but I had a large piece of blue synthetic fabric that I used for the background. The turquoise plants are also created from fabric I wanted to use up.
City Lights, a fabric art quilt,24″ x 22″Sea Turtles 35″ x 23 ” 2014Sand Between My Toes
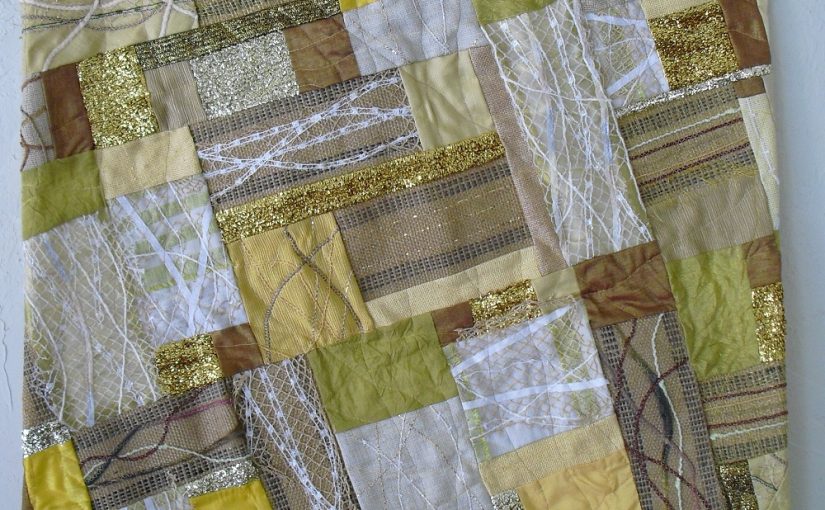
Use the Palette of a Commercial Piece of Fabric
A fabric friend suggested this to me several years ago. I have to admit I couldn’t wrap my mind around this idea for a long time. Go to a fabric store. Look at the colors on the commercial fabrics. Very experienced designers work to create these prints. Choose a palette that you would like to use. You don’t need to use the fabric just let the colors inspire you.
In my abstract art quilt, Spring Break I did use some of the fabric. However, the process of chosing the materials was driven by the colors of the original piece of redirected linen. I looked for complementary colors from the fabrics I already had.
Spring BreakI built the fabrics around this piece of fabric.
In conclusion, inspiration for art can be found in many unusual places. Inspiration comes from spending time in your studio. Keep your mind open and inspiration will appear.
Techniques for creating texture on a flat piece objects are subtle. In other posts, I addressed other aspects of my mantra, Color!Texture!Movement! Moreover, adding color or movement creates a bolder statement. Above all,color impacts the viewer first and then movement next. But texture may even go unnoticed. However, now I will share my ideas for creating texture in my art quilts.
Tucks Create Texture
For instance, tucks are small seams sewn on the edge of a fold. Yet, a series of 3-5 tucks create texture. For example, in Upwelling they represent the layers of earth movement. Furthermore,this technique is also helpful to reduce the size of a piece of fabric by just a small amount.
Upwelling, 30″ x 34″ Tucks run the width of several pieces to create texture.
Naturally Thick Fabrics
On the other hand,corduroy or other thick fabrics add texture by their nature. Look for fabrics that naturally have an interesting texture like dupioni silk. Unfortunately, these fabrics are often challenging to work with. Most importantly,develop your skills so that you will be able to work with them more easily.
Couching Decorative Threads
In addition,couching (zigzaging)different threads on fabric adds texture. First,I couch threads on long strips. Then I cut the pieces apart to use as fabric. In addition,this is a good way to utilize small pieces of yarn or decorative threads. At the same time,use the same color of thread to emphasize the line aspect of art. in this way,the focus will be on the color of the yarn not the color of stitching thread.
Desert Sands, 16″ x 21″ 2015
Three Dimensional Objects
Furthermore,add texture with 3D objects. In addition,artistic people may create their own 3D object using fibers. Here I included two fabric figures that I had previously made. Similarly,on the male figure, I added a serape for the Mexican theme. Likewise,embroidery thread hair,jewelry and lace completed the female’s figure.Finally,I added found plastic objects.
El Senor y La Senora Win Loteria
True Confessions Time
Ultimately,sometimes I am motivated by just using up materials. What items can I add to my art to finish it up? As a result, this random technique led me to a positive ending. I had about 8 designer samples of short threads in different colors wrapped together. Spontaneously I decided to add them to the foot of a tree. Don’t they look like grass? Boy! did this work!
Under the Shady Tree, 37″ x 25″ 2019Under the Shady Tree detail 2
Start with Fiber
Fun With Fiber 6
Start with fiber. Here I used a redirected folded fiber piece. I added a found Mexican(Aztec inspired) clay head and redirected fabrics. Then I attached it to a highly textured piece of burlap.
In conclusion, the techniques to add texture include tucks, thicker fabrics, couching decorative threads, and adding three dimensional objects. There must be other ways to add texture. Do you know of any? Please respond with your suggestions. I am open to new ideas.
An important life skill for artists to develop is resilience. Resilience helps one weather the rough spots in life. Learn who you are. Learn what your passion is and develop it . Be authentic. Friends, family members and those close to you may not see your passion as you do. Focus on what is true and real for you. This can be hard. As human beings we rely on the reflections of those around us to see ourselves.
Burlap and Silk, an art quilt demonstrating the contrasting fabrics of soft and hard rough and smooth.
Following One’s own Path takes Resilience.
Developing resilience is an important life skill for artists to combat certain comments people might make. “What are you doing that for? “People will say the first thing that pops into their mind without thinking. Realize that it is okay if some people don’t agree with your choice of activity. When someone doesn’t like what I am deeply involved in, I often think about model trains. Some people are extremely passionate about model trains, something that I have absolutely no interest in.
“Isn’t that a lot of work?” Just yesterday a neighbor made that comment about all of the work I do to maintain my garden. I love doing it. I can’t imagine not doing. It is the same way I feel about my art. Passion is what you can’t live without. It isn’t work if you like doing it. Picture water sliding off a duck’s back when disparaging remarks are made. Little by little build resiliency.
Being the Black Sheep takes Resilience.
Developing resilience is an important life skill for artists tostand up to certain activities other might want you to do. When growing up my family was into sports; listening, watching on TV and attending baseball and football games. Of course, I also did these things until I got old enough to realize that I didn’t want to do it anymore. I would rather be out doing something active than watching others do it. This act of resilience was easy for me. Being the odd man out may not be as easy for some people. Of course, it would be nice if the people we care about also cared about the things that we care about. But that doesn’t always happen.
Overcoming Setbacks takes Resilience.
Setbacks can also happen. Sometimes one’s work or family responsibilities take center stage. Being a responsible person creates its own confidence and resiliency. When one knows themselves and is authentic, then moving in a new direction can support one’s vision.
Life skills for artists Develop Resilience.
Many paths lead to success. If one path doesn’t work, find another. Take the long view. A different path might not immediately be visible. Keep working towards your goal, be it personal or professional or artistic.
The poster in my laundry room has this quote on it.
“Great spirits have always encountered violent opposition from mediocre minds.” Albert Einstein
Or as a favorite song, The Middle by Jimmy Eat World says
(partial lyrics)
“Live right now, yeah, just be yourself. It doesn’t matter if it’s good enough for someone else.
It just takes some time,
Little girl, you’re in the middle of the ride.
Everything, everything will be just fine,
Everything, everything will be alright, alright.
Just do your best do everything you can
And don’t you worry what thebitter hearts are gonna say.”
Resilience is a life skill that can be developed and nourished. It applies to our professional, personal as well as our artistic endevours. Things happen in life that are sometimes out of our control. Don’t take setbacks personally. Just forge forward.
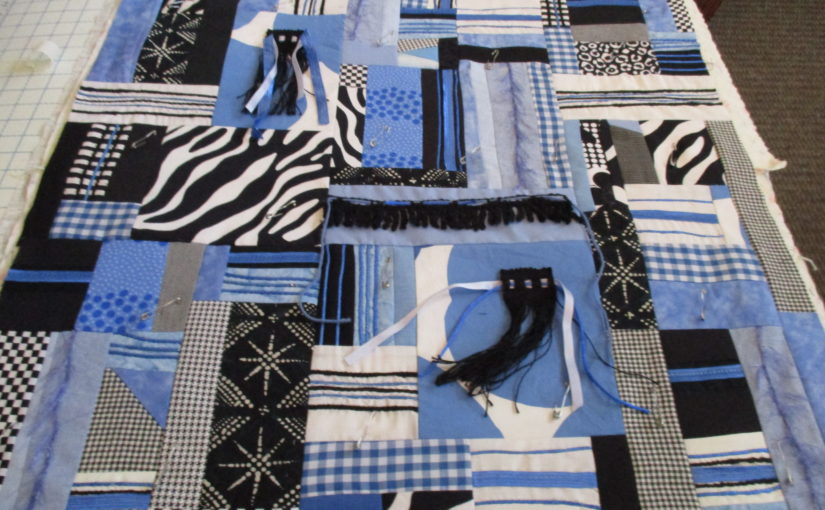
First of all,I prepared this Pechakucha laser talk in anticipation of presenting it at an art quilt meeting. The Pechakucha,a Japanese word for chitchat. To clarify it is a format that gives a speaker a limited amount of time to discuss a topic. For example, I would have 4 minutes to present a limited number of photos to on one topic. At the same time,numerous presenters of a variety of topics are able to share. That is to say that I prepared to discuss my passion for making art quilts from redirected materials. Moreover,FABMO, a local nonprofit is where I get my materials from. http://fabmo.org
My Art Quilt World
To begin,I do nature art quilts, abstracts and Mexican inspired fabric collages. Furthermore, I am very passionate about using redirected materials and threads to keep them out of the landfill. My inspiration comes from the materials I find at FABMO . I have been a volunteer there for many years. To clarify,I brought photos from three pieces that I completed recently to present at this Pechakucha laser talk. So I could share the process with you.
Spring Break, an art quilt
Paisley pattern on linen
First I choose the fabric, Here is the material I started with. I liked the variety of color and decided to use the colors as a basis of an abstract art quilt.
Step 1 Beginning to place pieces on the design wall randomly
Next, I couched decorative threads and yarns with the idea of making interesting details. Then I cut up the strips randomly to use as fabric. Following that trying out other fabrics on the design wall.You can see several examples of redirected couched ribbon and yarn on different colored fabric.
Finally,the completed piece using scribble quilting. Scribble quilting moves the quilt side to side while quilting to create flowing lines of sewing.
Skyward, an art quilt
GreyhoundsGreyhounds in another direction
Originally, I chose this FABMO fabric for the movement and stark lines. But when choosing the fabric,I didn’t even noticed the dogs. They were not of interest for me. First,I began to couch green and black threads.
Here, I zigzagged a variety of colors.
Then,I continued couching other colored threads. Some of these threads were light blue but read more like grey against the light grey part of the fabric.
Can you believe that the tree is made from the same material?
Finally, I was ready to use the fabric to create tree branches. Using the fabric layering technique,I laid the back fabric down on the table.Of course the back is also another piece of material from FABMO. I covered it with batting and I laid an indigo dyed piece on top for the sky background.
The finished art quilt just showed the tree tops.
The finished piece,Skyward,succeeds in its interplay of light and dark on the branches. On the other hand,one doesn’t notice the dogs at all.
Under the Shady Tree, an art quilt
The finished art quilt, Under the Shady Tree made from redirected materials.
Next is the finished piece of under the Shady Tree. Aficionados of redirected materials may recognize the fence fabric. To clarify, I used the fabric layering technique.
Unusual materials can be used in unique ways.
Furthermore,notice several leaves with bluish and gold colors. To be clear,I used a multicolored synthetic knit that kept rolling up in other projects. I couched it to help it lay flat. Then I cut it into leaves.
a different view
Last but not least,Shiny sheer fabrics add interest.
Take apart details and see what interesting fibers one can find.
Creating Texture
Moreover,texture is created by taking apart fabric details. They can be used as bunches of threads to add interest. One can also find decorative threads,ribbon and small cording . Lastly, I laid it on the foreground , covered it with tulle netting and free motioned quilted the three layers together.
To sum up,I am all about color, texture, and movement which I create using redirected materials. Thank you for letting me share some of my recent works with you.
Winter Sunset 23″ h x 22″ 2018Burlap and Silk 24″ x 23″ 2015Cheddar and Triscuits,30″ x 28″ 2015
I find Cheddar and Triscuits a perfect name for this art quilt.Cheddar is the name of the color used in. The cheddar and white traditional quilting blocks contrast with several types of redirected high end fabric from the San Francisco Design Center. Fiberous netting and decorative threads and synthetic raffia add texture. I couched other decorative threads and rickrack on a strip of fabric. Then I cut them into smaller pieces to add where needed.
Circuit Board 15″ x 14″ 2015
When I first saw the fabric with the dashes on it, I immediately thought of a computer circuit board. I added many redirected fabrics in this piece. Decorative threads couched on a long strip of fabric and then sliced into pieces add interest. Pulling in colors similar to the fabric with dashes was fun. It was done without much thought but with much necessity.
The Quarry 21″ x 31″ 2015
The Quarry uses found materials,beads and the color,brown that I usually avoid. Someone created fabric with a process of marbling paper in several colors, black, blue and reflective blue and pink. The stratification formed by these fabrics was a new idea to me. Bone beads added a 3D effect as if they were layered under the ground and just peeking out of a cliff.
In Conclusion
Playing with the contrast of fabrics or your chosen materials lets you create something unexpected. An outlier can suggest a new direction or technique to follow in the future. It is up to the artist to make that decision. Or maybe the success of the project that will make the decision for the artist. Make your art like your life depended on it! Because it does!
This work in progress shows the steps I take to create this abstract contemporary art quilt. I draw inspiration from one fabric.
Color! Movement! Texture!
Color! Movement! Texture! are my main goals for my abstract art quilts. Color is where I begin. What colors do I want to work with? I found a piece of linen at Fabmo, a nonprofit that redirects materials from the San Francisco Design Center. I really liked the variety of colors and movement in this one piece. This fabric became my inspiration to find other fabrics and textures with the same colors for my abstract piece.
Inspiration from One Fabric
Oddly enough, several years ago four quilter friends and I were having trouble choosing colors for a donation quilt we wanted to create together. One friend suggested that we find a fabric and choose the colors from that fabric. At the time I couldn’t quite wrap my head around what she was saying. However, when I saw this multicolored linen, I immediately understood what she had been trying to have us do. Sometimes it takes times for inspiration to happen.
1. Inspiration from one piece of commercially producted fabric
Photo 1 Choosing the Fabric
First I choose the fabric I want to work with. This one piece has so many different colors in it. Those are the colors that I want to work with. This is when the fun begins. I go through my fabrics to find additional fabrics. I look for shades that are lighter and darker.At this step, I don’t reject much.
Photo 2
I chose these fabric from the stash that I had. Also I found decorative threads and yarns to add to some of fabrics for interest.
2. Here are the fabrics I chose from my stash.
photo 3 Inspiration from One Fabric
I place small pieces of fabric on my design wall. I move them around before sewing them together. Then I start to sew smaller pieces together. I make sure that colors, textures and similar pieces are equally balanced around the piece. Does your eye have a place to rest? Are there too many colors in one area? Time to adjust before the whole piece is sewn together.
3. Spring Break
Photo 4 and photo 5
Here is a detail of the smaller pieces already sewn together.
4. A detail of the pieces sewn together5. Another detail of the pieces sewn together
photo 6
6. Another detail of the pieces sewn together
photo 7
7. Here is the finished quilt, Spring Break.
Inspiration from one fabric helped me create this abstract art quilt. Hopefully, this step by step explanation will inspire you as well.
For more information on couching threads refer to my previous post.