My art quilts are all about the quilt artist creating abstract, whimsical or impressionistic pieces. Inspiration comes from the natural world as well as from Mexican and Native American influences. My materials of choice are often redirected fabrics from the San Francisco Design Center and found objects. Art quilts free me to play with color and texture. My technique, Scribble Quilting allows me to create movement on many of my pieces.
TWO INSPIRATIONAL ARTISTS
I owe some of my inspiration to two artists from Santa Cruz County, California. Meri Vahl, an award winning art quilter has been recognized nationally for her work. Teacher of the fabric layering technique, she was patient. Understanding that each student brought individual strengths, weaknesses and abilities. Ellen edith;friend, art quilter, fabric designer and artist extraordinaire made whimsical, personal quilts. Her influence lives on well beyond her life. I have great appreciation for these two local leaders of the art quilt world.
SAQA (STUDIO ART QUILT ASSOCIATES)
I am proud to be part of an evergrowing group of art quilters. SAQA started by Yvonne Porcella in Northern California in 1989. It has grown to an international organization. Art quilters have transformed the quilt into a 21st Century art form. I continue to explore new forms and ways of working with unusual materials on this journey.
ABOUT THE ARTIST,BIO
I was born and raised in Palo Alto, California. In high school I studied sewing and clothing construction for two years. I continued to sew much of my wardrobe. In 1974,I took my first quilting class at a neighborhood fabric store. Over the years, I continued to sew clothes and make quilts for my family. I stopped counting bed quilts at 300. After teaching 30 years in Watsonville as a bilingual teacher, I retired to spend more time on creating art quilts.
MY FIRST ART QUILT
Homage to a Dancer,45″ x 56″
In 2008, I made my first art quilt, Homage to a Dancer. It reflects my participation in Los Méxicas,the University of California,Santa Cruz ballet folklórico group.
A STUDIO IN THE ART CENTER
In May of 2016, I opened a studio in the Santa Cruz Art Center, 1001 Center St. Downtown Santa Cruz. I have space to work and display my work. For First Fridays and Open Studios, I fill the lobby with art. In June, 2019 New York Art Center accepted my work into their gallery. 7 Franklin Place, TRIBECA, New York City.
AWARD WINNING ARTIST
Great Blue Heron at Dusk,31″ x 25″
Great Blue Heron at Dusk entered into an art show in 2010. The following year it won a merit award at the Olive Hyde Art Gallery in Fremont,California.
In 2013, Visions of New Mexico won third place in the Neo Membreno Vessels 2013 Show at the Western New Mexico University Museum in Silver City, New Mexico.
Unexpected comments about my art came from people who originally had no interest in my passion. I understand that everyone is not going to be interested in art quilts. It is a bit of a niche. There are those who love model train displays. I am not one of those people. So I understand when someone is not interested in what I do.Yet, turning someone into a fan can be amazing.
Desert Mountains, 22″x 18″ 56 x 46 cm Mountain landscape art quilt in greens and gold
She said,” I want to thank you for your post explaining about the history of art quilts. I had no idea. You did such a great job of explaining and promoting the art quilt. A family member of mine was a trained artist. My family was into art. But I didn’t know anything about art quilts. Furthermore, I had no interest at all. But your post made me take a look at your art. You certainly have done a lot of work. We talk occasionally but her lengthy conversation surprised me a bit. I had unexpectedly turned someone into a fan.
In the Shadow of the Mountain, 25″ x 20″
An Older Example of Turning Someone into a Fan
I began my art quilt path about 2009 before I retired. Subsequently,I began sharing my upcoming shows with the staff at my school site. A respected teacher that I had worked with for years basically said that she had no interest in hearing about the show I was promoting. I appreciate honesty. I knew to not bother her in the future.
Fast forward ahead several years, I published my website. This person reached out to me with useful suggestions. One of them being that I highlight the artwork on the first page of my website rather than having my biography first. Needlessto say, I heeded her advice.
She also had this comment that I saved for its content and eloquence. “When is a quilt not a quilt?When you do the playful, intuitive, adventurous thing that you do with color, form and texture creating the unique, painting-like quality of your quilt pieces. You turn quilting on its head! “from a colleague
Most importantly,that same person commented at a later date about one of my art quilts that “It dances!” Just the mark I often shoot for. Turning someone into a fan inspires me.
My Own Movie Moment
During the 2023 Silicon Valley Open Studios event, I had a When Harry met Sally movie movement. Not the one in the restaurant with Harry and Sally but the other restaurant scene. The blind date with best friends, Jess and Marie where Marie repeats what Jess had written in a magazine.
While chatting with a visitor to my booth, she mentioned that the best place to view art is at a medical facility. I listened as she explained that she saw the most incredible fabric tree the previous day at Kaiser Permanente in Scotts Valley, California. Kaiser Permanente in Scotts Valley had previously purchased two of my fabric trees several years ago. I said that most likely it was one of my pieces. The lady was so excited to meet the artist of the piece she had loved seeing so recently. She couldn’t resist buying her own tree art quilt. This was the first time anyone had described one of my own pieces back to me. It was so exciting that it felt like my own movie moment.
One of the fun things about showing my work is the comments that people make. “How fun! “How unique! ” “I love your work.” Yet for acquaintainces to take the time to communicate an in depth message about my work is truly special. Turning someone into a fan is even more compelling when their original interest was nonexistent.
http://www.saqa.com/ Learn more at the Studio Art Quilt Associates website, the art quilt professional organization.
I learned stress free piece curved lines from reading a library book. It is that easy to learn. Rarely have I learned any technique from a book. Like many, I prefer to watch someone demonstrate the technique in person. I regularly use this technique to add movement in my abstract art quilts. This technique is not for creating equal curved lines for traditional quilting blocks.
Steps to Practice Curved Line Piecing
Materials needed-100% cotton fabric, rotary cutter, cutting mat, sewing machine, thread, iron and ironing board to press final product
Step 1
Step 1
Choose 2 pieces of cotton fabrics about 4″ x 4″ (10 x10 cm). Printed fabric makes it easy to tell which side is the right side. Solid color fabric ensures success.
Step 2 Notice that the pieces are on top of each other.
Step 2
Place the 2 pieces, right side up, on top of each other. Using a rotary cutter on a cutting mat, cut a simple curved line starting somewhere in the middle of the two pieces. Don’t stress about the shape of the curve or the exact middle. It doesn’t matter.
Step 3
Step 3
Separate the pieces. Take the top right piece and place it next to the bottom left piece. Take the top left piece and fit it next to the bottom right piece. They should fit together like a puzzle pieces.
Step 4
Step 4
To sew, place fabric right sides together. Sew together with a 1/4″( .5)cm seam. The important part-The two pieces need 1/4″ (.5cm)seam when moving through the presser foot. Due to the curve,the length of the fabric pieces won’t line up on all edges. Lift the top piece of fabric to adjust slightly as it moves through the presser foot. Also gently move the bottom piece of fabric if necessary. It sounds more difficult than it is. Press flat. That’s it!!! Repeat with the other 2 pieces of fabric.
Finished and pressed
Step 5
Step 5. Practice,practice, practice. As your skill develops, vary your cutting line to create different curves. I found this technique amazingly forgiving. Incorporate creatively into your art quilt projects.
Taking Curved Line Piecing to the Next Level
Step 6Step 7
After practicing this technique for a while, I decided that I didn’t always want duplicate pieces for my art quilts. I adjusted the technique to use two pieces of fabric instead of four. I placed the edges of the two pieces face up close together, overlapping the fabric(step 6). The overlapping part is the section where I make the curved cutting line. Place the 2 fabric pieces together like a puzzle piece (step 7).
It is hard to tell but the fabric shown here is about 10″ long.front of finished curved line piece using two pieces of fabricback of finished curved line piece using two pieces of fabric
Once you have mastered the basic technique, let the experimenting begin. Lots of room for variation in the shape of the curves. Try different fabrics that are not 100% cotton. It works with them also.
Issues with Curved Line Piecing
Love in the Abstract art quilt, 24″x 26″ 61 x 66 cm. Curved line piecing adds movement. Love in the Abstract added texture with couched threads.
Sometimes quilters can get carried away. If a few curved lines are good then a whole piece of them must be better. At least that is what I thought at one time. This turned out not to be a good idea. The piece would not lie flat. Maybe there were too many small pieces of fabric. The way it looked was also a problem. It was not pleasing to my eye. Lesson learned. Moderation is fine.
Poppin’ Back multicolored art quilt, 23″ x 22″ 58 x 56cm
Entering Shows
When one is ready to enter shows, one may find size restrictions. Sometimes it is easy to complete a piece within those limits. Yet,depending on the technique that one uses, it can be difficult.
I use curved line piecing in my abstract art quilts. This technique uses more fabric than just straight line sewing. If I am making a piece for a juried show with a small size restriction,it can be difficult to get the size just right. It is difficult to plan for a particular size especially if the size is on the small side,like 12″ x 12″. One has to take into account the seam allowances at the same time as planning for the fabric of an interesting shape of a curve. Be forewarned!
In spite of the issues that I brought up,I enjoy using this technique to add movement to my art quilts. I hope that you will also add this technique to your toolbox of skills.
What most people don’t know about the roots of art quilting is that they are firmly based in Northern California. Art quilting is one of the newest art genres. SAQA(Studio Art Quilt Associates), the art quilters professional organization started in San Jose,California. SAQA has grown to be an international organization with over 4000 members. Northern California remains a hotbed for art quilting.
Yvonne Porchella, founder of SAQA wearing her signature checkerboard glasses. Ms. Porchella always included black and white checkerboard patterns in her art.
What many don’t know about the beginnings of art quilts
Yvonne Porcella
In 1989 in San Jose, CA, Yvonne Porcella http://yvonneporcella.net/bio.html invited about 50 art quilters to come together into an organization to promote quilting as an art. This local group became Studio Art Quilt Associates(SAQA). It currently has over 4000 members internationally. I am surprised at how many people including accomplished art quilters from our region are unaware of SAQA’s northern Californian roots of art quilting.
Yvonne Porcella was born and raised in Watsonville, Santa Cruz County,California. (I taught there for thirty years.) Ms.Porcella began her art career fascinated with the colorful costumes of her Croatian background. Her signature detail is a black and white checkerboard fabric she added to many of her pieces. Luckily, I was able to hear her speak at the San Jose Museum of Quilts and Textiles. Sadly, she passed soon thereafter in 2016.
What many don’t know about the beginnings of art quilts.
Studio Art Quilt Associates(SAQA)
SAQA promotes art quilts as an art form. The organization has been instrumental in the inclusion of art quilts into many museums and high level galleries. From SAQA’s website, Studio Art Quilt Associates, Inc. (SAQA) is a nonprofit organization whose mission is to promote the art quilt: “a creative visual work that is layered and stitched or that references this form of stitched layered structure.” Our vision is that the art quilt is universally respected as a fine art medium. SAQA’s core values are: excellence, innovation, integrity, and inclusion. Over the past 30 years, SAQA has grown into a dynamic and active community of over 4,000 artists, curators, collectors, and art professionals located around the world. With our exhibitions, resources, publications, and membership opportunities, we seek to increase the public’s appreciation for the art quilt and to support our members in their artistic and professional growth.
SAQA’s success in promoting art quilts has lead to an increased interest in the variety of techniques and styles of art quilting from museums and galleries to the local guild level. SAQA is divided into regions. There are 347 members in our NorthernCa/ Southern Nevada Region. https://saqanorcalnv.com/ However, it must be remembered that there are many more art quilters of all levels than are not SAQA members. Seemingly, the roots of art quilting in northern California have spread worldwide.
San Jose Museum of Quilts and Textiles
San Jose Museum of Quilts and Textiles formed in 1977 as the first museum in the United States to focus on quilts and textiles as an art form.Ms. Porcella was a board member of the SJMQT for many years. The meeting room and gallery is named in honor of her support for the museum. One might ask why is this museum in San Jose. Part of the answer is the local support from art quilters in Northern California.
This is the short subjective list of talented quilt artists living in Northern California.
Extra Special Expertise
Nancy Bavor www.quiltworth.com Los Altos Hills Master’s degree thesis,University of Nebraska, Lincoln-The California Art Quilt Revolution
SAQA(Studio Art Quilt Associates) is the international professional level art quilt organization. It is open to any one who wants to elevate their expertise from quilters to collectors. Find more information at the website, http://www.saqa.com/. Due to SAQA’s success in promoting quilts as art, many traditional quilt venues include art quilt sections. In addition, local traditional quilt guilds offer classes in art quilts. In this way, art quilts and SAQA are inseparable.
A Little Northern California Humor
I was born and raised in Palo Alto, California. Then I went to UC,Irvine in Orange County, Southern California for my education. There I met my husband and got married. We lived in Orange County for 10 years including beginning my elementary school teaching career in Santa Ana. Before moving to Northern California, my husband and I traveled in Western Europe for a year. Upon our return we moved to Santa Cruz, California where we have lived since 1980. About that time I kept hearing about Silicon Valley. I know my California geography. But where was that? Little did I realize that my hometown and home county had become Silicon Valley in my absence.
A winter storm is hitting the central coast of California on a day I had planned to create new work. Furthermore,I prefer to choose my colors and fabrics when my studio has natural light comes through the ceiling level windows of my studio. I am ready to go but the natural light is not so bright. By all means,make art in a less than perfect situation
In the Shadow of the Mountain, art quilt , 25″ x 20″ 51 x 64 cm
Therefore, I forge ahead. Throwing caution to the wind I begin. I tell myself that I will not finalize anything until the light is brighter. Yet I feel more free to not worry or stress, always a good way to create. This piece is not headed to a museum or even for a show. Just something fun to work on or play with. Be brave. Make art in a less than perfect situation.
The winter storms continued as I gave myself permission to choose colors in a less than perfect situation. In reality things aren’t too bad. I have heat and electricity. I have materials to make art. Motivated? Yes. I am just lacking as much light as I would like. I work in the brightest spot in my studio which happens to be on my ironing board. Throw caution to the wind and choose colors. It might not be what you planned but do your best anyway.
The Cove, 8″ x 8″ 20 x 20 cm
Turn it into a Learning Opportunity.
Most importantly,I notice that some color choices are less forgiving than others. Certain lime greens have to work perfectly with other greens to be included. Certain reds need to play together well also. I could avoid these colors and just play it safe. But what fun would that be? I decide that deep reds will be okay to work with.
On the one hand,some of my favorite pieces are hills with trees. Yet, I had never felt successful doing mountains. This day layers of mountains glide into one another filling the landscape with a variety of bright and muted colors. I don’t work from photographs. To be honest, it took me many years for my inspiration of the mountains surrounding La Quinta, southeast of Palm Springs, California to fall into place. Familar sheers as well Guatemalan woven fabrics filled my comfort zone yet were used in a new way.
Before I knew it I was off, creating layers of mountains criss crossing one another. Continuing to make art in a less than perfect situation propelled me in a new direction. Incorporating sheers for reflecting lights and using my Mayan fabrics in a new way held my interest through several art quilts.
Southwest Mountains, 24′ x 24″ 61 x 61cmShiny Mountain, 24″ x 24″ 61 x 61 cm
Sometimes working in a less than optimal situation is necessary. This forces one to address new ways to solve solutions. Furthermore, it can become a learning experience. Do not wait until the “perfect” situation arises to create art. Create where ever and whenever you are. The best artists remain resilient.
http://www.saqa.com/ Studiio Art Quilt Associates- International art quilters organization
I create fabric embellishments to add color,texture and movement to my abstract art quilts. Some are 3D. Couch(zigzag) leftover yarn or decorative threads to create lines. It is fun to try out new ways of adding textile details to my art. Take a closer look at how fabric embellishments with decorative threads or yarn can add texture and interest to an art quilt.
Finding Materials to Create Fabric Embellishments
Several years ago a fiber friend gifted me a huge container of bits and pieces of a wide range of colors and styles of decorative threads or novelty yarns. She knew that I like to add them to my work. Right, she was.
My bin full of different colors and lengths of decorative threads to make textile details.
A cards with several different types of decorative or novelty threads like the one below can be purchased. I bought mine at a huge quilt fair. Of course, find shorter bits of yard at thrift shops and garage sales. Regardless of what the threads are called, the point is to add unusual threads or yarn to your pieces. Use embroidery threads, yarn or thicker threads. Double, triple or quadruple the ply to make the threads thicker.Think outside the box and create a new use yourself.
Decorative threads that I often add texture to my art quilts.Another example to the types of threads I embellish my quilts with.
To Begin
To begin, choose 3-4 colors to work with. Pick out other fabrics in those hues or shades.After that, I randomly place the fabric on the design wall. At this point I haven’t decided if I will use all of the fabrics. Will they all go together and make it into the final piece? Stay tuned.
Lavender decorative thread above piece where it is sewn. Pieces of fabric on the design wall
For instance,the deep purple fabric has a lighter purple decorative thread couched or zig zagged onto the fabric. Ultimately,I prefer a matching thread color while couching so that the sewing threads are not so visible. But that is an artist’s choice. In the photo on the left, view the purple decorative thread before it is sewn on. Also see the pattern created by multiple strips of ribbon and decorative threads. Cheap thrills!
A Strip of Fabric
Primarily, I start with a strip of fabric about 20″-30″ (51cm -77cm) and couch(zigzgag) the ribbons and decorative threads on the strips. Then I cut the strips into random lengths like the pieces you see. I also choose the cut pieces to be of different widths. You may choose differently.
Furthermore,using fiberous fabrics to create textile details adds interest to your art quilts. Check our decorator shops for their discontinued materials. Find unusual fabrics there. Moreover,they will be thrilled that you will take these discontinued materials off their hands.
small piece of fabric with decorative threads and ribbons sewn onsmall pieces of fabric with decorative threads sewn onA fiberous type of fabric with decorative threads sewn on for a textile detail. Example of type of decorative thread on the left.More examples of details on the design wallFor example several plys of yarn together make a thick line. Decorative threads can too.back-A fiborous piece with decorative threads sewn onA fiborous piece with decorative threads sewn on-front
After I have completed several details with decorative threads, it is time to start placing pieces on the design wall. See photo below.
Trying out spots on the design wall for fabricsSmall pieces of fabric on the design wall ready to be sewn together.
This is how I placed the textile details after moving them around for balance of color. As a result several of the details did not make it into the final piece. That is all right. I will save them for another time. My main intent in this post is to focus on the creation of details. Yet, here is the finished product, Lavender Caramels.
Lavender Caramels completed 28″ x 26″ 71 cm x 66cm
Quilters create small pieces of fabric or scraps as a normal part of their sewing process. How to effectively use these scraps is a constant issue. I often use fabric 2″-3″ (5-8cm) to create my art. Guild members have gifted me small pieces of fabric, saying “Here, you use small pieces of fabric. Have these.” I didn’t refuse them. I put them to good use.
A little fabric humor- In my fiber group, I was the only art quilter. The other members made different kinds of fiber art. We would meet and share our art and our process. I learned that what seems obvious to quilters is not always so obvious to others. Discussing my process, I asked how do you think I begin? A friend answered,”You start by cutting up a lot of little pieces of fabric.” I had to chuckle. Sewers and quilters know that as we sew and trim, we easily create small pieces that become our scraps. We don’t need to create our own.
Another Use for Small Pieces of Fabric
Above all, quilters will probably always have small pieces left over. Whenever I make a bed quilt or a lap quilt, I like it to be reversible. In that way, I get two quilts for the price of one. Variety and change is good. Use your small pieces as part of the second side. Sew the leftover fabric from the front together and add them to the back fabric. This uses up the fabrics and also adds to the beauty of the quilt.
Many Art Quilt Techniques use Small Pieces.
There is a wide variety of techniques that use small pieces of fabric. Impressionistic art quilts lend themselves easily to the use of small pieces. With a little trimming a small piece of fabric becomes foliage, a rock or a hint of an animal. I have a container to store strips. Another bin is only for small pieces. Several bags are full of pieces larger than 6″. The real trick is to remember to look in those containers when choosing fabrics.
Small Pieces are my Signature Item.
Several years ago I had a commission to make a huge bed quilt 130″x130″ 325cm x 325cm using geometric shapes of solid colors. This is a king size bed with the quilt hanging down the sides to the floor. I was almost finished piecing the top together. But I came up short of a small bit of fabric. I could have bought some more. Yet I really needed only a few very small amount. I had a few small pieces left over so I sewed them together. That was enough fabric to complete the top of the quilt.
Furthermore, I was so pleased with the effect I decided I would repeat the process in the future. I would add them as a feature to my work. Small pieces (about 2” -3″ 5-8cm) sewn together are now a signature part of my abstract art quilts.
Business Cards Use Small Pieces of Fabric
I use small pieces of fabric to create my business cards. My business cards are small handmade art quilts about 3″ x 4″ 8cm x 10cm.Most people would throw out these small fabric and batting scraps. I sew several small pieces of material together. Then I write the basic information on a solid light color piece with a fabric pen. I add batting. I sew the three layers together and zig zag the edges. The extra effort to use materials that normally would be tossed out is important to me. I like that the card is a small art quilt for those who are unfamiliar with the art form. The positive response I receive for such an unique business card also makes it worthwhile. https://annbaldwinmayartquilts.com/2020/12/artful-fabric-business-cards/ /i
One of my handmade fabric business cards. Each one is unique.The other side with the important information
Will these techniques make all of your scraps go away? Probably not. But it might be a step in tbe right direction.
I do realize that some might consider some of these scrap reducing suggestions to be a bit time consuming or even wacky. However, I am serious about reducing waste and reusing materials.Yet I can be a bit over the top at times. But as I say, ” It is not illegal, yet.” In addition, the best part is one can choose to do these ideas to use small pieces of fabric or not. Sometimes I give myself permission to toss a piece of fabric.
Recently someone mentioned to me at my studio that she had some fabric that she had had for a long time. She suggested that she should get rid of it solely for the reason that she hadn’t used it. While we all have our own rules of engagement, that is not one of mine. If I like a fabric I will keep it until I can find a good project for it. In this posting I share examples of using fabrics saved for a long time.
Using Saved Fabrics
As soon that visitor commented on her long saved fabrics, I lead her to see this recently completed piece. I explained that I had had the fabric with wavy yellow, green and turquoise lines for a long time. I could not remember where or when I had gotten it.
Over the years I would try to see if it fit in other quilts. But each time I put it back on the shelf. Often this whimsical fabric didn’t fit the style or mood of the piece or maybe the color wasn’t just right. Here, however, everything works;the colors, the movement, the whimsical style.
Sunset Through the Forest random piecesSunset Through the Forest, an art quil
ATLAS in Rose
I recently completed the abstract art quilt, ATLAS in Rose. The rose, reddish rose and gold fabric is a high quality fabric that I had had for a long time. Yet I hadn’t used it. The red and rose colors would not play well with other colors. In spite of that, I kept it. Luckily, I did. Because it went perfectly with this black and white scientifically inspired art quilt. It added color and just the right amount of movement to the art quilt.
rose and gold fabricATLAS in Rose , finished art quilt
Fabric with Small Boxes
The following red, yellow and green fabric with small boxes is another piece that I liked. I didn’t know how I would use it. But I had to have it. The colors and movement spoke to me. I ended up for saving it for many years. In Cactus Dreams, the colors fit. The geometric boxes mirror the checks in the Guatemalan and in the checkerboard fabrics.
fabric with green,yellow,red and boxesCactus Dreams,detail,abstract art quiltCactus Dreams,abstract art quilt
In Conclusion
I finished these three art quilts in the past year. Without realizing it, I probably mentioned to the visitor that I had used some saved fabric. Thankfully, I had kept the fabric. Because they worked perfectly!
Ann Baldwin May wrote Develop Your Art Style as a potential Zoom talk at a NorCal /Southern Nevada Regional Meeting of the International Art quilters organization,SAQA. Although this post’s original audience was art quilters, many of the points apply to all forms of artists. Especially artists who are just beginning to put themselves and their art out into the world.
Introduction
Ann Baldwin May developed her art style to become a quilt artist. Ms. May reinvented herself in retirement. Her art friends call her resilient, a prolific artist and a master at social media. She was accepted into the New York Art Center in Tribeca in 2019.
Splendid Fairy Wren, 30″ h x 25″ w, an abstract art quilt
Develop Your Art Style
How to develop your own art style? Do you want to make a career out of art ? Do you want to sell items that you make? Is your goal to be in a museum? These decisions are part of the process. An answer does not need to be made right away. Only one person can make these decisions. It is YOU. In the beginning,I would visit shows and see no art quilts that looked like mine. At first, I worried about this, but then I realized that it was a good thing. I had my own unique style. I focussed on developing it more.
Honing your Craft
Develop your skill set .This will be your bag of tricks that you will draw from.What skills are you good at? What skills do you like to use while making your art? Use these to develop your own style.
Classes are great but at some point one has to work on developing their own style.
Attend SAQA (Studio Art Quilt Associates) conferences. The workshops offer great advice for all steps of your career.
Celebrating Fall 33″h x 31″ w
Putting Yourself Out There
The 20th century model for art and many things was make or do great work. Then the world would come to you. The 21st century model is different. Each person needs to let the world know what they are doing. This can be difficult for some of us to do. However,I found this phrase helpful when I started out. Hi, I am shamelessly promoting my work. This phrase shows that it is uncomfortable yet it still needs to be done.
Let people know what you are doing. Share with your friends and the groups you are in. They will be a big support for you especially in the beginning.
Start a list of people who want to hear from you. Gather names and emails at each show you participate in. Use it to notify people of what you are doing. I do a monthly newsletter about where I am showing my art or what I am making.
What is your digital footprint? If someone sees your work and googles you, what will they see? What do you want to see when you google an artist? A website announces to the world that you are serious about your art. Online sale sites are growing. Besides sales, I have gotten commissions from my Etsy shop. I was also contacted by an editor for Art Quilting Studio to write articles for them. I was interviewed by a freelance writer for the Smithsonian Magazine due to my digital footprint.
Each Community is Unique.
Each community is unique. I happen to live in a community with a vibrant art scene. Santa Cruz, California is fifth in the nation of listing artists as their livelihood.There are opportunities to show your work at restaurants, coffee shops, quilts shows, county fairs, festivals,real estate offices,First Fridays events, Open Studios Art Tours. Your community is probably different. join together with others and form a group. Accept the opportunity to create your own events.
Educating the Public about what You Do
Take the opportunity to educate the public about art quilts. I usually say art quilting is a new form. It (SAQA) began in 1989 in Northern CA. Yvonne Porcella was actually born and raised in my county. Many people still don’t know about it.
Sea Turtles,23″ x 35″,an underwater fantasy art quilt
Further Steps
Create a laser statement, sometimes called a elevator talk. Explain what you do in a sentence or two. Most people know what quilts.But they are still unfamiliar with art quilts. I usually say art quilts use quilting technique to make wall art. My portfolios are Nature, Abstracts and Mexican inspired art quilts.
Reach beyond the art quilt world to the art world in general. Enter shows that accept fiber art.
Local press- If you are having shows or creating events the local press with search you out. Of course, you can also let them know.
Be professional. Be a person someone wants to work with. Leave your ego at the door.Be prompt, prepared at all steps.
About ten years I began my art path into the world. I gleaned these ideas presented here mainly from my own search to develop my own style. I find that they have worked for me. As one takes baby steps into the art world, people will comment on what they see or like. This feedback from the public will help you define your own style.You may have one but you may not truly recognize it. I offer these suggestions to help as you develop your own art style.
You may be interested in reading more about my style.
Memories of favorite colors can stay with you throughout a lifetime. As a seven year old, I remember telling the neighbor lady that I wanted to be an artist when I grew up. My favorite colors were pink and yellow. I chose them both because I couldn’t decide which one I liked the better.
My goal of becoming an artist faded almost immediately. That idea didn’t resurface until much, much later after a 36 year career as an elementary school teacher. Yet, my memories of my favorite colors remained with me.
Elementary School
For several years while I was in upper elementary school, a ladies choir came to sing for our school. I don’t remember the music but what stuck with me were their dresses. The ladies all wore a solid color shirtdress that was most likely from their own closet. The affect of the variety of colors was intriguing to me. I was starstruck. I kept this memory for such a long time that I made myself a single color dress to wear to work many years later.
Shirt dresses possibly from Villager.
Memories of Favorite Colors,Age 13
My mother loved clothing and dressing nicely. I could always count on her for a lovely outfit for a Christmas gift . For my thirteenth Christmas, she surprised me with several items to mix and match in forest green and light blue. There was a green blouse with light blue flowers, a fluffy Mohair blue sweater,blue pants and a light blue skirt. I was in heaven. Those colors have stayed dormant within me although I haven’t done anything with them. Maybe the time is now right?
My mohair sweater looked like this only in light blue.
Memories of Favorite Colors -Chocolate Brown and Light Blue
Fast forward ahead to my life as a young wife. My husband and I enjoyed visited model homes to get inspiration for our own space. We were both enamored with a home decorated in dark chocolate brown colors with light blue accents. Again we didn’t act on our interest. But the memory of colors of that model home stayed with us both .
Memories of Colors-Purple
We all must admit that we have been influenced positively and at times negatively by our parents. My mother did not like purple. The purple of the 1960’s was more of a sickly lilac. I share her dislike for that color. It is not a color that blends well with our olive complexion. Here are some beautiful dresses in the color lilac. I must admit it is hard to dislike these stunning examples.
lilac dressThe lilac dress is in the middle.lilac dress
Other Shades of Purple
Much later a wider variety of purples became popular. Shades of purple that constrast well with many colors are a natural choice for my art. Here are some examples.
Splendid Fairy Wren, 30″ h x 25″ wUnder the Palapa, 27″ x 21″Shore to Sky E, 10″ x 10″Love in the Abstract, an abstract art quilt in purples and pinks,24″ x 26″Winter Sunset, An abstract art quilt with lavander,pink, and grey colors,the finished piece
Conclusion
These are some of my memories of favorite colors that have stayed with me for many years. Thank you for letting me share. I assume that others also have fond memories of shades from their childhood and beyond. Do you have any color favorites of your own.? Feel free to share them here.
Announcing my participation in the juried Juried Open Studios 2019. Sponsered by the Arts Council of Santa Cruz County. Saturday and Sunday, October 5-6 , October 19-20. Moreover,my venue is at the Santa Cruz Art Center, 1001 Center St. located in the Historic Downtown Santa Cruz. Above all, I fill the lobby with Color! Texture! Movement! from11 to 5 pm each weekend. In addition,free motion quilting and curved line piecing demonstrations take place throughout the day.
Lingering Fog, art quilt
County Wide Event
Similarly,artists from all over the county open up their studios for three weekends in October. As a result of so many artists residing in the county, the group is divided in half. One part participates on the first weekend of the month. The second part participates on the second weekend of the month. After that,any artist can open their studios for the third weekend called the encore weekend.
Beach Umbrellas,an abstract art quilt
This will be my fourth year of participation in the Open Studios Tour featuring over 300 artists. Although my studio is small for Open Studios and First Fridays, I hang my art quilts in the lobby of Santa Cruz Art Center. I fill the artium or lobby with Color! Texture and Movement! There is room for from 10-20 large art quilts.
American art by Black self taught artists from the 20th and 21st centuries is a broader and better form than previously admitted. Currently,museums struggle to become more inclusive. Above all,they give new prominence to neglected works. Moreover, William Arnett and his Souls Grown Deep Foundation helped to shine a light. Their focus is the important achievement of black self-taught artists of the American South. In other words,these artists were born of extreme deprivation and social cruelty.
About the Photograph
Thornton Dial’s two-sided relief-painting-assemblage. “History Refused to Die” (2004) gives this Metropolitan Museum of Art exhibition its title. His work is in conversation with quilts. From the left, Lola Pettway (“Housetop,” circa 1975); Lucy T. Pettway (“Housetop” and “Bricklayer” blocks with bars, circa 1955); and Annie Mae Young (“Work-clothes quilt with center medallion of strips,” from 1976). Credit 2018 Estate of Thornton Dial/Artists Rights Society (ARS), New York; Agaton Strom for The New York Times
Souls Grown Deep Foundation
The Souls Grown Deep Foundation is in the process of sharing the entirety of its considerable holdings. Meanwhile,some 1,200 works by more than 160 artists are sent to museums across the country. In short,this will have a substantial impact on black self taught artists.
An Electrifying Sense of Change for Black Self Taught Artists
The Met’s curators took nearly two years and several trips to Atlanta to finalize their selection. Moreover,they chose well. In short,the show seems nearly perfect in art, installation and greatness. Randall R. Griffey and Amelia Peck, curators, organized well.
Lonnie Holley’s 1982 sculpture “Ruling for the Child,” at left, and Thornton Dial’s “The End of November: The Birds That Didn’t Learn How to Fly,”
Majestic Effect
Furthermore,the effect is majestic. In short,the show validates the art’s stature. It transforms the Met’s footprint of African art and American folk art. Nine of Thornton Dial’s fierce, self-aware works are here. Mostly his relief paintings. Three extraordinary drawings commemorate Sept. 11, Florence Griffith Joyner and Barack Obama’s 2009 inauguration.
Gee’s Bend Quilts
A dozen of the geometric quilts are here. Both muted and boisterous, they challenge the conventional history of abstraction. Furthermore,they reflect the talents of the Gee’s Bend collective, especially those of the Pettway family. Truly, black self taught artists.Nearly everything included is made from scavenged objects and materials, scraps of the shameful history of black labor in the South. One of the most valuable lessons here is the works’ inherent sense of defiance. In short,their beauty in itself as an act of resistance.
Gee’s Bend, Abstract art, black and white , violet and orange
Two very Different Galleries
The show’s two galleries have very different emotional and visual tones. After beckoning you from down the corridor with the bright colors and joyful asymmetry of Loretta Pettway’s “Medallion” quilt (circa 1960), the exhibition starts with a room of works nearly devoid of color.
“Shadows of the Field”
Dial’s “Shadows of the Field” (2008) evokes haunted expanses of cotton plants with the help of strips of synthetic cotton batting. Along one wall, the “work-clothes” quilts of Lucy Mingo and four other Gee’s Benders reflect lives of hard labor and scrimping. Their fabrics are almost exclusively blues and gray denim whose worn textures and faded colors are masterfully played off one another.Emma Lee Pettway Campbell’s Blocks are strips work-clothes quilt from around 1950.All things considered they are accomplished black self taught artists.
Thornton Dial’s “Shadows of the Field” (2008)
Joe Minter’s 1995 symmetrical arrangement of rusted shovels, rakes, hoes and chains, seems to bless the whole room. Regal and severe, it suggests both a group of figures and an altar. Moreover,its title pulls no punches: “Four Hundred Years of Free Labor.”
Joe Minter’s “Four Hundred Years of Free Labor”
Second Gallery of Black Self Taught Artists
The second gallery erupts in color brilliant in palette as in use of materials. Gee’s Bend quilts deliver. Lucy T. Pettway’s traditional housetop and bricklayer patterns are in a quilt from around 1955. Annie Mae Young’s 1976 work brings together the quilt tradition of a medallion of burning stripes of contrasting corduroy with a broad denim work-clothes border.
A dozen of the 18 geometric quilts included in the Souls Grown Deep Foundation gift are here, including Lucy T. Pettway’s “Housetop” and “Bricklayer” blocks with bars, left, and Mary Elizabeth Kennedy’s “Housetop-nine-block ‘Log Cabin’ variation.”Credit2018 Lucy T. Pettway/Artists Rights Society (ARS), New York; Agaton Strom for the New York Times
Jaw-dropping Dial
Blessing the artworks here is a jaw-dropping Dial: a two-sided relief-painting-assemblage. It is the source of the exhibition’s title, “History Refused to Die.” One side shows a couple chained to, yet sheltered, to a white metal structure. Surrounded by a wild expanse,pieces of fabric knotted seem to billow and blow like a stormy sea or clouds.
The Other Side
The other side is a rough weaving of the straight stalks of the okra plant. Okra came to the United States from Africa during the slave trade. Its scattered colors are primarily the red, black, green and yellow. The same colors as the 13-striped Afro-American flag. At the upper right, the simple silhouette of a white dove of peace or freedom. At the top, a row of short steel angle beams are spray-painted with horizontal dashes of browns and black.
Similarly Simply Masterpieces
Several other works here are similarly simply masterpieces. In “Locked Up Their Minds,” Purvis Young offers his own version of James Ensor’s “Christ’s Entry Into Brussels in 1889.” Young’s large painting on wood shows a group of black figures. Some of the figures have halos. Others are holding up padlocks signifying their freed minds to flocks of angels. Two immense white horses add to the drama. The show’s final piece is Dial’s ironically titled “Victory in Iraq,” a painting from 2004. It hangs just outside the second gallery. Its barbed wire and twisted mesh against a field of fabric defines and holds the space.
The gloomy June coastal overcast was just lifting as I stepped off the bus on Science Hill at the University of California, Santa Cruz(UCSC). The sun was out but a coolness in the air remained. A slight hint of redwood filled the air. Having been on campus numerous times but I hadn’t recalled the loveliness of the fragrance. Enchanting, it was.The collaboration between the artist and the scientist is about to begin learning from guarding chalk to black holes.
Bridge from one side of campus to the other.
The Physics Office
I enjoyed the short walk to Benjamin Lehmann’s office in the Interdisplinary Science Building. I had never been there,but I had been to the nearby Science Library. After arriving a bit early, I took the opportunity to look around the lobby . I snuck a look at the photos of professors and PhD candidates on the wall. As it was finals week, the lobby was busy with a diverse group of students working on their laptops. The days of science being a males only field are over.
Ann Baldwin May 2018, art quilterBenjamin Lehmann, Phd physics studentBen’s office
Ben’s Office-From Guarding Chalk to Black Holes
When Ben arrived, he showed me his office, a small room with 4 desks and a chalkboard. Evidently, physicists resisted the change to white boards. They have been able to continue with chalk and blackboards for their labors. Each grad student guards their special stash of chalk. As a retired elementary school teacher who spent most of her career teaching from a chalk board, I found the practice relatable and charming.
The Search for Common Ground
We began taking baby steps to find common ground to work together. Ben pulled up some images,photos,charts and graphs on his computer that he thought might be a starting point of inspiration. They were incredible shots of space. I prefer my art be more impressionistic rather than photo image perfect. However, I plan on keeping an open mind on this aspect. I may be adjust my opinion for this project. Ben expressed an interest in being an active participant in some of the artwork.The fabric laying techniques easily accessible to newcomers. He would create a scene and I would do the sewing part. The possibility is worth looking forward to.
Learning about Dark Matter
Ben asked what I understood about dark matter. My response pertained to my very limited knowledge of black holes. Ben graciously commented that many words seems similar but have different meanings. As a theorist, he explained that he studies the beginning of the universe by studying particles and their actions right after the Big Bang. Dark matter is matter(solid, liquid, gas)that is all around us but we can’t see it. I thought of wifi. As an educational system, a core part of UCSC curriculum fosters interdisciplinary studies and collaborations as essential to the future work environment. Ben, as one of its students was successful in communicating these difficult ideas. While I understood his explanations, I warned him that I might need to have them repeated again.
Scientists need to Communicate Clearly
The issue of scientists communicating to others is crucial, more now than ever. Explaining complex scientific concepts to people, however educated they my be in their own fields, is a crucial skill. Ben shared that monthly lectures were offered by the Physics Department. At those meetings, different physicists to share their work. He admitted that he sometimes couldn’t totally understand the physicists whose work was in a field of physics different from his own. We must all work to break down the silos of communication.
Creativity -Thinking with an Open Mind
Creativity involves being open to new thinking or trying something new. One must venture forth without knowing what the end process or destination may be. In other words, Ben, theorical physicist and I, art quilter both had a creative day.
Finals Week
As the early afternoon heated up, Ben had to leave to proctor a final exam. I continued to sit on the bench we had found outside inhaling the redwoods until it got too hot. UCSC rightfully holds a place on the list of most beautiful campuses. I thoroughly enjoyed my visit. I undoubtably was the only person relaxed and smiling on that finals week afternoon.
Simply,my art quilts may be abstract, whimsical or impressionistic. Furthermore,inspiration comes from the natural world as well as from Mexican and Native American influences. In addition, materials of choice are redirected fabrics and found objects. They come from the San Francisco Design Center. In addition,art quilts let me to play with color and texture. My technique, Scribble Quilting allows me to create movement on many of my pieces.
A Short Bio
I was born and raised in Palo Alto, California.In high school I studied sewing and clothing construction for two years. Later,I continued to sew much of my wardrobe. As a newlywed, I took my first quilting class at a neighborhood fabric store in Huntington Beach. My husband and I lived and traveled in Europe for a year.Then we moved to Santa Cruz, California in 1980. I continued to sew clothes and make quilts for my family.I stopped counting bed quilts at 300. After teaching 30 years in Watsonville as a bilingual teacher, I retired.
A main motivation of mine besides making stunning art is to reuse materials. Pieces of yarn and decorative threads that some people may discard become unique design elements. I couch (zigzag) them on a strip of fabric, cut them and use as fabric. Yet, sometimes there are decorative threads that one just has to buy. There is one like that in this piece. The ribbon alternates rusty orange and green with 3D native inspired tied knots. Bring Your Bravery! Be Brave!
Choosing Colors- Be Brave!
Choose your color scheme. I recommend three to four colors. Sort hues from light to dark in the same shades. Be brave. Experiment with different colors on your design wall. Don’t be afraid to eliminate fabrics. Start with more material than you think you might need. Include one bright fabric that makes the piece pop.
Creating Details Bring Your Bravery! Be Brave!
Couch (zigzag) decorative threads on 5”wide strips of cotton. Try something new. Bring Your Bravery! Be Brave! Emphasize the art element of line by couching with thread that matches the yarn to make the sewing thread disappear. Double or triple the ply for a thicker line. Repeat four to six times using different colors and types of decorative threads. Couch the decorative threads fairly close together about 1/8-1/4 inch apart. Leave a 1” space on each side of the fabric strip. This gives you flexibility. You can always make it smaller.
Tucks add texture.
Bring Your Bravery! Be Brave! Tucks add texture. Fold a 12” length or longer strip of fabric wrong sides together to create a fold. Stitch 1/8” or 1/4” close to the fold edge. Choose your thread to blend into the fabric or to stand out as a design element. Make 3-5 tucks on the same strip of fabric. Remember to save room for the seam allowance on the sides. Press to lay flat. Cut up the strips into 4”- 8”pieces. Balance their placement on the design wall.
Temporarily Mark your Design Wall
Plan to make your finished artwork about 24”square. Mark with pins the approximate size of your finished piece on the design wall as a guideline. Remember when you are putting fabric on the design wall, the finished product will be smaller. Start with fabric pieces that are a bit larger.
Photo 2 Small strips are being sewn together.
Place the Pieces Randomly
So, you have assembled your own “fabric” with couched decorative threads and tucks. Now it is time to mix those fabrics with others on the design wall. Bravely put the pieces up randomly and start to move the pieces around to see what goes together. What fabrics jump out at you?
Photo 3 Almost all squared up.
Balance the Fabrics
Limit those to an odd number of them. Balance the different fabrics making sure that they are spread out evenly over the top. Beginners might choose to piece their top using straight lines up and down. Placing the pieces on a diagonal adds interest. A diagonal quilt will go past the guideline pins and be trimmed into a rectangular or square.
Show courage. Sew, cut and move fabric around the design wall. Keep cutting and sewing pieces together until it pleases you. The top doesn’t need to be totally finished to start to sew. Sew straight or curved line seams. Continue to sew pieces together into about 8” strips. Pin them to the design wall either in straight lines or on a diagonal. Allow time for this process. Trust yourself.
A “Painful” Time
This can be a “painful” time for an artist, if the piece isn’t coming together as one wishes it would. I find that if I don’t like a part, it gets more interesting after I cut it up and rearrange the pieces. Leave items on the design wall and return later to look at the piece with fresh eyes. Complete sewing the top when you are happy with it. Prepare the quilt sandwich and quilt. Scribble Quilting is fun and adds movement to your piece. Whichever way you quilt your piece, you will have an artful abstract art quilt as testament to your bravery.
About the Author
Ann Baldwin May lives in Santa Cruz, California. In 2012, she retired after teaching elementary school for 36 years. She has won several awards for her work. She participates in the juried Santa Cruz County Open Studios Art Tour from her studio in the Santa Cruz Art Center. May is a member of SAQA( Studio Art Quilter Associates). Contact her at baldwinmay49@yahoo.com or www.annbaldwinmayartquilts.com. Or visit her Etsy shop at annbmayartquilts.etsy.com
Directions for Curved Line Piecing-optional
Lay two pieces of 5” cotton squares on top of each other right sides up on the cutting mat. Cut a slightly curved line through both fabrics with a rotary cutter. There will be four pieces. The top of one fabric will fit the bottom of the other fabric like two puzzles pieces making the original square. Take those two pieces that fit together and sew right sides together with a ¼” seam. Only the part of the fabric going through the foot will line up to a ¼” seam due to the curve. Slightly adjust the top fabric as you move them both through the foot. Press open. This technique is very forgiving. You will be amazed at your curved line. Practice making curves of different widths.
Advice for Beginners
Let each person’s eye see the hues in their own way. Let go of controlling the way the colors mix together. The color of thread changes depending on the color of the fabric that it is sewn on. The color of the fabric is influenced by the color it is next to.
When I started making art quilts, I had a lot of experience sewing clothes and bed quilts. I would think of how a traditional quilter would do something and then I would choose to do it differently.
Consider expanding your stash to include a wider range of shades and hues.
Tips
It is imperative to be cautious with certain aspects of our lives, but cutting up fabric is not one of those times.
Create texture by including fabrics other than 100% cotton. While a variety of fabric adds interest, provide some solid fabrics as a needed resting spot for one’s eyes.
Include a bit of fabric that will pop. Shiny synthetics work well for this.
Supplies and Materials
Rotary blade, cutting matt, design wall(white flannel thumbtacked to the wall) sewing machine, batiks, found threads(decorative threads, yarns, rickrack, colored string, synthetic raffia), a variety of small pieces of cotton fabrics(fat quarter or smaller), fabrics of different textures (optional), thread, batting, cotton backing fabric, scissors, walking foot for quilting.
OCTOBER 13, 2017 BY MARCIA YOUNG (edited for space)
Georgia O’Keeffe and Textiles
First of all,the Peabody Essex Museum presents one of America’s artists in a new light. Georgia O’Keeffe: Art, Image, Style is the first exhibition to place artwork along side of her wardrobe. For example,these textile pieces have never before been shown. Similarly,there will also be photographs of the artist. This unique show is organized by the Brooklyn Museum and guest curator Wanda M. Corn. She is Professor Emerita in Art History at Stanford University. This exhibition is on view at Peabody Essex Museum from December 16, 2017 through April 1, 2018. Then it continues on its national tour.
For more than 70 years, Georgia O’Keeffe shaped her public persona. Above all, she defied labels and carved out a truly progressive, independent life. This was necessary for her to create her art says Austen Barron Bailly. Bailly is the organizing curator. Above all,O’Keeffe dressed as a way to unite her attire, her art, and her home. Fo example,her aesthetic legacy of organic silhouettes, few decorations and restrained color palettes continues to capture the popular imagination. Above all, it inspires leading designers and tastemakers of today.
Georgia O’Keeffe Style
Above all,Georgia O’Keeffe: Art, Image, Style includes 125 works. Furthermore,it examines how the famous artist carefully formed her public image. For example,O’Keeffe considered her clothed body as another canvas for her work,says Bailly. Similarly,the exhibition of O’Keeffe explores how she expressed her identity and artistic values. That is to say,O’Keeffe’s androgynous persona, feminist outlook, stark fashion sense and skill as a seamstress combine to create a new understanding of her role as an artist and an individual.
A Life Long Style
Throughout her life, O’Keeffe had strong opinions about how she wanted to look. It didn’t matter what the dress codes of the era were. O’Keeffe’s distinct aesthetic sensibility started young rebellion against feminine strict roles. In the 1920s and 1930s in New York, her black and white palette dominated much of her art and dress. Later years in New Mexico, her art and clothing changed in response to the Southwestern landscape. O’Keeffe sewed some of the clothes herself. Some clothes were custom made or bought off the rack. Always she consistently favored the simple lines and abstract forms that followed through her artwork and home design.
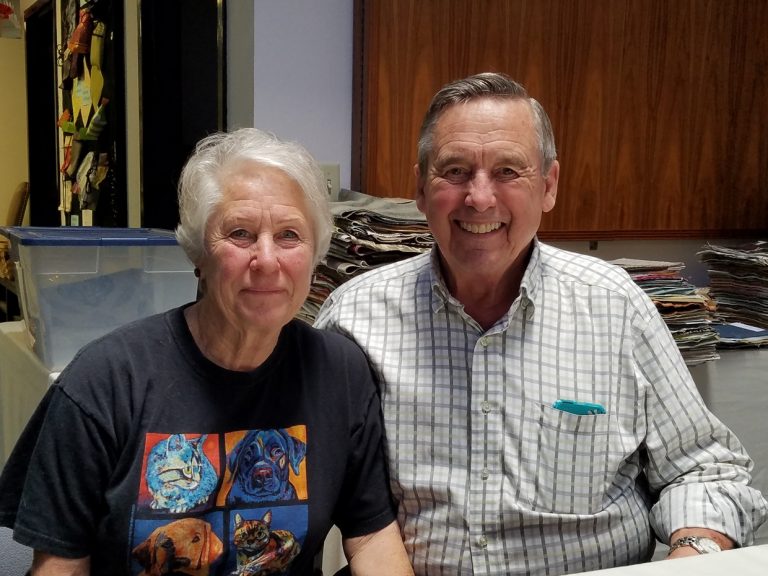
Exactly two years ago I came home with a small stash of beautiful upholstery fabric samples. Little did I know how quickly and profoundly these textiles would change my life! Today I want to tell the amazing story of FabMo, the non-profit organization where I acquired those samples. It is also the inspiring story of how two people can make a difference, its two co-founders, Hannah and Jonathan Cranch. Fabmo reuses fabric and materials.
Hannah and Jonathan CranchHolly Welstein, Hannah and Jonathan Cranch speak with visitors to FABMO
How It All Started for two people to make a difference
A couple of decades ago Hannah and Jonathan Cranch were ordinary people going about their own business. Hannah taught art in Palo Alto primary schools, while Jonathan was a general contractor. They occasionally enjoyed attending seasonal open houses at the Design Center in San Francisco, seeing what was new in the design world. They both enjoyed the refreshments, browsing the beautiful displays and chatting with the salespeople
You are Throwing What Away? Fabmo reuses fabric and materials.
One day, during one such visit, they saw a man toss a big trash bag into the dumpster. The bag tore open, spilling out a bunch of gorgeous fabrics. It turned out that in preparation for the open houses, the showrooms had to make room for newly released fabrics, which meant getting rid of all the discontinued textiles. These exquisite, expensive designer fabrics, which were displayed but never used, were thus headed for the landfill.
Fabmo reuses fabric and materials for an art teacher.
Hannah, as an art teacher, knew her fellow teachers would salivate over such a treasure, so she began the quest to save these resources. She visited showrooms and spoke with key people, asking for some fabrics, and they gradually agreed to give her some. Each time, she returned home with a bag or two full of lustrous samples, which she distributed to Palo Alto teachers.
As she gradually built relationships, the amount of material she acquired began to grow. Soon, she and Jonathan started supplying five school districts, and passed some fabrics on to the Children’s Theater, as well. Fabmo reuses fabric and materials.
When Things Got More Serious
Hannah later learned that someone named Steve was visiting the showrooms every Monday to collect discontinued fabric samples, which were then picked up by a charitable organization run by a group of nuns. One day the charity did not come by to pick up, and so showroom workers asked Hannah, who was fortuitously at the Design Center at that moment, whether she wanted the fabrics. She certainly did! As it turned out, the charity never came back, and Hannah began a weekly pickup from then on. With the sudden increase in quantity, the picture changed dramatically. However, Fabmo still reuses fabric and materials.
Selection at Johnathan and Hannah’s houseSelection at their home
At essentially the same time, in summer 2007, Palo Alto schools closed for the summer. Hannah and Jonathan were unable to distribute the growing amounts of fabrics they were collecting. They published notices on Freecycle, Craigslist and other online venues, and began compiling an email list of interested people. Soon after, they set up five tables in their living room, filled them up with materials, and invited these interested fabric-lovers to come over and pick whatever they wanted. Before long this became a recurring event.
Fabmo reuses fabric and materials at selection events.
Originally, Hannah and Jonathan distributed the materials they gathered. They were the ones deciding what resources to give each school/theater. Once they allowed people to come over to their house and pick on their own, however, they could no longer think of it as “distribution.” They decided to call these “selection events” instead, since patrons got to choose their own treasures.
Running out of Room at their house
At first, their living-room events lasted two days. As the amount of fabrics kept growing, they were extended to three. Soon, the living room wasn’t big enough for everything. Hannah and Jonathan set up yet more tables in their family room.
But the rescued samples kept accumulating. In no time they filled one spare bedroom, then another, until all the bedrooms in the house were full of textiles and other materials. Hannah and Jonathan began holding regular selection events, timing them to open up a guest room as needed.
Fabmo reuses fabric and materials with a growing mailing list.
Their email list, initially limited to about thirty people, kept growing. Before long, some one hundred and seventy people came by every month. Some were hesitant to enter a private house. Others, however, came regularly. Some of the latter offered to help pay for the gas for Hannah’s collection trips to SF, so Hannah and Jonathan put up a donation box to help finance their drives. Then someone offered to help take care of welcoming guests. One day, when Hannah, who was also co-owner of a catering business, was too busy with an event, Jonathan took that woman up on her offer. From then on the Cranches relied more and more on volunteers to help them with the many tasks of gathering, sorting and distributing. They started documenting who came to their house, and, in order to limit crowding, began setting appointments.
How FabMo Was Born
In 2009, after years of making fabrics available from their private house, Jonathan learned that their home insurance would not cover such large gatherings. Although the Cranches distributed everything for free, the insurance considered what they were doing as a business. So they found a small shared space in Palo Alto where they could hold Selection Events, but which had very little room for storage.
Six months later they moved to a bigger warehouse on Old Middlefield Road. Later they added another warehouse.
Selection at Old Middlefield Way
That same year FabMo was born as a public benefit corporation, and in 2010 was granted 501(c)(3) status. FabMo was now officially a non-profit organization! The name FabMo is short for Fabrics and More, as by then the Cranches rescued many different materials. In addition to fabrics, they also saved wallpapers, trims, tiles, leather, carpets and so on.
Another location at Bella Vista
Continual expansion
Since then, FabMo’s activities have continued to expand. Nine years ago, a regular attendee suggested creating an event for people to showcase items they created with FabMo materials, so as to inspire others. That’s how the Holiday Boutique came about. In 2015 FabMo moved into their current location in Mountain View. They regularly hold monthly three-day Selection Events, as well as 8-10 Special Sales a year. Most recently, FABMO has moved one town over to Sunnyvale, California.
In 2014 FabMo started holding regular events in Santa Cruz as well, with an active volunteer and consumer base there. They also hold Selection Events in Vallejo, as well as in different Bay Area Tech Shops. FabMo has a regular presence in at least four fairs every year (MakersFaire, San Mateo County Fair, and two Earth Day Fairs).
FabMo Now
These days, FabMo rescues more than 70 tons of materials every year from Design Centers in San Francisco and San Jose, and from other miscellaneous sources. They make these amazing resources available to creative souls all over the Bay Area and beyond. More than 8,500 people are signed up to their mailing list, with about 300 coming to collect treasures during each Selection Event. Hannah and Jonathan continue to be very involved with the organization relying on an active Board, a growing family of several hundred volunteers, and textile aficionados, who, like themselves, appreciate the creative and environmental impact of this amazing endeavor. People come from Hawaii, the Pacific Northwest, Michigan and beyond to attend, determining their own schedule based on FabMo’s.
FabMo’s dedication
To this day, FabMo distributes fabrics for a suggested donation. It trusts patrons to give what they can to help keep the project running. Costs of maintaining such a business in the Bay Area are sky-high, as are utilities and fuel. Teachers still receive many of the materials for free. FabMo only sells Special Sale materials, but even then for low prices.
serendippity
Hannah and Jonathan didn’t plan any of this. They simply couldn’t stand to see fabulous textiles thrown away and wasted, and before they knew it, FabMo had appeared. What started as a small project of love run by two individuals, turned into a collaborative effort of a creative, eco-friendly community, a family of sorts. But it still remains a not-for-profit project of love.
FabMo’s dedication continues to keep tons of precious resources out of the landfill. It also progressively builds an entire community of like-minded people who care about the environment. Likewise, it encourages the creativity of numerous others. The Cranches certainly changed my life, re-sparking my own long-suppressed creativity.
Now, people from all over the United States are starting to ask how to establish similar organizations. The Cranches even received a few inquiries from overseas. Imagine how many resources could be rescued if every community had a FabMo! Imagine all the creative things people could come up with!
To learn more about FabMo or sign up to their mailing list check out their web page: http://www.fabmo.org/fabmo/Home.htlmYou can also like their Facebook page: https://www.facebook.com/FabMo.
You can learn how one quilt artist uses FABMO materials for her art.
Eli Leon and Lemmy. Photo: Courtesy of Eli Leo Living Trust
Eli Leon Collects Unique Textiles
For 55 years, Oakland psychotherapist Eli Leon collected unusual textiles. Above all,his collection included kitchiana, aprons, vintage clothing, traditional standard quilts, and, most famously, Afro-tradition quilts. On the one hand,he bought most items in California. But he would go on repeated research and collecting trips to East Texas, northern Louisiana, and southern Arkansas.
The Sale of the Unique Collection
This June 23- 25, Geneva and Julie Addison will be selling his collections from his home at 5663 Dover St. in Oakland. Above all,the collections are breathtaking. For instance,they are manifestations of a collector with a sharp eye for acquiring and displaying in his home. Moreover,proceeds from the sale will go towards Leon’s care. See their blog about the sale, with more than 500 photographs. However, his Afro-tradition quilts are not included in this sale.
At my Quirky Berkeley blog, I explored Leon’s life, home and collections. Here is a small bit of the wonderful items that will be for sale this weekend. For example,the first weekend of the sale will deal with the non-textile collections. Then,the traditional quilts and other textiles will be sold later this summer. Further,the sale is first come, first served. Subsequently,it represents a perfect chance to pick up some pre-collected quirky material culture and to honor a great scholar and collector.
Most importantly,Leon’s most famous collection is of African American quilts. However,his trust plans that the collection will be preserved intact by a museum. Furthermore,the collection includes 100 of the traditional American quilts,. Here are a couple photos.
Yellow double wedding ring quiltRed Sampler Quilt
Above all,Leon was a passionate and driven and skilled collector. In addition,I have never seen a better opportunity for buying quirky little things. In other words,visiting Leon’s house will give a glimpse into the world of that driven and talented collector.
Quilt collectionQuilt collection
Tom Dalzell, a labor lawyer, created a website, Quirky Berkeley, to share all the whimsical objects. The site now has more than 8,000 photographs of quirky objects around town.It also includes posts where the 30-year resident muses on what it all means.
Check out the group fiber show at the R. Blitzer Gallery 2017.
Fiber Show at R.Blitzer Gallery 2017
Fiber Reflections:Shared Dimensions will be at the R. Blitzer Gallery. Santa Cruz, CA April 5-28, 2017 Here are some of the participating artists.
Beautiful jacket by Marilou MoschettiMarilou Moschetti fiber piece
Marilou Moschetti, Fiber Show at R.Blitzer Gallery artist
I began creating Nuno felt 15 years ago. It is a technique used to fuse silk and fine Merino wool together. In 2002 I fell in love with the art of felt making during a trip to New Zealand. I teach felt workshops throughout Northern California. I received my Bachelor’s Degree from San Jose State University.
Primarily,Carole Rossi is a quilt & fiber artist. She lives in Sacramento, California with her husband. Creating her art is how she thrives. The fabric, the colors, the textures are her passion.
Long ago,Carole learned to sew from her Italian grandfather. He was an accomplished tailor. Carole is a lawyer specializing in higher education & employment law. Currently, Carole uses piecing techniques to create representational images. her art quilts are based on her photographs of her travels.
Ocean by Carole Rossiby Carole Rossi
Alexandra Sanders,artist at Fiber at R.Blitzer
I am an artist in Santa Cruz, California. I have my Bachelor’s degree in Art from San Jose State University. My emphasis is in Textiles-batik, and silk painting. I choose to paint birds with watercolors.
Egrets by Alexandra SandersTree Batik by Alexndra Sanders
My art quilts may be abstract, whimsical or impressionistic. Inspiration comes from the natural world. Similarly, I am influenced by Mexican and Native American cultures. My materials of choice are redirected fabrics. Art quilts free me to play with color and texture.
Shore to Sky F by Ann Baldwin MayPack Animal by Ann Baldwin May
New stitches can be found by accident. Mistakes can sometimes lead to a wonderful realization or improvement.
Discovering New Stitches by Mistake
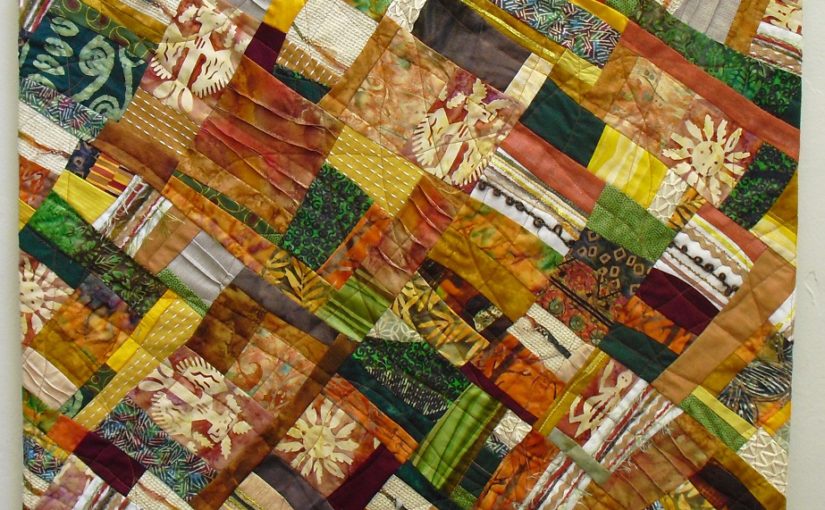
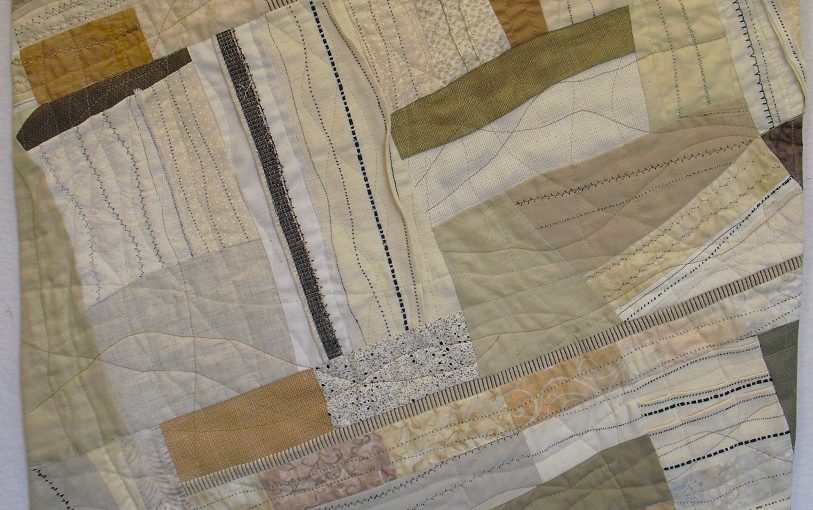
Tranquility, an art quilt with black stitches pulled through to the front before quilting.
The Tension was Off.
Tension is the balance between the top threads and the bottome threads on a sewing machine.A while back my 20 year old Huskavarna Lily was acting up. Out of the blue, the tension would change as I was sewing. The action pulled the bobbin thread through to the front (top) of the fabric. As annoying as this was, I liked the way the stitches looked. I was discovering new stitches quite by accident. Could I repeat the success of this stitch ?
Let me confess, that I am not a person who often uses all of the stitches that are available on my machine. I usually use the zigzag stitch and one or two decorative stitches. I decided to fool around. How could I could use this “accidental stitch ” to my advantage? I wanted to discover new stitches by mistake. Would it be a way to add interest to my art quilts?
Changing the Tension
I changed the tension to 8 or 9 high on my machine. with a black thread in the bobbin. The top thread I used matched the white or beige color of my fabric. At the time, I was doing Native American inspired quilts. Moreover,I felt the black dots on the top somehow seemed to work for me. The maximum contrast drew my attention. I also adjusted the stitch length and width to make them as large as possible for maximum visibility. The results were pleasing.
In conclusion,errors can turn into serendipitous wonders if we keep our minds open to them. In the future, I should be more adventuous to change the tension and adjust more of my machines stitches.