Finding a way to cheat in quilting is a way of letting the fabric do the heavy lifting.Naturally when I suggest a fabric artist to find a way to cheat, I am not suggesting anything illegal. However, I suggest that the background fabric can help you create your art piece. In addition,let the color and design of the fabric add to the work. Fabric collage art brings together smaller pieces to form a unique work of art. Read about background fabric and fabric collage examples.
A whole cloth with a quiltlike pattern known as a cheater cloth.
Cheater Cloth has been available for a long time.
Unbelievably, cheater cloth has been around for longer than you would think. Surprisingly, it appeared as early as 1850. A cheater cloth is a whole piece of cloth printed with usually with a traditional quilt pattern. In other words, it is a short cut for some who wants to quilt quickly. In this way, a person can quilt without having to sew the fabric pieces together. However, to be clear I am not suggesting that one use one of these traditional creater cloths in their art work.
A detail of a cheater cloth that looks like it has hand embroidery sewn on it.
Using Background Fabric to Find a Way to Cheat in Quilting.
Furthermore, it is only in this vein that I call myself a “cheater.” Use background fabric to do the heavy lifting in some pieces. Recently, a fellow artist commented that I had used some paint on an art quilt. Yet in reality it was a piece of fabric that looked like I had painted it. At times I will do the jaywalking of cheating. Select a background fabric that aides in forming depth in your art.
Find a Way to Cheat Yet Make it Your Own.
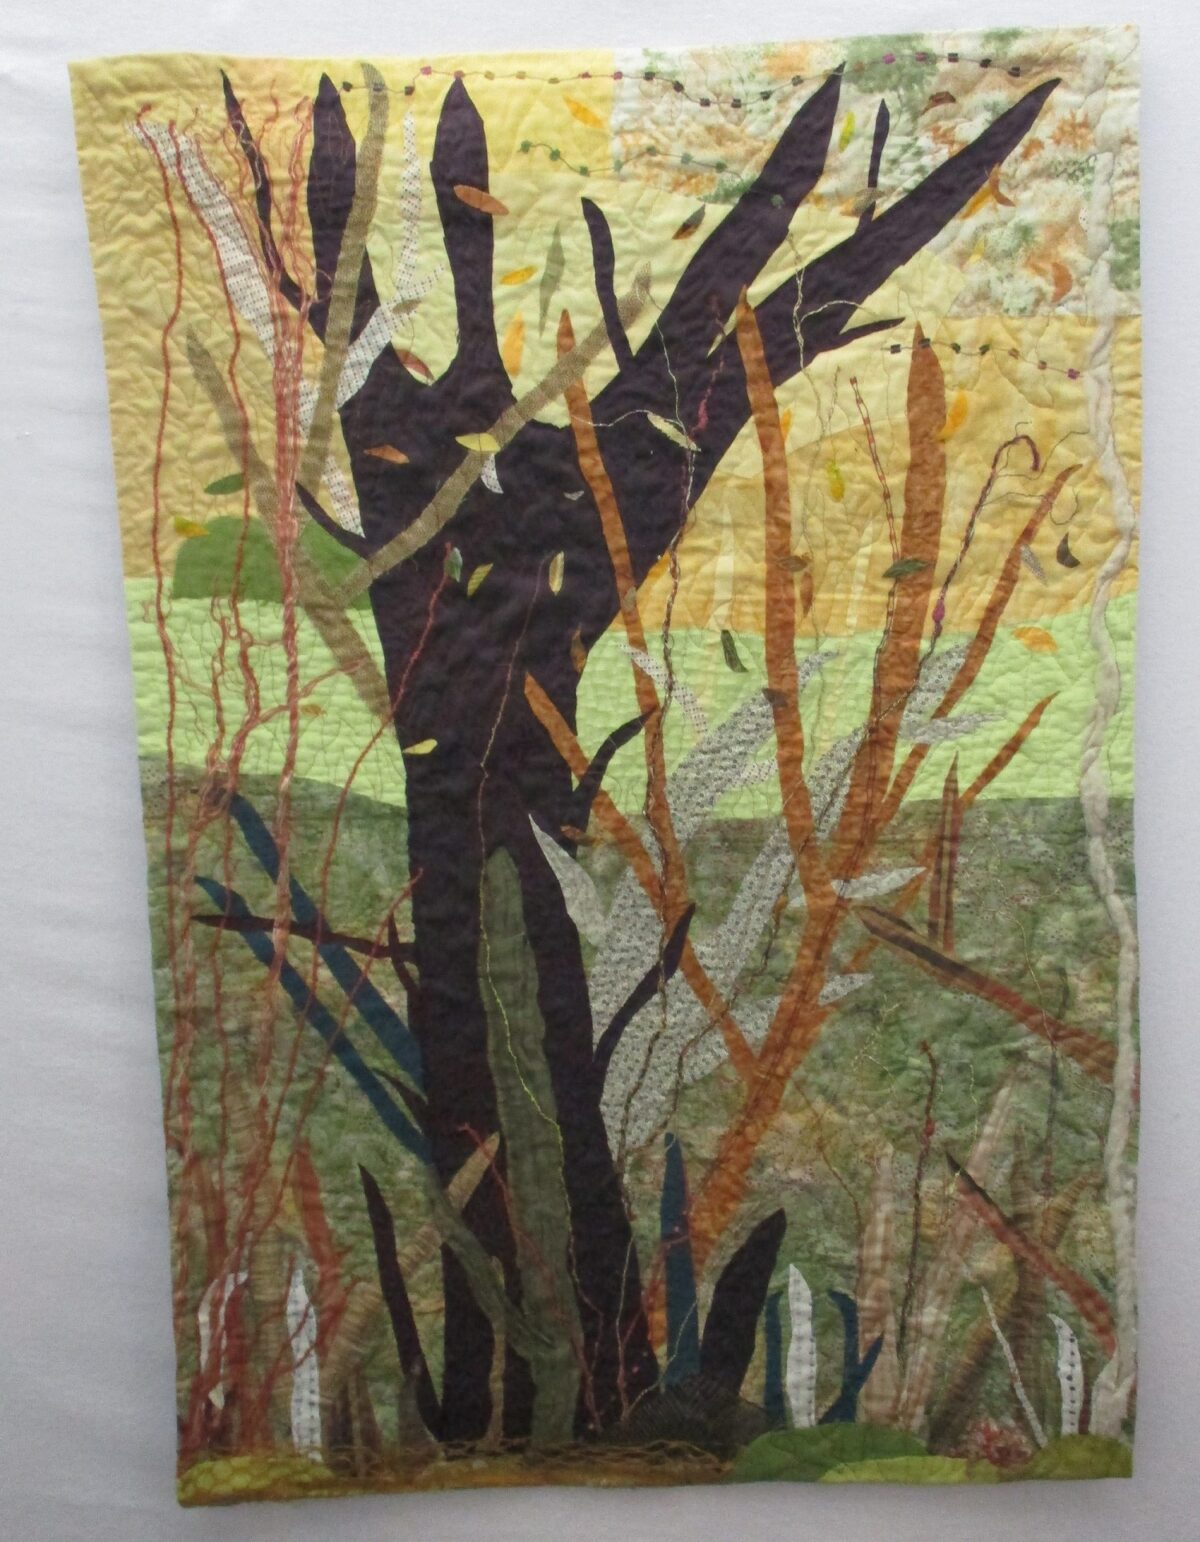
Here is Beach Tree,2021,an art quilt with a multicolored whole cloth as the background.
Beach Tree, 43″ x 29″ 109 cm x 74cm began with a whole piece of fabric with blended blues and greens. Above all,the multi colored background reminds me of the seashore. Because I live in Surf City, this worked for me. Next,I created a magenta tree on top. Then,I added foliage and leaves to create a tree that is uniquely mine. Indeed,this is the type of cheating that I am suggesting. Use a fabric to enhance your art work. Consequently,add to the design to make it your own. Find a way to cheat in quilting legally.
In November Skies, I cut shades of gray, violet and blue clouds to form the background sky. Rocks and plants fill the foreground. Decorative threads imitate birds flying in the distance. Finally, I cut three flying cranes from an Asian inspired piece of fabric. The birds enhance my work with a bit of elegance that I could not have created on my own. I finished the piece by covering with tulle netting. Then I free motion quilted the whole piece.
Moon Over Slough,21″ x 21″ 53 cm x 53cm uses a multicolored fabric for the background to create layers in the landscape. The moon,slough plants and rocks finish the landscape. The impressionistic lines reach out to the viewer. Are they mountains? water? or sand? The viewer becomes involved in making their own mind up about the piece.
Kelp Dwellers,2018
Kelp Dwellers, 25″ x 25″ 63 cm x 63cm started with a discontinued abstract multicolored sheer fabric sample. There is so much diversity of fauna,flora and movement under the water. Any fish that I cut out can probably be found under the water. I call these pieces Underwater Fantasies because accuracy is not the goal. Sheer and reflective fabrics help to create a sense of wonder.
My Background Fabric
detail of Overlook,35″ x 26″ 89 cm x 66cm,2018
Sometimes I cheat with my own work. The sky background is a piece of cloth I dyed in an indigo class. Actually the fabric is the piece that I used to wrap up my work during the process. In this landscape art quilt,Overlook, it worked to create a cloud filled sky as the backdrop to my tree and owl on a hillside.
Adding Little People
The designers of fabric works hard to create interesting designs. There are so many designs to choose from. This is what encourages the public to buy so much fabric. The designs may be of people, birds, or animals. Those of use who are not strong in drawing can cut out a picture from the fabric. Use it in a fabric collage or art quilt. This is a legal way to use someone else’s work.
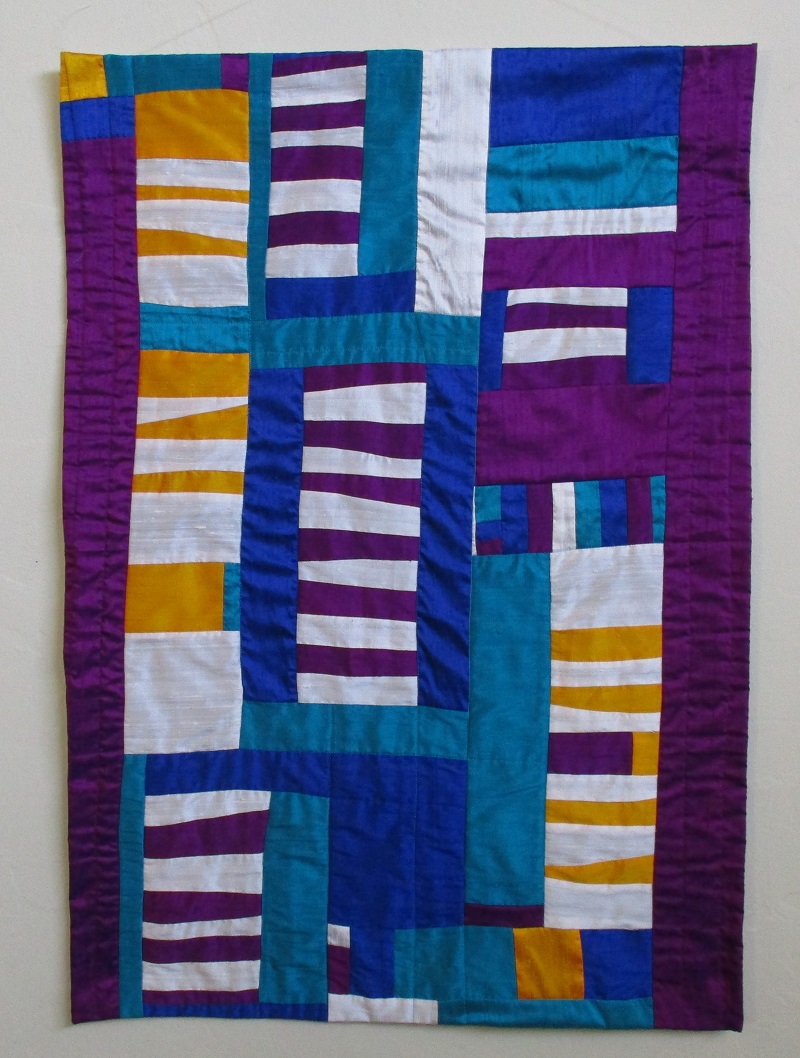
Here are a couple of whimsical fabric collages that I made at the beginning of my art quilt career. Without the charming fabric of the little people and the bright colors, the effect wouldn’t be the same.
Teaching, the Toughest Job You’ll Ever Love 1, 2012
This art quilt,Teaching, the Toughest Job You’ll Ever Love 1, 48″ x 43″ 122 cm x 109cm is a fabric collage of brightly colored child friendly fabrics. Some small pieces of fabric are fused on. I added 3D flowers, a golden heart and 3D stars to the quilt top. The lettering is bias tape.
Teaching, the Toughest Job You’ll Ever Love 2, 2013
Furthermore, I had so much fun creating the first piece I decided to create another.This art quilt,Teaching, the Toughest Job You’ll Ever Love 2 is a bit smaller, 27″ x 26″ 69cm x 66cm. Yet, I again used fused pieces and 3D objects added the pieced fabric top.
In Conclusion
It is my hope that you will become inspired to try these techniques. They are another skill to add to your toolkit. Creating a unique piece of artwork that could only be yours is the goal.
Above all,I usually get my materials from FABMO, a nonprofit that gathers materials weekly from the San Francisco Design Center. fabmo.org Then they make the materials available to the public to keep them out of the landfill. Furthermore,these materials are new, high end , high quality fabrics. For example,linen, silk and other unique fabrics are readily available. Most importantly,these fabrics cannot be found in regular fabric stores. It is a win-win situation.
More recently, people have been giving me fabric.Thy know that I will put good use to it. Sometimes it is just a few yards and sometimes it can be more.When a loved one who sewed passes, they may leave behind a lot of fabric. This year I was gifted a lot of fabric in this category. I keep the pieces I think I might use and pass on the rest to others who may use it.
Frequently Asked Questions about Inspiration
What motivates you? Using fabrics and materials sustainably motivates me. I rarely throw anything out.
Where do you get your inspiration/ideas from? My inspiration comes from how the materials play with one another. I usually decide ahead of time which portfolio I will make next. It could be abstract, nature, or Mexican inspired.
Frequently Asked Questions about Time
How long have you been sewing or quilting? In high school,I took two years of sewing. Then I continued sewing. In the 1970s,I took my first quilting class at a neighborhood fabric store. I stopped counting my bed quilts at 300. Then around 2008, I began making art quilts.
Doesn’t it take a long time to make a quilt ?
Yes, it does. But I used to think about writing a book. A quilt doesn’t take as long as that.
Sewing Questions
What kind of a machine do you use? Above all,my machine is a computerized Lily Husquavara.
Do you sew by hand? For instance,I hand sew my sleeves or fabric tubes. Furthermore,art quilts with facings are handsewn to the back. Moreover, most of my quilts are done by machine. On the other hand,I do sew small details or found objects on my art quilts. by hand. However, the majority of my work is machine pieced and machine quilted.
Do you sew clothes? In short,I rarely sew my own clothes anymore. In the same vein,I do not sew clothes for others.
Other Questions
Do you do memory quilts? I do make memory quilts. People give me or send me the clothes from their loved one. We work together to decide on a style that will work for the client. I have made wall art and traditional and non traditonal lap quilts from the clothes. As the work progresses, I send photos to keep the client informed of progress.
Do you teach classes? All in all,no, I don’t teach classes. However,post COVID I have starting a mentoring project. A more personal 1 on 1 situation based on what skills the student would like to learn or what direction they would like their sewing,quilting or art career to go.
Have you been to Paducah, Kentucky, home of the National Quilt Museum? No.
First of all,trees in art quilts are my most popular pieces.Everyone loves trees. Above all,everyone can relate to the shape and various colors of trucks and leaves. Vacant Lot, is an early example of one of my tree art quilts. Furthermore,five of my art quilt trees hang in local Santa Cruz County Kaiser Permanente Medical facilities.
Tree Friendly Town
I live in a tree friendly town. That is to say that Santa Cruz, California is part of the Tree City USA program. My county is full of fruit tree orchards as well as redwoods. Furthermore,the Spanish explorers saw their first redwood tree in Santa Cruz County. In addition, California’s first state park, Big Basin is also in my county. That is a lot of trees for the second smallest county in California.
Of course,many locales are tree friendly places even if they not they are enrolled in the national urban tree program. We can all relate to trees and leaves; the forms they take and the shapes they make. Creating trees lets me explore and expand my use of texture, color, and movement. Let me take this opportuntity to share my love of trees.
Adding Color
Young children and other people know what color a tree should be. We understand the general shape of a tree including the wide variety of sizes and forms. Adjust the color of a tree to an unnatural color. Our brains will still recognize that it as a tree. This is what makes it fun for an artist.
Palo Colorado,34″ x 32″ 86cm x 81cm
Red and White Challenge
In 2013, my local quilting guild had a Red and White Challenge. Participants receive certain fabrics that must be used. Notice the red and white polka dot fabric. Additional fabrics and details were encouraged. I placed the red tree, Palo Colorado on a background of various pieced white fabrics with red hand stitching for accents.
Along the Path,34″ h x 22″ 86cm x 56cm
Teal colored tree trunk and branches ? Not so common,nor are violet branches. I have received such a positive response from the movement of leaves extending beyond the edges of the art quilt that I have continued to do that.
At the Edge of the Grove,29″h x 26″ 74cm x 66cm
What could be more fun than orange branches!
Tree Along Creek,32″ x 27″ 81 cm x 69cm
This tree along the creek has pale colored branches with bluish green tint from couched yarns and decorative threads. The pop of medium green comes from a piece of dress fabric from the 1940s.
Adding Texture
Celebrating Fall has branches made from a highly textured yet, loosely woven fabric. I couched decorative threads are on top of the fabric to add more interest. This same couching technique is also visible in Tree Along Creek and At the Edge of the Grove.
Celebrating Fall,33″ x 31″ 84cm x 79cm
Adding Movement
In Looking up at Dusk,flying leaves and twigs are carried along by the wind. While creating this piece, I actually toss some pieces onto the quilt top. Great fun! Great serenpidity!
Looking up at Dusk,31″ x 24″ 79cm x 61cmOverlook,35″ x 26″ 88cm x66cm
In Overlook, I choose a green and white patterned fabric for the trunk and branches. I couched decorative threads and yarn to the fabric before cutting out the shape of the tree. The white spaces on the fabric create movement. The curvy line quilting in the sky also adds action. The sky fabric is from an indigo dying class. Can you see the clouds moving across the sky?
Conclusion
My art is all about Color! Texture! and Movement! Tree art quilts are a perfect theme for me to showcase this mantra. Repurposed decorative threads and yarns are a natural fit as well to add more texture and movement.
Learn how to make a fabric landscape collage quilt using the fabric layering technique. In general, this art form is accessible to all skill levels of art quilts.
Make a Fabric Landscape Collage Quilt
Introduction
In this post you will learn how I make a fabric landscape collage quilt. Basically,the fabric collage is covered with tulle netting and then, free motion quilted together.
Free motion quilting is a high level quilt skill. Before I learned about fabric layering, I had almost given up on perfecting my skills at it. Yet, I found the fabric layering technique very forgiving for practicing free motion quilting. It became a great way for me to advance my skill level of this technique . Try it. Maybe it will help you too.
Topics Covered
How to create a fabric landscape collage art quilt
Follow a step by step procedure
Seascapes- Underwater Fantasies!
Trees with Color! Texture! Movement!
How to free motion quilt successfully!
Conclusion
How to create a Fabric Landscape Collage Art Quilt
The fabric layering technique uses a table rather than a design wall to design. First, I create a scene. Next I cover it with tulle netting. Then I free motion sew the three layers(back, batting,top) together.I use this technique for my Nature portfolio; landscapes,seacapes, mountains,and trees. I prefer to create a more impressionistic scene than realistic view.
Many beginners are encouraged to find a photo that they like in order to copy it for their first fabric collage. A photo to copy may be helpful at the beginning stages. As my artist career advances, I find a photo more restricting than freeing. My art is all about color, texture, and movement. To me copying a photo creates a flat rendition of the scene. That is not the effect that what I am going for.
First Steps
To begin, I choose the fabric that will create the background. Fore most, I prefer to choose a fabric with some dimension already on it, ie. light and dark spaces. For example, if I choose a dark background, then I will choose lighter colored materials for my plants, fish, rocks and other items . On the other hand, if I choose a lighter background, then I will choose darker colored scenery.
In this photo, the quilt sandwich is ready. Choose the backing fabric. Place it on a table. Cover it with batting, the soft center part of a quilt. Place the background fabric on top. Iron each layer so that they will lie flat.
step 1 Begin with a quilt sandwich; back fabric, batting and background fabric
Step 1
First, the back fabric is flat on the table. Next, a piece of batting is laid on top of that. Clearly, you can see the white batting hanging a bit over the edge. Then I laid a piece of moddled commercial fabric on top. The piece is about 14″ by 14″36 cm x36 cm. I let the fabric’s different shades of coloring do part of the work in creating interest and depth in the piece. Finally, I lightly baste the layers together with an Avery glue stick.
step 2
Step 2
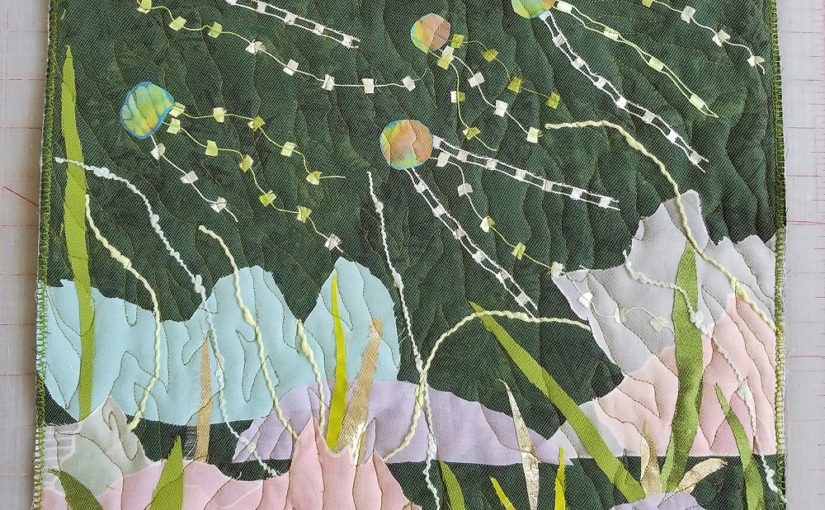
Next, I cut out light colored rocks. I placed them in the foreground. Then I cut out irregularly shaped dots of different colored batik fabric for the jellies,or jelly fish. I place the jellies as if they are swimming in the current.
step 3 Add plants with fabric and decorative threads
Step 3-
Next, I cut out plants and place them between the rocks. Next, I add decorative threads for the tenacles of the jellies. Adjust the decorative threads so that it looks like the water is moving them. After that when everything is in its place, I baste the pieces in place with a tiny dab of glue. I use a long pin to place the smallest spot of glue under the fabric. This helps me keep the dot of glue small.
step 4 Cover with tulle netting and pin down.
Step 4
Next I cover the scene with tulle netting. Then I pin the tulle in place. The tulle is really hard to see in this photo. Similarly, it usually appears almost invisible when the piece is finished. I am not fussy about the color of the tulle that I use. A black tulle will add a muted tone to your piece. A lighter color like white becomes more invisible in the final piece. Some tulle now comes with sparkles. This works especially well for water scenes. The sunlight seems to reflect off of the water!
step 5 Started free motion quilting.
Step 5
Next, I free motion quilt the three layers together. The first step is to lower the feed dogs on my machine. Primarily, this allows me to move the piece smoothly however I want. The quilting creates another level of movement. If the feed dogs( the little metal teeth) on your machine aren’t adjustable, cover them with a plastic attachment to free motion quilt. Tightly hold the edges of the quilt taut and smooth while quilting. I like to create plants moving in the water with my quilting. However, you may choose whatever you like.
The art quilt is completed.
Step 6
Finally, I finish the piece by zigzagging the edges twice. However, for larger pieces, I prefer sew a facing to the front and turn then turn the facing to the back. Then I hand stitch it down.
Finally, here is a photo of the back of the piece. The machine stitching is easily viewed.
It is easier to see the quilting from the back.
Seascapes
Seascapes are basically a variation on landscapes but underwater. My seascapes are often underwater fantasies of marine life and plants.
Above all, marine life is front and center in my home town of Santa Cruz, California. For example, this is where three young princes of Hawaii first surfed in North America on July 19, 1885 on large redwood boards. In addition, Santa Cruz is at the top of the Monterey Bay with the world class aquarium just an hour away. The area is also home several national marine research facilities. Surf City, U.S.A takes its marine life seriously.
Art ranks High too.
On the other hand, Santa Cruz is also listed as fifth in the nation as an artistic destination. That is to say that many artists live in the county. That is to say that marine life and art come together in this newer genre of art quilts. Come be inspired to try it yourself!
A Visit to the Monterey Bay Aquarium
When I first started making marine life art quilts, I visited the Monterey Bay Aquarium. In other words, I wanted to observe the fish. What do their mouths look like? What shapes are their tails? My intention was to create a accurate picture of the sea life. However, that idea went out the window very quickly. In conclusion, there is no one way that a fish’s mouth looks. The variety of shapes and forms is endless. My underwater fantasy portfolio was born. In addition, I was free to create an animal in any way I wanted because there was probably a fish that looked that way somewhere.
Deep Blue Sea 37″ x 24″ 2020 $2100.
Sea Dragons at the Aquarium
Similarly, I saw my first sea dragon at the Monterey Bay Aquarium. I couldn’t believe my eyes. Was that a plant? Was that an animal? It was impossible to tell. I was fascinated. Ever since that day, I have been incorporating sea dragons into my art.
Technically, sea dragons are cousins to the sea horse. What? It is hard to believe. Sadly for us humans, the sea dragon display is not longer at the aquarium. Happily for the sea dragons, they have been returned to their natural habitat in the waters of the Monterey Bay Marine Sanctuary. However, these fascinating animals may be on display at another aquarium.
I incorporate color, texture and movement into my art quilts while using the fabric layering technique.Plants and animals may stand out or barely be seen depending on their color. In the same way, lots of thick decorative threads add texture and life to the underwater rocks. In addition, in Sea Dragons in the Golden Kelp, I created the animals by thread painting on Sulky water soluble fabric stabilizer. This thread painting technique creates lacy and leafy animals. Free motion quilting adds movement by creating plant life that seems to move with the currents. Use one’s imagination to see animals among the plants.
Violet Seascape 33″ x26″ 2020 $2100.
Furthermore, underwater fantasies lend themselves to the use of sheer fabrics. Who knows what shadowy beings are lurking in the depths? Shiny, reflective fabrics cut into the shapes of fish and marine life add a dimension that often only becomes visible is a certain light. What a surprise! What fun!
Large Spotted Fish 15″ x 15″
Trees
Furthermore,I use this technique often to create some of my most favorite art quilts highlighting trees.
Vacant Lot 43″ x 31″
First of all, trees in art quilts are my most popular pieces. Above all, everyone can relate to the shape and various colors of trucks and leaves. Vacant Lot, is an early example of one of my tree art quilts. Furthermore, five of my art quilt trees hang permanently in local Santa Cruz County Kaiser Permanente Medical facilities.
Tree Friendly Town
I live in a tree friendly town. That is to say that Santa Cruz, California is part of the Tree City USA program. My county is full of fruit tree orchards as well as redwoods. Furthermore, the Spanish explorers saw their first redwood tree in Santa Cruz County. In addition, California’s first state park, Big Basin is also in my county. That is a lot of trees for the second smallest county in California.
Of course, many locales are tree friendly places even if they not they are enrolled in the national urban tree program. We can all relate to trees and leaves; the forms they take and the shapes they make. Creating trees lets me explore and expand my use of texture, color, and movement. Let me take this opportuntity to share my love of trees.
Use of Color
Young children and other people know what color a tree should be. We understand the general shape of a tree including the wide variety of sizes and forms. Change the color of a tree to an unnatural color. Our brains will still recognize that it as a tree. This is what makes it fun for an artist.
Teal colored tree trunk and branches ? Not so common nor are violet branches. I have received such a positive response from the movement of leaves extending beyond the edges of the art quilt that I have continued to do that.
Along the Path 34″ x 22″ soldAt the Edge of the Grove
29″ x 26″
What could be more fun than orange branches!
Tree Along Creek 32″ x 27″
This tree along the creek has pale colored branches with bluish green tint from couched yarns and decorative threads. The pop of medium green comes from a piece of dress fabric from the 1940s.
Adding Texture
Celebrating Fall has branches made from a highly textured yet, loosely woven fabric. I couched decorative threads are on top of the fabric to add more interest. This same couching technique is also visible in Tree Along Creek and At the Edge of the Grove.
Celebrating Fall 33″ x 31″ 2019
Adding Movement
In Looking up at Dusk,flying leaves and twigs are carried along by the wind. While creating this piece, I actually toss some pieces onto the quilt top. Great fun! Great serenpidity!
Looking up at Dusk,31″ x 24″ 2017Overlook 35″ x 26″ 2018
In Overlook, I choose a green and white patterned fabric for the trunk and branches. I couched (zigzagged)decorative threads and yarn to the fabric before cutting out the shape of the tree. The white spaces on the fabric create movement. The curvy line quilting in the sky also adds action. The sky fabric is from an indigo dying class. Can you see the clouds moving across the sky?
How to Free Motion Quilt Successfully!
Free motion quilting is an advanced quilting technique. Free motion quilting is when the quilter is in charge of moving the quilt instead of the machine. Here are a few easy tricks for success.
You must be able to lower the feed dogs on your sewing machine. The feed dogs are the little metal teeth that help move the fabric through the machine. If your older machine doesn’t allow for this. The feed dogs may be covered with a plastic attachment.
Use a darning foot while quilting attach photo.
While free motion quilting, the quilter moves the fabric. While stitching the throttleusually used by your foot pedal , goes quickly and your hands move the fabric slowly. Remember ,the mantra is fast feet, slow hands.
Use Aurifil 50 wt. thread is by far the best thread to use for free motion quilting. It is strong and thin. It is available in many colors at better quilting shops. While it seems expensive, there is really a lot of thread on the spool. I once pieced and quilted a king size bed quilt using only 1 spool of thread. This product will give you the best result for free motion quilting.
Practice your skill. In order for the stitches to be the same size, practice moving the fabric slowly while making the foot pedal throttle go quickly. This skill is not difficult but it does take practice.
Conclusion
Fabric landscape and seascape fabric collages are a fun and exciting new art form. People of all ages may begin their art exploration with them. They are a forgiving way to practice fee motion quilting. They let me explore my love of Color! Texture! Movement! while using of redirected materials. A win-win situation.
The fabric layering technique of making art quilts uses a table rather than a design wall. In short, I create a scene and then cover it with tulle netting and free motion quilt the three layers(back, batting,top) together. I use this technique for my Nature portfolio; underwater fantasies, trees, landscapes. The photos in this post are of an underwater fantasy, more impressionistic than realistic.
To Begin
To begin, I choose the top fabric. I prefer to choose a fabric with some dimension already on it, light and dark spaces. If I choose a dark background, then I will choose lighter colored materials for my plants, fish, rocks and other items . If I choose a lighter background, then I will choose darker color to create the scenery.
Step 1
The back fabric is flat on the table. A piece of batting is laid on top of that. You can see the white batting hanging a bit over the edge. Then I laid a piece of moddled commercial fabric on top. The piece is about 14″ by 14″. I let the fabric’s different shades of coloring do part of the work in creating interest and depth in the piece. I lightly baste the layers together with an Avery glue stick.
step 1 in fabric layering technique for making art quilts
Step 2
For this piece, I cut out light colored rocks and placed them in the foreground. I cut out irregularly shaped dots of different colored batik fabric for the jellies(formerly called jelly fish). I place the jellies as if they are swimming in the current. An art trick or rule is to have an odd number of items, three, five or nine objects.
step 2 in fabric layering technique another look
Step 3
Next, I cut out plants and place them between the rocks. I add decorative threads for the tenacles of the jellies being aware of the movement of the water. When everything is in its place,I baste the pieces in place with a light dab of glue. One can use different brands of glue. Test before hand that the glue does not discolor the fabric and make a mark after it has dried.
Step 4
Next, I cover the scene with tulle netting and pin the tulle in place.
step 4 in fabric layering technique another look for making art quilts
Step 5
Then,I free motion quilt the three layers together. I lower the feed dogs on my machine to allow me to move the piece however I want. The quilting creates another level of movement.
step 5 in fabric layering technique another look for making art quilts
Step 6
I finish the piece by zigzagging the edges twice. For larger pieces, I often attach a facing and turn it to the back and stitch by hand.
step 6 in fabric layering technique another look for making art quilts
Here is a photo of the back of the piece where you can see the machine stitching easier.
Free motion quilting is at the apex of skill for quilters. The technique takes a lot of practice to master. Before I took Meri Vahl’s class, I had been practicing. To be honest, I was so frustrated that I had almost decided to give up. Luckily, I didn’t. The fabric layering technique is a forgiving way to practice the skill. I highly recommend it.
Here are my suggestions for success in free motion quilting.
Use Aurifil brand thread. It can be found in fine quilting shops or online. It is totally worth the higher price. The thread is strong yet thin. I once pieced and quilted a double sized bed quilt using only one spool.
Aurifil thread 50wt
“Fast feet, slow hands.” This is the mantra for free motion quilting. This means that one pushes the pedal of their machine so that the throttle goes quickly. With the feed dogs down, the quilter slowly moves the quilt with her hands. This does take a fair amount of practice.Practice using the fabric layering technique. Begin by outlining your figures with the free motion quilting.
Have fun practicing with this technique! Let me know how it goes for you! I hope you have as much fun as I do using this technique.