Designing and Inspiration is a process that in part requires opening one’s mind to new ideas and ways of creating. These posts may be of interest to those who design in many genres.
My art quilts are all about the quilt artist creating abstract, whimsical or impressionistic pieces. Inspiration comes from the natural world as well as from Mexican and Native American influences. My materials of choice are often redirected fabrics from the San Francisco Design Center and found objects. Art quilts free me to play with color and texture. My technique, Scribble Quilting allows me to create movement on many of my pieces.
TWO INSPIRATIONAL ARTISTS
I owe some of my inspiration to two artists from Santa Cruz County, California. Meri Vahl, an award winning art quilter has been recognized nationally for her work. Teacher of the fabric layering technique, she was patient. Understanding that each student brought individual strengths, weaknesses and abilities. Ellen edith;friend, art quilter, fabric designer and artist extraordinaire made whimsical, personal quilts. Her influence lives on well beyond her life. I have great appreciation for these two local leaders of the art quilt world.
SAQA (STUDIO ART QUILT ASSOCIATES)
I am proud to be part of an evergrowing group of art quilters. SAQA started by Yvonne Porcella in Northern California in 1989. It has grown to an international organization. Art quilters have transformed the quilt into a 21st Century art form. I continue to explore new forms and ways of working with unusual materials on this journey.
ABOUT THE ARTIST,BIO
I was born and raised in Palo Alto, California. In high school I studied sewing and clothing construction for two years. I continued to sew much of my wardrobe. In 1974,I took my first quilting class at a neighborhood fabric store. Over the years, I continued to sew clothes and make quilts for my family. I stopped counting bed quilts at 300. After teaching 30 years in Watsonville as a bilingual teacher, I retired to spend more time on creating art quilts.
MY FIRST ART QUILT
Homage to a Dancer,45″ x 56″
In 2008, I made my first art quilt, Homage to a Dancer. It reflects my participation in Los Méxicas,the University of California,Santa Cruz ballet folklórico group.
A STUDIO IN THE ART CENTER
In May of 2016, I opened a studio in the Santa Cruz Art Center, 1001 Center St. Downtown Santa Cruz. I have space to work and display my work. For First Fridays and Open Studios, I fill the lobby with art. In June, 2019 New York Art Center accepted my work into their gallery. 7 Franklin Place, TRIBECA, New York City.
AWARD WINNING ARTIST
Great Blue Heron at Dusk,31″ x 25″
Great Blue Heron at Dusk entered into an art show in 2010. The following year it won a merit award at the Olive Hyde Art Gallery in Fremont,California.
In 2013, Visions of New Mexico won third place in the Neo Membreno Vessels 2013 Show at the Western New Mexico University Museum in Silver City, New Mexico.
What is quilting? Quilting can be several things. A basic definition is the sewing together of two or three layers of fabric either for a practical purpose or a solely artistic purpose. What if a person cuts up fabric and sews it back together to make the top of a bed covering? Yes is the answer.
Who is a Quilter?
Are you a quilter if you only sew or piece the top together and then have another person do the quilting? Yes. When I started, I only did that part. I worried that I could not call myself a quilter when I really only pieced the top together. Another person quilted the three layers, the top, the batting and the back, together. It turns out that I was wrong. Even back then,I was a quilter.
Acceptance of Many
The quilting world and the art quilt world both accept people as quilters whether or not they actually sew the three layers together. Some have the luxury of sending their tops to a person with a long arm machine or another person to complete that part of the process. Let’s just make sure that they are given credit for their contribution.Words are funny that way, confusing at times and not even close to the reality. No wonder there is so much misunderstanding in the world.
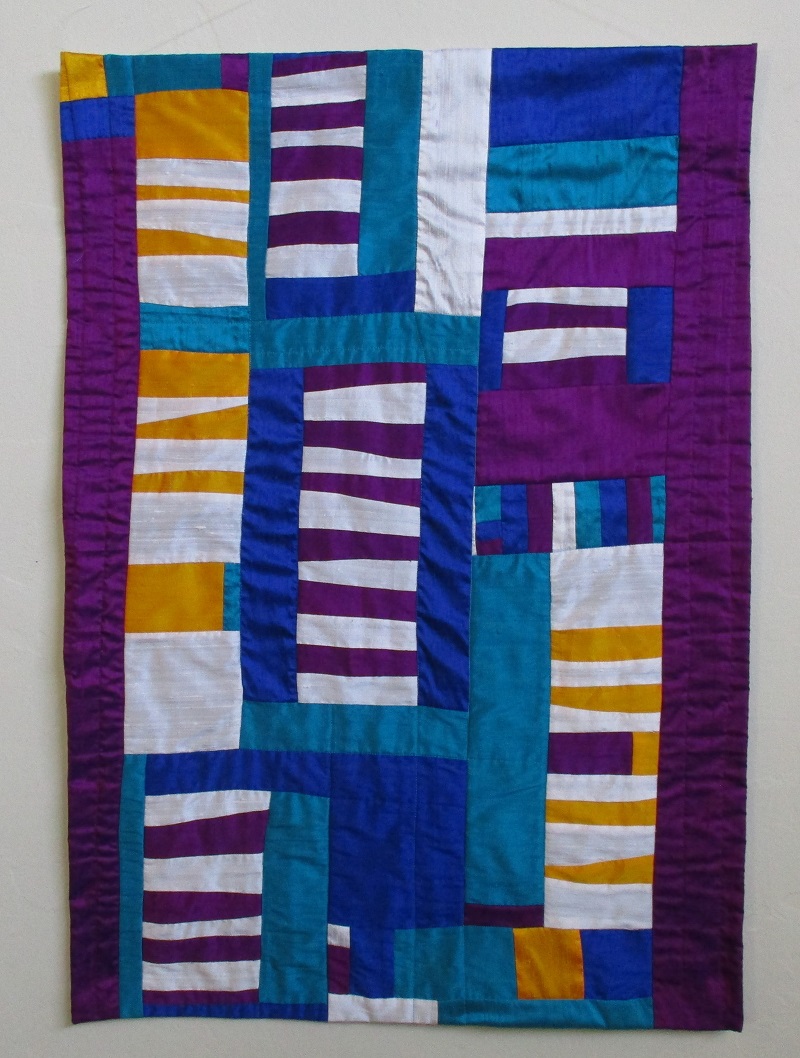
Poppin’ Back, 23″ x 22″
How to Complete
I recently completed two abstract art pieces. Poppin’Back used bright yellows, purples,magentas contrasting with white pieces of fabric. The fabrics were cotton. When it was time to sew the three layers together, I didn’t stop to think. I forged ahead, quilting the usual way I often do, moving the quilt from side to side to create wavy lines . This creates another level of movement that I adds to the art piece.
Smilin’ 33″ x 24″
The Second Piece
The second piece,Smilin’ was completely made from dipioni silk in bright contrasting colors with curved line piecing.I loved the bright colors and shapes. What would quilting lines add to the stunning colors? I decided that they wouldn’t add much.
Yet, the 3 layers layers of fabric needed to be attached. Stitching in the Ditch which means quilting in the seams solved the issue for me. Many art quilters would expertly sew 1/4″ lines to fill spaces. Giving myself permission to do something differently,I listened to what I felt the piece needed. I am happy with the final product.
Conclusion
Consider what is quilting brings to an art piece? Does it add an important element like movement or color to the piece? Is it necessary? Each art piece is unique. It deserves its own consideration on how to quilt it. These are decisions that only the artist can make. It is one of the artistic decisions that the artists must make. My plan is to pay attention and listen to the art more in the future.
See more art quilts at the Studio Art Quilt Associates’ website. https://www.saqa.com/
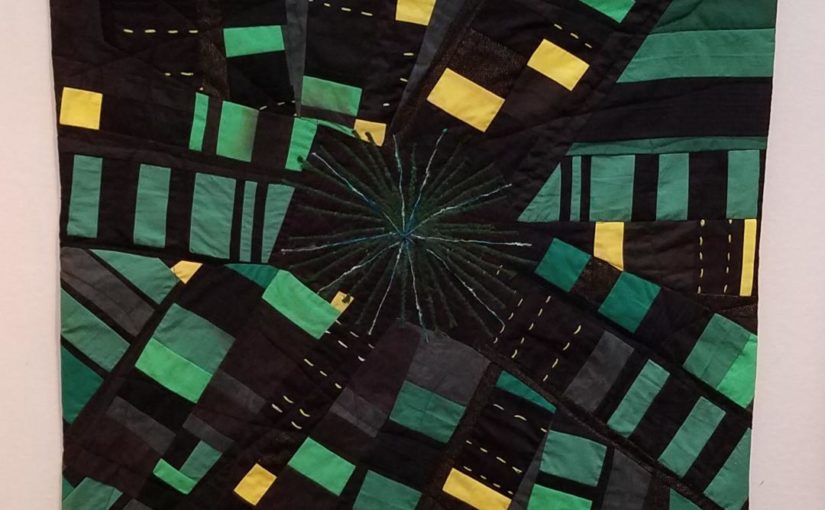
Not too long ago,I participated in an art and physics collaboration. As a result I created this green, yellow and black art quilt,ATLAS at CERN based on the colors from CERN. Inspired by this abstract piece I wanted to attempt something similar in a different color wave. So I choose to use the colors of black, white and rose for my next scientifically inspired art quilt.
A Scientifically Inspired Art Quilt
ATLAS at CERN, scientifically inspired art quilt
Creating Details
First, I go through my materials to find the appropriate colors of fabrics and items for the color wave I have chosen for my scientifically inspired art quilt.
Next, I think what I want to make to add texture or interest. This is when I begin to think about the whole quilting process and the order that I need to follow. I knew that I wanted to use a beaded necklace with a bit of pink. But I would have to wait until the quilt top was completed to actually sew it in place. Otherwise quilting the top would be a problem; the beads wouldn’t go through my machine. Moreover, I didn’t want to wreck the beads in the process. Hand sewing of the necklace would have to wait until the whole piece was sewn together. Yet, I would still have to keep the location of the necklace in mind as I worked.
Other Details
Continuing with other details,I found a repurposed zipper in just the right color. I created a starburst mirroring the actual scientific view after the splitting of atoms. Then, I chose rose colored embroidery threads to couch (zigzagg) with matching colored thread. I also couched several different decorative threads and a piece of stretchy webbing onto black pieces of fabric to create a pleasant contrast. A running stitch of rose colored embroidery threads through black fabric was also made. Lastly, I created a black 3D fabric flower to adorn a rose colored piece of fabric.
ATLAS in Rose selecting fabrics
A Scientifically Inspired Art Quilt On the Design Wall
I like to choose fabrics with movement. It was serenditious to find so many black and white fabrics with circles and dots that lent themselves well to ascientifically inspired art quilt. These would go well with the oval placement in the center of the beaded necklace. The black and white stripes contrasted geometrically. I created further stripes by couching black decorative threads and black ribbon on white fabric. I used black sewing thread for low or no contrast.
ATLAS in Rose, work on design wall
The Finished Top
ATLAS in Rose , finished art quilt
Here is the completed scientifically inspired art quilt. Handsewn repurposed white buttons added interest to the beaded necklace, front and center upon completion.
You may find out more about how I create my abstract art quilts at these links.
Above all, I like using discontinued designer fabrics in my art quilts. These materials add texture and movement to my work. Most importantly as a fiber artist, I look for unique materials. Using discontinued fabrics from designers fits the bill.
Just as important is keeping these beautiful materials out of the landfill. Certainly,giving them a new life is important. First,I gather my materials first with no idea in mind as to how I will use them. Then I see which materials play well together.
Finding Discontinued Materials
About ten years ago I started volunteering at Fabmo,(Fabric and more). About the same time,I became more serious about making my fabric art. FABMO is a nonprofit center for redirecting fabrics. For example,dedicated volunteers make weekly trips to the San Francisco Design Center, a decorator hub. These materials are new and ready to be recycled. Furthermore,the public can buy these materials for a donation.http://fabmo.org
Inspiration from Discontinued Fabrics
The nonprofit recently moved to a warehouse in a Sunnyvale, California. After that,it was ready to offer selection days for the public. For example, items to choose from include discontinued items, fabric samples and details. The fabric is like none available in local quilt shops and fabric stores. It inspires me to see how the fabrics play with one another. At the same time,the volunteers are dedicated to reduce, reuse, and recycle fabrics. They search for new ideas to use the materials. Then they share these ideas on their newsletter. Check with your local decorators for similar opportunities.
Unique fabrics make Unique Art.
Autumn Comes to the Farm,an art quilt made from redirected fabrics, 20″ x 20″Desert Sands,21″ x 16″
Inspiration from Unusual Fabrics
The next step is to choose from the wide variety of materials that are available. Needlesstosay, the amount of possibilities is a bit overwhelming. Furthermore,the use of silk, linen and synthetics allows me to add texture to my art pieces. These fabrics can be a bit more difficult to work with than cotton. Unlike bed quilts, art quilts as wall art do not have to be washed. In other words, easy care materials like cotton are not mandatory.
Rusty Cans in the Wash,16″ x 15″Visions of New Mexico,3rd place award, 31″ x 26″
A Win Win Situation
Finally,I am very inspired by how these redirected materials play together. I really hope that you will search out sources for redirected materials in your area. It will add a spark to your art. It will create a decline in entries to the local landfill. What could be more of a win-win situation?https://annbaldwinmayartquilts.com/2019/08/adding-color-to-your-art-quilts/
Wetlands Wanderer,an egret in the wetlands Above all,notice the decorative threads at the bottom of the quilt. 28″ x 27″
Add Decorative Threads for Texture
Above all,decorative threads add texture to art quilts. Furthermore,texture is part of my mantra, Color! Texture! and Movement! Therefore, I take creating, finding and using texture very seriously. Above all for me, it is fun. I get excited about repurposing decorative ribbons and threads in my art quilts. I would like to take this opportunity to share some ideas.
My artistic path evolved about the same time I found Fabmo fabric and more https://www.fabmo.org/. Fabmo is a nonprofit that rescues fabric samples and materials from designers to keeping them out of the landfill. In addition,they make them available to the public. The charming decorative three dimensional details call to me. However, I discovered these threads quite by accident. For example,I accidently took some details apart. Most importantly, I discovered lovely threads and ribbons to add texture to my art quilts.
decorative detailsRibbons from disassembled details
Take Things Apart to find Decorative Threads for Texture
These small details add texture, fiber and interest to art quilts. However,some of the threads are quite long when disassembled. Lots of room for creativity. Make a small detail by twisting and folding longer threads. Decorative threads entered my art pieces. In addition, I use these decorative details to add 3D texture to both my abstract and nature inspired art quilts.
Cinnamon Threads, detail from an abstract art quilt detail of 23″ x 20″ art quilt
How Would You Use These Decorative Threads?
Red detailBeige detail and disassembled red detail
Some Examples of What I Did
In addition,here are a couple of photos of works in progress highlighting deconstructed fibers.
An egret, a work in progressfibers in a work in progress,
Helpful Hints
Not in the San Francisco Bay area with access to FABMO in Sunnyvale? Find interior decorators in your area. They will be thrilled to pass on their “outdated” details. Moreover,beautiful yarns can be found at garage sales. Leftover pieces of interesting yarns may also be found at yard sales or Goodwill. Decorative threads are available for purchase. Of course, interesting decorative threads are often sold at quilt shows. Does your local quilt guild have a flea market? Lots of good finds there.
In Conclusion
In conclusion, I hope that you will be inspired to try and incorporate more decorative threads into your art quilts. Therefore, please share your successes and advice. Above all, try something new.
First of all,I love creating movement in my abstract art quilt pieces. A fiber artist friend asked me,“What are the essential elements you want your audience to know about your work? What do you want them to take away from seeing your art?” This friend versed in the deep discussions generated by involvement with the Artist Conference Network. I am grateful for those thought provoking questions. They helped me coalesce the ideas I had been mulling over.
Beach Umbrellas,an abstract art quilt, 37 ” x 37″ 94cm x 94cm curved line piecing creates moveSpring Break,an abstract art quilt, 32″ x 32″ 81cm x 81cm curved line piecing creates movement
Creating Movement in Abstract Art Quilts
How does one infuse movement into something that is inherently flat and static? Curved line piecing rather than just straight line sewing is one way to add movement in abstract art quilt pieces. At first, I attempted to make every seam a curved line. Then I realised that it proved too much of a good thing. The wobbly surface wasn’t the effect I wanted. Some straight lines are important for shape and balance. Another true life lesson learned: balance is important. Now I choose lines more carefully for visual impact to sew via curved line piecing. They may be wildly or more subtly shaped curves. https://annbaldwinmayartquilts.com/2019/07/creating-movement-in-art/
Activity on the Material
I choose the fabrics I use with movement in mind. I look for interesting curved lines that can create movement in my abstract art quilts. When I cut them up, they add interest and drama. They catch the eye and draw it in. One fabric of elongated greyhound dogs was rotated and sliced into the pieces. The shape of the animals disappeared yet the movement of the line remained. Other fabrics provide a pop of action to the piece. Creating the illusion of movement is an essential part in my abstract art quilts.
Beginning to zigzag yarns on grey, black, white linen background
In addition, movement is added through the quilting process. I begin by quilting straight lines in the middle of the piece making basically a large grid about 5” apart. Then the fun begins. I start quilting from corner to corner gently turning the fabric slightly side to side as I quilt. The thread line creates the movement. If the thread color contrasts with the fabric color, then the threads stand out. When the thread color matches the fabric, the thread may seem to disappear, yet the movement remains on a more subtle level. Many viewers look closer to try and understand how that can be.
Skyward, 25″ x 25″ 63cm x 63cm finished piece
Couching Decorative Threads
One technique I now consider quintessential part of my tool box is couching decorative threads. I sew multiple colored threads or yarns on to a strip of fabric. Then I cut them up into random lengths and use them as fabric. At first, the main purpose was to add texture to my pieces. Yet, the threads are often sewn in undulating parallel lines creating the slightest of distortion and movement. In Copper Cliffs both examples given can be seen, the fabric with irregular dots and the lines of decorative threads I cut apart.
Copper Cliffs, an art quilt,21 ” x 19″ 53 cm x 48 cm curvy lines of yarn create movement
I create my abstracts on a design wall. I take time to balance the colors and fabrics. Quiet spaces let one’s eyes rest. Looking at the piece with fresh eyes may take several days or longer before sewing the pieces together.
Gridlock II, an abstract art quilt, 36″ x 42″ 91 cm x 107 cm curved line piecing creates movementGridlock I ,an abstract art quilt black and white 33″ x 31″ 84cm x 79 cm
A Final Look
Abstract artists have the added benefit of being able to rotate the completed piece. They look to see if the art may be better from a different direction. It just might happen. Just because it was conceived and executed in one direction doesn’t mean that it cannot look better “upside down.”
Sandy Shore, an abstract art quilt 29″h x 25″w 74 cm x 64cm wacky, scribble quilting creates movement
A former colleague of mine made an unsolicited comment about my work, “It dances.” Her remark touched me on several levels. Years earlier she admitted that she had no interest in attending an art quilt show. So when I heard her comment, I felt that I had truly opened her eyes to a new art form.
Do you Squash your Art Quilts?
As you can tell, movement in an art quilt is important to me. Yet not all art quilters share my view. A trend in quilting art quilts seems to be creating as many stitching lines on a piece as possible. These lines tend to be straight lines with about ¼” spacing. They may turn at sharp corners. While attending a recent national art quilt shows, I noticed that almost 75% of the quilts had such quilting. I admit that such narrow line quilting may be effective for some pieces. The skill level is high for the artists that quilt that way. However, this style makes me cringe. Squashing and smashing the fabric into flat controlled pieces actually saddens me. Such tight stitching suffocates the fabric, preventing it from moving or breathing.
Best Parts about Making Abstract Quilts
I love making abstract art quilts. There are several reasons why. While placing pieces on the design wall, there is flexibility to easily add fabrics or change their locations. Furthermore, I can turn the fabric piece upside down or even side ways to choose the best spot. This also works if the fabric pieces have decorative threads on them. Do I want the lines to go vertically or horizontally? In addition, if I sew two fabrics together incorrectly, I just cut the fabric off easily and resew. No seam ripping is necessary. I welcome these hacks after experiences making traditional blocks where more accuracy is demanded.
Conclusion
In conclusion, I create movement in my abstract art pieces in several ways. I choose some pieces of fabric because they show movement as part of the design element. Couching decorative threads in not quite straight lines adds subtle movement. Pieces are sewn together with a curved line piecing technique. Finally the artist generates wavy lines all over the piece while quilting the three layers of fabric together. A basically flat piece of art is brought to life by these techniques.
Read about Other Resources
Read more about the Artist Conference Network. This artist driven organization supports artists as they move towards their artistic goals. Groups meet periodically to share and review each artist’s goals.
Some fond fabric memories have stuck with me for many decades. Sewing had been a passion of mine for many years. Then I focussed on quilting traditional bed quilts. I began my art quilting adventure ten years.Where did this passion for sewing begin? In search of the answer to that question, I looked back on some fond fabric memories.
Elementary School
For several years in elementary school, the local women’s chorus came to sing for the school. Singing ladies filled the auditorium stage, each wearing a dress of one solid color. I was mesmerized by all of the different colors. This choir sang only a couple of times at my school, but the image of their dresses stayed with me much more than the music. It was such a fond memory that at age thirty I sewed myself a one color dress (teal)that I wore to work for many years.
The Summer before Grade 7
This !960s crop top and shorts are similar to my first sewing project.
At age 12, I begged my mom to let me take sewing lessons during the summer. My memory is that I had to really push to convince my mom to sign me up. My mom was an incredible knitter but she rarely sewed. A friend of mine from sixth grade and I signed up at the local Singer Sewing Machine store downtown. We diligently chose patterns and fabric to make a pair of shorts and a crop top. If only the class had been designed for a total beginner, it would have been fine. However, the teacher expected women to bring in unfinished projects for her to help them finish. My friend and I had no idea of how to get started or what to do. What a disaster!
Eighth Grade
Luckily, I persevered. Eighth grade sewing taught me the basics of using a pattern and of skirt and blouse construction. I made a white collarless short sleeved shirt with a 7” zipper at the neck. The blue skirt was an A-line.Was there a waistband? Another a 7” zipper was necessary for the skirt. Putting in a zipper was definitely a learned skill. I don’t remember loving the class. But for some reason, I did want to continue to learn more about sewing.
High School
In high school in the late 1960s, I took two years of sewing. I continued to construct more difficult items for my wardrobe. Fond memories involve making jackets with bound buttons . Sophistication reigned when I wore those jackets.In those days, department stores like Macys and The Emporium where I worked sold fabric. As many teenaged girls did,I put a lot of thought into planning my wardrobe. My memory is that I worked hard to have a variety of styles and textures in my clothes. I knit a pale yellow shell to go with a skirt I had sewed. Didn’t everyone make sure their wardrobe was intriguing and fiber fresh?
Adulthood
Over the years I continued sewing clothes. I branched out into bed quilts. I was so passionate about traditional quilts. Often after a monthly lecture at our quilt guild, I wouldn’t be to sleep. I would be so excited to try out a new idea! The memory of my passion remains.
A Fashion Show
Another fond memory while transitioning to my art quilt career involved a fashion show at the Pacific International Quilt Festival. The group challenge was to create an outfit inspired by the book, Rare Bird by Iris Apfel. I made a tunic and skirt using African prints. The skirt is trimmed in black and white lace. While actual quilting was not involved, piecing the fabrics into blocks did take place. I created the fabric by sewing the blocks together. Then I cut out the pieces using a pattern. I had to pay attention to where the particular blocks would show up on the actual tunic.
Becoming an Art Quilter
I have now been making art quilts for ten years. People have told me that I have a good eye for color.My formal art education included one year of breath requirements ( drawing and painting). During my elementary school teaching career, I did work for several years at an arts infused school. When local artists taught my class, I participated along with the students. I later incorporated those lessons into my curriculum.
All in all not a lot of formal art education which makes me reflect on where the sources of my art success come from. I am not sure what I can attribute that to. Maybe the years of wardrobe planning did inform my eye for color. Throughout my whole life, I continued to play with fabrics, textiles and colors. Generally I thought all women did. However, recently I have become aware of the fact that color choices come easier to some than others. Based om my fond fabric memories, I conclude that practice and persistence counts.
Are you curious about how to become more creative? Have you ever thought how creativity works? Is someone born with it? Is it a developed skill? Or is it magic? I personally feel that it is a bit of all of those things. But for the most part, creativity is based on a lot of practice, making mistakes and hard work.
Becoming More Creative
American Democracy,2019 27″ w x 28″h
They must be a Genius.
I am not very musically inclined. Upon hearing a complicated piece of music, I would wonder how did someone create that? I would have no idea how the piece was put together. I assumed that the artist created the piece all at once. Therefore, they had to be some kind of a genius to be so special and creative.
Creativity is not a Fixed Entity.
More recently after creating many original art quilts, I have a clearer idea of how creativity works. Creativity is not a fixed entity. It must be nurtured and developed. The musicians might be very talented but probably they worked a long time on a particular piece working bit by bit. Maybe even different people contributed different parts. Ever notice that some people write the music and others write the words? People have strengths in different areas.Their genius takes years of practice.
Making Choices
When beginning an art quilt, first I decide what type of quilt I will make. Will it be an abstract, a nature piece or a Mexican inspired fabric collage? Then I begin to choose the colors based on the fabrics and materials that I have. It helps me to have a vague idea of where I am going. But I keep it flexible in case,I want to change things. Sometimes I start by making a lot of really interesting parts to be focal points. It could be a fabric doll, couched decorative threads or ribbons or 3D textural piece.
Plan something. Then Work to make it Better.
For an abstract art quilt, I begin by choosing a three color palette before adding light and dark hues. It is best to have an idea of what I am going to use these special details or parts for so that the colors I choose will work with the project. But there have been instances when these details haven’t worked as first intended. So were put aside and saved for another piece.
After choosing the colors, I take my first steps of laying the pieces on my design wall. Then I ponder, what I could do to make it better. How can I make it more artful or interesting? How can I add texture or movement to the piece? This is an ongoing process. I make those adjustments and continue on.
Fresh Eyes
Taking a break. Coming back to look again with fresh eyes is helpful and necessary. It is amazing how our eyes can fail to see things. Even when trying to look for errors and they are right in front of our face.
In Conclusion
After making over 400 art quilts, I have a clearer idea of how creativity works for me. Time in the studio working to create art is a must. I am motivated by the way different materials work together. Themes or colors may be the same but rarely do my pieces look similar. Serendipity does occur and should be embraced when it happens.
Try these low tech quilting hacks to make to make quilting tasks easier. This post is about my favorite tools that I often use in my studio. Redirecting materials are a major motivating factor in my art. It so happens that it affects my low tech quilting hacks as well.
Threading the Needle
My regular sewing foot has a white plastic piece that holds it together. A bit of the white forms a background that allows for the ease of threading the needle. For years, I sewed clothing. Yet, never noticed this because I had no need to change the foot. As soon as I started quilting and began to use different feet, I noticed that threading the needle became more difficult.
What Had Changed?
I couldn’t figure out what had changed. It took me a while, the small white background was not longer there. So I recreated the white by using a small piece of white paper. I now keep a particularly stiff piece of white paper close at hand. For easy threading of the needle, I slip the paper behind the needle. When I use the walking foot or darning foot for free motion quilting, I can see the needle’s hole much better.
a useful white piece of paper to aide threading a needle
Easing of Fabric through the Feed-A Low Tech Quilting Hack
Many years ago I received a stick that looks like an orange stick used for nail care. Suzanne Cam gave them away as part of a quilting workshop. This tool has now become an indespensible tool. I use it often to grab threads, to gently guide fabric smoothly through the feed when necssary.
Moving Small Pieces- A Low Tech Quilting Hack
I also use the stick to move small pieces of fabric. For the fabric layering technique,I create my art flat on a table. I place the backing fabric down first. Then I lay the batting on top.Finally, I create the scene. At times this requires a gentle movement of small pieces of fabric or yarn. I use the stick for this. Nothing else creates a smooth curve or allows me to control the placement of small items or details.
a multiuse well used stick
Tiny Globs of Glue
At times I need to glue items to my fiber pieces. Often I only need the tiniest bit of glue not a glob of glue that might show. When my studio was in my home, I would use a plate from the kitchen to put the glue on. After moving to my studio,no plates were readily available.
Making Do
I flipped over the 3 ” plastic cap from the can of starch to use. To control the smallest bit of glue, I use a large needle or hat pin. When finished I can easily wipe off the residue of white glue . The pin or needle is then ready for its original intended use.
Plastic caps to control globs of glue
A Design Wall
I use a design wall to create my abstract pieces of art. It is essential for me to have a large space available. I would recommend at least 60″ high and wide. My studio design wall is about 90″ by 90″. I covered the wall with a piece of white flannel fabric. It is held in place by push pins. Portability is not an issue for me. Other quilters will swear by their expensive design walls. Don’t be fooled! Simple can be just as effective!
My large white flannel design wall design
True Confessions Time!
I am not an early adopter nor a gadget person. Quality standard tools and materials are necessary. These hacks are very low tech. Whatever works! For those still reading this post, I expect to hear a chuckle or two or daresay I, some laughing out loud at their simplicity. What simple hacks do you use? Please share.
Winter Sunset 23″ h x 22″ 2018Burlap and Silk 24″ x 23″ 2015Cheddar and Triscuits,30″ x 28″ 2015
I find Cheddar and Triscuits a perfect name for this art quilt.Cheddar is the name of the color used in. The cheddar and white traditional quilting blocks contrast with several types of redirected high end fabric from the San Francisco Design Center. Fiberous netting and decorative threads and synthetic raffia add texture. I couched other decorative threads and rickrack on a strip of fabric. Then I cut them into smaller pieces to add where needed.
Circuit Board 15″ x 14″ 2015
When I first saw the fabric with the dashes on it, I immediately thought of a computer circuit board. I added many redirected fabrics in this piece. Decorative threads couched on a long strip of fabric and then sliced into pieces add interest. Pulling in colors similar to the fabric with dashes was fun. It was done without much thought but with much necessity.
The Quarry 21″ x 31″ 2015
The Quarry uses found materials,beads and the color,brown that I usually avoid. Someone created fabric with a process of marbling paper in several colors, black, blue and reflective blue and pink. The stratification formed by these fabrics was a new idea to me. Bone beads added a 3D effect as if they were layered under the ground and just peeking out of a cliff.
In Conclusion
Playing with the contrast of fabrics or your chosen materials lets you create something unexpected. An outlier can suggest a new direction or technique to follow in the future. It is up to the artist to make that decision. Or maybe the success of the project that will make the decision for the artist. Make your art like your life depended on it! Because it does!
Working backwards means thinking through each process of making your art piece before getting started. To create this collider event display, I had to figure out what would go on last. Then I thought about what each previous step backwards would be. What steps would I need to get to the finished product?That worked fairly well except for slight changes at the end.
Photo of the collider event display I worked from
Working backwards is a Different Way of Thinking
Working backwards to create art is a new and different way of thinking for me. Usually,I create my art quilts differently. As each part is completed, I reflect on what I can do to make it better or more artisitic. Generally, I don’t work from a photograph. I complete one step before even thinking about the next part. Motivation and inspiration comes from how the materials play together. Working backwards is a different way of thinking for me.
Reflecting
I reflect on how I can make it more engaging as each part is completed. Then finally, how the quilting might enhance the piece. For better or for worse,I rarely consider the quilting until the top is finished. But the whole point of this collaboration is to look at a project in a new way.
Beginning Steps to Create Art by Working Backwards
Choosing fabric and detail stitches
3.Running stitch with yellow embroidery thread4. Attempting to create the starburst effect5. Sewing more pieces together
Changes
Several fairly large changes happened at this point. I wanted to cover the cream oval with yarn to create a shadow as in the photo. But the effect wasn’t what I wanted. Luckily, the fabric was loosely woven together so I was able to pick out the threads one by one until they were gone.
Do I have to match the photo?
I also struggled with matching the photo. When I gave myself permission to not match the photo and make a work of art to my liking, I felt much better. I finished the quilt with my artist judgement in mind.
6. The finished art quilt
In Summary
With this collaboration I adjusted my decision making processes. Photographs of the collider event displays(CED) were mandatory. My collaborator showed me some collider event displays that he felt would lend themselves to work in fabric and yarn. I chose several from the suggested group.
Thinking Ahead
Using a photo as a guide, I had to have an idea of what each step would be, before beginning at all. I almost always use fabric that I have on hand. The size of that fabric then determines the size of the piece. If I quilted the three layers together first,then I could know the exact size that the CED would have to be. I had seen other art quilters quilt their work first, so it wasn’t a new idea. Just something that I had never done.
Pay Attention When Going Backwards
You have to pay attention to where you are going when walking backwards or working backwards. Working backwards just takes a bit more of a plan. It is a lot more safe than walking backwards.
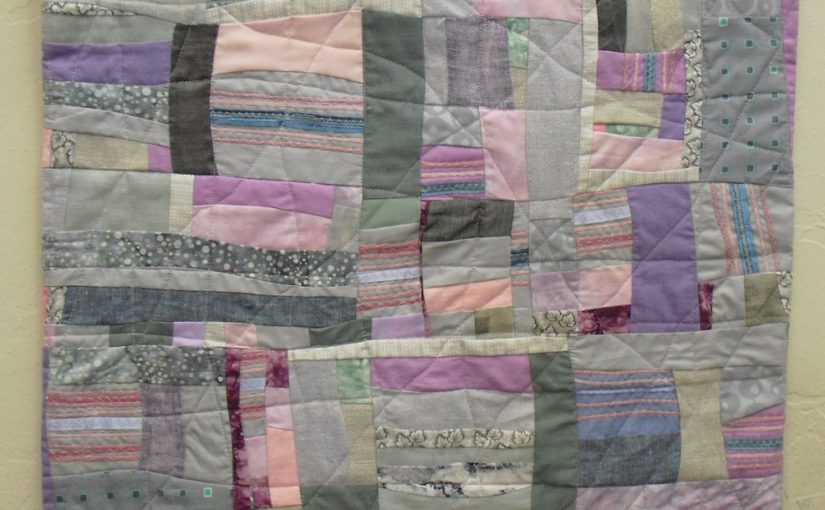
Winter Sunset, An abstract art quilt with lavander,pink, and grey colors,the finished piece
Abstract Art Quilt Work in Progress, Winter Sunset
This work in progress shows the steps I follow to create an abstract piece of art. Designing my abstract art quilts begins with choosing a group of colors. Inspiration for this quilt came from the greys and pinks of a winter sunset. I pick the decorative threads that I want to work with. I choose fabric that fits into the shades of colors that I chose. This time I want the colors to blend together and hardly be noticeable. Look for the green marbled fabric I added for that purpose. Choosing mnaterials from my stash is my favorite part of the creaive process.
1. Yarn and decorative threads for couching.2.I begin to choose fabrics.
Couching Decorative Threads and Yarns
Couching decorative threads and yarns to a long strip of fabric is fun. I use little pieces that might otherwise be thrown away. Each person’s eyes will blend the colors together differently. Then I randomly cut up the strips to use as fabric. I place the fabric on the design wall. Then I move the pieces around until I like it.
Long strips of cotton with the threads couched on them.I cut up the long strips. They are ready to be used as fabric.I place them on my design wall.
Keep Colors and Textures Balanced.
Beginning to sew the pieces together, I keep my eye out to make sure that the balance of the colors and textures is good.
I start to add the other fabrics.8. I added more fabric.
I keep adjusting the fabrics adding and subtracting fabrics as I go. Until I get it just right in my eye’s mind.I begin sewing small pieces together.
I sew more pieces of fabric together.
I continue sewing pieces pieces together. Here you can tell that the pieces are getting larger.
An abstract art quilt with lavander,pink, and grey colors
I moved some other pieces around. Sewing together continued. I finished sewing or piecing the top together.. The quilt sandwich has the top, the batting and the backing fabric pinned together to quilt.
done
I use my wacky fun scribble quilting technique to quilt the three layers together creating an added level of movement. Scribble quilting is a technique I named. I move the quilt side to side while quilting with a walking foot.
Winter Sunset, An abstract art quilt with lavander,pink, and grey colorsthe finished piece
You may be interested in reading more at Studio Art Quilt Associates (SAQA) website.
Having Fun With Color!Texture!Movement! appeared in Art Quilting Studio, Summer edition, 2018. Ann Baldwin May is having Fun With Color!Texture! Movement! in each of her art quilts.
Having Fun With Color!Texture! Movement! will show the steps needed to add color,texture andmovement to art quilts using the fabric layering technique.
Having Fun With Color!Texture!Movement! GETTING STARTED
The fabric layering technique makes it easy to have Fun With Color!Texture! Movement! to your art quilts. Begin by laying the back cotton fabric on a table. Choose a size that will easily fit on your work table. A square or rectangle about 15”-20” is a good start. Press the fabric to lay flat. Cover with batting which should also lay flat. Don’t worry if the edges don’t exactly line up, they will be trimmed later. Next, choose a fairly neutral background fabric or fabrics. Overlap the fabrics about an inch. If the fabrics shift during quilting, the batting won’t show. Cut a meandering line to look like rolling hills on the edge of the top fabric. Lightly baste with a glue stick.
Choose your Colors Having Fun With Color!Texture!Movement!
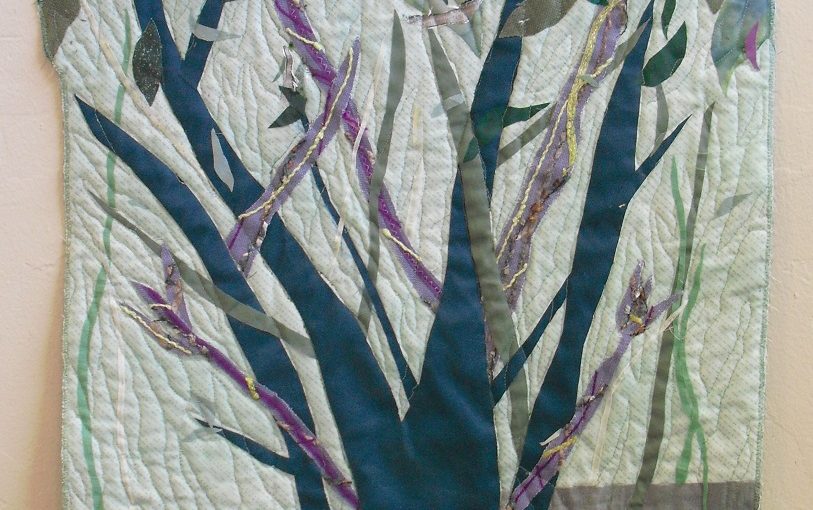
detail of Along the Path
Choose your colors adding a range of hues from light to dark as well as colors that contrast. Play with the colors to see what you like. Be ready to eliminate those that really don’t work. Go for an impressionistic view rather than a picture perfect trunk, leaf, or branch. Each viewer’s eye will blend the colors uniquely.
Start Large to Small
When beginning to create the scene, start with the largest part and work to the smallest. Cut out the tree trunk and add branches as you go. Flip the fabric and use the backside to add dimension. When you have the tree the way you like it, lightly baste. Just baste in a few places not all over. Later on, if you may want to slide a branch underneath and you won’t be able to if it is totally glued down.
Add Details Having Fun With Color!Texture!Movement!
Add rocks to the foreground. Choose fabric that will work for you to add texture. Avoid fabrics that have rocks printed on them. I chose marbled fabric I bought at Pacific International Quilt Festival and a redirected fabric to add texture. You will notice that they are cut simply. Lightly baste the rocks to the background. For the medium sized branches, I couched (zigzagged) decorative threads and ribbons on to a multicolored piece of redirected linen. Then I cut the branches out. I lay them on the piece balancing out the colors. Crossing branches adds interest and movement. Keep going until the scene is pleasing to you. Baste lightly.
Along the Path,detail
Leaves Add Interest
Working on the leaves is so much fun. Gather contrasting and blending colors. Make the leaves about 3”-4” varying the shape and size. Small scrap pieces are all that are needed. Pay attention to balancing the placement of the colors . Reflective, shiny sheer fabrics add a pop to the leaves. Save them for the top for the greatest effect. If you choose to have the leaves stick out from the edge, make those leaves ½” bigger for ease of zigzagging. During the final trimming you can adjust the leaf lines by cutting before zigzagging. Lightly baste leaves in place. Your art quilt will also be successful if you decide to make the edges straight .
The Beginning of the End
When your artist’s eye says that the scene is complete, cover with tulle. Make sure that the tulle is 2 “ longer on all sides. It can pull a bit during quilting. Pin the tulle down making sure that it is flat but not stretched. Use a lot of straight pins; remove as you quilt. As with other quilting techniques, begin in the middle of the piece and quilt outward. Edges may be rolled to accommodate the machine’s space.
Helpful Hints
Beginners will have success stitching along the edges of the branches, following the lines of the fabric. More experienced quilters can add movement by quilting lines resembling slanting plants. Choose a thread color that blends with the background. I highly recommend Aurifil thread for successful free motion quilting. Trim the edges and zigzag two times. Press lightly with a pressing cloth or piece of fabric. Add a sleeve to the back to hang. Stand back and admire!
Everyone Starts Somewhere.
Several years ago I began my path from traditional quilts to art quilts. I took a class in the fabric layering technique from the award winning, Meri Vahl (meriartquilts.com). Meri had learned the technique from Northern California artist, Laura Fogg(laura-fogg.squarespace.com).The technique allows for much personal creativity; none of our work looks similar. I was inspired to create a tree with leaves overflowing the edges as I have sold five pieces to the new Kaiser Permanente Facility in Scotts Valley and WEatsonville, California. A change in color scheme keeps all of my trees unique.
Important Materials
quality scissors; large and small, sewing machine, darning /free motion foot, walking foot for zigzagging, rotary cutter, cutting board, plastic see through quilting ruler, cotton fabric for backing, tulle, synthetic fabrics, redirected materials, commercially marbled fabric, sheers, batiks, Aurifil thread, Avery glue stick, pressing cloth ( to protect tulle and synthetics from melting when being pressed),a pointed wooden stick , straight quilting pins(They are longer than sewing pins.)
Tips
Leave a 1-2” empty back ground space on the sides of your piece. Then when trimmed your art doesn’t lose any interesting parts.
A light colored tulle will be best for your first project. I personally am not fussy about the color of tulle I use.
This technique is a forgiving way to practice free motion quilting. Before I learned this technique, I was ready to give up with free motion quilting in frustration. Lower or cover your feed dogs. Put your stitch length at 0. Use the darning/free motion foot with Aurifil thread. Push foot pedal control fast while slowly moving/quilting the layers of fabric.( Fast foot ,slow hand) Aurifil thread is available at most quilting stores. It appears more expensive but it really isn’t. I pieced and quilted a queen sized quilt of many seams with one spool.
Throwing the leaves onto the scene adds movement. Free yourself from cutting out perfectly formed leaves.
Use a large straight pin like a hat pin to get the tiniest dab of glue on the tip and gently slide under the fabric to be basted. I use a wooden stick similar to an emery stick to help me gently nudge the pieces of fabric to where I want them to be.
Advice for Beginners
I come from the world of bed quilts. The basic sewing skills used in traditional quilting are fundamental for most art quilting. However the “Quilting Rules” can be left behind. Buying patterns, pressing seams and matching seams are a few of those rules I have freed myself from. Give yourself permission to try something new, be it a color combination or creating your own designs. Listen to yourself. Take baby steps. You decide if you like your work or not. If not, change it. There is no wrong way to do it. Many art workshops or seminars begin with activities to get people in touch with one’s creative side.
Along the Path
About the Author
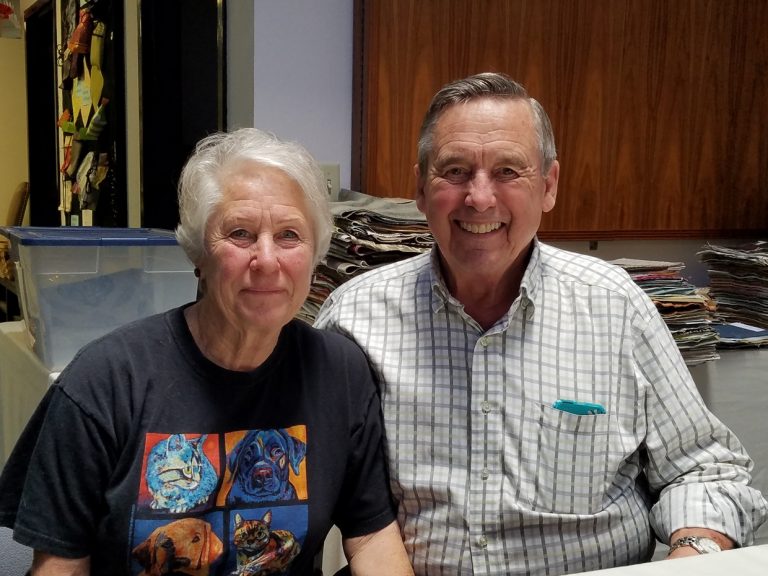
Ann Baldwin May lives in Santa Cruz, California. In 2012, she retired after teaching elementary school for 36 years. She began quilting in the 1970s. Ms. May participates in the juried Santa Cruz County Open Studios Art Tour from her studio in the Santa Cruz Art Center. She recently sold five tree art quilts to Kaiser Permanente for their facilities in Santa Cruz County, California. May is a member of SAQA( Studio Art Quilter Associates). Contact her at baldwinmay49@yahoo.com or www.annbaldwinmayartquilts.com. Or visit her Etsy shop at https://www.etsy.com/shop/annbmayartquilts/
Exactly two years ago I came home with a small stash of beautiful upholstery fabric samples. Little did I know how quickly and profoundly these textiles would change my life! Today I want to tell the amazing story of FabMo, the non-profit organization where I acquired those samples. It is also the inspiring story of how two people can make a difference, its two co-founders, Hannah and Jonathan Cranch. Fabmo reuses fabric and materials.
Hannah and Jonathan CranchHolly Welstein, Hannah and Jonathan Cranch speak with visitors to FABMO
How It All Started for two people to make a difference
A couple of decades ago Hannah and Jonathan Cranch were ordinary people going about their own business. Hannah taught art in Palo Alto primary schools, while Jonathan was a general contractor. They occasionally enjoyed attending seasonal open houses at the Design Center in San Francisco, seeing what was new in the design world. They both enjoyed the refreshments, browsing the beautiful displays and chatting with the salespeople
You are Throwing What Away? Fabmo reuses fabric and materials.
One day, during one such visit, they saw a man toss a big trash bag into the dumpster. The bag tore open, spilling out a bunch of gorgeous fabrics. It turned out that in preparation for the open houses, the showrooms had to make room for newly released fabrics, which meant getting rid of all the discontinued textiles. These exquisite, expensive designer fabrics, which were displayed but never used, were thus headed for the landfill.
Fabmo reuses fabric and materials for an art teacher.
Hannah, as an art teacher, knew her fellow teachers would salivate over such a treasure, so she began the quest to save these resources. She visited showrooms and spoke with key people, asking for some fabrics, and they gradually agreed to give her some. Each time, she returned home with a bag or two full of lustrous samples, which she distributed to Palo Alto teachers.
As she gradually built relationships, the amount of material she acquired began to grow. Soon, she and Jonathan started supplying five school districts, and passed some fabrics on to the Children’s Theater, as well. Fabmo reuses fabric and materials.
When Things Got More Serious
Hannah later learned that someone named Steve was visiting the showrooms every Monday to collect discontinued fabric samples, which were then picked up by a charitable organization run by a group of nuns. One day the charity did not come by to pick up, and so showroom workers asked Hannah, who was fortuitously at the Design Center at that moment, whether she wanted the fabrics. She certainly did! As it turned out, the charity never came back, and Hannah began a weekly pickup from then on. With the sudden increase in quantity, the picture changed dramatically. However, Fabmo still reuses fabric and materials.
Selection at Johnathan and Hannah’s houseSelection at their home
At essentially the same time, in summer 2007, Palo Alto schools closed for the summer. Hannah and Jonathan were unable to distribute the growing amounts of fabrics they were collecting. They published notices on Freecycle, Craigslist and other online venues, and began compiling an email list of interested people. Soon after, they set up five tables in their living room, filled them up with materials, and invited these interested fabric-lovers to come over and pick whatever they wanted. Before long this became a recurring event.
Fabmo reuses fabric and materials at selection events.
Originally, Hannah and Jonathan distributed the materials they gathered. They were the ones deciding what resources to give each school/theater. Once they allowed people to come over to their house and pick on their own, however, they could no longer think of it as “distribution.” They decided to call these “selection events” instead, since patrons got to choose their own treasures.
Running out of Room at their house
At first, their living-room events lasted two days. As the amount of fabrics kept growing, they were extended to three. Soon, the living room wasn’t big enough for everything. Hannah and Jonathan set up yet more tables in their family room.
But the rescued samples kept accumulating. In no time they filled one spare bedroom, then another, until all the bedrooms in the house were full of textiles and other materials. Hannah and Jonathan began holding regular selection events, timing them to open up a guest room as needed.
Fabmo reuses fabric and materials with a growing mailing list.
Their email list, initially limited to about thirty people, kept growing. Before long, some one hundred and seventy people came by every month. Some were hesitant to enter a private house. Others, however, came regularly. Some of the latter offered to help pay for the gas for Hannah’s collection trips to SF, so Hannah and Jonathan put up a donation box to help finance their drives. Then someone offered to help take care of welcoming guests. One day, when Hannah, who was also co-owner of a catering business, was too busy with an event, Jonathan took that woman up on her offer. From then on the Cranches relied more and more on volunteers to help them with the many tasks of gathering, sorting and distributing. They started documenting who came to their house, and, in order to limit crowding, began setting appointments.
How FabMo Was Born
In 2009, after years of making fabrics available from their private house, Jonathan learned that their home insurance would not cover such large gatherings. Although the Cranches distributed everything for free, the insurance considered what they were doing as a business. So they found a small shared space in Palo Alto where they could hold Selection Events, but which had very little room for storage.
Six months later they moved to a bigger warehouse on Old Middlefield Road. Later they added another warehouse.
Selection at Old Middlefield Way
That same year FabMo was born as a public benefit corporation, and in 2010 was granted 501(c)(3) status. FabMo was now officially a non-profit organization! The name FabMo is short for Fabrics and More, as by then the Cranches rescued many different materials. In addition to fabrics, they also saved wallpapers, trims, tiles, leather, carpets and so on.
Another location at Bella Vista
Continual expansion
Since then, FabMo’s activities have continued to expand. Nine years ago, a regular attendee suggested creating an event for people to showcase items they created with FabMo materials, so as to inspire others. That’s how the Holiday Boutique came about. In 2015 FabMo moved into their current location in Mountain View. They regularly hold monthly three-day Selection Events, as well as 8-10 Special Sales a year. Most recently, FABMO has moved one town over to Sunnyvale, California.
In 2014 FabMo started holding regular events in Santa Cruz as well, with an active volunteer and consumer base there. They also hold Selection Events in Vallejo, as well as in different Bay Area Tech Shops. FabMo has a regular presence in at least four fairs every year (MakersFaire, San Mateo County Fair, and two Earth Day Fairs).
FabMo Now
These days, FabMo rescues more than 70 tons of materials every year from Design Centers in San Francisco and San Jose, and from other miscellaneous sources. They make these amazing resources available to creative souls all over the Bay Area and beyond. More than 8,500 people are signed up to their mailing list, with about 300 coming to collect treasures during each Selection Event. Hannah and Jonathan continue to be very involved with the organization relying on an active Board, a growing family of several hundred volunteers, and textile aficionados, who, like themselves, appreciate the creative and environmental impact of this amazing endeavor. People come from Hawaii, the Pacific Northwest, Michigan and beyond to attend, determining their own schedule based on FabMo’s.
FabMo’s dedication
To this day, FabMo distributes fabrics for a suggested donation. It trusts patrons to give what they can to help keep the project running. Costs of maintaining such a business in the Bay Area are sky-high, as are utilities and fuel. Teachers still receive many of the materials for free. FabMo only sells Special Sale materials, but even then for low prices.
serendippity
Hannah and Jonathan didn’t plan any of this. They simply couldn’t stand to see fabulous textiles thrown away and wasted, and before they knew it, FabMo had appeared. What started as a small project of love run by two individuals, turned into a collaborative effort of a creative, eco-friendly community, a family of sorts. But it still remains a not-for-profit project of love.
FabMo’s dedication continues to keep tons of precious resources out of the landfill. It also progressively builds an entire community of like-minded people who care about the environment. Likewise, it encourages the creativity of numerous others. The Cranches certainly changed my life, re-sparking my own long-suppressed creativity.
Now, people from all over the United States are starting to ask how to establish similar organizations. The Cranches even received a few inquiries from overseas. Imagine how many resources could be rescued if every community had a FabMo! Imagine all the creative things people could come up with!
To learn more about FabMo or sign up to their mailing list check out their web page: http://www.fabmo.org/fabmo/Home.htlmYou can also like their Facebook page: https://www.facebook.com/FabMo.
You can learn how one quilt artist uses FABMO materials for her art.
Step By Step Instructions to Make an Abstract Art Quilt
This work in progress shows the step by step instructions to make this abstract art quilt, Sunlit Boulders. Featured in Art Quilting Studio Magazine, Fall issue, 2018.
Sunlit Boulders 31″ h x 28″w
Inspiration and Adjustments
Sunlit Boulders is an art quilt with curved line piecing, Scribble Quilting and couched decorative yarns and threads. My first intention was to highlight the Native American batik shown on the left on the first photo. As I chose different fabrics, I decided that I would minimize their use. I removed more of that fabric. I was happier with the way it looked. It’s okay to change ideas in midproject if it doesn’t look or feel right to you. Follow these step by step instructions to make your own abstract art quilt. It will be uniquely yours.
Photo 1. gathering fabrics
Photo 1
I am auditioning fabrics that complement and contrast with the batik fabric. Using strips of fabric, I couch(zigzag) a variety of decorative threads and yarns to the strips. I cut the strips apart into varying lengths without much forethought.
Photo 2. Trying out fabrics.
Photo 2
I am still auditioning fabric. I included some pieced strips left over from a previous project. Notice that I eliminated the reddish fabric.
Photo 3. Begin to sew smaller pieces together.
Photo 3
I start to cut up the strips of couched yarns to add to the quilt. I am trying out where I like the pieces, moving them around. Dark strips frame the piece. I begin to sew some pieces together. Figures from the batik stand out enough.
photo 4 Sew pieces together. Move to a different spot to create balance of fabric and color.
Photo 4
Tucks are add texture. Notice that I moved some pieces around. I do more sewing of pieces together.
photo 5. I find problems are solved by cutting up fabric into a smaller piece.
Photo 5
I am not afraid to cut up fabric. I can always use the fabric at a later date for a different project. More tucks are added to fabrics. I eliminated some batiks symbols.
Photo 6. All sewn together.
Photo 6
All pieced together and ready for batting and backing.
Photo 7. A quilt sandwich when the top, the batting and the backing is ready to be quilted.
Photo 7
Scribble Quilting is complete. Edges need to be trimmed and cut straight.
Photo 8 Finished.
Photo 8
The finished art quilt represents my mantra of color, texture, and movement.
This work in progress shows the steps I take to create this abstract contemporary art quilt. I draw inspiration from one fabric.
Color! Movement! Texture!
Color! Movement! Texture! are my main goals for my abstract art quilts. Color is where I begin. What colors do I want to work with? I found a piece of linen at Fabmo, a nonprofit that redirects materials from the San Francisco Design Center. I really liked the variety of colors and movement in this one piece. This fabric became my inspiration to find other fabrics and textures with the same colors for my abstract piece.
Inspiration from One Fabric
Oddly enough, several years ago four quilter friends and I were having trouble choosing colors for a donation quilt we wanted to create together. One friend suggested that we find a fabric and choose the colors from that fabric. At the time I couldn’t quite wrap my head around what she was saying. However, when I saw this multicolored linen, I immediately understood what she had been trying to have us do. Sometimes it takes times for inspiration to happen.
1. Inspiration from one piece of commercially producted fabric
Photo 1 Choosing the Fabric
First I choose the fabric I want to work with. This one piece has so many different colors in it. Those are the colors that I want to work with. This is when the fun begins. I go through my fabrics to find additional fabrics. I look for shades that are lighter and darker.At this step, I don’t reject much.
Photo 2
I chose these fabric from the stash that I had. Also I found decorative threads and yarns to add to some of fabrics for interest.
2. Here are the fabrics I chose from my stash.
photo 3 Inspiration from One Fabric
I place small pieces of fabric on my design wall. I move them around before sewing them together. Then I start to sew smaller pieces together. I make sure that colors, textures and similar pieces are equally balanced around the piece. Does your eye have a place to rest? Are there too many colors in one area? Time to adjust before the whole piece is sewn together.
3. Spring Break
Photo 4 and photo 5
Here is a detail of the smaller pieces already sewn together.
4. A detail of the pieces sewn together5. Another detail of the pieces sewn together
photo 6
6. Another detail of the pieces sewn together
photo 7
7. Here is the finished quilt, Spring Break.
Inspiration from one fabric helped me create this abstract art quilt. Hopefully, this step by step explanation will inspire you as well.
For more information on couching threads refer to my previous post.
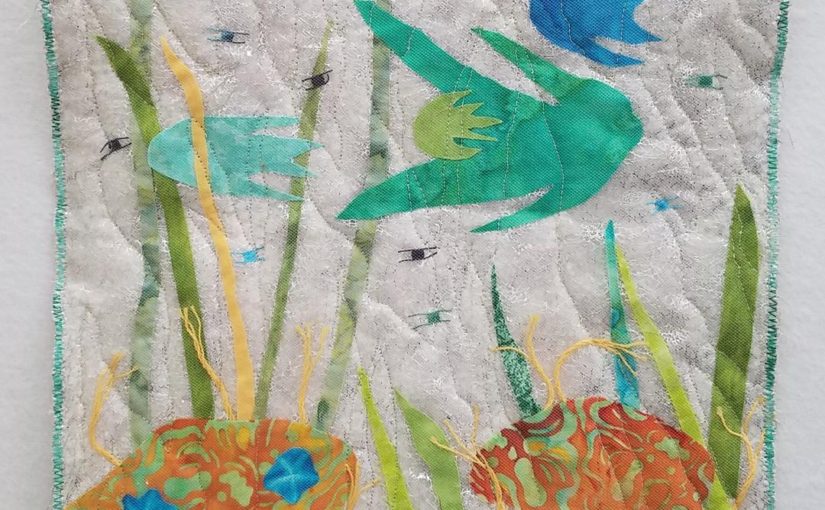
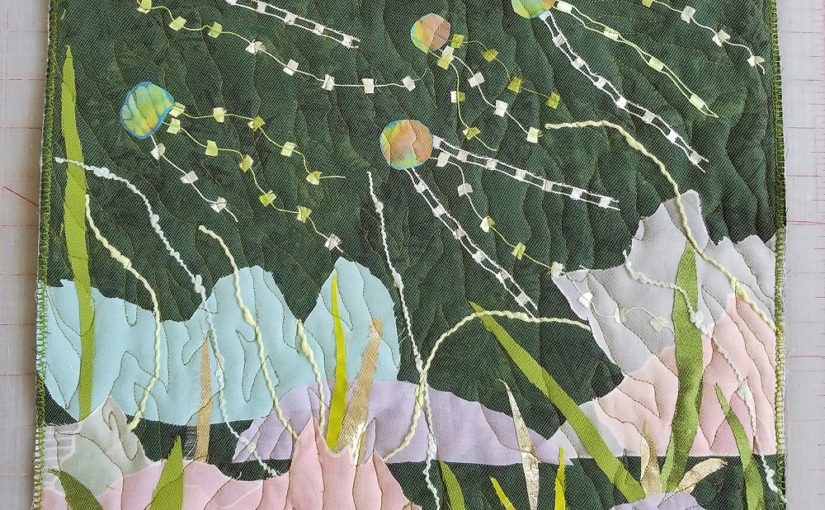
The fabric layering technique of making art quilts uses a table rather than a design wall. In short, I create a scene and then cover it with tulle netting and free motion quilt the three layers(back, batting,top) together. I use this technique for my Nature portfolio; underwater fantasies, trees, landscapes. The photos in this post are of an underwater fantasy, more impressionistic than realistic.
To Begin
To begin, I choose the top fabric. I prefer to choose a fabric with some dimension already on it, light and dark spaces. If I choose a dark background, then I will choose lighter colored materials for my plants, fish, rocks and other items . If I choose a lighter background, then I will choose darker color to create the scenery.
Step 1
The back fabric is flat on the table. A piece of batting is laid on top of that. You can see the white batting hanging a bit over the edge. Then I laid a piece of moddled commercial fabric on top. The piece is about 14″ by 14″. I let the fabric’s different shades of coloring do part of the work in creating interest and depth in the piece. I lightly baste the layers together with an Avery glue stick.
step 1 in fabric layering technique for making art quilts
Step 2
For this piece, I cut out light colored rocks and placed them in the foreground. I cut out irregularly shaped dots of different colored batik fabric for the jellies(formerly called jelly fish). I place the jellies as if they are swimming in the current. An art trick or rule is to have an odd number of items, three, five or nine objects.
step 2 in fabric layering technique another look
Step 3
Next, I cut out plants and place them between the rocks. I add decorative threads for the tenacles of the jellies being aware of the movement of the water. When everything is in its place,I baste the pieces in place with a light dab of glue. One can use different brands of glue. Test before hand that the glue does not discolor the fabric and make a mark after it has dried.
Step 4
Next, I cover the scene with tulle netting and pin the tulle in place.
step 4 in fabric layering technique another look for making art quilts
Step 5
Then,I free motion quilt the three layers together. I lower the feed dogs on my machine to allow me to move the piece however I want. The quilting creates another level of movement.
step 5 in fabric layering technique another look for making art quilts
Step 6
I finish the piece by zigzagging the edges twice. For larger pieces, I often attach a facing and turn it to the back and stitch by hand.
step 6 in fabric layering technique another look for making art quilts
Here is a photo of the back of the piece where you can see the machine stitching easier.
Free motion quilting is at the apex of skill for quilters. The technique takes a lot of practice to master. Before I took Meri Vahl’s class, I had been practicing. To be honest, I was so frustrated that I had almost decided to give up. Luckily, I didn’t. The fabric layering technique is a forgiving way to practice the skill. I highly recommend it.
Here are my suggestions for success in free motion quilting.
Use Aurifil brand thread. It can be found in fine quilting shops or online. It is totally worth the higher price. The thread is strong yet thin. I once pieced and quilted a double sized bed quilt using only one spool.
Aurifil thread 50wt
“Fast feet, slow hands.” This is the mantra for free motion quilting. This means that one pushes the pedal of their machine so that the throttle goes quickly. With the feed dogs down, the quilter slowly moves the quilt with her hands. This does take a fair amount of practice.Practice using the fabric layering technique. Begin by outlining your figures with the free motion quilting.
Have fun practicing with this technique! Let me know how it goes for you! I hope you have as much fun as I do using this technique.
Read this interview about Cindy Grisdela,art quilter by Studio Art Quilt Associates(SAQA) too good not to share.
Art Quilter Cindy Grisdela
JourneysEndDetail-CindyGrisdela
SAQA: When did you begin making art with fabric? Do you work in other media as well?
GRISDELA: I started sewing when I was 10. My mother decided I was old enough to be trusted with her beloved Singer. I studied art in high school and college experimenting with painting, drawing, ceramics, sculpture and weaving.I made my first quilt in 1983. After seeing an article in a magazine of a queen size Trip Around the World, I wanted to make one. After that I was hooked. I spent a number of years making traditional quilts as a creative outlet while I raised my family. About 15 years ago, I got bored with following patterns. So I started seriously trying to make my own art in fabric.
Color and Texture
SAQA: What inspires you?
GRISDELA: I’m inspired by abstraction, color and texture. I enjoy playing with color and seeing how various colors and shapes interact. One of the reasons I create with fabric instead of with paint is the ability to add another dimension to my compositions. I can add texture with dense free motion quilting. The stitching is an integral part of the composition. It is not just a means to hold the three layers together.
SAQA: Have any artists or art movements influenced your work?
GRISDELA: I have a degree in Art History. There are always lots of influences rattling around in my head. I love Abstract Expressionism, especially the Color Field School of artists. Matisse’s cut outs are important to me, as are Klee, Kandinsky and Klimt. I’m also drawn to the work of Robert and Sonia Delaunay. Among quilt artists, I am indebted to the work of Gwen Marston who was an early influence.
SAQA: What techniques and materials do you use?
GRISDELA: I use hand dyed fabrics to create almost all of my current work mostly by Cherrywood Fabrics. I experimented with dyeing my own fabrics a number of years ago, but realized that’s not my skill. So I’m happy supporting others who do it well.All of my work now is created using improvisational piecing techniques and free motion quilting. I enjoy the dialogue that happens when I’m just cutting out colors and shapes intuitively. One decision leads to the next. It’s a little like putting together a jigsaw puzzle. Only I get to decide what the picture is going to look like. I do all my quilting without marking ahead of time or using a computer program.
A Lakeside Studio
SAQA: Where do you create?
GRISDELA: I have a studio in the basement of our townhouse. I look out on the lake while I’m sewing. It’s a very peaceful retreat. The commute downstairs is great too! I also have a shared space with nine other artists a short distance from my home. I’m the only fiber artist in the group. But it’s good to be around other creative people and share inspiration. I try to spend one day a week there.
Artmaking and Business
SAQA: How do you reconcile the artmaking and business sides of your creative life?
GRISDELA: That’s the tough part. For the last ten years I’ve been traveling extensively showing an selling my work at fine art and fine craft shows all over the country. I do about 12-14 shows a year. I also have an active blog and presence on Instagram and Facebook. I’m a regular contributor to the SAQA (Studio Art Quilter Associates)Journal.
I spend about half my time on the business side. This entails writing, applying to shows, keeping my website up to date, marketing, and other business. I like to spend time in the studio in the morning and early afternoon. That’s when I’m most creat I work on other business later in the day. I keep lists and work backward to make sure enough time is allotted to keep my inventory up for the shows. Sometimes I’m writing blog posts or marketing pieces on the road.
Publications
SAQA: Have you published books or been a guest on an art-related media program?
GRISDELA: I will continue doing shows. Probably not as many as I did in 2017. I’m doing a lot more teaching now to promote the book. It’s such fun to see a diverse group of artists come together for a day or more to explore their individual creativity. Each person’s work is different from the others and different from mine. We all bring our own personalities and backgrounds to the table.
I also have plans to work on a new series of larger improv quilts. The great thing about improv is there’s always something new to explore!
Use yarn to create fabric to add texture to an art quilt. I zigzag or couch multiple pieces of yarn on strips of 100% cotton. Then I cut them up and use the pieces as fabric in my art pieces. Decorative threads can also be used.
Yarn I inherited from my mother.
My First Inspiration
I have several small spools of yarn I inherited from my mother. Their bright colors attracted me. I don’t know what my mother had used them for. I wanted them for something,although I didn’t know for what. They languished in my studio for a long time before a perfect use came up.
My Second Inspiration
Several years back at a large quilt show, I saw a piece that had a large amount of yarn jammed on top into big blob. To be honest, I didn’t like effect at all. But it gave me the idea to use yarn in a more orderly fashion. I stumbled upon a way to create more texture for my pieces.
Materials
First, I chose the colors that I want to use in my art quilt. I go through my box of decorative threads and yarns looking for yarn with texture and complementary shade of color. Using a long strip of cotton fabric, 20”-40” long and 5” to 6” wide, I begin. Other backings like ribbon didn’t work well as it was slippery and was not easy to sew with. I zigzag(couch) the yarn to the cotton strip. I prefer to match the sewing thread color to the yarn as that the color of the yarn stands out more; the stitching appears invisible. But that is a personal choice one can make.
Suggestions
Don’t worry about the lines being straight. A thin piece of yarn can be doubled or tripled to become thicker . Vary your use of threads for texture. Remember to leave space for the 1/4″seam allowance. Don’t sew too close to the side edges of the cotton fabric.
Next,various strips of cotton with yarn and decorative threads zigzagged on them.Then,long strips of cotton with the yarn couched on them.
More Suggestions
Sometimes I keep the threads straight and sometimes I cross one thread on top of another. I like the movement this creates on my art quilts. Overthinking this process is not necessary. I find it fun and relaxing. If things don’t turn out as I would like then I can just save the piece for another project. After 5 or 6 pieces of yarn have been couched, then I randomly cut them into pieces to use as fabric.
Sometimes I use linen with a slight design on it for added texture.Finally,I cut up the long strips. They are ready to be used as fabric.
Conclusion It will be easy to find interesting yarns and decorative threads at flea markets or garage sales. There won’t be enough yarn for a scarf or a sweater but there will be more than enough for your couching projects.
Homage to a Dancer, one of the first art quilts I made.
People ask how art quilts and bed quilts different. The answer is something that I have lived through. I started making bed quilts back in the 1970’s. In 2008, I made the transition to creating wall art. May I offer some generalizations?
Bed quilts and art quilts are made with the same tools; sewing machine, rotary cutters, cutting boards, see through ruler, a variety of feet for their machines. Many of the techniques are also the same. Both have three pieces sewn together,use applique tecniques, quilt by stitch in the ditch, and often include binding. Bed quilts generally have squares or blocks of fabric sewn together. Bed quilters prefer to use 100% cotton. It is the best fabric to work with. It lies flat and most importantly, it is washable.
Art Quilts are Wall Art.
When a quilter moves away from the necessity of washing their piece, a whole new realm of fabric possibilities open up. For me, foregoing the use of patterns also forged my way toward art quilts. I have been “scarred” by my pattern disasters. I flatly refuse to use them anymore unless it is my own pattern. But that only happens rarely. By not following anyone else’s ideas, colors, or materials, I have been able to create my own style.
Silk, linen, synthetics, yarn and decorative threads have become my go to materials. I am very focused on using redirecting fabrics and materials to keep them out of the landfill. I keep the smallest pieces of fabric to try and find a use for it instead of placing them in the trash. Of course, my first focus is on creating a beautiful piece of art that someone will want to live with.
New stitches can be found by accident. Mistakes can sometimes lead to a wonderful realization or improvement.
Discovering New Stitches by Mistake
Tranquility, an art quilt with black stitches pulled through to the front before quilting.
The Tension was Off.
Tension is the balance between the top threads and the bottome threads on a sewing machine.A while back my 20 year old Huskavarna Lily was acting up. Out of the blue, the tension would change as I was sewing. The action pulled the bobbin thread through to the front (top) of the fabric. As annoying as this was, I liked the way the stitches looked. I was discovering new stitches quite by accident. Could I repeat the success of this stitch ?
Let me confess, that I am not a person who often uses all of the stitches that are available on my machine. I usually use the zigzag stitch and one or two decorative stitches. I decided to fool around. How could I could use this “accidental stitch ” to my advantage? I wanted to discover new stitches by mistake. Would it be a way to add interest to my art quilts?
Changing the Tension
I changed the tension to 8 or 9 high on my machine. with a black thread in the bobbin. The top thread I used matched the white or beige color of my fabric. At the time, I was doing Native American inspired quilts. Moreover,I felt the black dots on the top somehow seemed to work for me. The maximum contrast drew my attention. I also adjusted the stitch length and width to make them as large as possible for maximum visibility. The results were pleasing.
In conclusion,errors can turn into serendipitous wonders if we keep our minds open to them. In the future, I should be more adventuous to change the tension and adjust more of my machines stitches.