Art quilts often use traditional quilting techniques to create a wide range of wall art. Art quilts can now be found in museums and galleries along side paintings and other media.
My art quilts are all about the quilt artist creating abstract, whimsical or impressionistic pieces. Inspiration comes from the natural world as well as from Mexican and Native American influences. My materials of choice are often redirected fabrics from the San Francisco Design Center and found objects. Art quilts free me to play with color and texture. My technique, Scribble Quilting allows me to create movement on many of my pieces.
TWO INSPIRATIONAL ARTISTS
I owe some of my inspiration to two artists from Santa Cruz County, California. Meri Vahl, an award winning art quilter has been recognized nationally for her work. Teacher of the fabric layering technique, she was patient. Understanding that each student brought individual strengths, weaknesses and abilities. Ellen edith;friend, art quilter, fabric designer and artist extraordinaire made whimsical, personal quilts. Her influence lives on well beyond her life. I have great appreciation for these two local leaders of the art quilt world.
SAQA (STUDIO ART QUILT ASSOCIATES)
I am proud to be part of an evergrowing group of art quilters. SAQA started by Yvonne Porcella in Northern California in 1989. It has grown to an international organization. Art quilters have transformed the quilt into a 21st Century art form. I continue to explore new forms and ways of working with unusual materials on this journey.
ABOUT THE ARTIST,BIO
I was born and raised in Palo Alto, California. In high school I studied sewing and clothing construction for two years. I continued to sew much of my wardrobe. In 1974,I took my first quilting class at a neighborhood fabric store. Over the years, I continued to sew clothes and make quilts for my family. I stopped counting bed quilts at 300. After teaching 30 years in Watsonville as a bilingual teacher, I retired to spend more time on creating art quilts.
MY FIRST ART QUILT
Homage to a Dancer,45″ x 56″
In 2008, I made my first art quilt, Homage to a Dancer. It reflects my participation in Los Méxicas,the University of California,Santa Cruz ballet folklórico group.
A STUDIO IN THE ART CENTER
In May of 2016, I opened a studio in the Santa Cruz Art Center, 1001 Center St. Downtown Santa Cruz. I have space to work and display my work. For First Fridays and Open Studios, I fill the lobby with art. In June, 2019 New York Art Center accepted my work into their gallery. 7 Franklin Place, TRIBECA, New York City.
AWARD WINNING ARTIST
Great Blue Heron at Dusk,31″ x 25″
Great Blue Heron at Dusk entered into an art show in 2010. The following year it won a merit award at the Olive Hyde Art Gallery in Fremont,California.
In 2013, Visions of New Mexico won third place in the Neo Membreno Vessels 2013 Show at the Western New Mexico University Museum in Silver City, New Mexico.
Check out the group fiber show at the R. Blitzer Gallery 2017.
Fiber Show at R.Blitzer Gallery 2017
Fiber Reflections:Shared Dimensions will be at the R. Blitzer Gallery. Santa Cruz, CA April 5-28, 2017 Here are some of the participating artists.
Beautiful jacket by Marilou MoschettiMarilou Moschetti fiber piece
Marilou Moschetti, Fiber Show at R.Blitzer Gallery artist
I began creating Nuno felt 15 years ago. It is a technique used to fuse silk and fine Merino wool together. In 2002 I fell in love with the art of felt making during a trip to New Zealand. I teach felt workshops throughout Northern California. I received my Bachelor’s Degree from San Jose State University.
Primarily,Carole Rossi is a quilt & fiber artist. She lives in Sacramento, California with her husband. Creating her art is how she thrives. The fabric, the colors, the textures are her passion.
Long ago,Carole learned to sew from her Italian grandfather. He was an accomplished tailor. Carole is a lawyer specializing in higher education & employment law. Currently, Carole uses piecing techniques to create representational images. her art quilts are based on her photographs of her travels.
Ocean by Carole Rossiby Carole Rossi
Alexandra Sanders,artist at Fiber at R.Blitzer
I am an artist in Santa Cruz, California. I have my Bachelor’s degree in Art from San Jose State University. My emphasis is in Textiles-batik, and silk painting. I choose to paint birds with watercolors.
Egrets by Alexandra SandersTree Batik by Alexndra Sanders
My art quilts may be abstract, whimsical or impressionistic. Inspiration comes from the natural world. Similarly, I am influenced by Mexican and Native American cultures. My materials of choice are redirected fabrics. Art quilts free me to play with color and texture.
Shore to Sky F by Ann Baldwin MayPack Animal by Ann Baldwin May
Scribble Quilting is a wacky fun way to quilt. Are you stuck in stitch-in-the-ditch? Are you a bit bored with straight line quilting? Maybe it’s time for you to try Scribble Quilting. It is not hard at all. All you need to get started is a walking foot, a quilt sandwich ready to quilt and different colors of thread.I developed this technique because I was bored with other ways to quilt.Looking for a wacky fun variation to your quilting? Try Wacky Fun Scribble Quilting.
Waiting for the Roadrunner, 22″ x 24″ 56cm x 61cm
Artful and Interesting
First of all,Scribble Quilting is a colorful, artful and an interesting way to quilt. For example,the quilting thread lines cross each other; creating positive and negative space. The sewing lines are the positive space. However,the negative spaces are the shapes created by the lines. Similarly, Lines undulate, curve and wave. Do the lines you’ve made draw your eye in and keep your interest?
By Accident
Like many great ideas, Scribble Quilting was discovered by accident. Once while making a baby quilt,I decided to quilt curvy lines with my walking foot instead of straight ones. Furthermore, I used one of the built-in stitches on my sewing machine which made regular, gentle curves. Soon, I wanted to make the curves wider. Switching back to my usual straight stitch, I began gently moving the quilt from side to side by hand to make wider curves than my built-in stitch had allowed. It was fun, and the lines looked more interesting. I kept quilting, experimenting with contrasting thread colors. Subsequently,I currently finish many of my art quilts this way.
Scribble Quilting
In addition,I named this technique Scribble Quilting. After art lessons were cut at in my elementary school classroom, I noticed that some students showed their frustration with what they considered unsuccessful art projects. After that, they would scribble all over them with four or five different crayons. It caught my attention. However,it looked like a party with confetti falling all over. As I quilted my pieces, drawing lines with multiple colors and crossing over them repeatedly, it reminded me of scribbling.
Fun with Thread Color
Take this opportunity to have fun with thread color. Be aware that the thread color can appear different depending on what colors it is on or near. Free yourself from perfectly matching the thread to the top fabric. I found that even slight variations in the color of the quilting threads added subtle interest to a quilt top.
More color is more interesting. For example, I bought a spool of wacky fun chartreuse (yellow green) thread at a flea market several years ago. I never wear this color and had not tried it in quilting. But this thread has become one of my favorites because of the way it plays with other colors. It brightens green or black fabric.Yet, it often reads as yellow. I encourage you to play with the thread to see how it changes, depending on the color of the fabric. Updated- Sometimes I use just one color of thread instead of more than one.
More Color is Better Except
More color is more interesting, with one exception. Thinking that variegated thread would be fun and wacky, I tried to use it. However, I personally was not satisfied with the results. I had no control over when the colors changed. It wasn’t fun when the bobbin thread didn’t match the top thread. Maybe this is just a personal choice on my part. Each quilter can make their own decisions.
Are you ready to start Scribble Quilting?
Begin each project by quilting straight lines about 5 inches (12cm) apart using a walking foot. Stitch-in-the-ditch works well to hold the quilt sandwich together. Remove the pins to avoid sewing over them. After you’ve finished straight-line quilting to secure the quilt sandwich, change to another thread color.
Next,quilt several lines in one color. Spread the stitiching lines out across the quilt top. As you sew from one edge of the quilt to the other,gently moving the quilt sandwich from side to side. Change thread color and continue quilting. Make wider curves so that the quilting lines cross. Keep quilting until the quilting is evenly space. Are happy with the way the lines cross each other? if not, then do some more.
Instructions
1) Prepare a quilt sandwich by pinning together the backing, batting and top (step 1).
step 1 of scribble quilting process
2) Decide where to start quilting. In the beginning, it’s easiest to start on one side and go to the opposite side.
3) Begin by using a walking foot to make straight lines of stitching about 5 inches 12 cm apart. Stitch in the ditch if you want. (step 2).
step 2 of scribble quilting process
4) Now begin sewing curved lines of quilting, still using a walking foot. Begin curved quilting on the edge of the quilt, near the middle of one side. Pull the quilt taut with both hands as you quilt. Gently move the sandwich from side to side as the machine stitches. Use your needle down position in case you have to stop. Stop quilting to readjust the quilt sandwich. Avoid jerky movements. The quilting thread should form a smooth, flowing line (step 3).
step 3 of scribble quilting process
Problemsolving
If your line of stitches moves abruptly to one side, stop immediately. Remove stitches until you have enough to thread a needle, then bury the threads in the batting. Continue quilting, starting at the end of the line of stitching. If you don’t want to stop or don’t notice the mistake until later, stitch another line of quilting which crosses the first line at the point where the mistake occurred (step 4). This will make the mistake less noticeable.
step 4 of scribble quilting process
5) As you quilt, check the back of the sandwich to see if some areas need more quilting. The quilting lines should be balanced from one area of the quilt to another (step 5). Keep quilting until you like the way it looks. If you’re not happy, add wavy lines in contrasting colors, crossing more lines of quilting.
step 5 of scribble quilting process
6) Bind the quilt using your favorite technique.
Welcome to the joy of Scribble Quilting! I hope that you enjoy using this wacky fun technique as much as I do.
New stitches can be found by accident. Mistakes can sometimes lead to a wonderful realization or improvement.
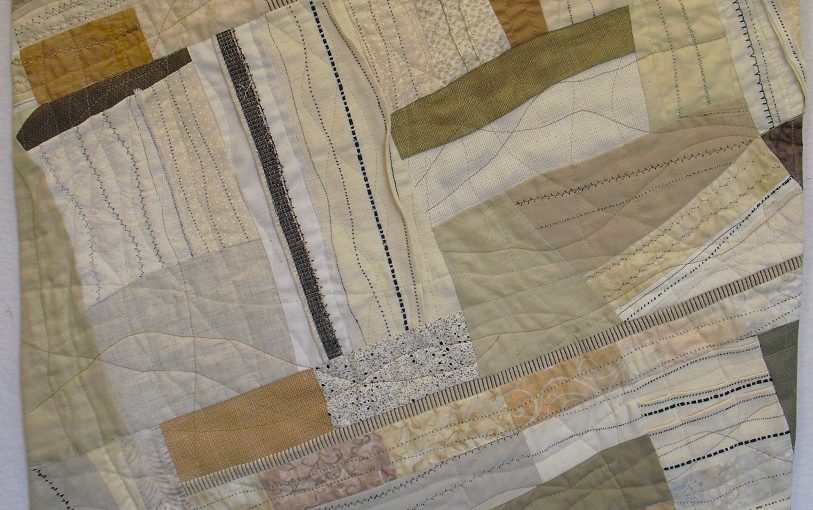
Discovering New Stitches by Mistake
Tranquility, an art quilt with black stitches pulled through to the front before quilting.
The Tension was Off.
Tension is the balance between the top threads and the bottome threads on a sewing machine.A while back my 20 year old Huskavarna Lily was acting up. Out of the blue, the tension would change as I was sewing. The action pulled the bobbin thread through to the front (top) of the fabric. As annoying as this was, I liked the way the stitches looked. I was discovering new stitches quite by accident. Could I repeat the success of this stitch ?
Let me confess, that I am not a person who often uses all of the stitches that are available on my machine. I usually use the zigzag stitch and one or two decorative stitches. I decided to fool around. How could I could use this “accidental stitch ” to my advantage? I wanted to discover new stitches by mistake. Would it be a way to add interest to my art quilts?
Changing the Tension
I changed the tension to 8 or 9 high on my machine. with a black thread in the bobbin. The top thread I used matched the white or beige color of my fabric. At the time, I was doing Native American inspired quilts. Moreover,I felt the black dots on the top somehow seemed to work for me. The maximum contrast drew my attention. I also adjusted the stitch length and width to make them as large as possible for maximum visibility. The results were pleasing.
In conclusion,errors can turn into serendipitous wonders if we keep our minds open to them. In the future, I should be more adventuous to change the tension and adjust more of my machines stitches.