Eli Leon and Lemmy. Photo: Courtesy of Eli Leo Living Trust
Eli Leon Collects Unique Textiles
For 55 years, Oakland psychotherapist Eli Leon collected unusual textiles. Above all,his collection included kitchiana, aprons, vintage clothing, traditional standard quilts, and, most famously, Afro-tradition quilts. On the one hand,he bought most items in California. But he would go on repeated research and collecting trips to East Texas, northern Louisiana, and southern Arkansas.
The Sale of the Unique Collection
This June 23- 25, Geneva and Julie Addison will be selling his collections from his home at 5663 Dover St. in Oakland. Above all,the collections are breathtaking. For instance,they are manifestations of a collector with a sharp eye for acquiring and displaying in his home. Moreover,proceeds from the sale will go towards Leon’s care. See their blog about the sale, with more than 500 photographs. However, his Afro-tradition quilts are not included in this sale.
At my Quirky Berkeley blog, I explored Leon’s life, home and collections. Here is a small bit of the wonderful items that will be for sale this weekend. For example,the first weekend of the sale will deal with the non-textile collections. Then,the traditional quilts and other textiles will be sold later this summer. Further,the sale is first come, first served. Subsequently,it represents a perfect chance to pick up some pre-collected quirky material culture and to honor a great scholar and collector.
Most importantly,Leon’s most famous collection is of African American quilts. However,his trust plans that the collection will be preserved intact by a museum. Furthermore,the collection includes 100 of the traditional American quilts,. Here are a couple photos.
Yellow double wedding ring quiltRed Sampler Quilt
Above all,Leon was a passionate and driven and skilled collector. In addition,I have never seen a better opportunity for buying quirky little things. In other words,visiting Leon’s house will give a glimpse into the world of that driven and talented collector.
Quilt collectionQuilt collection
Tom Dalzell, a labor lawyer, created a website, Quirky Berkeley, to share all the whimsical objects. The site now has more than 8,000 photographs of quirky objects around town.It also includes posts where the 30-year resident muses on what it all means.
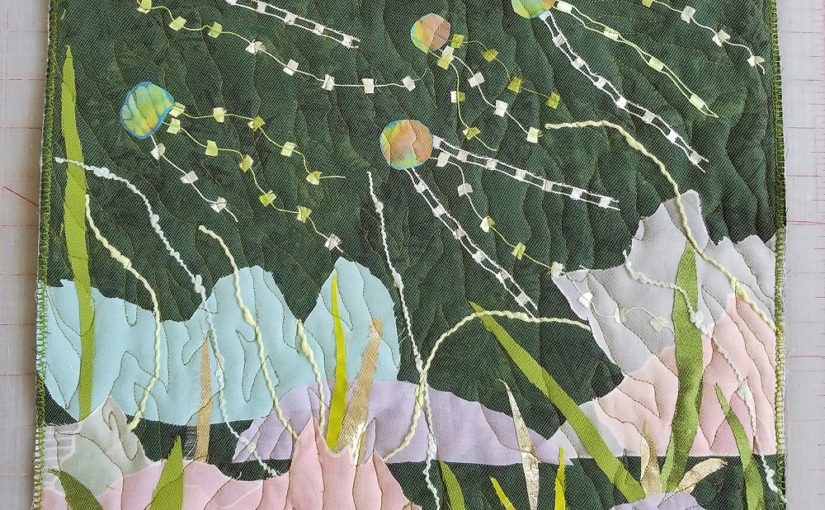
The fabric layering technique of making art quilts uses a table rather than a design wall. In short, I create a scene and then cover it with tulle netting and free motion quilt the three layers(back, batting,top) together. I use this technique for my Nature portfolio; underwater fantasies, trees, landscapes. The photos in this post are of an underwater fantasy, more impressionistic than realistic.
To Begin
To begin, I choose the top fabric. I prefer to choose a fabric with some dimension already on it, light and dark spaces. If I choose a dark background, then I will choose lighter colored materials for my plants, fish, rocks and other items . If I choose a lighter background, then I will choose darker color to create the scenery.
Step 1
The back fabric is flat on the table. A piece of batting is laid on top of that. You can see the white batting hanging a bit over the edge. Then I laid a piece of moddled commercial fabric on top. The piece is about 14″ by 14″. I let the fabric’s different shades of coloring do part of the work in creating interest and depth in the piece. I lightly baste the layers together with an Avery glue stick.
step 1 in fabric layering technique for making art quilts
Step 2
For this piece, I cut out light colored rocks and placed them in the foreground. I cut out irregularly shaped dots of different colored batik fabric for the jellies(formerly called jelly fish). I place the jellies as if they are swimming in the current. An art trick or rule is to have an odd number of items, three, five or nine objects.
step 2 in fabric layering technique another look
Step 3
Next, I cut out plants and place them between the rocks. I add decorative threads for the tenacles of the jellies being aware of the movement of the water. When everything is in its place,I baste the pieces in place with a light dab of glue. One can use different brands of glue. Test before hand that the glue does not discolor the fabric and make a mark after it has dried.
Step 4
Next, I cover the scene with tulle netting and pin the tulle in place.
step 4 in fabric layering technique another look for making art quilts
Step 5
Then,I free motion quilt the three layers together. I lower the feed dogs on my machine to allow me to move the piece however I want. The quilting creates another level of movement.
step 5 in fabric layering technique another look for making art quilts
Step 6
I finish the piece by zigzagging the edges twice. For larger pieces, I often attach a facing and turn it to the back and stitch by hand.
step 6 in fabric layering technique another look for making art quilts
Here is a photo of the back of the piece where you can see the machine stitching easier.
Free motion quilting is at the apex of skill for quilters. The technique takes a lot of practice to master. Before I took Meri Vahl’s class, I had been practicing. To be honest, I was so frustrated that I had almost decided to give up. Luckily, I didn’t. The fabric layering technique is a forgiving way to practice the skill. I highly recommend it.
Here are my suggestions for success in free motion quilting.
Use Aurifil brand thread. It can be found in fine quilting shops or online. It is totally worth the higher price. The thread is strong yet thin. I once pieced and quilted a double sized bed quilt using only one spool.
Aurifil thread 50wt
“Fast feet, slow hands.” This is the mantra for free motion quilting. This means that one pushes the pedal of their machine so that the throttle goes quickly. With the feed dogs down, the quilter slowly moves the quilt with her hands. This does take a fair amount of practice.Practice using the fabric layering technique. Begin by outlining your figures with the free motion quilting.
Have fun practicing with this technique! Let me know how it goes for you! I hope you have as much fun as I do using this technique.
Read this interview about Cindy Grisdela,art quilter by Studio Art Quilt Associates(SAQA) too good not to share.
Art Quilter Cindy Grisdela
JourneysEndDetail-CindyGrisdela
SAQA: When did you begin making art with fabric? Do you work in other media as well?
GRISDELA: I started sewing when I was 10. My mother decided I was old enough to be trusted with her beloved Singer. I studied art in high school and college experimenting with painting, drawing, ceramics, sculpture and weaving.I made my first quilt in 1983. After seeing an article in a magazine of a queen size Trip Around the World, I wanted to make one. After that I was hooked. I spent a number of years making traditional quilts as a creative outlet while I raised my family. About 15 years ago, I got bored with following patterns. So I started seriously trying to make my own art in fabric.
Color and Texture
SAQA: What inspires you?
GRISDELA: I’m inspired by abstraction, color and texture. I enjoy playing with color and seeing how various colors and shapes interact. One of the reasons I create with fabric instead of with paint is the ability to add another dimension to my compositions. I can add texture with dense free motion quilting. The stitching is an integral part of the composition. It is not just a means to hold the three layers together.
SAQA: Have any artists or art movements influenced your work?
GRISDELA: I have a degree in Art History. There are always lots of influences rattling around in my head. I love Abstract Expressionism, especially the Color Field School of artists. Matisse’s cut outs are important to me, as are Klee, Kandinsky and Klimt. I’m also drawn to the work of Robert and Sonia Delaunay. Among quilt artists, I am indebted to the work of Gwen Marston who was an early influence.
SAQA: What techniques and materials do you use?
GRISDELA: I use hand dyed fabrics to create almost all of my current work mostly by Cherrywood Fabrics. I experimented with dyeing my own fabrics a number of years ago, but realized that’s not my skill. So I’m happy supporting others who do it well.All of my work now is created using improvisational piecing techniques and free motion quilting. I enjoy the dialogue that happens when I’m just cutting out colors and shapes intuitively. One decision leads to the next. It’s a little like putting together a jigsaw puzzle. Only I get to decide what the picture is going to look like. I do all my quilting without marking ahead of time or using a computer program.
A Lakeside Studio
SAQA: Where do you create?
GRISDELA: I have a studio in the basement of our townhouse. I look out on the lake while I’m sewing. It’s a very peaceful retreat. The commute downstairs is great too! I also have a shared space with nine other artists a short distance from my home. I’m the only fiber artist in the group. But it’s good to be around other creative people and share inspiration. I try to spend one day a week there.
Artmaking and Business
SAQA: How do you reconcile the artmaking and business sides of your creative life?
GRISDELA: That’s the tough part. For the last ten years I’ve been traveling extensively showing an selling my work at fine art and fine craft shows all over the country. I do about 12-14 shows a year. I also have an active blog and presence on Instagram and Facebook. I’m a regular contributor to the SAQA (Studio Art Quilter Associates)Journal.
I spend about half my time on the business side. This entails writing, applying to shows, keeping my website up to date, marketing, and other business. I like to spend time in the studio in the morning and early afternoon. That’s when I’m most creat I work on other business later in the day. I keep lists and work backward to make sure enough time is allotted to keep my inventory up for the shows. Sometimes I’m writing blog posts or marketing pieces on the road.
Publications
SAQA: Have you published books or been a guest on an art-related media program?
GRISDELA: I will continue doing shows. Probably not as many as I did in 2017. I’m doing a lot more teaching now to promote the book. It’s such fun to see a diverse group of artists come together for a day or more to explore their individual creativity. Each person’s work is different from the others and different from mine. We all bring our own personalities and backgrounds to the table.
I also have plans to work on a new series of larger improv quilts. The great thing about improv is there’s always something new to explore!
Use yarn to create fabric to add texture to an art quilt. I zigzag or couch multiple pieces of yarn on strips of 100% cotton. Then I cut them up and use the pieces as fabric in my art pieces. Decorative threads can also be used.
Yarn I inherited from my mother.
My First Inspiration
I have several small spools of yarn I inherited from my mother. Their bright colors attracted me. I don’t know what my mother had used them for. I wanted them for something,although I didn’t know for what. They languished in my studio for a long time before a perfect use came up.
My Second Inspiration
Several years back at a large quilt show, I saw a piece that had a large amount of yarn jammed on top into big blob. To be honest, I didn’t like effect at all. But it gave me the idea to use yarn in a more orderly fashion. I stumbled upon a way to create more texture for my pieces.
Materials
First, I chose the colors that I want to use in my art quilt. I go through my box of decorative threads and yarns looking for yarn with texture and complementary shade of color. Using a long strip of cotton fabric, 20”-40” long and 5” to 6” wide, I begin. Other backings like ribbon didn’t work well as it was slippery and was not easy to sew with. I zigzag(couch) the yarn to the cotton strip. I prefer to match the sewing thread color to the yarn as that the color of the yarn stands out more; the stitching appears invisible. But that is a personal choice one can make.
Suggestions
Don’t worry about the lines being straight. A thin piece of yarn can be doubled or tripled to become thicker . Vary your use of threads for texture. Remember to leave space for the 1/4″seam allowance. Don’t sew too close to the side edges of the cotton fabric.
Next,various strips of cotton with yarn and decorative threads zigzagged on them.Then,long strips of cotton with the yarn couched on them.
More Suggestions
Sometimes I keep the threads straight and sometimes I cross one thread on top of another. I like the movement this creates on my art quilts. Overthinking this process is not necessary. I find it fun and relaxing. If things don’t turn out as I would like then I can just save the piece for another project. After 5 or 6 pieces of yarn have been couched, then I randomly cut them into pieces to use as fabric.
Sometimes I use linen with a slight design on it for added texture.Finally,I cut up the long strips. They are ready to be used as fabric.
Conclusion It will be easy to find interesting yarns and decorative threads at flea markets or garage sales. There won’t be enough yarn for a scarf or a sweater but there will be more than enough for your couching projects.
Homage to a Dancer, one of the first art quilts I made.
People ask how art quilts and bed quilts different. The answer is something that I have lived through. I started making bed quilts back in the 1970’s. In 2008, I made the transition to creating wall art. May I offer some generalizations?
Bed quilts and art quilts are made with the same tools; sewing machine, rotary cutters, cutting boards, see through ruler, a variety of feet for their machines. Many of the techniques are also the same. Both have three pieces sewn together,use applique tecniques, quilt by stitch in the ditch, and often include binding. Bed quilts generally have squares or blocks of fabric sewn together. Bed quilters prefer to use 100% cotton. It is the best fabric to work with. It lies flat and most importantly, it is washable.
Art Quilts are Wall Art.
When a quilter moves away from the necessity of washing their piece, a whole new realm of fabric possibilities open up. For me, foregoing the use of patterns also forged my way toward art quilts. I have been “scarred” by my pattern disasters. I flatly refuse to use them anymore unless it is my own pattern. But that only happens rarely. By not following anyone else’s ideas, colors, or materials, I have been able to create my own style.
Silk, linen, synthetics, yarn and decorative threads have become my go to materials. I am very focused on using redirecting fabrics and materials to keep them out of the landfill. I keep the smallest pieces of fabric to try and find a use for it instead of placing them in the trash. Of course, my first focus is on creating a beautiful piece of art that someone will want to live with.
Check out the group fiber show at the R. Blitzer Gallery 2017.
Fiber Show at R.Blitzer Gallery 2017
Fiber Reflections:Shared Dimensions will be at the R. Blitzer Gallery. Santa Cruz, CA April 5-28, 2017 Here are some of the participating artists.
Beautiful jacket by Marilou MoschettiMarilou Moschetti fiber piece
Marilou Moschetti, Fiber Show at R.Blitzer Gallery artist
I began creating Nuno felt 15 years ago. It is a technique used to fuse silk and fine Merino wool together. In 2002 I fell in love with the art of felt making during a trip to New Zealand. I teach felt workshops throughout Northern California. I received my Bachelor’s Degree from San Jose State University.
Primarily,Carole Rossi is a quilt & fiber artist. She lives in Sacramento, California with her husband. Creating her art is how she thrives. The fabric, the colors, the textures are her passion.
Long ago,Carole learned to sew from her Italian grandfather. He was an accomplished tailor. Carole is a lawyer specializing in higher education & employment law. Currently, Carole uses piecing techniques to create representational images. her art quilts are based on her photographs of her travels.
Ocean by Carole Rossiby Carole Rossi
Alexandra Sanders,artist at Fiber at R.Blitzer
I am an artist in Santa Cruz, California. I have my Bachelor’s degree in Art from San Jose State University. My emphasis is in Textiles-batik, and silk painting. I choose to paint birds with watercolors.
Egrets by Alexandra SandersTree Batik by Alexndra Sanders
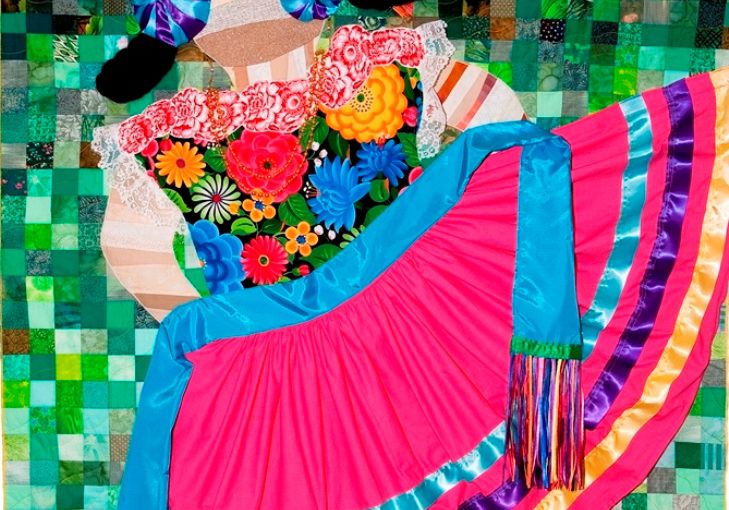
My art quilts may be abstract, whimsical or impressionistic. Inspiration comes from the natural world. Similarly, I am influenced by Mexican and Native American cultures. My materials of choice are redirected fabrics. Art quilts free me to play with color and texture.
Shore to Sky F by Ann Baldwin MayPack Animal by Ann Baldwin May
Scribble Quilting is a wacky fun way to quilt. Are you stuck in stitch-in-the-ditch? Are you a bit bored with straight line quilting? Maybe it’s time for you to try Scribble Quilting. It is not hard at all. All you need to get started is a walking foot, a quilt sandwich ready to quilt and different colors of thread.I developed this technique because I was bored with other ways to quilt.Looking for a wacky fun variation to your quilting? Try Wacky Fun Scribble Quilting.
Waiting for the Roadrunner, 22″ x 24″ 56cm x 61cm
Artful and Interesting
First of all,Scribble Quilting is a colorful, artful and an interesting way to quilt. For example,the quilting thread lines cross each other; creating positive and negative space. The sewing lines are the positive space. However,the negative spaces are the shapes created by the lines. Similarly, Lines undulate, curve and wave. Do the lines you’ve made draw your eye in and keep your interest?
By Accident
Like many great ideas, Scribble Quilting was discovered by accident. Once while making a baby quilt,I decided to quilt curvy lines with my walking foot instead of straight ones. Furthermore, I used one of the built-in stitches on my sewing machine which made regular, gentle curves. Soon, I wanted to make the curves wider. Switching back to my usual straight stitch, I began gently moving the quilt from side to side by hand to make wider curves than my built-in stitch had allowed. It was fun, and the lines looked more interesting. I kept quilting, experimenting with contrasting thread colors. Subsequently,I currently finish many of my art quilts this way.
Scribble Quilting
In addition,I named this technique Scribble Quilting. After art lessons were cut at in my elementary school classroom, I noticed that some students showed their frustration with what they considered unsuccessful art projects. After that, they would scribble all over them with four or five different crayons. It caught my attention. However,it looked like a party with confetti falling all over. As I quilted my pieces, drawing lines with multiple colors and crossing over them repeatedly, it reminded me of scribbling.
Fun with Thread Color
Take this opportunity to have fun with thread color. Be aware that the thread color can appear different depending on what colors it is on or near. Free yourself from perfectly matching the thread to the top fabric. I found that even slight variations in the color of the quilting threads added subtle interest to a quilt top.
More color is more interesting. For example, I bought a spool of wacky fun chartreuse (yellow green) thread at a flea market several years ago. I never wear this color and had not tried it in quilting. But this thread has become one of my favorites because of the way it plays with other colors. It brightens green or black fabric.Yet, it often reads as yellow. I encourage you to play with the thread to see how it changes, depending on the color of the fabric. Updated- Sometimes I use just one color of thread instead of more than one.
More Color is Better Except
More color is more interesting, with one exception. Thinking that variegated thread would be fun and wacky, I tried to use it. However, I personally was not satisfied with the results. I had no control over when the colors changed. It wasn’t fun when the bobbin thread didn’t match the top thread. Maybe this is just a personal choice on my part. Each quilter can make their own decisions.
Are you ready to start Scribble Quilting?
Begin each project by quilting straight lines about 5 inches (12cm) apart using a walking foot. Stitch-in-the-ditch works well to hold the quilt sandwich together. Remove the pins to avoid sewing over them. After you’ve finished straight-line quilting to secure the quilt sandwich, change to another thread color.
Next,quilt several lines in one color. Spread the stitiching lines out across the quilt top. As you sew from one edge of the quilt to the other,gently moving the quilt sandwich from side to side. Change thread color and continue quilting. Make wider curves so that the quilting lines cross. Keep quilting until the quilting is evenly space. Are happy with the way the lines cross each other? if not, then do some more.
Instructions
1) Prepare a quilt sandwich by pinning together the backing, batting and top (step 1).
step 1 of scribble quilting process
2) Decide where to start quilting. In the beginning, it’s easiest to start on one side and go to the opposite side.
3) Begin by using a walking foot to make straight lines of stitching about 5 inches 12 cm apart. Stitch in the ditch if you want. (step 2).
step 2 of scribble quilting process
4) Now begin sewing curved lines of quilting, still using a walking foot. Begin curved quilting on the edge of the quilt, near the middle of one side. Pull the quilt taut with both hands as you quilt. Gently move the sandwich from side to side as the machine stitches. Use your needle down position in case you have to stop. Stop quilting to readjust the quilt sandwich. Avoid jerky movements. The quilting thread should form a smooth, flowing line (step 3).
step 3 of scribble quilting process
Problemsolving
If your line of stitches moves abruptly to one side, stop immediately. Remove stitches until you have enough to thread a needle, then bury the threads in the batting. Continue quilting, starting at the end of the line of stitching. If you don’t want to stop or don’t notice the mistake until later, stitch another line of quilting which crosses the first line at the point where the mistake occurred (step 4). This will make the mistake less noticeable.
step 4 of scribble quilting process
5) As you quilt, check the back of the sandwich to see if some areas need more quilting. The quilting lines should be balanced from one area of the quilt to another (step 5). Keep quilting until you like the way it looks. If you’re not happy, add wavy lines in contrasting colors, crossing more lines of quilting.
step 5 of scribble quilting process
6) Bind the quilt using your favorite technique.
Welcome to the joy of Scribble Quilting! I hope that you enjoy using this wacky fun technique as much as I do.
New stitches can be found by accident. Mistakes can sometimes lead to a wonderful realization or improvement.
Discovering New Stitches by Mistake
Tranquility, an art quilt with black stitches pulled through to the front before quilting.
The Tension was Off.
Tension is the balance between the top threads and the bottome threads on a sewing machine.A while back my 20 year old Huskavarna Lily was acting up. Out of the blue, the tension would change as I was sewing. The action pulled the bobbin thread through to the front (top) of the fabric. As annoying as this was, I liked the way the stitches looked. I was discovering new stitches quite by accident. Could I repeat the success of this stitch ?
Let me confess, that I am not a person who often uses all of the stitches that are available on my machine. I usually use the zigzag stitch and one or two decorative stitches. I decided to fool around. How could I could use this “accidental stitch ” to my advantage? I wanted to discover new stitches by mistake. Would it be a way to add interest to my art quilts?
Changing the Tension
I changed the tension to 8 or 9 high on my machine. with a black thread in the bobbin. The top thread I used matched the white or beige color of my fabric. At the time, I was doing Native American inspired quilts. Moreover,I felt the black dots on the top somehow seemed to work for me. The maximum contrast drew my attention. I also adjusted the stitch length and width to make them as large as possible for maximum visibility. The results were pleasing.
In conclusion,errors can turn into serendipitous wonders if we keep our minds open to them. In the future, I should be more adventuous to change the tension and adjust more of my machines stitches.