The gloomy June coastal overcast was just lifting as I stepped off the bus on Science Hill at the University of California, Santa Cruz(UCSC). The sun was out but a coolness in the air remained. A slight hint of redwood filled the air. Having been on campus numerous times but I hadn’t recalled the loveliness of the fragrance. Enchanting, it was.The collaboration between the artist and the scientist is about to begin learning from guarding chalk to black holes.
Bridge from one side of campus to the other.
The Physics Office
I enjoyed the short walk to Benjamin Lehmann’s office in the Interdisplinary Science Building. I had never been there,but I had been to the nearby Science Library. After arriving a bit early, I took the opportunity to look around the lobby . I snuck a look at the photos of professors and PhD candidates on the wall. As it was finals week, the lobby was busy with a diverse group of students working on their laptops. The days of science being a males only field are over.
Ann Baldwin May 2018, art quilterBenjamin Lehmann, Phd physics studentBen’s office
Ben’s Office-From Guarding Chalk to Black Holes
When Ben arrived, he showed me his office, a small room with 4 desks and a chalkboard. Evidently, physicists resisted the change to white boards. They have been able to continue with chalk and blackboards for their labors. Each grad student guards their special stash of chalk. As a retired elementary school teacher who spent most of her career teaching from a chalk board, I found the practice relatable and charming.
The Search for Common Ground
We began taking baby steps to find common ground to work together. Ben pulled up some images,photos,charts and graphs on his computer that he thought might be a starting point of inspiration. They were incredible shots of space. I prefer my art be more impressionistic rather than photo image perfect. However, I plan on keeping an open mind on this aspect. I may be adjust my opinion for this project. Ben expressed an interest in being an active participant in some of the artwork.The fabric laying techniques easily accessible to newcomers. He would create a scene and I would do the sewing part. The possibility is worth looking forward to.
Learning about Dark Matter
Ben asked what I understood about dark matter. My response pertained to my very limited knowledge of black holes. Ben graciously commented that many words seems similar but have different meanings. As a theorist, he explained that he studies the beginning of the universe by studying particles and their actions right after the Big Bang. Dark matter is matter(solid, liquid, gas)that is all around us but we can’t see it. I thought of wifi. As an educational system, a core part of UCSC curriculum fosters interdisciplinary studies and collaborations as essential to the future work environment. Ben, as one of its students was successful in communicating these difficult ideas. While I understood his explanations, I warned him that I might need to have them repeated again.
Scientists need to Communicate Clearly
The issue of scientists communicating to others is crucial, more now than ever. Explaining complex scientific concepts to people, however educated they my be in their own fields, is a crucial skill. Ben shared that monthly lectures were offered by the Physics Department. At those meetings, different physicists to share their work. He admitted that he sometimes couldn’t totally understand the physicists whose work was in a field of physics different from his own. We must all work to break down the silos of communication.
Creativity -Thinking with an Open Mind
Creativity involves being open to new thinking or trying something new. One must venture forth without knowing what the end process or destination may be. In other words, Ben, theorical physicist and I, art quilter both had a creative day.
Finals Week
As the early afternoon heated up, Ben had to leave to proctor a final exam. I continued to sit on the bench we had found outside inhaling the redwoods until it got too hot. UCSC rightfully holds a place on the list of most beautiful campuses. I thoroughly enjoyed my visit. I undoubtably was the only person relaxed and smiling on that finals week afternoon.
Lost in space. Starting the collaboration,I felt a bit lost.
Collaboration of Physics and Art 1
My Collaboration of Physics and Art 1 began June 13, 2018. I am an art quilter and fiber artist. Physics PhD candidate, Benjamin Lehmann, University of California, Santa Cruz was my collaborator, (I have read far too many World War II books to not get stuck on the multiple meanings of the word, collaborate. I must get past that.) UCSC Physics professor, Stephanie Bailey,initiator of the idea,explained,
“This project aims to enable people to access and engage with physics through art and to think about the role physics plays in our lives and world at large.” I plan on blogging about our collaboration. I hope that it proves to be of interest.
The Artist’s Short Bio
Professor Bailey initiated the collaboration with a call of interest to local artists. I responded in order to connect more with the field of my daughter’s boyfriend. My own background is in the Humanities,History and Spanish. I started sewing in high school. Later I took up traditional bed quilting. About ten years ago, I initiated my foray into art quilts. In 2012, I retired from teaching elementary school.
Searching for the New
Since then I have been a full time art quilter. I never took physics in high school. Feeling ready to try something new,I really had no idea what I had signed up for. While being open to the experience, I didn’t know what to expect. What will I be able to create? Will the scientist be creating art as well? The timing for the project was compatible with my schedule. I was open to taking a new direction in my art. The plan is to complete the project with a show in January, 2019.
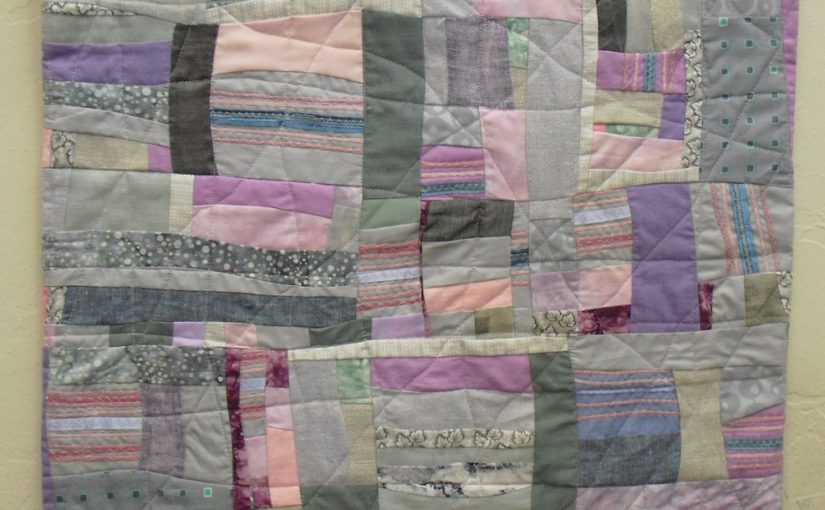
City Lights, a fabric art quilt
Imagining a Plan
At first,I considered which of my pieces might align best with “space shots”. Then I decided that the abstract pieces or fabric layering technique creating scenes would work best. I feared I would have problems coming up with ideas. Then at least I could fall back on what I had already done. While it feels safe to have ideas before I start, I want to keep my options open to be inspired to move in new directions.
This is the process that I could use. Imagine stars instead of jellies.
What Could I Do?
However, so many questions remained. How many pieces of art would be expected? How many other pairs of collaborators would there be? As if she heard my questions, Professor Bailey communicated a list of 15 local artists. I recognized several friends of mine on the list. Their work, painting and fused glass is very different from mine. I will focus on what lends itself to fiber. I will not be too concerned about completely a certain number of works.
Upon reflection, I am struck by the greater meaning of our collaboration. How do people of different points of view and experience come together ? How do we learn to work closely together? Ultimately, how can we learn to see the world through the eyes of someone different from ourselves?
Sea Dragons in the Golden KelpUnder the Shady Tree 27″ x 38″
Color! Texture! Movement!
Art quilts by Ann Baldwin May are all about color, texture and movement. Her inspiration comes from the natural world as well as from Mexican and Native American Influences. Motivation stems from how the materials play with one another. Her materials of choice are redirected fabrics from the San Francisco Design Center.
The artist’s portfolios includes abstracts, seascapes, landscapes and Mexican inspired fabric collages. Artist created fiber details, tucks or found objects add texture. Flowing quilting lines and curved line piecing creates movement . Techniques include curved line piecing, free motion quilting, and fabric layering.
Bio
Ann Baldwin May was born and raised in Palo Alto, California. She received her education from University of California, Irvine. She has a BA History,anElementary Teaching Credential, and a Masters in Teaching Spanish. Her first quilting class was in 1975. She retired in 2012. She worked 30 years as a bilingual teacher and Bilingual Resource Teacher in Watsonville, California.
Being an Artist
After making over 300 bed quilts, she turned her attention to art quilts. Ann is passionate about using repurposed materials often from the San Francisco Design Center. She has won several awards for her work. Five pieces were recently purchased by Kaiser Permanente for their Santa Cruz County facilities. Her work reflects her inspiration of materials, nature and her love and respect for the Mexican culture. Ann Baldwin May Art Quilts participates in the juried Santa Cruz County Open Studios Art Tour. Visit her studio and gallery in the Santa CruzArt Center, 1001 Center St. #4 Downtown S.C.
Organizations
Pájaro Valley Quilt Association (PVQA),a past president, secretary and parliamentarian. Santa Cruz Art League Pájaro Valley Arts Council Studio Art Quilt Associates(SAQA)-international art quilters organization New Fiber Group of Santa Cruz County
Simply,my art quilts may be abstract, whimsical or impressionistic. Furthermore,inspiration comes from the natural world as well as from Mexican and Native American influences. In addition, materials of choice are redirected fabrics and found objects. They come from the San Francisco Design Center. In addition,art quilts let me to play with color and texture. My technique, Scribble Quilting allows me to create movement on many of my pieces.
A Short Bio
I was born and raised in Palo Alto, California.In high school I studied sewing and clothing construction for two years. Later,I continued to sew much of my wardrobe. As a newlywed, I took my first quilting class at a neighborhood fabric store in Huntington Beach. My husband and I lived and traveled in Europe for a year.Then we moved to Santa Cruz, California in 1980. I continued to sew clothes and make quilts for my family.I stopped counting bed quilts at 300. After teaching 30 years in Watsonville as a bilingual teacher, I retired.
Above all, Art at the Santa Cruz County Building offers incredible art to a place where the public actually goes. Moreover, it brightens the day for people that are paying their taxes or just inquiring about a property. Some pieces just bring a smile to your face. However, sometimes people are truly at the county building for a serious item. They may choose to engage or ignore the art.
Above all,I am pleased to have my art quilts seen by such a random group of the public. All citizens visit the Santa Cruz County Office Building at 701 Ocean St. The display was up in July,2018. There are a variety of media to enjoy. Art at the County Building, First Friday Reception was Friday, July 2, 2018.
Underwater Fantasy by Ann Baldwin May, art quilter
Ann Baldwin May
My art quilts may be abstract, whimsical or impressionistic. Moreover, inspiration comes from the natural world as well as from Mexican influences. Furthermore, my materials of choice are often redirected fabrics from the San Francisco Design Center. Art quilts free me to play with color and texture.
Bio
I was born and raised in Palo Alto, California. Later,I studied sewing for two years in high school. After living and traveling in Europe for a year, my husband and I moved to Santa Cruz, California in 1980. Then,in 1975, I took a quilting class. From then on,I continued to sew clothes and make quilts for my family. Finally, I stopped counting bed quilts at 300. After teaching 30 years in Watsonville as a bilingual teacher, I retired. After that, I began to spend more time on my art quilting career.
Winter Sunset, An abstract art quilt with lavander,pink, and grey colors,the finished piece
Abstract Art Quilt Work in Progress, Winter Sunset
This work in progress shows the steps I follow to create an abstract piece of art. Designing my abstract art quilts begins with choosing a group of colors. Inspiration for this quilt came from the greys and pinks of a winter sunset. I pick the decorative threads that I want to work with. I choose fabric that fits into the shades of colors that I chose. This time I want the colors to blend together and hardly be noticeable. Look for the green marbled fabric I added for that purpose. Choosing mnaterials from my stash is my favorite part of the creaive process.
1. Yarn and decorative threads for couching.2.I begin to choose fabrics.
Couching Decorative Threads and Yarns
Couching decorative threads and yarns to a long strip of fabric is fun. I use little pieces that might otherwise be thrown away. Each person’s eyes will blend the colors together differently. Then I randomly cut up the strips to use as fabric. I place the fabric on the design wall. Then I move the pieces around until I like it.
Long strips of cotton with the threads couched on them.I cut up the long strips. They are ready to be used as fabric.I place them on my design wall.
Keep Colors and Textures Balanced.
Beginning to sew the pieces together, I keep my eye out to make sure that the balance of the colors and textures is good.
I start to add the other fabrics.8. I added more fabric.
I keep adjusting the fabrics adding and subtracting fabrics as I go. Until I get it just right in my eye’s mind.I begin sewing small pieces together.
I sew more pieces of fabric together.
I continue sewing pieces pieces together. Here you can tell that the pieces are getting larger.
An abstract art quilt with lavander,pink, and grey colors
I moved some other pieces around. Sewing together continued. I finished sewing or piecing the top together.. The quilt sandwich has the top, the batting and the backing fabric pinned together to quilt.
done
I use my wacky fun scribble quilting technique to quilt the three layers together creating an added level of movement. Scribble quilting is a technique I named. I move the quilt side to side while quilting with a walking foot.
Winter Sunset, An abstract art quilt with lavander,pink, and grey colorsthe finished piece
You may be interested in reading more at Studio Art Quilt Associates (SAQA) website.
Groovin High by Faith RinggoldTar Beach , an art quilt by Faith Ringgold
Faith Ringgold Quilt Artist
Sacramento, Calif –UPDATED December 22, 2017 –
On February 18, 2018, the Crocker Art Museum will bring to Sacramento Faith Ringgold: An American Artist. This exhibition features Ringgold’s famous story quilts. In other words, tankas, inspired by thangkas, Tibetan textile paintings. Also included are Ringold’s oil paintings, prints, drawings, masks, and sculptures. Furthermore, on view are the original illustrations from the artist’s award-winning book Tar Beach.
Harlem-born Artist and Activist
After a trip to Amsterdam’s Rijksmuseum in 1972,Harlem-born artist and activist Ringgold began working with textiles. After that,a gallery guard introduced her to Tibetan thangkas. Above, all,thangkas are traditional Buddhist paintings on cloth, surrounded by silk brocades. After returning home, Ringgold enlisted the help of her mother, a professional dressmaker.Importantly, Ms. Ringgold made politically minded thangkas of her own. Certainly,she sewed frames of cloth around depictions of brutal rape and slavery. In 1980, Ringgold crafted her first quilt. Again,with some sewing help from her mother. Ms. Ringgold created Echoes of Harlem (1980).Moreover,she portrayed 30 Harlem residents in a mandala-like composition.
Moreover,these works combined visual and written storytelling to explore topics. In addition, the underrepresentation of African Americans in art history stands out. Moreover, she explored her upbringing in Harlem. After that, the legacy of Aunt Jemima. According to the artist, the textile medium allows her political messages to be more digestible. “When [viewers are] looking at my work, they’re looking at a painting. Certainly,they’re able to accept it better because it is also a quilt,” she says.
A main motivation of mine besides making stunning art is to reuse materials. Pieces of yarn and decorative threads that some people may discard become unique design elements. I couch (zigzag) them on a strip of fabric, cut them and use as fabric. Yet, sometimes there are decorative threads that one just has to buy. There is one like that in this piece. The ribbon alternates rusty orange and green with 3D native inspired tied knots. Bring Your Bravery! Be Brave!
Choosing Colors- Be Brave!
Choose your color scheme. I recommend three to four colors. Sort hues from light to dark in the same shades. Be brave. Experiment with different colors on your design wall. Don’t be afraid to eliminate fabrics. Start with more material than you think you might need. Include one bright fabric that makes the piece pop.
Creating Details Bring Your Bravery! Be Brave!
Couch (zigzag) decorative threads on 5”wide strips of cotton. Try something new. Bring Your Bravery! Be Brave! Emphasize the art element of line by couching with thread that matches the yarn to make the sewing thread disappear. Double or triple the ply for a thicker line. Repeat four to six times using different colors and types of decorative threads. Couch the decorative threads fairly close together about 1/8-1/4 inch apart. Leave a 1” space on each side of the fabric strip. This gives you flexibility. You can always make it smaller.
Tucks add texture.
Bring Your Bravery! Be Brave! Tucks add texture. Fold a 12” length or longer strip of fabric wrong sides together to create a fold. Stitch 1/8” or 1/4” close to the fold edge. Choose your thread to blend into the fabric or to stand out as a design element. Make 3-5 tucks on the same strip of fabric. Remember to save room for the seam allowance on the sides. Press to lay flat. Cut up the strips into 4”- 8”pieces. Balance their placement on the design wall.
Temporarily Mark your Design Wall
Plan to make your finished artwork about 24”square. Mark with pins the approximate size of your finished piece on the design wall as a guideline. Remember when you are putting fabric on the design wall, the finished product will be smaller. Start with fabric pieces that are a bit larger.
Photo 2 Small strips are being sewn together.
Place the Pieces Randomly
So, you have assembled your own “fabric” with couched decorative threads and tucks. Now it is time to mix those fabrics with others on the design wall. Bravely put the pieces up randomly and start to move the pieces around to see what goes together. What fabrics jump out at you?
Photo 3 Almost all squared up.
Balance the Fabrics
Limit those to an odd number of them. Balance the different fabrics making sure that they are spread out evenly over the top. Beginners might choose to piece their top using straight lines up and down. Placing the pieces on a diagonal adds interest. A diagonal quilt will go past the guideline pins and be trimmed into a rectangular or square.
Show courage. Sew, cut and move fabric around the design wall. Keep cutting and sewing pieces together until it pleases you. The top doesn’t need to be totally finished to start to sew. Sew straight or curved line seams. Continue to sew pieces together into about 8” strips. Pin them to the design wall either in straight lines or on a diagonal. Allow time for this process. Trust yourself.
A “Painful” Time
This can be a “painful” time for an artist, if the piece isn’t coming together as one wishes it would. I find that if I don’t like a part, it gets more interesting after I cut it up and rearrange the pieces. Leave items on the design wall and return later to look at the piece with fresh eyes. Complete sewing the top when you are happy with it. Prepare the quilt sandwich and quilt. Scribble Quilting is fun and adds movement to your piece. Whichever way you quilt your piece, you will have an artful abstract art quilt as testament to your bravery.
About the Author
Ann Baldwin May lives in Santa Cruz, California. In 2012, she retired after teaching elementary school for 36 years. She has won several awards for her work. She participates in the juried Santa Cruz County Open Studios Art Tour from her studio in the Santa Cruz Art Center. May is a member of SAQA( Studio Art Quilter Associates). Contact her at baldwinmay49@yahoo.com or www.annbaldwinmayartquilts.com. Or visit her Etsy shop at annbmayartquilts.etsy.com
Directions for Curved Line Piecing-optional
Lay two pieces of 5” cotton squares on top of each other right sides up on the cutting mat. Cut a slightly curved line through both fabrics with a rotary cutter. There will be four pieces. The top of one fabric will fit the bottom of the other fabric like two puzzles pieces making the original square. Take those two pieces that fit together and sew right sides together with a ¼” seam. Only the part of the fabric going through the foot will line up to a ¼” seam due to the curve. Slightly adjust the top fabric as you move them both through the foot. Press open. This technique is very forgiving. You will be amazed at your curved line. Practice making curves of different widths.
Advice for Beginners
Let each person’s eye see the hues in their own way. Let go of controlling the way the colors mix together. The color of thread changes depending on the color of the fabric that it is sewn on. The color of the fabric is influenced by the color it is next to.
When I started making art quilts, I had a lot of experience sewing clothes and bed quilts. I would think of how a traditional quilter would do something and then I would choose to do it differently.
Consider expanding your stash to include a wider range of shades and hues.
Tips
It is imperative to be cautious with certain aspects of our lives, but cutting up fabric is not one of those times.
Create texture by including fabrics other than 100% cotton. While a variety of fabric adds interest, provide some solid fabrics as a needed resting spot for one’s eyes.
Include a bit of fabric that will pop. Shiny synthetics work well for this.
Supplies and Materials
Rotary blade, cutting matt, design wall(white flannel thumbtacked to the wall) sewing machine, batiks, found threads(decorative threads, yarns, rickrack, colored string, synthetic raffia), a variety of small pieces of cotton fabrics(fat quarter or smaller), fabrics of different textures (optional), thread, batting, cotton backing fabric, scissors, walking foot for quilting.
As he retires from painting his striking Santa Cruz murals, James Aschbacher is re-inventing his art.
The Life of James Aschbacher
Sadly, after a action-packed 66 years, artist and muralist James Carl Aschbacher passed away. His wife author Lisa Jensen, and several dear friends, were at his side. James was born October 9, 1951, in Evanston, IL. For 16 years he was co-proprietor of Atlantis Fantasyworld comic book store with Joe Ferrara. At age 40, with no previous artistic training, James gave up retail to pursue art full-time.
His first Magic is Magic.
Though he’s best known now as Santa Cruz’s most popular muralist, James Aschbacher once wrote a column for Magic Magazine.“I had a little stage show when I was 16,” he reveals. “My dad and I did magic acts—sawing the lady in half, that kind of thing. Even some Houdini tricks.” As he readies himself for another Open Studios season, transformation is still part of Aschbacher’s visual magic.
Murals
Over the past 15 years, James Aschbacher muralist painted with his wife, GT film critic Lisa Jensen, some with entire classes of fifth-graders from around the county—have sprung up everywhere, 18 in all. Working with private clients and city partners, Aschbacher has created wall-sized fantasies populated by his whimsical flying fish, twirling birds and cats, and fanciful folk with wild hair. Retiring this year from the mural game, citing back trouble, Aschbacher now devotes himself full time to painstakingly crafted, shaped, incised and painted artworks.
Atlantis Fantasy World
A Chicago native, Aschbacher came west in 1975 with a girlfriend who was attending UCSC. “I saw the palm trees and I loved it immediately.” He began supporting himself with a mail-order business in illustrated and vintage children’s books. To expand his valuable collection of comics, he searched all over. “I went to flea markets,” he recalls. “And that’s where I met Joe Ferrara. We were both go-getters. In 1978 we opened Atlantis Fantasy World on Pacific Avenue.”
Aschbacher recalls the scene as “fun, weird, wild times. We handled some Star Trek stuff, and when Star Wars opened six months later, sci-fi came out of the closet. We were the first with TSR role-playing games like Dungeons and Dragons.”
He started Experimenting with Art.
After the Loma Prieta earthquake of 1989, Aschbacher retired from the comics scene. He started experimenting with art. “I had all these ideas, but no skill,” he says with a chuckle. “I never took an art class. Having grown up working in construction with his dad, Aschbacher was no stranger to woodshops. With cans of spray paint and hand-cut stencils, he began feeling his way into a style. “I did 200 paintings that way, spray paint through stencils on illustration board. I was obsessed,” he admits. “To work late into the night,I installed lights in the back yard.”“I learned on the job,” he says with a grin from an astonishingly neat work table at the studio end of his mid-county home.
Painting Fanciful Figures
The next breakthrough came when he started painting fanciful figures onto the stencils, each coated with hundreds of coats of sprayed color. “Lisa’s mom gave me paint brushes one Christmas, so I started carving in wood, then brushing paint into the carvings.” His familiar style was born. First a plywood base, then the painted board nailed onto the wood, and finally a border of encised and painted hieroglyphs. “Paul Klee’s quirky drawing gave me confidence that I didn’t have to have an academic style, I didn’t need perspective.”
The size of each painting was originally determined by the sizes of the recycled scrap board. Only later did he make large foundations for the highly popular pieces, available at the annual Church Street Art Fair, at Bargetto, on Pasta Mike sauces, etc.
Entering the Art Field
Aschbacher entered his first Open Studios in 1995. “I’ve been doing it for 25 years,” he notes. And it has been very very good to him.
“Then I started getting galleries,” he says, including Many Hands in Santa Cruz and two in Chicago. “Those were big for me, since my family was from that area.”
Color and Certain Symbols
As the years went by, Aschbacher’s palette got brighter. “I wasn’t brave enough at first.” Color is now a central feature of his style, along with the hieroglyphs. “Certain symbols—the circle, the cross, the star, the wave—are universal. And I like to alternate lines and solids. I’m a Libra, so I want balance.”
A devoted pizza and pasta chef, Aschbacher says he never tires of creating in his highly recognizable style. “It might bore other people, but not me, because I always love seeing how it will look.”
Do his smiling creatures reflect his own persona? “Absolutely. My mission is to make people smile.”
James was a board member for many yearsof the Santa Cruz Arts Council.
LOCAL COLOR Now in his 25th year participating in Open Studios, James Aschbacher has had a great deal of success locally with his vibrant signature style. PHOTO: CHIP SCHEUER.
Santa Cruz Art Center 1001 Center St. Downtown Santa Cruz offers a wide range of design businesses and art.
A visit to the Art Center in not complete without a visit to 11th Hour Coffee. The coffee is roasted on site. Food is also available. Spacious seating area inside or outside in the back or front courtyard. Find your sun or shade!
A visit to the Art Center in not complete without a visit to 11th Hour Coffee. The coffee is roasted on site. Food is also available. Spacious seating area inside or outside in the back or front courtyard. Find your sun or shade!
Other Businesses include
Santa Cruz Food Lounge, Suite 1 – a downtown special event venue. Available for community meetings. A community hub focused on outstanding food, art, entertainment, education.
Ann Baldwin May Art Quilts, Suite 4 Working studio and gallery. abstract art quilts, nature or Mexican inspired fabric collages. Pre covid,I filled the lobby each First Fridays and Open Studios. Color! Texture! and Movement! 831.345.1466
Follow the art activities on our Facebook Page, Arts at the Santa Cruz Art Center.This group is open to the public. Anyone can post there. The only rule is the activity must take place at the Art Center.The purpose is to highlight the arts related businesses and activities. Located at1001 Center St. Downtown Santa Cruz, CA. Many venues feature art for the monthly First Fridays Art Tour.
The Public is Welcome.
We invite those who present or host events in the SC Art Center to join this group. All events taking place there are welcome. The usual activities include music, theatre, visual arts, or dancing .In the past there have been poetry readings, comedy, mystery dinners and book launchings. Advertise your show.
Having Fun With Color!Texture!Movement! appeared in Art Quilting Studio, Summer edition, 2018. Ann Baldwin May is having Fun With Color!Texture! Movement! in each of her art quilts.
Having Fun With Color!Texture! Movement! will show the steps needed to add color,texture andmovement to art quilts using the fabric layering technique.
Having Fun With Color!Texture!Movement! GETTING STARTED
The fabric layering technique makes it easy to have Fun With Color!Texture! Movement! to your art quilts. Begin by laying the back cotton fabric on a table. Choose a size that will easily fit on your work table. A square or rectangle about 15”-20” is a good start. Press the fabric to lay flat. Cover with batting which should also lay flat. Don’t worry if the edges don’t exactly line up, they will be trimmed later. Next, choose a fairly neutral background fabric or fabrics. Overlap the fabrics about an inch. If the fabrics shift during quilting, the batting won’t show. Cut a meandering line to look like rolling hills on the edge of the top fabric. Lightly baste with a glue stick.
Choose your Colors Having Fun With Color!Texture!Movement!
detail of Along the Path
Choose your colors adding a range of hues from light to dark as well as colors that contrast. Play with the colors to see what you like. Be ready to eliminate those that really don’t work. Go for an impressionistic view rather than a picture perfect trunk, leaf, or branch. Each viewer’s eye will blend the colors uniquely.
Start Large to Small
When beginning to create the scene, start with the largest part and work to the smallest. Cut out the tree trunk and add branches as you go. Flip the fabric and use the backside to add dimension. When you have the tree the way you like it, lightly baste. Just baste in a few places not all over. Later on, if you may want to slide a branch underneath and you won’t be able to if it is totally glued down.
Add Details Having Fun With Color!Texture!Movement!
Add rocks to the foreground. Choose fabric that will work for you to add texture. Avoid fabrics that have rocks printed on them. I chose marbled fabric I bought at Pacific International Quilt Festival and a redirected fabric to add texture. You will notice that they are cut simply. Lightly baste the rocks to the background. For the medium sized branches, I couched (zigzagged) decorative threads and ribbons on to a multicolored piece of redirected linen. Then I cut the branches out. I lay them on the piece balancing out the colors. Crossing branches adds interest and movement. Keep going until the scene is pleasing to you. Baste lightly.
Along the Path,detail
Leaves Add Interest
Working on the leaves is so much fun. Gather contrasting and blending colors. Make the leaves about 3”-4” varying the shape and size. Small scrap pieces are all that are needed. Pay attention to balancing the placement of the colors . Reflective, shiny sheer fabrics add a pop to the leaves. Save them for the top for the greatest effect. If you choose to have the leaves stick out from the edge, make those leaves ½” bigger for ease of zigzagging. During the final trimming you can adjust the leaf lines by cutting before zigzagging. Lightly baste leaves in place. Your art quilt will also be successful if you decide to make the edges straight .
The Beginning of the End
When your artist’s eye says that the scene is complete, cover with tulle. Make sure that the tulle is 2 “ longer on all sides. It can pull a bit during quilting. Pin the tulle down making sure that it is flat but not stretched. Use a lot of straight pins; remove as you quilt. As with other quilting techniques, begin in the middle of the piece and quilt outward. Edges may be rolled to accommodate the machine’s space.
Helpful Hints
Beginners will have success stitching along the edges of the branches, following the lines of the fabric. More experienced quilters can add movement by quilting lines resembling slanting plants. Choose a thread color that blends with the background. I highly recommend Aurifil thread for successful free motion quilting. Trim the edges and zigzag two times. Press lightly with a pressing cloth or piece of fabric. Add a sleeve to the back to hang. Stand back and admire!
Everyone Starts Somewhere.
Several years ago I began my path from traditional quilts to art quilts. I took a class in the fabric layering technique from the award winning, Meri Vahl (meriartquilts.com). Meri had learned the technique from Northern California artist, Laura Fogg(laura-fogg.squarespace.com).The technique allows for much personal creativity; none of our work looks similar. I was inspired to create a tree with leaves overflowing the edges as I have sold five pieces to the new Kaiser Permanente Facility in Scotts Valley and WEatsonville, California. A change in color scheme keeps all of my trees unique.
Important Materials
quality scissors; large and small, sewing machine, darning /free motion foot, walking foot for zigzagging, rotary cutter, cutting board, plastic see through quilting ruler, cotton fabric for backing, tulle, synthetic fabrics, redirected materials, commercially marbled fabric, sheers, batiks, Aurifil thread, Avery glue stick, pressing cloth ( to protect tulle and synthetics from melting when being pressed),a pointed wooden stick , straight quilting pins(They are longer than sewing pins.)
Tips
Leave a 1-2” empty back ground space on the sides of your piece. Then when trimmed your art doesn’t lose any interesting parts.
A light colored tulle will be best for your first project. I personally am not fussy about the color of tulle I use.
This technique is a forgiving way to practice free motion quilting. Before I learned this technique, I was ready to give up with free motion quilting in frustration. Lower or cover your feed dogs. Put your stitch length at 0. Use the darning/free motion foot with Aurifil thread. Push foot pedal control fast while slowly moving/quilting the layers of fabric.( Fast foot ,slow hand) Aurifil thread is available at most quilting stores. It appears more expensive but it really isn’t. I pieced and quilted a queen sized quilt of many seams with one spool.
Throwing the leaves onto the scene adds movement. Free yourself from cutting out perfectly formed leaves.
Use a large straight pin like a hat pin to get the tiniest dab of glue on the tip and gently slide under the fabric to be basted. I use a wooden stick similar to an emery stick to help me gently nudge the pieces of fabric to where I want them to be.
Advice for Beginners
I come from the world of bed quilts. The basic sewing skills used in traditional quilting are fundamental for most art quilting. However the “Quilting Rules” can be left behind. Buying patterns, pressing seams and matching seams are a few of those rules I have freed myself from. Give yourself permission to try something new, be it a color combination or creating your own designs. Listen to yourself. Take baby steps. You decide if you like your work or not. If not, change it. There is no wrong way to do it. Many art workshops or seminars begin with activities to get people in touch with one’s creative side.
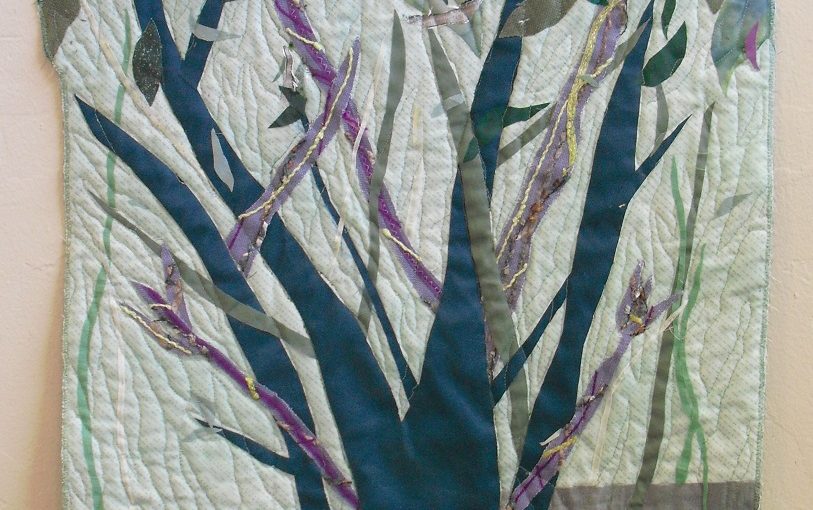
Along the Path
About the Author
Ann Baldwin May lives in Santa Cruz, California. In 2012, she retired after teaching elementary school for 36 years. She began quilting in the 1970s. Ms. May participates in the juried Santa Cruz County Open Studios Art Tour from her studio in the Santa Cruz Art Center. She recently sold five tree art quilts to Kaiser Permanente for their facilities in Santa Cruz County, California. May is a member of SAQA( Studio Art Quilter Associates). Contact her at baldwinmay49@yahoo.com or www.annbaldwinmayartquilts.com. Or visit her Etsy shop at https://www.etsy.com/shop/annbmayartquilts/
Georgia O’Keeffe: Art, Image, Style By Susan Flynn
Independent Streak
Georgia O’Keeffe’s independent streak started early. Her high school yearbook described her this way: “A girl who would be different in habit, style and dress. A girl who doesn’t give a cent for men and boys still less.”
A class photo seems to further this reputation as a woman determined to do things her way. Unlike her peers with a penchant for puffiness, O’Keeffe poses in a dress with fitted sleeves and cuffs. She wears her hair pulled straight back into a long ponytail. She does not style her hair in the trendy high pompadour with a big floppy bow.
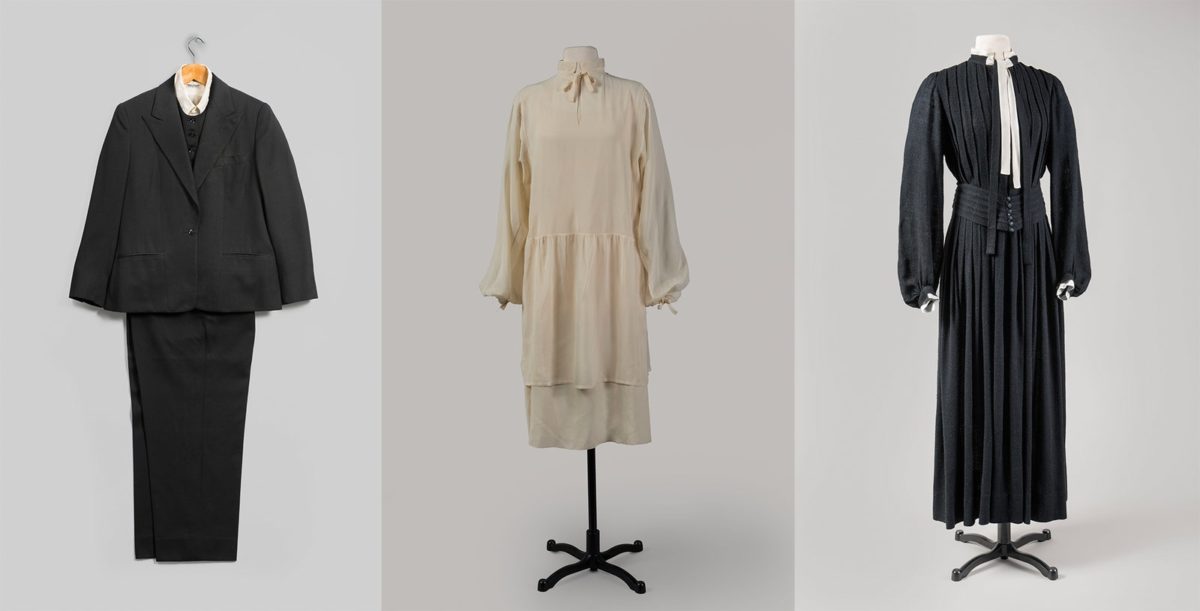
Clothes designed by Georgia O’Keeffe
A World of her Own Design
With exacting detail and fierce intensity, Georgia O’Keeffe controlled how the world would see her. She orchestrated her life from the clothes she wore to the way she addressed a letter to the objects she placed on her mantle and finally, to the compositions of her paintings. —AUSTEN BARRON BAILLY, PEM’S GEORGE PUTNAM CURATOR OF AMERICAN ART
“For more than 70 years, Georgia O’Keeffe shaped her public persona. She defied labels. She lived life on her terms so that she could make the art she felt she was called to make.”
Never before Seen
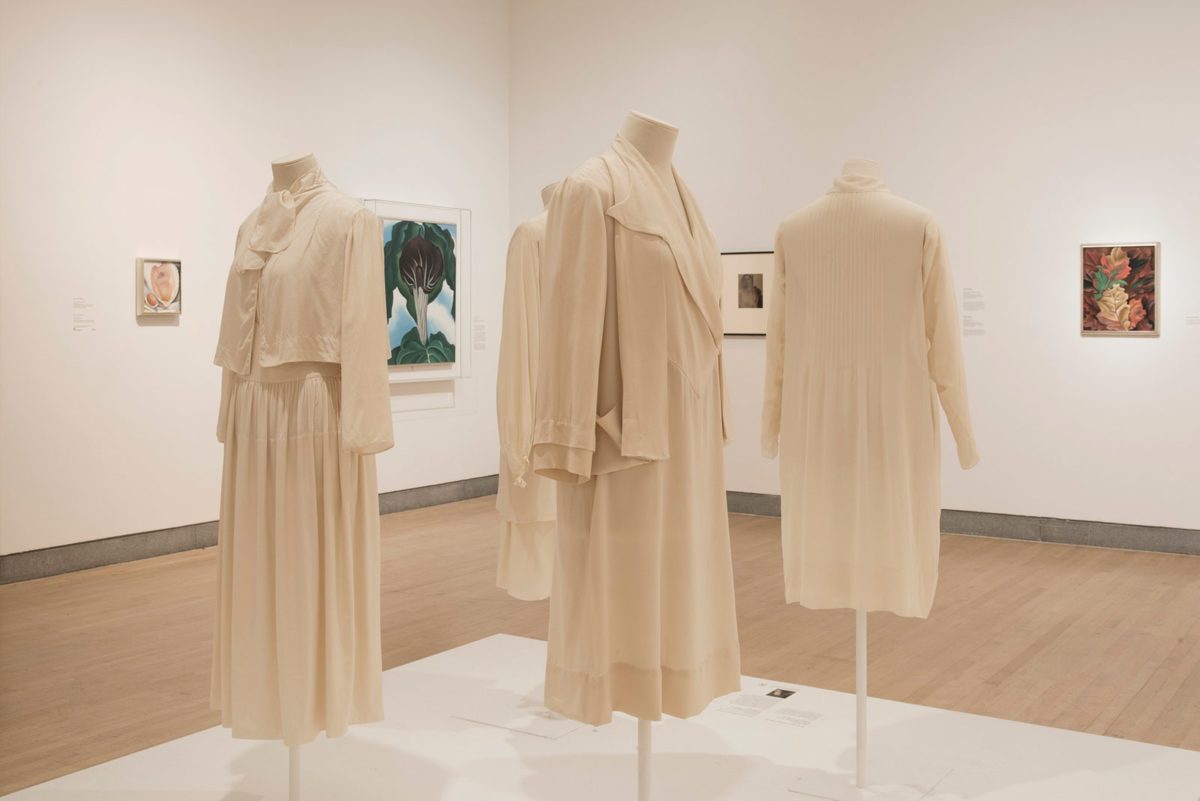
Georgia O’Keeffe: Art, Image, Style, which opens December 16,2017 at Peabody Essex Museum(PEM)Salem, MA, offers a radically new way to consider an artist we think we know from her iconic paintings of flowers and Southwestern landscapes. Through 125 works, the exhibition expands our understanding of O’Keeffe by presenting her wardrobe,for the first time, alongside photographs and paintings.
Sections divide the exhibition by the time of her life. From her early years, when O’Keeffe crafted a signature simple style of dress. Then to her years in New York, in the 1920s and 1930s, when a black-and-white palette dominated much of her art and dress. Finally to her later years in New Mexico, where her art and clothing changed in response to the surrounding colors of the Southwestern landscape.She continued styling right up until her death in 1986.
Georgia O’Keeffe ‘s dresses
A New Way to look at O’keeffe
“We are able to explore Georgia O’Keeffe and her art though the lens of her self-fashioning and her self-presentation,” said Bailly, the exhibition coordinating curator. “We can recognize that her clothes and the way she dressed were their own authentic form of artistic expression.”
Her whole life was a work of Art.
Before working on the exhibition, Bailly said she had no idea that O’Keeffe made many of her own clothes. In fact, the renowned modernist artist was a gifted seamstress who favored simple lines, minimal ornamentation and organic forms.
“When you see how exquisitely she crafted linen tunics or silk blouses, you are going to be blown away,” Bailly said. “There is such understated simplicity and elegance to her designs. There is the beauty of the fabrics with the tiny little feminine details. You start to see similarities between the aesthetics of her clothes and her paintings. Without opening up her closet, you never would sense that her whole life was a work of art.”
Decades Ahead of Everyone
Georgia O’Keeffe was decades ahead of everyone. Today, social media makes it easy to curate one’s own public image. Scroll through your Instagram feed. You’re likely to encounter friends skilled at projecting their self-identified brand. O’Keeffee’s presented a unified aesthetic vision in every aspect of her life.
“I think people are really captivated by the fact that she maintained such a strikingly coherent style throughout her long life, “said Bailly. “Her ability to achieve creative and aesthetic excellence according to her vision in every aspect of her life far eclipsed her peers. Her remarkable personal style continues to inspire.”
Above all,human spaceflight inspires humans to create art in many forms.In addition,watch the video of a collection of fiber art quilts entitled Fly Me To The Moon. In addition,the show has been touring the country since late 2016. Moreover, many more stops are planned for the schedule. Subsequently,a group of those art quilts honored space travel was displayed at NASA’s Johnson Space Center in Houston in 2015. So this is in honor of the recognition of the 50th anniversary of the Apollo 1 fire. After that,the show’s curator, Susanne Jones comments on the artistic elements of some of the pieces. Ultimately,she notes the educational value of the exhibit to a nation inspired by space exploration.
Blue Collider Event Display art quilt in Stitching, CA
The ‘Space for Art’ column recognizes the inspiration from the interaction between space and art. This inspiration presents itself in many artistic forms. For example,creative artists present the story of space exploration.
Quilting adds a New Level
The world of quilting adds surprise and a new level to recent discoveries. Another whole world of fine art that I was completely unaware of. However, thrilled I am to have now discovered it. The space-themed quilts in particular hold much interest.
Finally,these are quilts created and sewn by fiber artists. In addition to fabric and thread, they also incorporate many forms of mixed media.This adds texture and dimension. Read the complete article here.
OCTOBER 13, 2017 BY MARCIA YOUNG (edited for space)
Georgia O’Keeffe and Textiles
First of all,the Peabody Essex Museum presents one of America’s artists in a new light. Georgia O’Keeffe: Art, Image, Style is the first exhibition to place artwork along side of her wardrobe. For example,these textile pieces have never before been shown. Similarly,there will also be photographs of the artist. This unique show is organized by the Brooklyn Museum and guest curator Wanda M. Corn. She is Professor Emerita in Art History at Stanford University. This exhibition is on view at Peabody Essex Museum from December 16, 2017 through April 1, 2018. Then it continues on its national tour.
For more than 70 years, Georgia O’Keeffe shaped her public persona. Above all, she defied labels and carved out a truly progressive, independent life. This was necessary for her to create her art says Austen Barron Bailly. Bailly is the organizing curator. Above all,O’Keeffe dressed as a way to unite her attire, her art, and her home. Fo example,her aesthetic legacy of organic silhouettes, few decorations and restrained color palettes continues to capture the popular imagination. Above all, it inspires leading designers and tastemakers of today.
Georgia O’Keeffe Style
Above all,Georgia O’Keeffe: Art, Image, Style includes 125 works. Furthermore,it examines how the famous artist carefully formed her public image. For example,O’Keeffe considered her clothed body as another canvas for her work,says Bailly. Similarly,the exhibition of O’Keeffe explores how she expressed her identity and artistic values. That is to say,O’Keeffe’s androgynous persona, feminist outlook, stark fashion sense and skill as a seamstress combine to create a new understanding of her role as an artist and an individual.
A Life Long Style
Throughout her life, O’Keeffe had strong opinions about how she wanted to look. It didn’t matter what the dress codes of the era were. O’Keeffe’s distinct aesthetic sensibility started young rebellion against feminine strict roles. In the 1920s and 1930s in New York, her black and white palette dominated much of her art and dress. Later years in New Mexico, her art and clothing changed in response to the Southwestern landscape. O’Keeffe sewed some of the clothes herself. Some clothes were custom made or bought off the rack. Always she consistently favored the simple lines and abstract forms that followed through her artwork and home design.
Above all, Sandy Takashima Shaw sees art as a place to begin conversations. Furthermore, she is a lifelong painter. In college, she majored in business and studied fine art. She’s half Japanese. Sandy grew up in Ohio. After graduation, she moved to Japan. That is to say she wanted to learn more about her heritage. She then traveled around Asia. Finally, she moved to San Francisco to begin work as a marketing manager in the technology industry. After years of painting in the evenings, Sandy was able to quit her day job. At last,she began to travel the world and paint.
Now she lives in Aptos with her family. Furthermore,she paints while the kids are at school. Her work appears in galleries around the U.S. Moreover,she teachs art. Google San Francisco recently commissioned a work for their office. She still travels annually with her family to surfing destinations. AND, fun fact, she’s also a certified life coach!
Sandy Takashima Shaw in front of her art
An authentic Artist
Foremost,Sandy’s main goal is to be completely authentic in her personal life. That is to say,Hher vibrant, mixed media acrylics feature hundreds of layers of paint, Japanese rice paper and ink. Similarly,my goal as an artist is to create art to spark positive social impact, thoughtful conversation, and meaningful connections.
the AND series
In her newest series is the AND series. For example, each painting represents an issue in our current political, social and cultural landscape. In addition,the word ‘and’ is prominently featured in each and brightly illuminated.
Art Inspired Salon
Out of this series, the idea was born to create an Art Inspired Salon. In addition,the salons bring people together to create positive actions. For example, we can take create the world we want. Furthermore,she holds the event at her studio. Attendees come together to enjoy food, beverages and conversation. They study the series on display and discuss.
Looking ahead,I believe that if we stay optimistic that positive change is possible. We will be more motivated to take personal action, both small and large. We can make the world a more compassionate and kinder place. It is time for feminine leadership to rise and heal our country and world.
Thanks, Sandy! We look forward to joining in the discussion.
Current and Upcoming Events
October 1, 2017 – September 30, 2018
Resilient and Revived Santa Cruz Museum of Art and History The Chamber of Heart and Mystery Exhibit January 5 – February 4, 2018
Spoken/Unspoken Juried Exhibit Santa Cruz Art League Reception: February 2, First Friday, 6:00-8:00pm February 8 – March 17, 2018
I had the pleasure of meeting Sandy Takashima Shaw, a kind and generous artist.
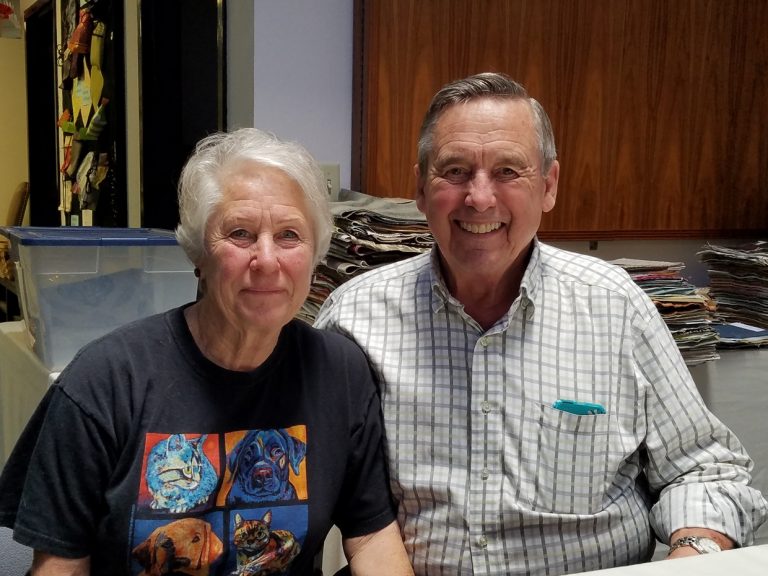
Exactly two years ago I came home with a small stash of beautiful upholstery fabric samples. Little did I know how quickly and profoundly these textiles would change my life! Today I want to tell the amazing story of FabMo, the non-profit organization where I acquired those samples. It is also the inspiring story of how two people can make a difference, its two co-founders, Hannah and Jonathan Cranch. Fabmo reuses fabric and materials.
Hannah and Jonathan CranchHolly Welstein, Hannah and Jonathan Cranch speak with visitors to FABMO
How It All Started for two people to make a difference
A couple of decades ago Hannah and Jonathan Cranch were ordinary people going about their own business. Hannah taught art in Palo Alto primary schools, while Jonathan was a general contractor. They occasionally enjoyed attending seasonal open houses at the Design Center in San Francisco, seeing what was new in the design world. They both enjoyed the refreshments, browsing the beautiful displays and chatting with the salespeople
You are Throwing What Away? Fabmo reuses fabric and materials.
One day, during one such visit, they saw a man toss a big trash bag into the dumpster. The bag tore open, spilling out a bunch of gorgeous fabrics. It turned out that in preparation for the open houses, the showrooms had to make room for newly released fabrics, which meant getting rid of all the discontinued textiles. These exquisite, expensive designer fabrics, which were displayed but never used, were thus headed for the landfill.
Fabmo reuses fabric and materials for an art teacher.
Hannah, as an art teacher, knew her fellow teachers would salivate over such a treasure, so she began the quest to save these resources. She visited showrooms and spoke with key people, asking for some fabrics, and they gradually agreed to give her some. Each time, she returned home with a bag or two full of lustrous samples, which she distributed to Palo Alto teachers.
As she gradually built relationships, the amount of material she acquired began to grow. Soon, she and Jonathan started supplying five school districts, and passed some fabrics on to the Children’s Theater, as well. Fabmo reuses fabric and materials.
When Things Got More Serious
Hannah later learned that someone named Steve was visiting the showrooms every Monday to collect discontinued fabric samples, which were then picked up by a charitable organization run by a group of nuns. One day the charity did not come by to pick up, and so showroom workers asked Hannah, who was fortuitously at the Design Center at that moment, whether she wanted the fabrics. She certainly did! As it turned out, the charity never came back, and Hannah began a weekly pickup from then on. With the sudden increase in quantity, the picture changed dramatically. However, Fabmo still reuses fabric and materials.
Selection at Johnathan and Hannah’s houseSelection at their home
At essentially the same time, in summer 2007, Palo Alto schools closed for the summer. Hannah and Jonathan were unable to distribute the growing amounts of fabrics they were collecting. They published notices on Freecycle, Craigslist and other online venues, and began compiling an email list of interested people. Soon after, they set up five tables in their living room, filled them up with materials, and invited these interested fabric-lovers to come over and pick whatever they wanted. Before long this became a recurring event.
Fabmo reuses fabric and materials at selection events.
Originally, Hannah and Jonathan distributed the materials they gathered. They were the ones deciding what resources to give each school/theater. Once they allowed people to come over to their house and pick on their own, however, they could no longer think of it as “distribution.” They decided to call these “selection events” instead, since patrons got to choose their own treasures.
Running out of Room at their house
At first, their living-room events lasted two days. As the amount of fabrics kept growing, they were extended to three. Soon, the living room wasn’t big enough for everything. Hannah and Jonathan set up yet more tables in their family room.
But the rescued samples kept accumulating. In no time they filled one spare bedroom, then another, until all the bedrooms in the house were full of textiles and other materials. Hannah and Jonathan began holding regular selection events, timing them to open up a guest room as needed.
Fabmo reuses fabric and materials with a growing mailing list.
Their email list, initially limited to about thirty people, kept growing. Before long, some one hundred and seventy people came by every month. Some were hesitant to enter a private house. Others, however, came regularly. Some of the latter offered to help pay for the gas for Hannah’s collection trips to SF, so Hannah and Jonathan put up a donation box to help finance their drives. Then someone offered to help take care of welcoming guests. One day, when Hannah, who was also co-owner of a catering business, was too busy with an event, Jonathan took that woman up on her offer. From then on the Cranches relied more and more on volunteers to help them with the many tasks of gathering, sorting and distributing. They started documenting who came to their house, and, in order to limit crowding, began setting appointments.
How FabMo Was Born
In 2009, after years of making fabrics available from their private house, Jonathan learned that their home insurance would not cover such large gatherings. Although the Cranches distributed everything for free, the insurance considered what they were doing as a business. So they found a small shared space in Palo Alto where they could hold Selection Events, but which had very little room for storage.
Six months later they moved to a bigger warehouse on Old Middlefield Road. Later they added another warehouse.
Selection at Old Middlefield Way
That same year FabMo was born as a public benefit corporation, and in 2010 was granted 501(c)(3) status. FabMo was now officially a non-profit organization! The name FabMo is short for Fabrics and More, as by then the Cranches rescued many different materials. In addition to fabrics, they also saved wallpapers, trims, tiles, leather, carpets and so on.
Another location at Bella Vista
Continual expansion
Since then, FabMo’s activities have continued to expand. Nine years ago, a regular attendee suggested creating an event for people to showcase items they created with FabMo materials, so as to inspire others. That’s how the Holiday Boutique came about. In 2015 FabMo moved into their current location in Mountain View. They regularly hold monthly three-day Selection Events, as well as 8-10 Special Sales a year. Most recently, FABMO has moved one town over to Sunnyvale, California.
In 2014 FabMo started holding regular events in Santa Cruz as well, with an active volunteer and consumer base there. They also hold Selection Events in Vallejo, as well as in different Bay Area Tech Shops. FabMo has a regular presence in at least four fairs every year (MakersFaire, San Mateo County Fair, and two Earth Day Fairs).
FabMo Now
These days, FabMo rescues more than 70 tons of materials every year from Design Centers in San Francisco and San Jose, and from other miscellaneous sources. They make these amazing resources available to creative souls all over the Bay Area and beyond. More than 8,500 people are signed up to their mailing list, with about 300 coming to collect treasures during each Selection Event. Hannah and Jonathan continue to be very involved with the organization relying on an active Board, a growing family of several hundred volunteers, and textile aficionados, who, like themselves, appreciate the creative and environmental impact of this amazing endeavor. People come from Hawaii, the Pacific Northwest, Michigan and beyond to attend, determining their own schedule based on FabMo’s.
FabMo’s dedication
To this day, FabMo distributes fabrics for a suggested donation. It trusts patrons to give what they can to help keep the project running. Costs of maintaining such a business in the Bay Area are sky-high, as are utilities and fuel. Teachers still receive many of the materials for free. FabMo only sells Special Sale materials, but even then for low prices.
serendippity
Hannah and Jonathan didn’t plan any of this. They simply couldn’t stand to see fabulous textiles thrown away and wasted, and before they knew it, FabMo had appeared. What started as a small project of love run by two individuals, turned into a collaborative effort of a creative, eco-friendly community, a family of sorts. But it still remains a not-for-profit project of love.
FabMo’s dedication continues to keep tons of precious resources out of the landfill. It also progressively builds an entire community of like-minded people who care about the environment. Likewise, it encourages the creativity of numerous others. The Cranches certainly changed my life, re-sparking my own long-suppressed creativity.
Now, people from all over the United States are starting to ask how to establish similar organizations. The Cranches even received a few inquiries from overseas. Imagine how many resources could be rescued if every community had a FabMo! Imagine all the creative things people could come up with!
To learn more about FabMo or sign up to their mailing list check out their web page: http://www.fabmo.org/fabmo/Home.htlmYou can also like their Facebook page: https://www.facebook.com/FabMo.
You can learn how one quilt artist uses FABMO materials for her art.
Step By Step Instructions to Make an Abstract Art Quilt
This work in progress shows the step by step instructions to make this abstract art quilt, Sunlit Boulders. Featured in Art Quilting Studio Magazine, Fall issue, 2018.
Sunlit Boulders 31″ h x 28″w
Inspiration and Adjustments
Sunlit Boulders is an art quilt with curved line piecing, Scribble Quilting and couched decorative yarns and threads. My first intention was to highlight the Native American batik shown on the left on the first photo. As I chose different fabrics, I decided that I would minimize their use. I removed more of that fabric. I was happier with the way it looked. It’s okay to change ideas in midproject if it doesn’t look or feel right to you. Follow these step by step instructions to make your own abstract art quilt. It will be uniquely yours.
Photo 1. gathering fabrics
Photo 1
I am auditioning fabrics that complement and contrast with the batik fabric. Using strips of fabric, I couch(zigzag) a variety of decorative threads and yarns to the strips. I cut the strips apart into varying lengths without much forethought.
Photo 2. Trying out fabrics.
Photo 2
I am still auditioning fabric. I included some pieced strips left over from a previous project. Notice that I eliminated the reddish fabric.
Photo 3. Begin to sew smaller pieces together.
Photo 3
I start to cut up the strips of couched yarns to add to the quilt. I am trying out where I like the pieces, moving them around. Dark strips frame the piece. I begin to sew some pieces together. Figures from the batik stand out enough.
photo 4 Sew pieces together. Move to a different spot to create balance of fabric and color.
Photo 4
Tucks are add texture. Notice that I moved some pieces around. I do more sewing of pieces together.
photo 5. I find problems are solved by cutting up fabric into a smaller piece.
Photo 5
I am not afraid to cut up fabric. I can always use the fabric at a later date for a different project. More tucks are added to fabrics. I eliminated some batiks symbols.
Photo 6. All sewn together.
Photo 6
All pieced together and ready for batting and backing.
Photo 7. A quilt sandwich when the top, the batting and the backing is ready to be quilted.
Photo 7
Scribble Quilting is complete. Edges need to be trimmed and cut straight.
Photo 8 Finished.
Photo 8
The finished art quilt represents my mantra of color, texture, and movement.
Do you want to be a great and highly effective artist? I do. I might be getting a bit obsessed with it, actually. Ideas pop into my head unexpectedly. I keep a long running list of ideas for improving my work.I also study how the most successful artists got where they are, and I pore over every word that they write. If you want to be a great artist, you should, too.
I wanted to find out what all these top artists had in common. Their mindset, their mental habits. I spent a lot of time observing, which led to this list of the six success traits shared by all top artists I’ve found. I’m happy to share it with you.The good news is that even if you don’t have all these personality traits already, most of them can be developed over time. Best of all, if you can cultivate these traits, you’ll become more effective in the rest of your life as well.
Westside Egret
Here We Go! Six Proven Habits of Effective Artists
1. Highly Effective artists are prolific.
The first key to being a successful, highly effective artist is to create. A lot.
The more you create, the better you get.
There’s no way around it; it takes work to be prolific. And effective artists work hard. Putting a successful art career together requires a lot of time in your studio, and not surfing LOLCats or Twittering about what you had for lunch.
2. Highly Effective artists are lifelong learners
If you’re a new artist, you’re probably on a steep learning curve at the moment.
Maybe you tell yourself that things will get better when you’ve been doing it longer. There won’t be so much to learn. You’ll have systems in place soon and everything will run smoothly.
Sadly, I think this is a myth. I’ve been painting and working my career as an artist for more than 15 years, and it keeps changing. Just when you’ve got one element sorted out, something new happens. Or becomes obsolete. Or mutates in 20 different directions.
If you want to stay ahead in art, you have to keep learning.
Fortunately, being curious and wanting to learn keeps you young and your brain active. A love of learning doesn’t just set you up for a successful art career, but for a successful and happy life.
3. Highly Effective artists are focused and consistent
Highly effective artists move consistently toward their vision. Their work has a consistent voice and approach. Even when they move toward something that may be off topic, they relate it back to their greater vision.
4. Highly Effective artists plan ahead
Highly effective artists know where they’re going. They have a master plan and they stick to it. Yes, they adapt based on feedback, but always in service of a vision.
They don’t let themselves get derailed. They follow the plan.
5. Highly Effective artists are persistent
Highly effective artists understand that success doesn’t happen overnight. Real success rarely happens quickly.
Time is on your side. To get to the top takes consistency, hard work, serious study, and lots of persistence. Successful artists don’t give up.
I’ve noticed a lot of people like the idea of working from home, working for themselves, being their own boss. But if you want these things, you need to be able to manage yourself.
No one is going to sack you if you’re late. No one reminds you of important deadlines or nags you to get your sales numbers up.
If you want to be a successful artist, you need to be a self-starter. It’s not enough to have good ideas. You have to act on them.
This work in progress shows the steps I take to create this abstract contemporary art quilt. I draw inspiration from one fabric.
Color! Movement! Texture!
Color! Movement! Texture! are my main goals for my abstract art quilts. Color is where I begin. What colors do I want to work with? I found a piece of linen at Fabmo, a nonprofit that redirects materials from the San Francisco Design Center. I really liked the variety of colors and movement in this one piece. This fabric became my inspiration to find other fabrics and textures with the same colors for my abstract piece.
Inspiration from One Fabric
Oddly enough, several years ago four quilter friends and I were having trouble choosing colors for a donation quilt we wanted to create together. One friend suggested that we find a fabric and choose the colors from that fabric. At the time I couldn’t quite wrap my head around what she was saying. However, when I saw this multicolored linen, I immediately understood what she had been trying to have us do. Sometimes it takes times for inspiration to happen.
1. Inspiration from one piece of commercially producted fabric
Photo 1 Choosing the Fabric
First I choose the fabric I want to work with. This one piece has so many different colors in it. Those are the colors that I want to work with. This is when the fun begins. I go through my fabrics to find additional fabrics. I look for shades that are lighter and darker.At this step, I don’t reject much.
Photo 2
I chose these fabric from the stash that I had. Also I found decorative threads and yarns to add to some of fabrics for interest.
2. Here are the fabrics I chose from my stash.
photo 3 Inspiration from One Fabric
I place small pieces of fabric on my design wall. I move them around before sewing them together. Then I start to sew smaller pieces together. I make sure that colors, textures and similar pieces are equally balanced around the piece. Does your eye have a place to rest? Are there too many colors in one area? Time to adjust before the whole piece is sewn together.
3. Spring Break
Photo 4 and photo 5
Here is a detail of the smaller pieces already sewn together.
4. A detail of the pieces sewn together5. Another detail of the pieces sewn together
photo 6
6. Another detail of the pieces sewn together
photo 7
7. Here is the finished quilt, Spring Break.
Inspiration from one fabric helped me create this abstract art quilt. Hopefully, this step by step explanation will inspire you as well.
For more information on couching threads refer to my previous post.
First of all,I found this article to be interesting. I am in the process of completing four Memorial Quilts for a client and her children using their beloved father’s clothing.Ann
Memory quilt made from tee shirts
First,on the Internet memory quilts range in price from $100 to over $1,000. Why such a large price range? However,there are a number of factors that go into the cost of making a quilt. Here are a number of cost factors that go into the pricing of a memory quilt.
Materials
There are 3 basic materials that go into all quilts. There is a quality range for each type of material. The price of your quilt will relate to the quality of materials used. The higher the quality the higher the cost. In other words,inexpensive materials create an inexpensive quilt.
Fabric
To help think about fabric, compare it to the thread count of bed sheets. For example,the lower the thread count, the cheaper the fabric. Polyester fabric with a low thread count is inexpensive. 100% cotton with a high thread count is much more expensive. For a high quality fabric for durability of wear and use, cotton should be used. Similarly,the backing and binding of the quilts will need extra fabric.
Batting
Secondly,batting is used in the middle of a quilt. It comes in a variety of quality levels from thin 100% polyester to high quality cotton batting. Polyester batting tears easily, it bunches up and will poke out the back of the quilt. However,cotton battings are the best choice. Yet,they will cost two to three times more than polyester batting.
Thread
Moreover,all quilts use thread for sewing the blocks together and quilting. On the other hand,there are cheap threads that won’t withstand time and use.Quality threads are truly worth the cost. So,a less expensive quilt is made with a lower quality thread.
In addition, another cost that is calculated into the price of a quilt is labor. Minimum wage is about $8 an hour. Typically, minimum wage is reserved for entry level and unskilled workers. However,an accomplished quilt makers are not unskilled. Above all they usually, they should have over five years or more of quilt making experience .
Skill
Similarly, it takes skill to make a memory quilt. If it didn’t take any skill or experience, you would make it yourself. Highly skilled and talented quilters make the nicest memory quilts. Furthermore,this means that their hourly rate will be much higher than minimum wage. If you want to only pay minimum wage to a quilter, expect an entry-level unskilled quilter to attempt making your quilt. If you value your clothing and memories you are putting into your memory quilt, an inexpensive quilt should scare you!
Time
How long does it take to make a memory quilt? In short,this depends on a number of factors including quilt style, complexity and craftsmanship. A low-cost quilt will take less time than a more expensive quilt. However,this means that the low-cost quilt will have a simple design without any complexities. The workmanship may be questionable.
The Worth a Quilter Places on His or Her Work.
If a quilter underprices their work, they are telling you up front that they do not think that their time and skills are good enough to charge more. Think about what this tells you. If someone does not find value in his or her work, will you?
Style
In short,there are two basic styles of quilts – those that are made in columns and rows and those that are designed by an artist.Our Too Cool puzzle style is a creative work. The number of steps and the amount of time it takes to make each style is vastly different.
Traditional
A traditional style memorial quilt is made from blocks in columns and or rows and the blocks are all one size. This makes the project very easy and involves very little planning and time to layout.
The Too Cool Style
A memory quilt made with many different sizes and shaped blocks involve a lot of consideration, planning, math and other time consuming steps. This style of quilt will take 10 times or longer than a traditional quilt.
To summarize,these and other considerations are indicators of the quality of a quilt. They also greatly influence the price of the quilt. For example, someone with great skill and artistry using cheap material might make a good looking quilt. But the quilt still has been made with cheap material that will look cheap and not wear well. Conversely, a quilt made with high quality materials that is poorly made is still a poorly made quilt. You want a quilt that is made from high quality materials by a skilled and artistic quilter. This quilt will be a family heirloom worthy of the cost.
Look carefully at the cost of memory quilts. Be sure to know what you are paying for. A quilt that costs only $100 is probably going to be a disappointment.
To learn more about having a memory quilt made, please feel free to download our Memorial Quilt Guide. It has information that will help you through the process of having a memorial quilt made.
Memorial quilt From mom’ s clothinggroup of memory quilts